Go を Wasm にビルドして Google Apps Script で動かす
Go のコードで文字列の変換をする関数があり、これが Google スプレッドシート上の関数としても利用できれば検証[1]に便利かもしれないと思いました。
Google スプレッドシートでは Apps Script の関数をセル上で実行できるので、Go のコードを Wasm にビルドして JavaScript から呼び出すことができれば良いのではないかと考え、実際に試してみることにしました。
動作環境
- Go 1.22.2
- Apps Script の設定
- Chrome V8 ランタイムを有効にする
- その他
- macOS の
pbcopyコマンド[2]を利用した手順を記載していますが、Linux 環境でもpbcopyを他の手段に置き換えることで同様に動作しました。
- macOS の
事前調査
Go を Wasm にビルドして GAS で動かす事例は見当たりませんでしたが、Rust を Wasm にビルドして GAS で動かす事例はありました:
こちらの記事には Go に関する記述もありました:
GASではTextEncoderなど対応されていないAPIがあるためそのままではGoなど一部の言語を用いて生成したwasmを使用することはできません
もしGoを用いて実行したい場合はwasm_exec.jsで実装してあるAPIをGAS向けに実装しなおす必要などがあります。(未検証)
Go の場合は wasm_exec.js というグルーコード[3]の実行に Polyfill が必要であることがわかりました。
wasm_exec.js の実装を確認し、以下の 4 個の Polyfill を必要とすることがわかりました:
GAS で Wasm を動かしてみる
スプレッドシートの作成とスクリプトエディタの起動
スプレッドシートの新規作成は https://spreadsheet.new/ にアクセスするだけで簡単に作成できます。
スプレッドシートのメニューから「拡張機能」→「Apps Script」を選択すると、スクリプトエディタを起動できます。
wasm_exec.js と Polyfill の導入
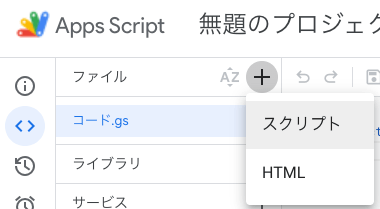
スクリプトエディタ上で「ファイルを追加」→「スクリプト」を選択することで GAS プロジェクトにファイルを追加できます。
GAS ではファイルの順序が実行順序に影響するため、ファイル名や順序を以下の手順通りにしてください。
TextEncoder の Polyfill
https://gist.github.com/Yaffle/5458286 の TextEncoder を利用します。
(TextDecoder もありますが、別の Polyfill を利用します)
以下のコードを GAS プロジェクトに _TextEncoder.gs として追加してください。
// TextEncoder/TextDecoder polyfills for utf-8 - an implementation of TextEncoder/TextDecoder APIs
// Written in 2013 by Viktor Mukhachev <vic99999@yandex.ru>
// To the extent possible under law, the author(s) have dedicated all copyright and related and neighboring rights to this software to the public domain worldwide. This software is distributed without any warranty.
// You should have received a copy of the CC0 Public Domain Dedication along with this software. If not, see <http://creativecommons.org/publicdomain/zero/1.0/>.

// Some important notes about the polyfill below:
// Native TextEncoder/TextDecoder implementation is overwritten
// String.prototype.codePointAt polyfill not included, as well as String.fromCodePoint
// TextEncoder.prototype.encode returns a regular array instead of Uint8Array
// No options (fatal of the TextDecoder constructor and stream of the TextDecoder.prototype.decode method) are supported.
// TextDecoder.prototype.decode does not valid byte sequences
// This is a demonstrative implementation not intended to have the best performance

// http://encoding.spec.whatwg.org/#textencoder

// http://encoding.spec.whatwg.org/#textencoder

function TextEncoder() {
}

TextEncoder.prototype.encode = function (string) {
  var octets = [];
  var length = string.length;
  var i = 0;
  while (i < length) {
    var codePoint = string.codePointAt(i);
    var c = 0;
    var bits = 0;
    if (codePoint <= 0x0000007F) {
      c = 0;
      bits = 0x00;
    } else if (codePoint <= 0x000007FF) {
      c = 6;
      bits = 0xC0;
    } else if (codePoint <= 0x0000FFFF) {
      c = 12;
      bits = 0xE0;
    } else if (codePoint <= 0x001FFFFF) {
      c = 18;
      bits = 0xF0;
    }
    octets.push(bits | (codePoint >> c));
    c -= 6;
    while (c >= 0) {
      octets.push(0x80 | ((codePoint >> c) & 0x3F));
      c -= 6;
    }
    i += codePoint >= 0x10000 ? 2 : 1;
  }
  return octets;
};
TextDecoder の Polyfill
色々試してみて、実行時にうまく動作しなかった Polyfill が多かったです。今回は @cto.af/textdecoder を利用します。
最終行の module.exports = TextDecoderPolyfill を globalThis.TextDecoder = TextDecoderPolyfill に置き換えたものを、GAS プロジェクトに _TextDecoder.gs として追加してください。
crypto.getRandomValues の Polyfill
GitHub Copilot が提案したコードを利用します。
globalThis.crypto = {
  getRandomValues(array) {
    // Math.randomを使用してランダムな値を生成
    for (let i = 0; i < array.length; i++) {
      array[i] = Math.floor(Math.random() * 256); // 0-255の範囲の整数
    }

    return array;
  }
};
performance.now の Polyfill
GitHub Copilot が提案したコードを参考にしました。
{
  const scriptStartTime = Date.now();

  globalThis.performance = {
    now() {
      return Date.now() - scriptStartTime;
    }
  };
}
wasm_exec.js
以下のコマンドで wasm_exec.js の内容をクリップボードにコピーし、GAS プロジェクトに _wasm_exec.gs として追加してください。
cat "$(go env GOROOT)/misc/wasm/wasm_exec.js" | pbcopy
Go の Wasm ビルド
適当なプロジェクトのディレクトリを作成し、go mod init example.com/greetings を実行して go.mod を作成しておきます。
以下の Go のコードを main.go として保存してください。
//go:build js && wasm

package main

import (
	"fmt"
	"syscall/js"
)

func Greet(this js.Value, args []js.Value) any {
	return fmt.Sprintf("Hi %s! I'm Go WebAssembly!", args[0].String())
}

func main() {
	ch := make(chan struct{})

	js.Global().Set("gowasm", js.ValueOf(
		map[string]any{
			"Greet": js.FuncOf(Greet),
		},
	))

	<-ch
}
GAS ではバイナリファイルをそのままアップロードできないため、ビルドした Wasm バイナリを base64 エンコードする必要があります。
以下のコマンドを実行すると const WASMBASE64="..."; がクリップボードにコピーされるので、GAS プロジェクトに _wasm.gs として追加してください。
GOOS=js GOARCH=wasm go build -trimpath -o /dev/stdout | openssl base64 -A | awk '{print "const WASMBASE64 = \"" $0 "\";"}' | pbcopy
GAS の関数を定義
main.go で定義した Greet 関数を GAS から呼び出すための関数を定義します。
function Greet(str) {
  const wasmBytes = Utilities.base64Decode(WASMBASE64);
  const buffer = new Uint8Array(wasmBytes).buffer;

  const go = new Go();
  const module = new WebAssembly.Module(buffer);
  const instance = new WebAssembly.Instance(module, go.importObject);
  go.run(instance);

  return globalThis.gowasm.Greet(str);
}
スプレッドシート側から Greet 関数を呼び出す
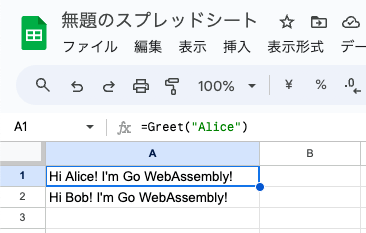
セルの数式として =Greet("Alice") を入力すると、Go の fmt.Sprintf で組み立てられた文字列 "Hi Alice! I'm Go WebAssembly!" がセルに表示されます。
所感
Wasm のポータビリティの高さを活かして、Go で書かれた関数を GAS 環境から利用できるようにできました。特に TextEncoder / TextDecoder の適切な Polyfill を見つけるところが大変でしたが、あまり試されていなかった組み合わせでもちゃんと動いてくれたときは嬉しかったです。
参考文献
- WebAssembly · golang/go Wiki - GitHub
- GASで始めるWebAssembly - Qiita
- 【GAS】GAS上でWebAssemblyを動かす!! - YouTube
- Go WebAssemblyでブラウザ上でGoを実行する その3 Javascript側からGoの関数を呼び出す : ビジネスとIT活用に役立つ情報(株式会社アーティス)
- 改行なしのBase64エンコードをする方法いろいろ - Qiita
-
テストコードを書くことが大切ですが、誰でも簡単に触れられる形で置いておくことで思わぬ発見があるかもしれません ↩︎
-
標準入力のデータをクリップボードにコピーするコマンド ↩︎
-
GOOS=js GOARCH=wasmでビルドした Wasm バイナリをブラウザや Node.js で実行するためのグルーコード: https://github.com/golang/go/blob/go1.22.2/misc/wasm/wasm_exec.js ↩︎
Discussion