Shopifyテーマ開発における基礎知識
スライダーなどのコンテンツを作る場合は section機能 で作る
「画像 + テキスト」のように入力項目が決まっていて、各種ページで使いそうな部分は section として実装します。メタフィールドで作れそうな雰囲気がありますが全然違いました。
Sectionに関する公式ドキュメント
セクションの書き方の例
<div>
  {% for block in section.blocks %}
    <div>
      <p>
        <a href="{{block.settings.url}}">
          <img src="{{block.settings.image_pc | img_url: "master"}}" alt="">
        </a>
      </p>
      <p>
        <a href="{{block.settings.url}}">
          <img src="{{block.settings.image_sp | img_url: "master"}}" alt="">
        </a>
      </p>
    </div>
  {% endfor %}
</div>

{% schema %}
{
  "name": "メインビジュアル",
  "tag": "section",
  "class": "mainvisual",
  "limit": 1,
  "settings": [
  ],
  "blocks": [
    {
      "name": "スライド",
      "type": "slide",
      "settings": [
        {
          "type": "image_picker",
          "id": "image_pc",
          "label": "【PC】画像"
        },
        {
          "type": "image_picker",
          "id": "image_sp",
          "label": "【スマホ】画像"
        },
        {
          "type": "url",
          "id": "url",
          "label": "リンク先"
        }
      ]
    }
  ],
  "presets": [
    {
      "name": "メインビジュアル"
    }
  ]
}
{% endschema %}
SchemaのJSONの構文チェック
JSONの記述ミスは気づきにくいのでチェッカーで確認するとミスを見つけやすい
Section開発で役に立つドキュメント
Settingsの値
どんな type があるかを見たいならここを見ると良い。
range や collection を指定する場合もこちらの設定から実現可能。
必要な記述
◆ theme.liquid
{{ content_for_header }}
headタグの中でShopifyとして必要なスクリプトタグを出力してくれる。
WordPressで言うところの wp_head(); みたいなものだと思う。
{% render 'meta-tags' %}
SNSシェア向けのメタタグを出力してくれる。
Viteで作ったCSSファイルの background: url の値をShopifyに適した形に置換する
import fs from "fs/promises";
import appRoot from "app-root-path";
import { crawlingDirStream } from "directory-crawler";

const replaceBackgroundURL = (dirName, ext) => {
  return new Promise(async (resolve) => {
    const extRegex = new RegExp(ext);
    const results = {};
    for await (const d of crawlingDirStream(Infinity, Infinity, dirName)) {
      if (d.isFile() && d.name.match(extRegex)) {
        const original = await fs.readFile(`${appRoot}/dist/assets/${d.name}`, "utf-8");
        let processed = original.replace(/url\((?!['"]?(?:data:|https?:|\/\/))(['"]?)([^'")]*)\1\)/g, `url({{'$2' | asset_url}})`);
        let a = processed.replace(/\'\/.*?\//g, "'");
        await fs.writeFile(`${appRoot}/dist/assets/style.css.liquid`, a, "utf-8");
      }
    }
    resolve(results);
  });
};

replaceBackgroundURL("./dist/assets", ".css");
Sectionsで追加可能な入力フォーム
これを見ればOK
固定ページの編集はこちらの記事を参考にしたい
絞り込み機能を使う
画像を切り抜く
バリエーション毎に異なる価格が含まれるかを判定する。
「\2,000 ~」のように「~」をつけたいときがある。
これを簡単に実装できる Liquid が用意されている。
product.price_varies で判定してみよう。
商品ページでvariantパラメータが付与されたとき
Deel Linkと言うらしい。
おすすめ商品(レコメンド)は非同期で実装する
axiosで
        const requestRecommendations = () => {
          return new Promise((resolve, error) => {
            axios({
              method: 'GET',
              url: '/recommendations/products',
              params: {
                section_id: 'product-recommendations',
                product_id: '{{product.id}}',
                limit: 4
              }
            }).then((response) => {
              const doc = document.createElement('div');
              doc.innerHTML = response.data;
              resolve(doc.querySelector('.section-product-recommend'));
            }).catch((error) => {
              reject(error);
            });
          });
        }
こんな感じで実装してもOK。
取得したHTMLデータを流し込めば出力できる。
出力はこんな感じで。
        (async () => {
          try {
            const containerElement = document.querySelector('.section-product-recommend-container');
            containerElement.style.opacity = '0';
            containerElement.style.transition = 'opacity 0.4s linear 0.2s';
            const response = await requestRecommendations();
            containerElement.append(response);
            containerElement.style.opacity = '1';
          } catch (e) {
            console.log('おすすめ商品の取得に失敗しました。');
          }
        })();
読み込み終わったらフェードインしてくれる。
コレクションの並び順を変更する
あまりにも基礎的すぎて誰も書いてくれないので書いておきます。
Shopifyの管理画面のコレクションページにて、商品管理の欄にある「並び替え」を変更するだけでOK

そう。Liquidファイルは触る必要無い。
商品にメタフィールドで付与したメタオブジェクト(リスト)を出力する
{% for the_metaobject in product.metafields.price.simulator.value %}
  <input id="metaobject-{{the_metaobject.name}}" type="checkbox">
  <label for="metaobject-{{the_metaobject.name}}">{{the_metaobject.name}}</label>
{% endfor %}
price.simulator についた value は絶対に必要。(メタオブジェクトやメタフィールドの設定画面でvalueというハンドルは作成していない。とにかく必要なものと覚えておこう。)
▼公式ドキュメント
メタオブジェクト癖ありすぎ。
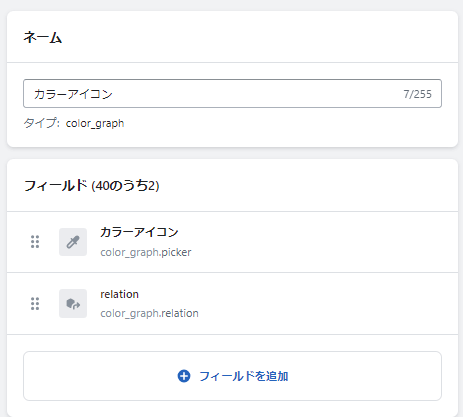

カラー名とカラーのイメージ色を紐づけするためのメタオブジェクト。
これを出力するには下記のようにLiquidを書く必要がある。
<div>
  <p><strong>カラー</strong></p>
  <ul style="list-style: none">
    {% for the_color in shop.metaobjects.color_graph.values %}
      {% assign color_label = the_color.relation.value.label %}
      <li>
        <div class="color-graph" style="display: flex; align-items: center; gap: 0 8px;">
          <span class="color-graph-icon" style="display:block; width: 24px; height: 24px; border-radius: 50%; border: 1px solid #ccc; background: {{the_color.picker}}"></span>
          <span class="color-graph-label">{{color_label}}</span>
        </div>
      </li>
    {% endfor %}
  </ul>
</div>
.values だったり、 .value だったり。
リファレンスで紐づけしたものは .value.hoge で取得するらしい。
うーん。