【Aptos/Move】AptosブロックチェーンでNFTを作成・Transferしてみる
はじめに
Aptosを手を動かしながら理解したい人のために、チュートリアルを自分で試してみて、事前に知っておいた方が良いことやつまづきポイントなどまとめました!
知っておかないと、今後のチュートリアルで理解が難しくなるAptosならではのことについてはこちらに記載しているので、詰まったら参照してみてください!
今回のチュートリアルでは、Aptosブロックチェーン上で非代替性トークン(NFT)を作成し、転送する方法について解説します。 Aptosにはノーコードで実装できるNFT機能が用意されており、それらは aptos_token.move というMoveモジュールにまとめられています。
Step 1: SDKを選ぶ
本チュートリアルではSDKはTypeScript、Pythonが選べますが、TypeScriptを選択します。
インストールは下記の手順(npmやyarnなど)でできますが、私はpnpmを使用していきます。
(以降チュートリアルではpnpmが使用されています。)
TypeSctipt SDKインストール
pnpm インストール
Step 2: サンプルコードを実行してみよう!
それではコードを動かしてみましょう!
- まずgithubからコードをcloneしてきます。
git clone https://github.com/aptos-labs/aptos-ts-sdk.git
- cloneできたらプロジェクトに移り、依存関係をインストールしてビルドします。
cd aptos-ts-sdk
pnpm install
pnpm build
私はここでこけました。なにやらESMとCJSのビルドは成功したが、DTSのビルド中(TypeScriptの型定義ファイル(.d.tsファイル)を生成するプロセス)にメモリ不足エラーが発生してしまいました。
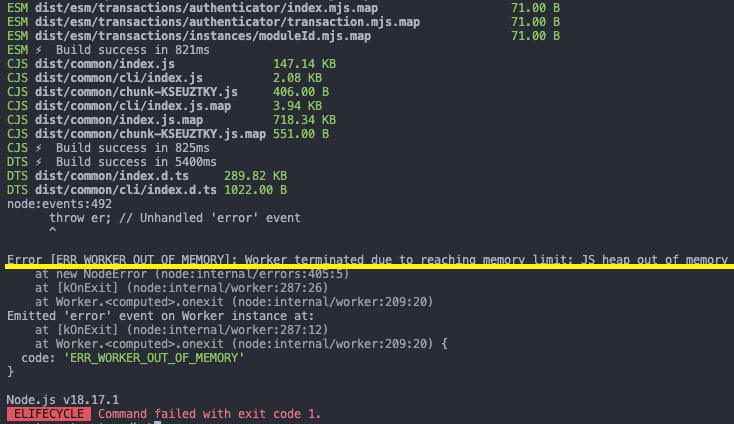
根本的な解決にはなりませんが一旦下記でビルドまで出来ました。
(ヒープメモリの上限を8GBに設定するというフラグを追加)
node --max-old-space-size=8192 ./node_modules/.bin/tsup
- ビルドができたらプロジェクトディレクトリへ移動します。
cd examples/typescript-esm
- そこでもう一度依存関係をインストールしてプロジェクトを立ち上げます。
pnpm install
pnpm build
pnpm run simple_digital_asset
下記のようなアウトプットが出て来れば成功です!
mameta typescript-esm %pnpm run simple_digital_asset

> ts-test@1.0.0 simple_digital_asset /Users/shineikikkawa/web3/dev/learning/aptos/aptos-ts-sdk/examples/typescript-esm
> ts-node --esm dist/simple_digital_asset.js

This example will create and fund Alice and Bob, then Alice account will create a collection and a digital asset in that collection and tranfer it to Bob.
=== Addresses ===

Alice's address is: 0xe525b73010f83a64debac73751deaaf7d434336b0b11c5166892af5df9724936

=== Create the collection ===

Alice's collection: {
    "collection_id": "0x06c6c990e21ddd6174f9f66f677f0a51a339200c7b035c092af9c958847d6ed7",
    "collection_name": "Example Collection",
    "creator_address": "0xe525b73010f83a64debac73751deaaf7d434336b0b11c5166892af5df9724936",
    "current_supply": 0,
    "description": "Example description.",
    "last_transaction_timestamp": "2024-05-04T00:05:25.940063",
    "last_transaction_version": 1669834,
    "max_supply": null,
    "mutable_description": true,
    "mutable_uri": true,
    "table_handle_v1": null,
    "token_standard": "v2",
    "total_minted_v2": 0,
    "uri": "aptos.dev"
}

=== Alice Mints the digital asset ===

Alice's digital assets balance: 1
Alice's digital asset: {
    "token_standard": "v2",
    "token_properties_mutated_v1": null,
    "token_data_id": "0x485b12c9afc1f46e9c1cc9b366e269049dabf560cee326931db53b971b27a37c",
    "table_type_v1": null,
    "storage_id": "0x485b12c9afc1f46e9c1cc9b366e269049dabf560cee326931db53b971b27a37c",
    "property_version_v1": 0,
    "owner_address": "0xe525b73010f83a64debac73751deaaf7d434336b0b11c5166892af5df9724936",
    "last_transaction_version": 1669857,
    "last_transaction_timestamp": "2024-05-04T00:05:27.619551",
    "is_soulbound_v2": false,
    "is_fungible_v2": null,
    "amount": 1,
    "current_token_data": {
        "collection_id": "0x06c6c990e21ddd6174f9f66f677f0a51a339200c7b035c092af9c958847d6ed7",
        "description": "Example asset description.",
        "is_fungible_v2": false,
        "largest_property_version_v1": null,
        "last_transaction_timestamp": "2024-05-04T00:05:27.619551",
        "last_transaction_version": 1669857,
        "maximum": null,
        "supply": null,
        "token_data_id": "0x485b12c9afc1f46e9c1cc9b366e269049dabf560cee326931db53b971b27a37c",
        "token_name": "Example Asset",
        "token_properties": {},
        "token_standard": "v2",
        "token_uri": "aptos.dev/asset",
        "decimals": 0,
        "current_collection": {
            "collection_id": "0x06c6c990e21ddd6174f9f66f677f0a51a339200c7b035c092af9c958847d6ed7",
            "collection_name": "Example Collection",
            "creator_address": "0xe525b73010f83a64debac73751deaaf7d434336b0b11c5166892af5df9724936",
            "current_supply": 0,
            "description": "Example description.",
            "last_transaction_timestamp": "2024-05-04T00:05:25.940063",
            "last_transaction_version": 1669834,
            "max_supply": null,
            "mutable_description": true,
            "mutable_uri": true,
            "table_handle_v1": null,
            "token_standard": "v2",
            "total_minted_v2": 0,
            "uri": "aptos.dev"
        }
    }
}

=== Transfer the digital asset to Bob ===

Alices's digital assets balance: 1
Bob's digital assets balance: 1
Step 3: アウトプットの理解
それではアウトプットを理解しましょう。下記の内容が含まれています。
- アカウントのアドレス情報
- コレクションの作成
- アリスがNFTをミントする
- アリスがNFTをボブに転送する
Step 4: SDKの中身を見てみよう!
それでは実際にコードを見ていきます!こちらのコードを確認していきます。
Step 4.1: Clientの初期化
最初に、Aptosクライアントを初期化します。デフォルトでは、Aptosクライアントはdevネットを指すように設定されていますが、引数で変更可能です。
// Setup the client
const APTOS_NETWORK: Network =
  NetworkToNetworkName[process.env.APTOS_NETWORK] || Network.DEVNET;
const config = new AptosConfig({ network: APTOS_NETWORK });
const aptos = new Aptos(config);
Step 4.2: ローカルでアカウントを作成
次に、2つのアカウント(アリスとボブ)をローカルに作成します。アカウントは公開アドレスと公開鍵/秘密鍵のペアで構成され、アカウントの所有権を認証するために使用されます。この時点では、アカウントはまだブロックチェーン上に存在していません。
// Create two accounts
const alice = Account.generate();
const bob = Account.generate();
Step 4.3: ブロックチェーン・アカウントの作成
ローカルで生成したアカウントをブロックチェーン上に作成するには、明示的に作成する必要があります。デブネットでは、テスト用のコインをFaucet APIから無料で取得できます。このサンプルでは、Faucetからコインをもらってアリスとボブのアカウントを作成しています。
await aptos.fundAccount({
  accountAddress: alice.accountAddress,
  amount: 100_000_000,
});
await aptos.faucet.fundAccount({
  accountAddress: bob.accountAddress,
  amount: 100_000_000,
});
Step 4.4: コレクションの作成
NFTを作成するには、まずコレクションを作成します。コレクションは、クリエイターのNFTをグループ化するためのコンテナです。
コレクションを作成するには、createCollectionTransaction関数を呼び出し、その後signAndSubmitTransaction関数を使ってトランザクションをブロックチェーンに送信します。
const createCollectionTransaction = await aptos.createCollectionTransaction({
  creator: alice,
  description: collectionDescription,
  name: collectionName,
  uri: collectionURI,
});

const committedTxn = await aptos.signAndSubmitTransaction({
  signer: alice,
  transaction: createCollectionTransaction,
});
ここで、creatorはコレクションを作成するアカウント(この例ではアリス)、descriptionはコレクションの説明、nameはコレクション名、uriはコレクションのメタデータを含むURIを指定します。
createCollectionTransaction関数は、シミュレートまたはブロックチェーンに送信できるSingleSignerTransactionを返します。この関数のシグネチャは以下のようになっています。
export async function createCollectionTransaction(
  args: {
    creator: Account;
    description: string;
    name: string;
    uri: string;
    options?: InputGenerateTransactionOptions;
  } & CreateCollectionOptions,
): Promise<SingleSignerTransaction>;
Step 4.5: NFT作成
トークン(NFT)を作成するには、関連するコレクションを指定する必要があります。トークンはコレクションに関連付けられている必要があり、そのコレクションにはミント可能な残りのトークンがなければなりません。トークンには多くの属性が関連付けられていますが、ヘルパーAPIでは静的コンテンツを作成するために必要な最小限の属性のみを公開しています。
トークンを作成するには、mintTokenTransaction関数を呼び出します。
const mintTokenTransaction = await aptos.mintTokenTransaction({
  creator: alice,
  collection: collectionName,
  description: tokenDescription,
  name: tokenName,
  uri: tokenURI,
});

const committedTxn = await aptos.signAndSubmitTransaction({
  signer: alice,
  transaction: mintTokenTransaction,
});
ここで、creatorはトークンを作成するアカウント(アリス)、collectionはトークンが属するコレクションの名前、descriptionはトークンの説明、nameはトークン名、uriはトークンのメタデータを含むURIを指定します。
mintTokenTransaction関数は、シミュレートまたはブロックチェーンに送信できるSingleSignerTransactionを返します。この関数のシグネチャは以下のようになっています。
async mintTokenTransaction(args: {
    creator: Account;
    collection: string;
    description: string;
    name: string;
    uri: string;
    options?: InputGenerateTransactionOptions;
  }): Promise<SingleSignerTransaction>
Step 4.6: トークンとコレクションのメタデータを読む
コレクションとトークンの両方がブロックチェーン上の一意のアドレスを持つオブジェクトです。それらのメタデータはオブジェクトのアドレスに格納されています。SDKには、このデータを照会するための便利なラッパーが用意されています。
コレクションのメタデータを読み取るには、getCollectionData関数を使用します。
const alicesCollection = await aptos.getCollectionData({
  creatorAddress: alice.accountAddress,
  collectionName,
  minimumLedgerVersion: BigInt(pendingTxn.version),
});
console.log(`Alice's collection: ${JSON.stringify(alicesCollection, null, 4)}`);
ここで、creatorAddressはコレクションの作成者のアドレス(アリスのアカウントアドレス)、collectionNameはコレクション名、minimumLedgerVersionは照会するブロックチェーンの最小バージョンを指定します。
所有するトークンのメタデータを読み取るには、getOwnedDigitalAssets関数を使用します。
const alicesDigitalAsset = await aptos.getOwnedDigitalAssets({
  ownerAddress: alice.accountAddress,
  minimumLedgerVersion: BigInt(pendingTxn.version),
});

console.log(
  `Alice's digital asset: ${JSON.stringify(alicesDigitalAsset[0], null, 4)}`,
);
ここで、ownerAddressはトークンの所有者のアドレス(アリスのアカウントアドレス)、minimumLedgerVersionは照会するブロックチェーンの最小バージョンを指定します。
これらの関数は、指定されたアドレスが所有するコレクションやトークンのメタデータを取得するために使用されます。
ステップ4.7:オブジェクトの所有者を読む
aptos_token.moveコントラクトから作成された各オブジェクトは、個別の資産です。ユーザーが所有する資産は、ユーザーのアカウントとは別に保存されます。あるユーザーがオブジェクトを所有しているかどうかを確認するには、オブジェクトの所有者を確認します。
const alicesDigitalAsset = await aptos.getOwnedDigitalAssets({
  ownerAddress: alice.accountAddress,
  minimumLedgerVersion: BigInt(pendingTxn.version),
});

console.log(
  `Alice's digital asset: ${JSON.stringify(alicesDigitalAsset[0], null, 4)}`,
);
この例では、getOwnedDigitalAssets関数を使用して、アリスが所有するデジタル資産を取得しています。
getOwnedDigitalAssets関数の実装は以下のようになっています。
export async function getOwnedDigitalAssets(args: {
  aptosConfig: AptosConfig;
  ownerAddress: AccountAddressInput;
  options?: PaginationArgs & OrderByArg<GetTokenActivityResponse[0]>;
}): Promise<GetOwnedTokensResponse> {
  const { aptosConfig, ownerAddress, options } = args;

  const whereCondition: CurrentTokenOwnershipsV2BoolExp = {
    owner_address: { _eq: AccountAddress.from(ownerAddress).toStringLong() },
    amount: { _gt: 0 },
  };

  const graphqlQuery = {
    query: GetCurrentTokenOwnership,
    variables: {
      where_condition: whereCondition,
      offset: options?.offset,
      limit: options?.limit,
      order_by: options?.orderBy,
    },
  };

  const data = await queryIndexer<GetCurrentTokenOwnershipQuery>({
    aptosConfig,
    query: graphqlQuery,
    originMethod: "getOwnedDigitalAssets",
  });

  return data.current_token_ownerships_v2;
}
この関数は、GraphQLクエリを使用してIndexerからデータを取得します。whereConditionでは、所有者のアドレスと数量が0より大きいことを条件としています。取得したデータはcurrent_token_ownerships_v2として返されます。
ステップ4.8:オブジェクトの相互転送
aptos_token.moveコントラクトから作成された各オブジェクトは、個別の資産です。ユーザー間でこれらの資産を転送することができます。
まず、アリスが所有するデジタル資産を取得します。
const alicesDigitalAsset = await aptos.getOwnedDigitalAssets({
  ownerAddress: alice.accountAddress,
  minimumLedgerVersion: BigInt(pendingTxn.version),
});

console.log(
  `Alice's digital asset: ${JSON.stringify(alicesDigitalAsset[0], null, 4)}`,
);
次に、transferDigitalAsset関数を使用して、アリスからボブにトークンを転送します。
const transferTransaction = await aptos.transferDigitalAsset({
  sender: alice,
  digitalAssetAddress: alicesDigitalAsset[0].token_data_id,
  recipient: bob.accountAddress,
});
const committedTxn = await aptos.signAndSubmitTransaction({
  signer: alice,
  transaction: transferTransaction,
});
const pendingTxn = await aptos.waitForTransaction({
  transactionHash: committedTxn.hash,
});
ここで、senderはトークンの送信者(アリス)、digitalAssetAddressは転送するトークンのアドレス、recipientはトークンの受信者(ボブのアカウントアドレス)を指定します。
最後に、各ユーザーが所有するトークンの数を確認します。
const alicesDigitalAssetsAfter = await aptos.getOwnedDigitalAssets({
  ownerAddress: alice.accountAddress,
  minimumLedgerVersion: BigInt(pendingTxn.version),
});
console.log(
  `Alices's digital assets balance: ${alicesDigitalAssetsAfter.length}`,
);

const bobDigitalAssetsAfter = await aptos.getOwnedDigitalAssets({
  ownerAddress: bob.accountAddress,
  minimumLedgerVersion: BigInt(pendingTxn.version),
});
console.log(`Bob's digital assets balance: ${bobDigitalAssetsAfter.length}`);
これにより、トークンの転送後のアリスとボブが所有するトークンの数が表示されます。
まとめ
以上が、Aptosブロックチェーン上でNFTを作成、管理、転送するための主要なステップです。コレクションとトークンの作成、メタデータの読み取り、所有権の確認、トークンの転送など、NFTに関連する基本的な操作について説明しました。
Aptosは、開発者にとって使いやすいプラットフォームを目指しており、SDKやAPIを通じてこれらの機能を簡単に利用できるようになっています。NFTの開発に興味がある方は、ぜひAptosを試してみてください。
Discussion