FlaskからHTMLに埋め込んだUnityWebGLを操作する方法
前置き
RaspberryPiに接続したデバイスをプログラミングの出来ない人にプレゼントすることになり、Flaskを使ってブラウザからデバイス操作できるようにしてあげました。
その際にデバイス状態が視覚的にわかるようにUnityで3Dモデルを作成とWebGLビルドを行い、RaspberryPiからのセンサーデータでUnityのモデル状態が変更するようにしました。
今回は上記を実現するために使用した技術を忘れないために備忘録的にまとめました。
作ったもの
前置きで書いたプレゼントの品は個人情報を含むので別途サンプルを作成しました。
今回はボタンを押すとボールの転がる速度が変化するサンプルを作成する手順を書き記しています。
github:https://github.com/yusankin/WebGLFlaskSample
Unity
環境
- unity 2021.3.19f1
セットアップ
-
モデル作成
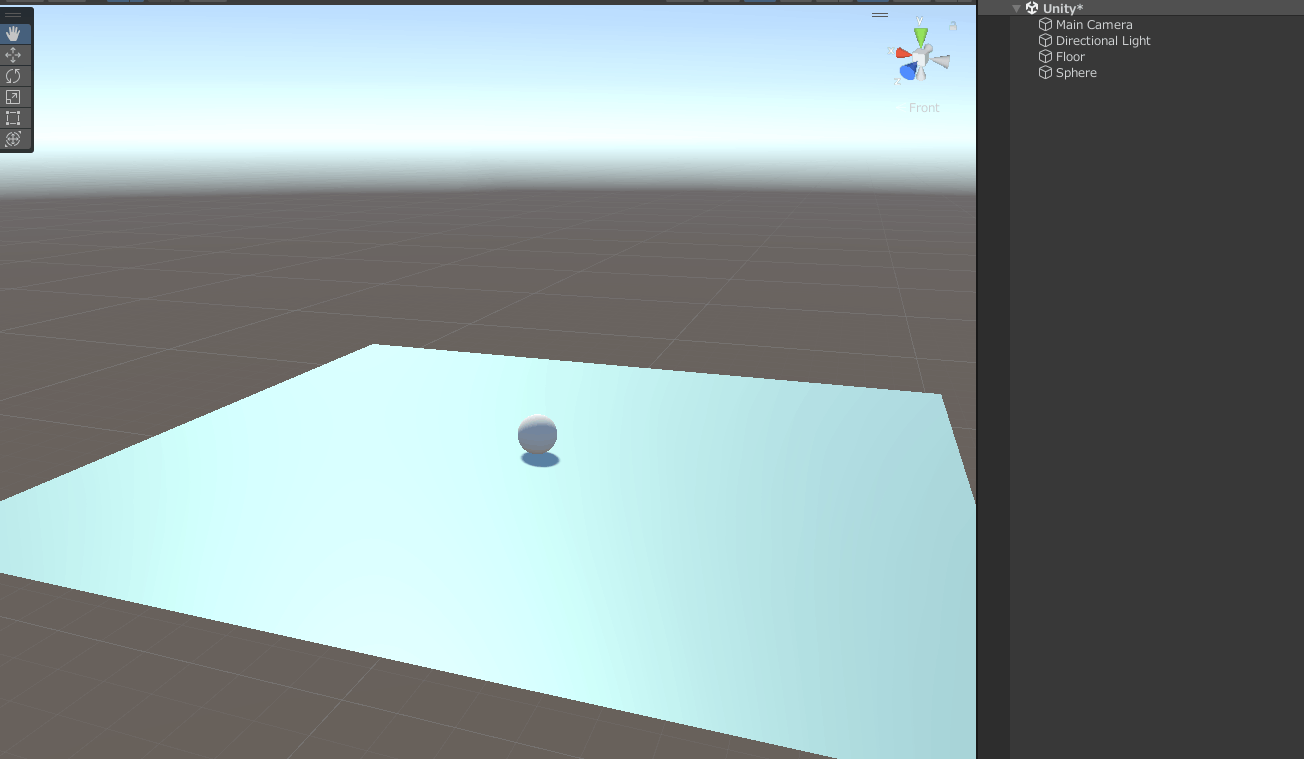
まず初めに図のようにスフィアと平面を配置します。
色は見えやすいように平面を水色に変更しています。
-
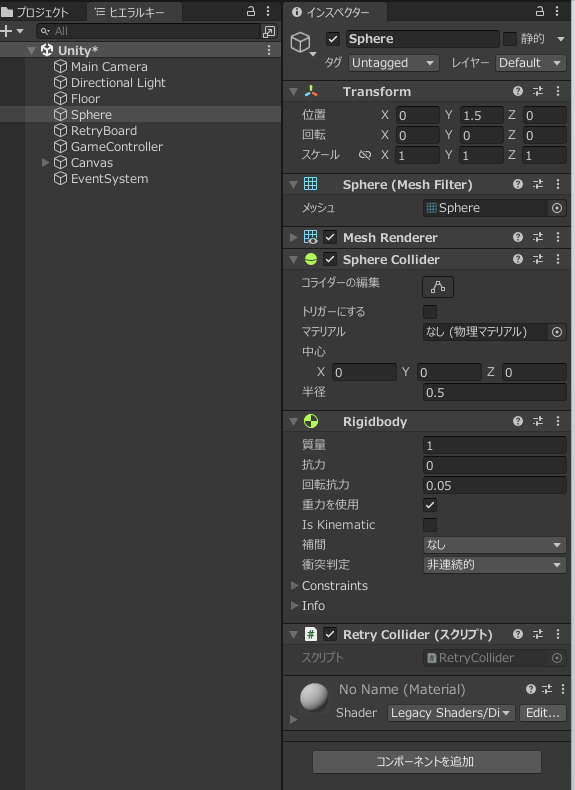
スフィアの落下判定用のボードを作成
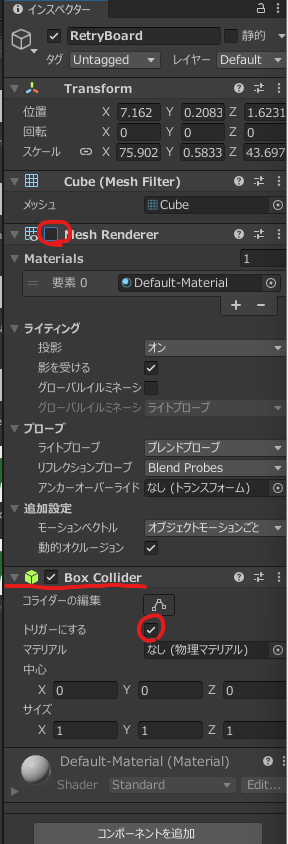
平面を十分に覆う大きさでキューブを作成します。

その際に、キューブのインスペクタにBoxColliderを追加してトリガーにするにチェックをつけます。(落下判定のトリガーにするため)
また、Mesh Rendererのチェックを外します。
-
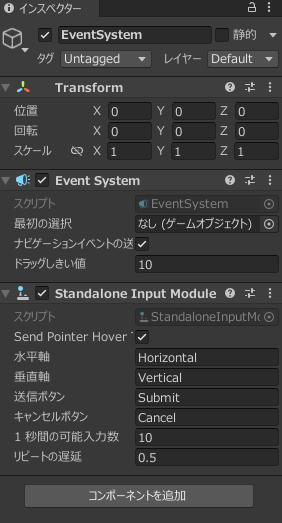
インプットモジュールの追加
ヒエラルキーにて空のオブジェクトを追加し、インスペクタにてコンポーネントの追加からStandalone Input Moduleを追加します。
Event SystemはStandalone Input Moduleを追加すると勝手に追加されます。
-
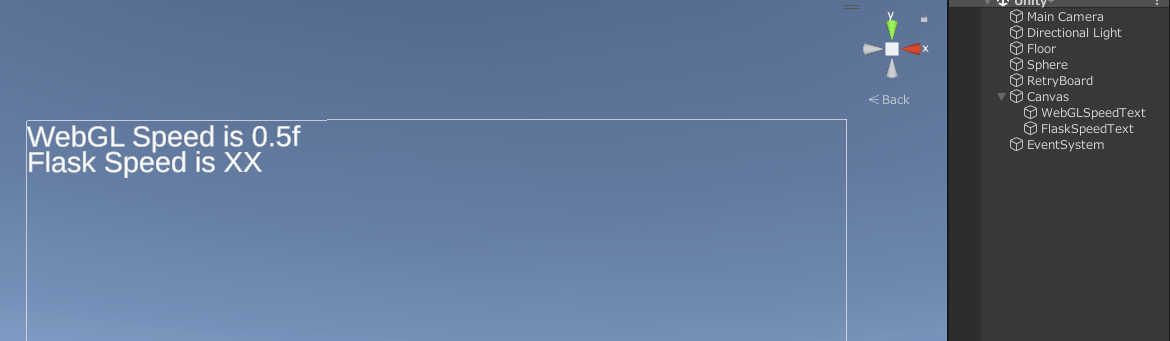
テキストの追加
UIのテキスト-TextMeshProを選択してテキストを追加します。
配置と名称は自由ですが、今回は2種のテキストをキャンバスの左上に追加しています。
-
落下時のリトライ設定
スクリプトを新規作成して名前をRetryColliderにし、下記のコードを張り付けます。RetryCollider.csusing System.Collections; using System.Collections.Generic; using UnityEngine; public class RetryCollider : MonoBehaviour { private Vector3 _initialPos; private Rigidbody rb; // Start is called before the first frame update void Start() { rb = GetComponent<Rigidbody>(); _initialPos = this.transform.position; } void OnTriggerEnter(Collider collider) { if (collider.name == "RetryBoard") { rb.velocity = Vector3.zero; rb.angularVelocity = Vector3.zero; this.transform.position = _initialPos; Debug.Log("Collider"); } } }スフィアに先ほど作成したRetryColliderを追加します。
-
スフィアの移動設定
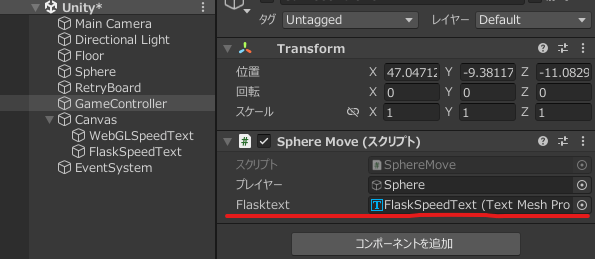
空のオブジェクトを作成してGameControllerと名前にします。
スクリプトを新規作成して名前をSphereMoveにし、下記のコードを張り付けます。SphereMove.csusing System.Collections; using System.Collections.Generic; using UnityEngine; using System.Globalization; using TMPro; public class SphereMove : MonoBehaviour { public GameObject _Player; private Rigidbody rb; internal float dx = 0; internal float dz = 0; private float _Speed; public TextMeshProUGUI Flasktext; void Start() { rb = _Player.GetComponent<Rigidbody>(); _Speed = 0.5f; } void Update() { UnitySpehreMove(); } private void UnitySpehreMove() { if (Input.GetKey(KeyCode.LeftArrow)) { dx = -0.1f; } else if (Input.GetKey(KeyCode.RightArrow)) { dx = 0.1f; } else { dx = 0.0f; } if (Input.GetKey(KeyCode.UpArrow)) { dz = 0.1f; } else if (Input.GetKey(KeyCode.DownArrow)) { dz = -0.1f; } else { dz = 0.0f; } var movement = new Vector3(dx, 0, dz); rb.AddForce(movement * _Speed); } public void FlaskSpeed(string flaskSpeed) { Flasktext.text = "Flask Speed is " + flaskSpeed; _Speed = float.Parse(flaskSpeed, CultureInfo.InvariantCulture); } public void ResetSpeed() { _Speed = 0.5f; Flasktext.text = "Flask Speed is XX"; } }GameControllerにSphere Moveを追加します。
FlasktextにFlaskから変更したいテキストを追加します。
-
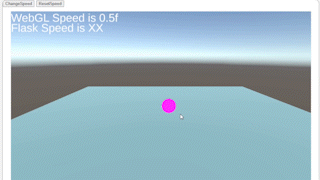
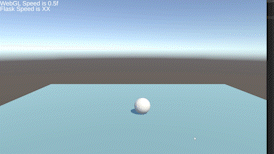
動作確認
作成したファイルが実行可能か確認をします。
下記のように動作すればOKです。
-
WebGLビルド
ファイル->ビルド設定からWebGLビルドを選択、シーンを追加してビルドの実行をしてください。
これでUnity側の設定は完了です。
次からFlaskの設定をしていきます。
Flask
環境
- Python 3.9.13
- Flask 2.2.3
ファイル構成
.
├── templates
│   ├── Build        # WebGLでBuildしてできたBuildファイル
│   ├── TemplateData # WebGLでBuildしてできたTemplateDataファイル
│   └── index.html   # WebGLでBuildしてできたHTMLファイル
└── app.py           # 今からはこのファイルの話
セットアップ
-
Flaskのインストール
Flaskをインストールします。
筆者はpipで入れてます。pippip install Flask -
app.pyの作成
app.pyを作成して下記ファイルを貼り付けます。
アプリを起動すればローカルホストでWebページを開くことができます。
コードの内容としてはスフィアのスピードを0.5->10にするものです。app.pyfrom flask import Flask, render_template, jsonify app = Flask(__name__,static_folder="templates") @app.route("/", methods=["GET", "POST"]) def main_page(): return render_template("index.html") @app.route("/SphereMove", methods=["POST"]) def TempDateToUnity(): flaskspeed = 10 res = {"count": flaskspeed} return jsonify(res) if __name__ == "__main__": app.run(debug=True , port=8888)実行してもWebページに飛んでもWebGLコンテンツがうまく動かないと思います。
次にHTMLファイルを編集してリンクの修正とFlask-WebGL間を連携できるようにします。
HTML
セットアップ
下記3つのことを変更していきます。
- jqueryの追加
- linkの修正
- 関数の追加
それでは順にHTMLのデータを変更していきます。
-
jqueryの追加とlinkの修正
ajax(非同期通信)を行うためにjqueryを追加します。
また、WebGL起動のために必要なアイコンとCSSのリンクを書き換えます。<head>部の追加と修正<!DOCTYPE html> <html lang="en-us"> <head> <meta charset="utf-8"> <!-- 追加 --> <link href="https://ajax.googleapis.com/ajax/libs/jqueryui/1.13.2/themes/smoothness/jquery-ui.css" rel="stylesheet"> <script src="https://ajax.googleapis.com/ajax/libs/jquery/3.6.4/jquery.min.js"></script> <!-- 追加 --> <meta http-equiv="Content-Type" content="text/html; charset=utf-8"> <title>Unity WebGL Player | UnityWebGL</title> <!-- 書き換え --> <link rel="shortcut icon" href="../templates/TemplateData/favicon.ico"> <link rel="stylesheet" href="../templates/TemplateData/style.css"> <!-- 書き換え --> </head> -
初期化とlinkの修正
FlaskからJavaScriptへ送るデータを格納するためにcountを定義します。
WebGL起動のためにbuildUrlのリンクを修正します。<script>部の追加と修正<script> var container = document.querySelector("#unity-container"); var canvas = document.querySelector("#unity-canvas"); var loadingBar = document.querySelector("#unity-loading-bar"); var progressBarFull = document.querySelector("#unity-progress-bar-full"); var fullscreenButton = document.querySelector("#unity-fullscreen-button"); var warningBanner = document.querySelector("#unity-warning"); var count = 0; // 初期化を追加 // Shows a temporary message banner/ribbon for a few seconds, or // a permanent error message on top of the canvas if type=='error'. // If type=='warning', a yellow highlight color is used. // Modify or remove this function to customize the visually presented // way that non-critical warnings and error messages are presented to the // user. function unityShowBanner(msg, type) { function updateBannerVisibility() { warningBanner.style.display = warningBanner.children.length ? 'block' : 'none'; } var div = document.createElement('div'); div.innerHTML = msg; warningBanner.appendChild(div); if (type == 'error') div.style = 'background: red; padding: 10px;'; else { if (type == 'warning') div.style = 'background: yellow; padding: 10px;'; setTimeout(function() { warningBanner.removeChild(div); updateBannerVisibility(); }, 5000); } updateBannerVisibility(); } var buildUrl = "../templates/Build"; // リンクの書き換え var loaderUrl = buildUrl + "/Build.loader.js"; var config = { dataUrl: buildUrl + "/Build.data.unityweb", frameworkUrl: buildUrl + "/Build.framework.js.unityweb", codeUrl: buildUrl + "/Build.wasm.unityweb", streamingAssetsUrl: "StreamingAssets", companyName: "DefaultCompany", productName: "UnityWebGL", productVersion: "0.1", showBanner: unityShowBanner, }; -
関数の追加
WebGLの関数を呼び出すための関数を定義します。<script>部の関数の追加var script = document.createElement("script"); script.src = loaderUrl; script.onload = () => { createUnityInstance(canvas, config, (progress) => { progressBarFull.style.width = 100 * progress + "%"; }).then((unityInstance) => { loadingBar.style.display = "none"; //ここから下に関数を追記 $(function () { $('#FlaskSpeedButton').click( function flask() { $.ajax({ type: "POST", url: '/SphereMove', data: {count: count}, dataType: 'json' }).done(function(response) { count = response.count; // unityInstance.SendMessage("UnityのC#スクリプトがアタッチされているオブジェクト名","アタッチされているスクリプトで呼び出したい関数名","(あれば)引数"; unityInstance.SendMessage("GameController","FlaskSpeed",String(count)); }).fail(function() { console.log("app is stopped") }); } ); $('#ResetSpeedButton').click( function reset() { $.ajax({ }).done(function(response) { unityInstance.SendMessage("GameController","ResetSpeed"); }).fail(function() { console.log("app is stopped") }); } ); }); //ここより上に関数を追記 fullscreenButton.onclick = () => { unityInstance.SetFullscreen(1); }; }).catch((message) => { alert(message); }); }; document.body.appendChild(script); </script>function flask()はFlaskからの値をWebGLに渡す場合、function reset()はJavascriptからWebGL関数を呼び出したい時の書き方です。
自身の環境で必要に応じて書き換えてください。$.ajax({ type: "POST", <-① url: '/SphereMove', <-② data: {count: count}, <-③ dataType: 'json' ------------------------------------------- @app.route("/SphereMove" <-②, methods=["POST"] <-①) def TempDateToUnity(): flaskspeed = 10 res = {"count": flaskspeed} <-③ return jsonify(res)FlaskとHTMLを抜粋します。
①、②、③を同じタイプにすることが重要です。 -
ボタンの追加
functionを呼び出すためのボタンの追加をします。<body>部の追加</script> <!-- ボタン追加 --> <input type="button" id="FlaskSpeedButton" value="ChangeSpeed" /> <input type="button" id="ResetSpeedButton" value="ResetSpeed" /> <!-- ボタン追加 --> </body> </html>
以上ですべての準備が終わりです。
pythonからコードを実行するとWebGLコンテンツが起動し、ボタンをクリックするとスフィアの移動速度が変化すると思います。
おわりに
FlaskからUnityWebGLの関数を呼び出す方法を紹介しました。
WebGLを外部から操作したい場合やRaspberryPiの取得データを画面に表示したい際に使えるかと思います。
この記事が誰かの何かの役に立てば幸いです。
Discussion