Discordのembedded-app-sdk試してみた
今月18日にDiscord公式からアクティビティのsdkがリリースされました。
watch togetherやgartic phoneといった、ボイスチャンネル内で使用できるアプリの開発ができるようになります。
今回は公式ドキュメント通りにviteを使ってhello worldを表示するまでやってみたいと思います。

コードはこちら
環境
- windows11
- node.js v18.17.1
必要なもの
- cloudflared
- pnpm
事前準備
開発者モード
今回は開発用のものなので、開発者モードをオンにします。

cloudflared
アクティビティのURLマッピングの際、外部からのアクセスを有効にさせるためローカルサーバを外部に公開させる必要があります。
公式ドキュメントではngrokかcloudflaredのどちらかと書いてありますが、ngrokでは動作しないのでcloudflaredが必要になります。
cloudflare登録
cloudflareに登録しましょう。
cloudflaredインストール
公式サイトから、OSに合わせてインストーラーをダウンロードしましょう。
ダウンロードできたらバージョンを確認しましょう。
cloudflared -version
確認出来たらログインします。
cloudflared tunnel login
tunnel作成
追記:多分やる必要ないです。
長めなので折り畳み
登録後、Cloudflare Zero Trustに遷移してNetwork→tunnelへ。

create tunnelで新しくtunnelを作ります。

コネクタの種類としてCloudflaredを選択し、 Nextを選択します。

tunnelの名前を入力し、保存します。エラーが出た場合、別の名前にしましょう。

保存が完了すると、WARPのインストール画面に遷移します。対応するOSを選択してcloudflaredをダウンロードしましょう。
下のボックス内にOSごとにコネクタの接続方法がかかれています。その通りに実行しましょう。

次にプライベートネットワークの設定をします。

とりあえず192.168.0.0/32をCIDRとして登録します。

WARPの権限追加
追記:これも多分やる必要ないです。
長めなので折り畳み
保存したらいったんSettingからWARP Clientを選択し、クライアント側からログインできるように権限を追加します。

Device enrollment permissionsからAdd a ruleを選択します。

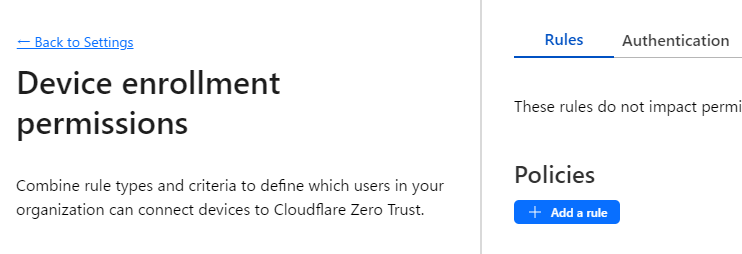
以下のような権限を追加し保存しましょう。

保存したら、WARPのインストールを行います。
終わったら起動させて、歯車マークから環境設定を選択しアカウントタブからCloudflare Zero Trustにログインします。
これでCloudflaredの準備は完了です。
アクティビティ作成
といっても公式ドキュメントの通り進めるだけです。
アプリ作成
まずはアプリの登録を行います。
サードバーからActivities -> Getting Startedを選択し、embeddedを有効にしましょう。

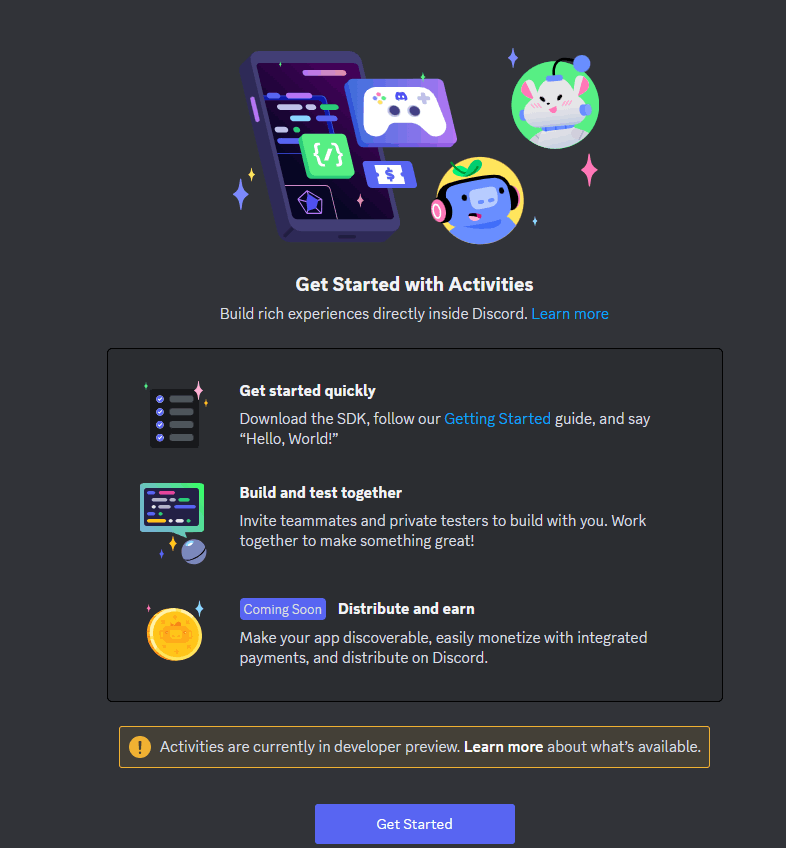
またコード内ではDiscord OAuth2を使用するので、ClientIDとClientSecretを忘れずにメモしてください。
リダイレクトURIも指定する必要がありますが、とりあえずhttp://localhost:3001に設定しておいてください。
クローン
公式のサンプルをクローンします。
git clone https://github.com/discord/getting-started-activity.git
以下のような構成になっています。
.envはないので作成しましょう。
├── client
│   ├── main.js
│   ├── index.html
│   ├── package.json
|   |── rocket.png
│   └── vite.config.js
├── server
│   ├── package.json
│   └── server.js
└── .env
.envの中には先ほどメモしたOAuth2のIDとSecretを記載しましょう。
VITE_DISCORD_CLIENT_ID=YOUR_OAUTH2_CLIENT_ID_HERE
DISCORD_CLIENT_SECRET=YOUR_OAUTH2_CLIENT_SECRET_HERE
client
clientに移動します。
以下のコマンドで必要なパッケージをインストールしましょう。
cd client
npm install
npm install @discord/embedded-app-sdk
その後、viteを起動します。
npm run dev
http://localhost:5173/ に移動すると立ち上がっているのがわかりますが、正常な動作はしません。何も表示されずずっとリロードを繰り返すと思います。
この時点でアクティビティでしかアクセスができない状態らしいです。
なのでDiscord側からアクセスします。
ローカルサーバ起動
上記のclientのviteは起動させたままで、cloudflared tunnelを起動させます。
cloudflared tunnel --url http://localhost:5173
実行すると以下のようなURLが表示されます。
Your quick Tunnel has been created! Visit it at (it may take some time to be reachable):
https://funky-jogging-bunny.trycloudflare.com
これをdeveloper potalのURL Mappingsに貼り付けます。
貼り付けの際に、https://は省略されます。
詳しくはこちらをご覧ください。

保存したら、アプリが所属しているサーバーのボイスチャンネルからアクティビティを起動させます。

以下のような画面が表示されれば成功です。

server
アクティビティが表示できましたが、まだDiscordとのアクセスができたわけではありません。
expressを使ってサーバーの構築をします。
新しくターミナルを用意したらserverに移動し、必要なパッケージをインストールしましょう。
cd server
npm install
インストールが終わったら起動します。
npm run dev
これでサーバーの準備が整いました。
これによりOAuth2をつかってユーザーの情報にアクセスできるようになります。
clientとserverの接続
client/main.jsをサーバと接続させます。
client/main.js(公式ドキュメントまんまなので折り畳み)
import { DiscordSDK } from "@discord/embedded-app-sdk";

import rocketLogo from '/rocket.png';
import "./style.css";

// Will eventually store the authenticated user's access_token
let auth;

const discordSdk = new DiscordSDK(import.meta.env.VITE_DISCORD_CLIENT_ID);

setupDiscordSdk().then(() => {
  console.log("Discord SDK is authenticated");

  // We can now make API calls within the scopes we requested in setupDiscordSDK()
  // Note: the access_token returned is a sensitive secret and should be treated as such
});

async function setupDiscordSdk() {
  await discordSdk.ready();
  console.log("Discord SDK is ready");

  // Authorize with Discord Client
  const { code } = await discordSdk.commands.authorize({
    client_id: import.meta.env.VITE_DISCORD_CLIENT_ID,
    response_type: "code",
    state: "",
    prompt: "none",
    scope: [
      "identify",
      "guilds",
    ],
  });

  // Retrieve an access_token from your activity's server
  const response = await fetch("/api/token", {
    method: "POST",
    headers: {
      "Content-Type": "application/json",
    },
    body: JSON.stringify({
      code,
    }),
  });
  const { access_token } = await response.json();

  // Authenticate with Discord client (using the access_token)
  auth = await discordSdk.commands.authenticate({
    access_token,
  });

  if (auth == null) {
    throw new Error("Authenticate command failed");
  }
}

document.querySelector('#app').innerHTML = `
  <div>
    <img src="${rocketLogo}" class="logo" alt="Discord" />
    <h1>Hello, World!</h1>
  </div>
`;
再起動するとアプリの認証を求められるそうですが、筆者は求められませんでした。
すでにOAuth2を使用したBotとして運用しているから??
ちょっと原因はわかりませんでした。
3/25追記
どうやらバグだったようです。
バージョン1.0.2以降はちゃんと認証を求められるらしいです。
とりあえず最後にSDKを利用して情報にアクセスしてみましょう。
以下のコードは、接続しているボイスチャンネルとサーバーのアイコンを読み取っています。
client/main.js
import { DiscordSDK } from "@discord/embedded-app-sdk";

import rocketLogo from './rocket.png';
import "./style.css";

// Will eventually store the authenticated user's access_token
let auth;

const discordSdk = new DiscordSDK(import.meta.env.VITE_DISCORD_CLIENT_ID);

setupDiscordSdk().then(() => {
  console.log("Discord SDK is authenticated");

  // setupDiscordSDK() で要求したスコープ内で API をコールできるようになりました。
  // 注意: 返されるaccess_tokenは機密情報であり、そのように扱われるべきである。
  appendVoiceChannelName();
  appendGuildAvatar();
});

async function setupDiscordSdk() {
  await discordSdk.ready();
  console.log("Discord SDK is ready");

  // Authorize with Discord Client
  const { code } = await discordSdk.commands.authorize({
    client_id: import.meta.env.VITE_DISCORD_CLIENT_ID,
    response_type: "code",
    state: "",
    prompt: "none",
    scope: [
      "identify",
      "guilds",
    ],
  });

  // Retrieve an access_token from your activity's server
  const response = await fetch("/api/token", {
    method: "POST",
    headers: {
      "Content-Type": "application/json",
    },
    body: JSON.stringify({
      code,
    }),
  });
  const { access_token } = await response.json();

  // Authenticate with Discord client (using the access_token)
  auth = await discordSdk.commands.authenticate({
    access_token,
  });

  if (auth == null) {
    throw new Error("Authenticate command failed");
  }
}

async function appendVoiceChannelName() {
  const app = document.querySelector('#app');

  let activityChannelName = 'Unknown';

  // Requesting the channel in GDMs (when the guild ID is null) requires
  // the dm_channels.read scope which requires Discord approval.
  if (discordSdk.channelId != null && discordSdk.guildId != null) {
    // Over RPC collect info about the channel
    const channel = await discordSdk.commands.getChannel({channel_id: discordSdk.channelId});
    if (channel.name != null) {
      activityChannelName = channel.name;
    }
  }

  // Update the UI with the name of the current voice channel
  const textTagString = `Activity Channel: "${activityChannelName}"`;
  const textTag = document.createElement('p');
  textTag.innerHTML = textTagString;
  app.appendChild(textTag);
}

async function appendGuildAvatar() {
  const app = document.querySelector('#app');

  // 1. From the HTTP API fetch a list of all of the user's guilds
  const guilds = await fetch(`https://discord.com/api/v10/users/@me/guilds`, {
    headers: {
      // NOTE: we're using the access_token provided by the "authenticate" command
      Authorization: `Bearer ${auth.access_token}`,
      'Content-Type': 'application/json',
    },
  }).then((response) => response.json());

  // 2. Find the current guild's info, including it's "icon"
  const currentGuild = guilds.find((g) => g.id === discordSdk.guildId);

  // 3. Append to the UI an img tag with the related information
  if (currentGuild != null) {
    const guildImg = document.createElement('img');
    guildImg.setAttribute(
      'src',
      // More info on image formatting here: https://discord.com/developers/docs/reference#image-formatting
      `https://cdn.discordapp.com/icons/${currentGuild.id}/${currentGuild.icon}.webp?size=128`
    );
    guildImg.setAttribute('width', '128px');
    guildImg.setAttribute('height', '128px');
    guildImg.setAttribute('style', 'border-radius: 50%;');
    app.appendChild(guildImg);
  }
}

document.querySelector('#app').innerHTML = `
  <div>
    <img src="${rocketLogo}" class="logo" alt="Discord" />
    <h1>Hello, World!</h1>
  </div>
`;
最初の画面のようにボイスチャンネル名とアイコンが表示されていれば成功です!
終わりに
お疲れ様でした。
普段Reactとかやってる人は学習コストが低めで扱いやすいです。
ただローカルでの実行ハードルは高めで、Cloudflareがほぼほぼ必須というのは0から始めるのは結構厳しめだなとも思いました。
いずれにせよ拡張性は高く、今後どのようなものが出るのか楽しみです。
Discussion