Arduino(3) LANでの通信
はじめに
前回、RTCからの時刻情報を液晶に表示しましたが、RTCの時刻が合っていないので無茶苦茶な年月日時分秒が表示されてしまいました。これを現在時刻に合わせる処理を実装していきたいと思いますが、どのタイミングでどの時間を設定するのかが難しいのです。
LAN経由でパソコンから指令を出したタイミングで時間を合わせてくれたら良いと思いますので、まずLAN通信を確立して行きます。
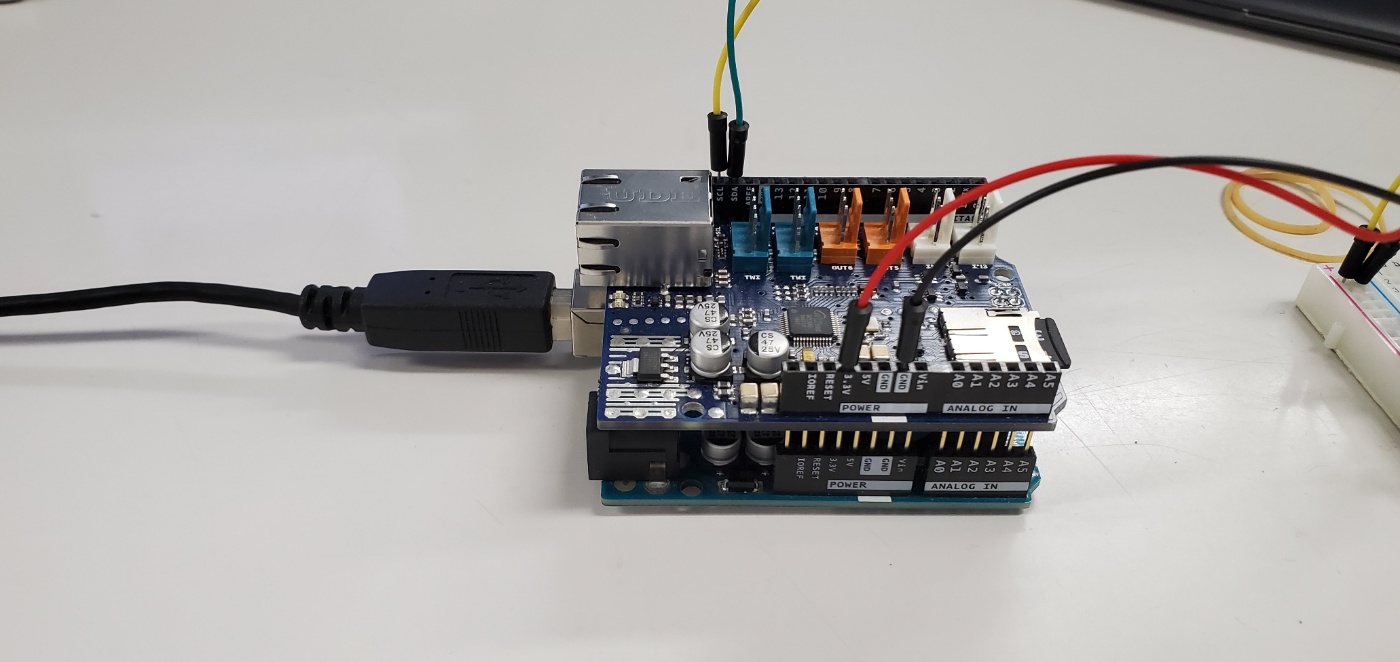
配線
「Arduino ETHERNET SHIELD」を使用します。これはArduinoの上側にはめ込むだけの様です。RTCと液晶の配線もそのまま付け替えて、ETHERNET SHIELDを付けてみました。
スケッチ例の解析
前回のRTCと同じく、何をどうすれば良いのやら。という事でスケッチ例を探します。
ありました、WebServerです。
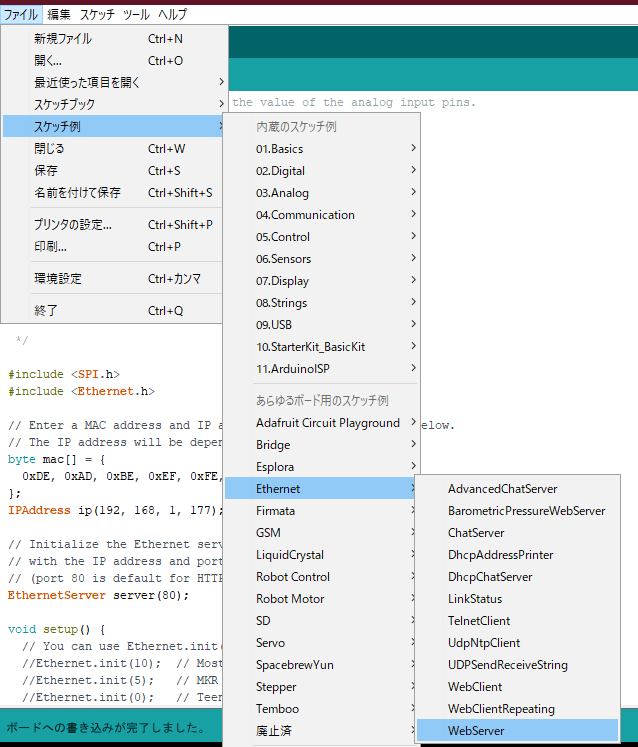
Serverですから、パソコンからの通信を待ち受けて時刻情報を受けて更新の土台になりそうです。
中身を見ると、そのものずばり「IPAddress」型のipという変数があり、IPアドレスっぽい数値を設定しています。試しにブラウザでこのIPアドレスを設定してみると、
http://192.168.1.177

なにやらアナログ入力の値を表示するみたいで、きちんと動作出来てるみたいです。
Setup関数の中身は初期設定なので、そのまま丸写しします。loop関数の中身を見ると、clientとの接続確認を実施した後は、client.printlnにてClientに送信するhttpを作成しているみたいです。簡単ですね。
ん、mac[]ってなんだ?macアドレスを変更出来るって事か?試しにコマンドプロンプトでarpコマンド使ってMACアドレスを調べてみたら、確かに192.168.1.177はMACアドレスが実装されたものとなっている様です。MACアドレスって簡単に変えられるんですね。
arp -a
結果

実装
#include <stdio.h>

//LCD
#include <Wire.h>
//RTC
#include <DS3232RTC.h>
//LAN
#include <Ethernet.h>

byte lcdAddress = 0x50;
char str[] = {"0000/00/00      00:00:00"};

//LAN
byte mac[] = {
  0xDE, 0xAD, 0xBE, 0xEF, 0xFE, 0xED
};
IPAddress ip(192, 168, 1, 177);
EthernetServer server(80);

//-----------------------------------------------
//  時刻の表示
//-----------------------------------------------
void rtc2lcd()
{
  char buffer[] = {"0000"};
  int value;

  //年を取得して文字列に代入
  value = year();
  itoa(value, buffer, 10);
  strncpy(str, buffer, 4);

  //月を取得して文字列に代入
  buffer[0] = '0';
  value = month();
  itoa(value, &buffer[1], 10);
  if(value > 9)
  {
    strncpy(&str[5], &buffer[1], 2);
  }else{
    strncpy(&str[5], buffer, 2);
  }

  //日を取得して文字列に代入
  value = day();
  itoa(value, &buffer[1], 10);
  if(value > 9)
  {
    strncpy(&str[8], &buffer[1], 2);
  }else{
    strncpy(&str[8], buffer, 2);
  }

  //時を取得して文字列に代入
  value = hour();
  itoa(value, &buffer[1], 10);
  if(value > 9)
  {
    strncpy(&str[16], &buffer[1], 2);
  }else{
    strncpy(&str[16], buffer, 2);
  }

  //分を取得して文字列に代入
  value = minute();
  itoa(value, &buffer[1], 10);
  if(value > 9)
  {
    strncpy(&str[19], &buffer[1], 2);
  }else{
    strncpy(&str[19], buffer, 2);
  }

  //秒を取得して文字列に代入
  value = second();
  itoa(value, &buffer[1], 10);
  if(value > 9)
  {
    strncpy(&str[22], &buffer[1], 2);
  }else{
    strncpy(&str[22], buffer, 2);
  }
  lcdWrite(str);                      //LCDに反映
}
//-----------------------------------------------
//  ACM1602NI初期化
//-----------------------------------------------
void lcdInit()
{
  i2cCmdWrite(0x01);    //Clear Display
  delay(5);
  i2cCmdWrite(0x38);    //Function Set
  delay(5);
  i2cCmdWrite(0x0c);    //Display ON/OFF Control
  delay(5);
  i2cCmdWrite(0x06);    //Entry Mode Set
  delay(5);
}
//-----------------------------------------------
//  文字列の書き出し
//-----------------------------------------------
void lcdWrite(char* str)
{
  int i;

  i2cCmdWrite(0x80);    //1行目の先頭にカーソルを移動
  delay(5);
  for(i = 0;i < 16;i++)
  {
    if(*str == '\0')break;
    i2cDataWrite(*str++);
    delay(5);
  }
  i2cCmdWrite(0xc0);    //2行目の先頭にカーソルを移動
  delay(5);
  for(i = 0;i < 16;i++)
  {
    if(*str == '\0')break;
    i2cDataWrite(*str++);
    delay(5);
  }
}
//-----------------------------------------------
//  I2CにてACM1602NIにコマンドを送信
//-----------------------------------------------
int i2cCmdWrite(byte cmd){
  Wire.beginTransmission(lcdAddress);
  Wire.write(0x00);
  Wire.write(cmd);
  return Wire.endTransmission();
}

//-----------------------------------------------
//  I2CにてACM1602NIに表示文字を送信
//-----------------------------------------------
int i2cDataWrite(byte data){
  Wire.beginTransmission(lcdAddress);
  Wire.write(0x80);
  Wire.write(data);
  return Wire.endTransmission();
}

//-----------------------------------------------
//  Main
//-----------------------------------------------
void setup() {
  // put your setup code here, to run once:
  //LCD
  Wire.begin();
  lcdInit();

  //RTC
  setSyncProvider(RTC.get);
  if(timeStatus() != timeSet)
        Serial.println("Unable to sync with the RTC");
    else
        Serial.println("RTC has set the system time");

  //LAN
  Ethernet.begin(mac, ip);
  if (Ethernet.hardwareStatus() == EthernetNoHardware) {
    Serial.println("Ethernet shield was not found.  Sorry, can't run without hardware. :(");
    while (true) {
      delay(1); // do nothing, no point running without Ethernet hardware
    }
  }
  if (Ethernet.linkStatus() == LinkOFF) {
    Serial.println("Ethernet cable is not connected.");
  }
  server.begin();
}

void loop() {
  // put your main code here, to run repeatedly:
  rtc2lcd();
  delay(1000);

  EthernetClient client = server.available();
  if (client) {
    Serial.println("new client");
    // an http request ends with a blank line
    boolean currentLineIsBlank = true;
    while (client.connected()) {
      if (client.available()) {
        char c = client.read();
        Serial.write(c);
        // if you've gotten to the end of the line (received a newline
        // character) and the line is blank, the http request has ended,
        // so you can send a reply
        if (c == '\n' && currentLineIsBlank) {
          // send a standard http response header
          client.println("HTTP/1.1 200 OK");
          client.println("Content-Type: text/html");
          client.println("Connection: close");  // the connection will be closed after completion of the response
          client.println("Refresh: 5");  // refresh the page automatically every 5 sec
          client.println();
          client.println("<!DOCTYPE HTML>");
          client.println("<html>");
          // output the value of each analog input pin
          for (int analogChannel = 0; analogChannel < 6; analogChannel++) {
            int sensorReading = analogRead(analogChannel);
            client.print("analog input ");
            client.print(analogChannel);
            client.print(" is ");
            client.print(sensorReading);
            client.println("<br />");
          }
          client.println("</html>");
          break;
        }
        if (c == '\n') {
          // you're starting a new line
          currentLineIsBlank = true;
        } else if (c != '\r') {
          // you've gotten a character on the current line
          currentLineIsBlank = false;
        }
      }
    }
    // give the web browser time to receive the data
    delay(1);
    // close the connection:
    client.stop();
  }
}
コメントでLANと記載している箇所以降が今回追加した分です。追加した箇所もサンプルのものそのままです。ライセンスとか大丈夫かな、問題ありならすぐに消しますので指摘下さい。
動作確認
シリアルモニタを見ると、起動直後の「Ethernet.linkStatus()」にて、LinkOFFを返している様で「Ethernet cable is not connected.」の表示が出ています。
でも、LAN通信は正常に出来ている様です。試しにloop()内に
Serial.println(Ethernet.linkStatus());
を記載すると、1を書き出しています。
linkStatusは接続状態を返す関数の様で、
Unknown
LinkON
LinkOFF
のどれかを返します。多分上から0の定義になっていると思われ、1を返すという事はLoop関数内では接続の認識の様です。という事で起動時にLinkOFF状態なのは放置とします。
残件
htmlにボタン付けて、現在時刻でRTCを更新したい。
Discussion