MySQLでDBサーバ構築してレプリケーションさせる
参考
① https://videohub.oracle.com/media/MySQL 8.0 入門セミナー ~インストール編 for Linux & アーキテクチャ編~ (2022年6月16日)/1_ph7s6hxj
②MySQL公式ドキュメント:https://dev.mysql.com/doc/refman/8.0/ja/linux-installation.html
1. MySQLを開始
1.1. リポジトリをダウンロード
この記事では、Oracle Linuxを使用している。
[opc@mysql-master1 ~]$ cat /etc/oracle-release
Oracle Linux Server release 8.6
yumリポジトリを利用する。 から、MySQLサーバのOSバージョンと合致したリポジトリをネットに接続可能な端末にダウンロードし、MySQLサーバに配置する。
画面左部の「Downloads」タブをクリックし切り替わった画面のMySQL Yum Repositoryをクリック。
すると、複数種類のリポジトリが表示されるので、利用するMySQLサーバのOSバージョンと合致したリポジトリを選択する必要がある。
[opc@mysql-master1 ~]$ cat /etc/oracle-release
Oracle Linux Server release 8.6
ダウンロードしたら、利用予定のMySQLサーバに転送する。
[root@mysql-master1 tmp]# ll
total 16
-rw-r--r--. 1 kiban kiban 14432 Jul 23 15:12 mysql80-community-release-el8-4.noarch.rpm
drwx------. 3 root  root     17 Jul 23 15:05 systemd-private-e967423d4c9e455a88d0cd2ee0f307be-chronyd.service-2MooXe
drwx------. 3 root  root     17 Jul 23 15:05 systemd-private-e967423d4c9e455a88d0cd2ee0f307be-unified-monitoring-agent.service-RX6Cai
drwxr-xr-x. 2 root  root      6 Jul 21 17:08 unified-monitoring-agent
以上
1.2. MySQLのインストール
先述の1.1節で配置したインストーラーを用いてインストール開始する。
まずはインストーラを解凍し、解凍が無事に完了したらちゃんと解凍されていることを確認も行う。
[root@mysql-master1 tmp]# rpm -Uvh mysql80-community-release-el8-4.noarch.rpm
warning: mysql80-community-release-el8-4.noarch.rpm: Header V4 RSA/SHA256 Signature, key ID 3a79bd29: NOKEY
Verifying...                          ################################# [100%]
Preparing...                          ################################# [100%]
Updating / installing...
   1:mysql80-community-release-el8-4  ################################# [100%]

[root@mysql-master1 tmp]# yum repolist enabled |grep 'mysql'
mysql-connectors-community       MySQL Connectors Community
mysql-tools-community            MySQL Tools Community
mysql80-community                MySQL 8.0 Community Server
RHEL8などLinux8ベースのOSの場合のみ同梱されているMySQLの無効化を行う。
[root@mysql-master1 tmp]# yum module disable mysql
MySQL 8.0 Community Server                                                            70 MB/s | 2.3 MB     00:00
MySQL Connectors Community                                                           5.8 MB/s |  74 kB     00:00
MySQL Tools Community                                                                 26 MB/s | 459 kB     00:00
Dependencies resolved.
=====================================================================================================================
 Package                    Architecture              Version                       Repository                  Size
=====================================================================================================================
Disabling modules:
 mysql

Transaction Summary
=====================================================================================================================

Is this ok [y/N]: y
Complete!
MySQLのインストールを実施。
[root@mysql-master1 tmp]# yum install mysql-community-server
Last metadata expiration check: 0:02:03 ago on Sat 23 Jul 2022 03:22:37 PM GMT.
Dependencies resolved.
=====================================================================================================================
 Package                                  Architecture     Version                 Repository                   Size
=====================================================================================================================
Installing:
 mysql-community-server                   x86_64           8.0.29-1.el8            mysql80-community            53 M
Installing dependencies:
 mysql-community-client                   x86_64           8.0.29-1.el8            mysql80-community            14 M
 mysql-community-client-plugins           x86_64           8.0.29-1.el8            mysql80-community           2.4 M
 mysql-community-common                   x86_64           8.0.29-1.el8            mysql80-community           636 k
 mysql-community-icu-data-files           x86_64           8.0.29-1.el8            mysql80-community           2.1 M
 mysql-community-libs                     x86_64           8.0.29-1.el8            mysql80-community           1.5 M

Transaction Summary
=====================================================================================================================
Install  6 Packages

Total download size: 74 M
Installed size: 347 M
Is this ok [y/N]: y
Downloading Packages:
(1/6): mysql-community-common-8.0.29-1.el8.x86_64.rpm                                 25 MB/s | 636 kB     00:00
(2/6): mysql-community-client-plugins-8.0.29-1.el8.x86_64.rpm                         62 MB/s | 2.4 MB     00:00
(3/6): mysql-community-icu-data-files-8.0.29-1.el8.x86_64.rpm                         76 MB/s | 2.1 MB     00:00
(4/6): mysql-community-libs-8.0.29-1.el8.x86_64.rpm                                   64 MB/s | 1.5 MB     00:00
(5/6): mysql-community-client-8.0.29-1.el8.x86_64.rpm                                 95 MB/s |  14 MB     00:00
(6/6): mysql-community-server-8.0.29-1.el8.x86_64.rpm                                 98 MB/s |  53 MB     00:00
---------------------------------------------------------------------------------------------------------------------
Total                                                                                123 MB/s |  74 MB     00:00
MySQL 8.0 Community Server                                                           3.0 MB/s | 3.1 kB     00:00
Importing GPG key 0x3A79BD29:
 Userid     : "MySQL Release Engineering <mysql-build@oss.oracle.com>"
 Fingerprint: 859B E8D7 C586 F538 430B 19C2 467B 942D 3A79 BD29
 From       : /etc/pki/rpm-gpg/RPM-GPG-KEY-mysql-2022
Is this ok [y/N]: y
Key imported successfully
MySQL 8.0 Community Server                                                           1.9 MB/s | 1.9 kB     00:00
Importing GPG key 0x5072E1F5:
 Userid     : "MySQL Release Engineering <mysql-build@oss.oracle.com>"
 Fingerprint: A4A9 4068 76FC BD3C 4567 70C8 8C71 8D3B 5072 E1F5
 From       : /etc/pki/rpm-gpg/RPM-GPG-KEY-mysql
Is this ok [y/N]: y
Key imported successfully
Running transaction check
Transaction check succeeded.
Running transaction test
Transaction test succeeded.
Running transaction
  Preparing        :                                                                                             1/1
  Installing       : mysql-community-common-8.0.29-1.el8.x86_64                                                  1/6
  Installing       : mysql-community-client-plugins-8.0.29-1.el8.x86_64                                          2/6
  Installing       : mysql-community-libs-8.0.29-1.el8.x86_64                                                    3/6
  Running scriptlet: mysql-community-libs-8.0.29-1.el8.x86_64                                                    3/6
  Installing       : mysql-community-client-8.0.29-1.el8.x86_64                                                  4/6
  Installing       : mysql-community-icu-data-files-8.0.29-1.el8.x86_64                                          5/6
  Running scriptlet: mysql-community-server-8.0.29-1.el8.x86_64                                                  6/6
  Installing       : mysql-community-server-8.0.29-1.el8.x86_64                                                  6/6
  Running scriptlet: mysql-community-server-8.0.29-1.el8.x86_64                                                  6/6
  Verifying        : mysql-community-client-8.0.29-1.el8.x86_64                                                  1/6
  Verifying        : mysql-community-client-plugins-8.0.29-1.el8.x86_64                                          2/6
  Verifying        : mysql-community-common-8.0.29-1.el8.x86_64                                                  3/6
  Verifying        : mysql-community-icu-data-files-8.0.29-1.el8.x86_64                                          4/6
  Verifying        : mysql-community-libs-8.0.29-1.el8.x86_64                                                    5/6
  Verifying        : mysql-community-server-8.0.29-1.el8.x86_64                                                  6/6

Installed:
  mysql-community-client-8.0.29-1.el8.x86_64            mysql-community-client-plugins-8.0.29-1.el8.x86_64
  mysql-community-common-8.0.29-1.el8.x86_64            mysql-community-icu-data-files-8.0.29-1.el8.x86_64
  mysql-community-libs-8.0.29-1.el8.x86_64              mysql-community-server-8.0.29-1.el8.x86_64

Complete!
最後まで進んでインストール完了したら、MySQLを起動させる。
まずはステータスの確認から。
[root@mysql-master1 tmp]# systemctl status mysqld
● mysqld.service - MySQL Server
   Loaded: loaded (/usr/lib/systemd/system/mysqld.service; enabled; vendor preset: disabled)
   Active: inactive (dead)
     Docs: man:mysqld(8)
           http://dev.mysql.com/doc/refman/en/using-systemd.html
インストールされており、サービスとしてenableとなっていることがわかる。
それでは起動させる。
[root@mysql-master1 tmp]# systemctl start mysqld

[root@mysql-master1 tmp]# systemctl status mysqld
● mysqld.service - MySQL Server
   Loaded: loaded (/usr/lib/systemd/system/mysqld.service; enabled; vendor preset: disabled)
   Active: active (running) since Sat 2022-07-23 15:45:02 GMT; 1min 29s ago
     Docs: man:mysqld(8)
           http://dev.mysql.com/doc/refman/en/using-systemd.html
  Process: 11752 ExecStartPre=/usr/bin/mysqld_pre_systemd (code=exited, status=0/SUCCESS)
 Main PID: 11834 (mysqld)
   Status: "Server is operational"
    Tasks: 37 (limit: 22765)
   Memory: 495.4M
   CGroup: /system.slice/mysqld.service
           mq11834 /usr/sbin/mysqld

Jul 23 15:44:56 mysql-master1 systemd[1]: Starting MySQL Server...
Jul 23 15:45:02 mysql-master1 systemd[1]: Started MySQL Server.
スタートさせた後は必ずステータスを確認して、起動していることを確認すること。
1.3 ログインしてパスワードを変更
rootユーザの初期パスワードはログに記載されているのでそこで確認し、自分の覚えやすいパスワードに変更していく。その後、他のユーザを作成してパスワード設定、権限設定を順次行う。
まずはrootユーザのパスワードを変更する。/var/log/mysql.logに記載されていることを確認。
[root@mysql-master1 log]# cat /var/log/mysqld.log
~
2022-07-23T15:44:59.597480Z 6 [Note] [MY-010454] [Server] A temporary password is generated for root@localhost: xCkVmf#Yd2ci
~
上記をみると、xCkVmf#Yd2ciが初期パスワードとして設定されていることがわかる。
ではログインして変更する。
[root@mysql-master1 log]# mysql -u root -p
Enter password:  ←ここにxCkVmf#Yd2ciを入力。表示はされないよ
~
mysql> alter user root@localhost identified by 'MyNewPass1!';
Query OK, 0 rows affected (0.00 sec)
mysql> exit
Bye
これでrootユーザのパスワードがMyNewPass4!に変更された。
再ログインしてみて、パスワード変更されたかを確認しておこう。
パスワード変更コマンドはいくつかあるので紹介する。
> set password for ユーザ名@ホスト名='任意password`;
現在ログインしてるユーザのパスワードを変更するには
> set password='任意passwword`;
ちなみに、パスワードポリシーはパスワード検証コンポーネントによって定義されている。これはデフォルトで有効になってる。内容は
mysql> SHOW VARIABLES LIKE 'validate_password%';
+--------------------------------------+--------+
| Variable_name                        | Value  |
+--------------------------------------+--------+
| validate_password.check_user_name    | ON     |
| validate_password.dictionary_file    |        |
| validate_password.length             | 8      |
| validate_password.mixed_case_count   | 1      |
| validate_password.number_count       | 1      |
| validate_password.policy             | MEDIUM |
| validate_password.special_char_count | 1      |
+--------------------------------------+--------+
7 rows in set (0.01 sec)
パスワード検証コンポーネントを無効化させるには
mysql> uninstall component 'file://component_validate_password';
Query OK, 0 rows affected (0.00 sec)
逆に有効化させるにはinstall component 'file://component_validate_password';を入力する。
2. MySQLアーキテクチャ

2.1 sampleデータ
サンプルデータをインストールする。 今回はworld databaseのzipファイルをローカルにダウンロードし、DBサーバに転送。zipファイルを解凍してからmysqlへインポートした。
$ unzip world-db.zip
$ cd world-db/
$ mysql -uroot -proomysqld < world.sql
これでインポート完了したので中身の確認をしてみる。
mysql> show databases;
+--------------------+
| Database           |
+--------------------+
| information_schema |
| mysql              |
| performance_schema |
| sys                |
| world              |
+--------------------+
5 rows in set (0.00 sec)

mysql> use world
Reading table information for completion of table and column names
You can turn off this feature to get a quicker startup with -A

Database changed
mysql> show tables;
+-----------------+
| Tables_in_world |
+-----------------+
| city            |
| country         |
| countrylanguage |
+-----------------+
3 rows in set (0.01 sec)
そのほかにも自分でテーブルを作成してみる。
mysql> create table `sample1` (
    -> `code` char(3) not null default '', `population` int(11) not null default '0', primary key (`code`))
    -> engine=InnoDB;
Query OK, 0 rows affected, 1 warning (0.02 sec)
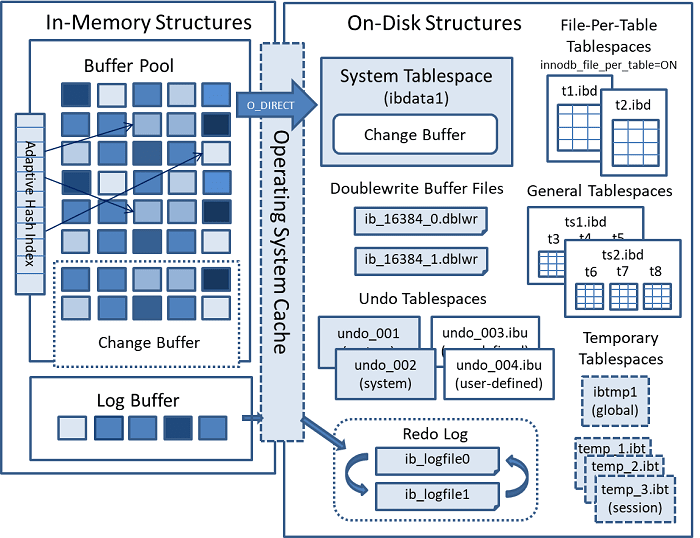
インポートしたデータはデフォルトでは/var/lib/mysqlに配置される。
[root@mysql-master1 mysql]# ll
total 189584
-rw-r-----. 1 mysql mysql       56 Jul 23 15:44  auto.cnf
-rw-r-----. 1 mysql mysql   736313 Jul 27 15:29  binlog.000001
-rw-r-----. 1 mysql mysql       16 Jul 23 15:45  binlog.index
-rw-------. 1 mysql mysql     1680 Jul 23 15:44  ca-key.pem
-rw-r--r--. 1 mysql mysql     1112 Jul 23 15:44  ca.pem
-rw-r--r--. 1 mysql mysql     1112 Jul 23 15:44  client-cert.pem
-rw-------. 1 mysql mysql     1676 Jul 23 15:44  client-key.pem
-rw-r-----. 1 mysql mysql   196608 Jul 27 15:31 '#ib_16384_0.dblwr'
-rw-r-----. 1 mysql mysql  8585216 Jul 23 15:44 '#ib_16384_1.dblwr'
-rw-r-----. 1 mysql mysql     5942 Jul 23 15:45  ib_buffer_pool
-rw-r-----. 1 mysql mysql 12582912 Jul 27 15:29  ibdata1 ←システムtableスペース
-rw-r-----. 1 mysql mysql 50331648 Jul 27 15:31  ib_logfile0 ←REDOログデータ
-rw-r-----. 1 mysql mysql 50331648 Jul 23 15:44  ib_logfile1 ←REDOログデータ
-rw-r-----. 1 mysql mysql 12582912 Jul 23 15:45  ibtmp1
drwxr-x---. 2 mysql mysql      187 Jul 23 15:45 '#innodb_temp'
drwxr-x---. 2 mysql mysql      143 Jul 23 15:44  mysql  ←この配下に一般ログやslowログがある
-rw-r-----. 1 mysql mysql 25165824 Jul 27 15:29  mysql.ibd
srwxrwxrwx. 1 mysql mysql        0 Jul 23 15:45  mysql.sock
-rw-------. 1 mysql mysql        6 Jul 23 15:45  mysql.sock.lock
drwxr-x---. 2 mysql mysql     8192 Jul 23 15:44  performance_schema
-rw-------. 1 mysql mysql     1680 Jul 23 15:44  private_key.pem
-rw-r--r--. 1 mysql mysql      452 Jul 23 15:44  public_key.pem
-rw-r--r--. 1 mysql mysql     1112 Jul 23 15:44  server-cert.pem
-rw-------. 1 mysql mysql     1676 Jul 23 15:44  server-key.pem
drwxr-x---. 2 mysql mysql       28 Jul 23 15:45  sys
-rw-r-----. 1 mysql mysql 16777216 Jul 27 15:29  undo_001
-rw-r-----. 1 mysql mysql 16777216 Jul 27 15:31  undo_002
drwxr-x---. 2 mysql mysql       87 Jul 27 15:29  world  ←インポートしたデータ
2.2 システム変数設定
MySQLサーバの設定はシステム変数で設定する。設定方法は、①my.cnfで設定した後に再起動を行う、②一時的な設定を行う(一部の変数しか設定変更できない)。
2.2.1 my.cnfで設定
設定ファイルは/etc/my.cnfが読み込まれることになっている。デフォルト設定を変更して任意のディレクトリに配置したmy.cnfを読み込ませたかったら以下を実施。複数ファイルを読み込んだら後勝ちになる。
$ mysqld --verbose --help
$ mysqld --defaults-file=/usr/local/mysql/date/my.cnf &
設定ファイルを変更したら基本的にはmysqlの再起動を行う。
2.2.2 一時的な設定
参考:https://dev.mysql.com/doc/refman/8.0/ja/server-system-variables.html
MySQLを再起動かけられないときなどは、my.cnfの編集なしに設定値を変更できる変数がある。ただし、一時的に設定変更しても、再起動やmy.cnfのリロードを行うと一時的な設定が元に戻る点に注意。
設定方法は以下で行える。設定はセッション単位(LOCAL)、サーバ全体(GLOBAL)での変更が可能。
> set [global|sesison] <変数> =<値>;
設定した値の確認方法は以下。
show [global|session] variables like '%<システム変数名>%';
実際に設定されてるシステム変数を一括で確認するには
$ mysqld --verbose --help
で確認できる。
一時的な設定変更を永続化させることができる。その場合は設定する際にpersistを付け加えればよい。
> set persist max_connections = 500;
システム変数を永続化オプションをつけて設定した場合はmy.cnfとの設定に差異がでる。そういった場合に設定変更履歴を確認するにはperformance_schemaを参照すること。
mysql> select * from performance_schema.variables_info where variable_source='persisted';
Empty set (0.00 sec)
2.2.3 システム変数例
nnodb_buffer_pool_sizeInno:DBバッファプールサイズ
innodb_log_buffer_sizeInno:DBログバッファのサイズ(メモリ上)
innodb_log_file_size:ログファイルのサイズ(ディスク上)
innodb_log_files_in_groups:ログファイルの数(デフォルト2)
binlog_expire_logs_seconds:バイナリログを削除するまでの期間を秒単位で指定。デフォルトは30日。
3. レプリケーション設定
レプリケーションの設定は4手順ある。
①レプリケーション用のパラメータを設定、
②マスター側にレプリケーションユーザ作成、
③マスター側のバックアップを取得し、スレーブ側にリストアする。そして、
④スレーブ側でレプリケーションのためにマスター情報やポジション情報を設定しレプリケーションをスタートさせる。
3.1 レプリケーション用のパラメータ設定
マスター側で設定するパラメータ
server-id
log_bin
datedir
gtid-mode
enforce-gtid-consistency = on
log-slave-updates
3.2 ソースサーバにレプリケーションユーザ作成
ソースサーバにレプリケーション用のユーザを作成して、そのユーザにレプリケーションスレーブ権限を付与させる。
mysql> create user repl@'10.1.%' identified by 'password';
Query OK, 0 rows affected (0.01 sec)

mysql> grant replication slave on *.* to repl@'10.1.%';
Query OK, 0 rows affected (0.00 sec)
replユーザがどこから接続可能にしたいのかによって、repl@'10.1.%'の書き方は変わってくる。localhostにするとほかのサーバがreplユーザでアクセスできないので注意。ユーザを作成したらパスワードの設定も忘れずに。
設定が完了したら、想定通りの挙動になっているかの確認を行う。
まずはマスター側でユーザの確認。
mysql> SELECT user, host, plugin FROM mysql.user;
+------------------+-----------+-----------------------+
| user             | host      | plugin                |
+------------------+-----------+-----------------------+
| repl             | 10.1.%    | caching_sha2_password |
| mysql.infoschema | localhost | caching_sha2_password |
| mysql.session    | localhost | caching_sha2_password |
| mysql.sys        | localhost | caching_sha2_password |
| root             | localhost | caching_sha2_password |
+------------------+-----------+-----------------------+
5 rows in set (0.00 sec)
replユーザのhostが10.1.%になっていることを確認。つまり、localhostに設定されていないので、①マスター側で接続を試みてもログインできないが②スレーブサーバからはログインできるということになる。確認しよう。
①
[kiban@mysql-master1 ~]$ mysql -urepl -p
Enter password:
ERROR 1045 (28000): Access denied for user 'repl'@'localhost' (using password: YES)
②
mysql -h10.1.2.148 -urepl -p
Enter password:
mysql>
①②を通じて、想定通りの設定が行われたことが確認できた。
3.3 dump出力
元から入ってるデータベース(システムデータベース)はレプリケーションされないので、それ以外(今回でいえばworld)だけエクスポートする。
mysql> show databases;
+--------------------+
| Database           |
+--------------------+
| information_schema |
| mysql              |
| performance_schema |
| sys                |
| world              |   ←これが出力対象
+--------------------+
以下でエクスポートする。
mysqldump -uroot -p<パスワード入力> --master-data=2 --socket=/var/lib/mysql/mysql.sock --hex-blob --flush-logs --default-character-set=utf8mb4 --databases world --single-transaction --triggers --routines --events > mysql_bkup_dump_20220807.sql
出力されたダンプをレプリカサーバに転送して、インポートさせる。
mysql -hlocalhost -uroot -roomysqld < mysql_bkup_dump_20220807.sql
インポート完了したらm、mysqlサーバにログインしてworldデータベースが存在することを確認する。
mysql> show databases;
+--------------------+
| Database           |
+--------------------+
| information_schema |
| mysql              |
| performance_schema |
| sys                |
| world              |
+--------------------+
5 rows in set (0.00 sec)
あることがわかった。
【重要】
レプリカサーバ側で。datedir配下にあるauto.cnfを削除する。
3.4 レプリケーション情報のセット
レプリカサーバ側でレプリケーションを行うための情報として、ソースサーバの情報をセットする。
まずはマスター側の情報を取得する。
mysql> show master status;
+-------------------------+----------+--------------+------------------+-------------------+
| File                    | Position | Binlog_Do_DB | Binlog_Ignore_DB | Executed_Gtid_Set |
+-------------------------+----------+--------------+------------------+-------------------+
| master-mysql-bin.000006 |      157 |              |                  |                   |
+-------------------------+----------+--------------+------------------+-------------------+
1 row in set (0.00 sec)
続いて、上記の情報をもとにスレーブ側で情報をセット。
mysql> change master to master_host='<マスターサーバのIPアドレス>',
    -> master_user='repl',
    -> master_password='<replユーザのpassword>',
    -> master_log_file='master-mysql-bin.000006',
    -> master_log_pos=157;
Query OK, 0 rows affected, 8 warnings (0.02 sec)
セットが完了したら、想定通りの設定がされているかをスレーブ側で確認。
mysql> show slave status\G
*************************** 1. row ***************************
               Slave_IO_State:
                  Master_Host: <マスターサーバのIPアドレス>
                  Master_User: repl
                  Master_Port: 3306
                Connect_Retry: 60
              Master_Log_File: master-mysql-bin.000006
          Read_Master_Log_Pos: 157
               Relay_Log_File: mysql-slave1-relay-bin.000001
                Relay_Log_Pos: 4
        Relay_Master_Log_File: master-mysql-bin.000006
             Slave_IO_Running: No
            Slave_SQL_Running: No
              Replicate_Do_DB:
          Replicate_Ignore_DB:
           Replicate_Do_Table:
       Replicate_Ignore_Table:
      Replicate_Wild_Do_Table:
  Replicate_Wild_Ignore_Table:
                   Last_Errno: 0
                   Last_Error:
                 Skip_Counter: 0
          Exec_Master_Log_Pos: 157
              Relay_Log_Space: 157
              Until_Condition: None
               Until_Log_File:
                Until_Log_Pos: 0
           Master_SSL_Allowed: No
           Master_SSL_CA_File:
           Master_SSL_CA_Path:
              Master_SSL_Cert:
            Master_SSL_Cipher:
               Master_SSL_Key:
        Seconds_Behind_Master: NULL
Master_SSL_Verify_Server_Cert: No
                Last_IO_Errno: 0
                Last_IO_Error:
               Last_SQL_Errno: 0
               Last_SQL_Error:
  Replicate_Ignore_Server_Ids:
             Master_Server_Id: 0
                  Master_UUID:
             Master_Info_File: mysql.slave_master_info
                    SQL_Delay: 0
          SQL_Remaining_Delay: NULL
      Slave_SQL_Running_State:
           Master_Retry_Count: 86400
                  Master_Bind:
      Last_IO_Error_Timestamp:
     Last_SQL_Error_Timestamp:
               Master_SSL_Crl:
           Master_SSL_Crlpath:
           Retrieved_Gtid_Set:
            Executed_Gtid_Set:
                Auto_Position: 0
         Replicate_Rewrite_DB:
                 Channel_Name:
           Master_TLS_Version:
       Master_public_key_path:
        Get_master_public_key: 0
            Network_Namespace:
1 row in set, 1 warning (0.00 sec)
設定が想定通りになっていることが確認できたので、いよいよレプリケーションを始める。
mysql> start slave;
Query OK, 0 rows affected, 1 warning (0.01 sec)
レプリケーションを開始すると、slaveのステータスを再度確認する。
mysql> show slave status\G
*************************** 1. row ***************************
               Slave_IO_State: Connecting to source
                  Master_Host: 10.1.2.148
                  Master_User: repl
                  Master_Port: 3306
                Connect_Retry: 60
              Master_Log_File: master-mysql-bin.000006
          Read_Master_Log_Pos: 157
               Relay_Log_File: mysql-slave1-relay-bin.000001
                Relay_Log_Pos: 4
        Relay_Master_Log_File: master-mysql-bin.000006
             Slave_IO_Running: Connecting
            Slave_SQL_Running: Yes
              Replicate_Do_DB:
          Replicate_Ignore_DB:
           Replicate_Do_Table:
       Replicate_Ignore_Table:
      Replicate_Wild_Do_Table:
  Replicate_Wild_Ignore_Table:
                   Last_Errno: 0
                   Last_Error:
                 Skip_Counter: 0
          Exec_Master_Log_Pos: 157
              Relay_Log_Space: 157
              Until_Condition: None
               Until_Log_File:
                Until_Log_Pos: 0
           Master_SSL_Allowed: No
           Master_SSL_CA_File:
           Master_SSL_CA_Path:
              Master_SSL_Cert:
            Master_SSL_Cipher:
               Master_SSL_Key:
        Seconds_Behind_Master: NULL
Master_SSL_Verify_Server_Cert: No
                Last_IO_Errno: 2003
                Last_IO_Error: error connecting to master 'repl@10.1.2.148:3306' - retry-time: 60 retries: 1 message: Can't connect to MySQL server on '10.1.2.148:3306' (110)
               Last_SQL_Errno: 0
               Last_SQL_Error:
  Replicate_Ignore_Server_Ids:
             Master_Server_Id: 0
                  Master_UUID:
             Master_Info_File: mysql.slave_master_info
                    SQL_Delay: 0
          SQL_Remaining_Delay: NULL
      Slave_SQL_Running_State: Replica has read all relay log; waiting for more updates
           Master_Retry_Count: 86400
                  Master_Bind:
      Last_IO_Error_Timestamp: 220806 21:33:27
     Last_SQL_Error_Timestamp:
               Master_SSL_Crl:
           Master_SSL_Crlpath:
           Retrieved_Gtid_Set:
            Executed_Gtid_Set:
                Auto_Position: 0
         Replicate_Rewrite_DB:
                 Channel_Name:
           Master_TLS_Version:
       Master_public_key_path:
        Get_master_public_key: 0
            Network_Namespace:
1 row in set, 1 warning (0.00 sec)
本来なら、マスターサーバのバイナリログを取り込んでリレーログにするSlave_IO_Runningと、取り込まれたリレーログからイベントを取り出してデータベースに反映させるSlave_SQL_RunningのステータスがともにYESになるはずである。しかし、Slave_IO_RunningがConnectingになっている。
そこで、スレーブサーバからマスターサーバの3306番ポートへ接続できるか確認するためにnc -vz マスターのIP 3306 を実行したところ、接続できなかった。
$ nc -vz 10.1.2.58 3306
Ncat: Version 7.70 ( https://nmap.org/ncat )
Ncat: No route to host.
ネットワーク設定に問題がないことは確認済みなので、サーバのfierwall設定を行う。
# firewall-cmd --zone=public --add-port=3306/tcp --permanet
# firewall-cmd --reload

# nc -vz 10.1.2.58 3306
Ncat: Version 7.70 ( https://nmap.org/ncat )
Ncat: Connected to 10.1.2.58:3306.
Ncat: 0 bytes sent, 0 bytes received in 0.01 seconds.
3306番ポートへ接続できることを確認。
スレーブのステータスを確認すると、
Slave_IO_Running: Yes
となってた。
レプリケーションされてることが確認できたので、マスター側で変更したデータがスレーブ側に連携されるかテストする。
まずはマスター側でスキーマ作成。
mysql> show databases;
+--------------------+
| Database           |
+--------------------+
| information_schema |
| mysql              |
| performance_schema |
| sys                |
| world              |
+--------------------+
5 rows in set (0.01 sec)

mysql> create database test1;
Query OK, 1 row affected (0.00 sec)

mysql> show databases;
+--------------------+
| Database           |
+--------------------+
| information_schema |
| mysql              |
| performance_schema |
| sys                |
| test1              |
| world              |
+--------------------+
6 rows in set (0.00 sec)
続いて、スレーブ側でtest1スキーマが作成されていることを確認。
mysql> show databases;
+--------------------+
| Database           |
+--------------------+
| information_schema |
| mysql              |
| performance_schema |
| sys                |
| test1              |
| world              |
+--------------------+
6 rows in set (0.00 sec)
ちゃんと作成されていた。
これでレプリケーションが正常にされていることがわかった。
4.MySQLチューニング
4.1
innodb_log_file_sizeログファイルのサイズ(ディスク上)。innodb_buffer_pool_sizeの25~100%ぐらい。


Discussion