Unity WebGL アプリケーションをローカル環境で動作させつつ、FastAPI を使用して Redis とデータ通信を行う環境を構築する手順
1. システム構成図
[ Unity WebGL ] <-> [ Nginx ] <-> [ FastAPI ] <-> [ Redis ]
- Unity WebGL: クライアントアプリケーション(Webブラウザで動作)
- Nginx: Unity WebGL の静的コンテンツをホスト
- FastAPI: Web API サーバー(データ通信)
- Redis: FastAPI からのデータを保存・取得するためのデータベース
FastAPI 公式サイト: https://fastapi.tiangolo.com/
Unity WebGL 公式ドキュメント: https://docs.unity3d.com/Manual/webgl-gettingstarted.html
2. 環境構築手順
フォルダ構成図
/project-root
├── api/                # FastAPI のバックエンド
│   ├── app.py         # FastAPI メインアプリケーション
│   ├── Dockerfile     # FastAPI の Docker 設定
│   ├── requirements.txt  # Python ライブラリ定義
│
├── build/              # Unity WebGL ビルドフォルダ
│   ├── WebGL/         # UnityのWebGL ビルドファイル
│       ├── Build/
│       ├── StreamingAssets/
│       ├── TemplateData/
│       ├── index.html
│
├── docker/             # Docker 関連設定
│   ├── nginx.conf     # Nginx の設定ファイル
│
├── docker-compose.yml  # Docker Compose 設定ファイル
├── Dockerfile          # Nginx の Docker 設定
Step 1: FastAPI サーバーの準備
1. api/app.py
from fastapi import FastAPI
from fastapi.middleware.cors import CORSMiddleware
import redis
import os

app = FastAPI()

app.add_middleware(
    CORSMiddleware,
    allow_origins=["http://localhost:8080"],
    allow_credentials=True,
    allow_methods=["*"],
    allow_headers=["*"],
)

REDIS_HOST = os.getenv("REDIS_HOST", "localhost")
REDIS_PORT = int(os.getenv("REDIS_PORT", 6379))

redis_client = redis.StrictRedis(host=REDIS_HOST, port=REDIS_PORT, decode_responses=True)

@app.get("/")
def read_root():
    return {"message": "Redis FastAPI Server Running!"}

@app.post("/set/{key}")
def set_value(key: str, value: str):
    redis_client.set(key, value)
    return {"message": f"Set {key} = {value}"}

@app.get("/get/{key}")
def get_value(key: str):
    value = redis_client.get(key)
    return {"key": key, "value": value}
2.api/Dockerfile(FastAPIのDocker設定)
# Python 3.9の公式イメージを使用
FROM python:3.9

# 作業ディレクトリを設定
WORKDIR /app

# 必要なライブラリをインストール
COPY requirements.txt .
RUN pip install --no-cache-dir -r requirements.txt

# アプリケーションのソースコードをコピー
COPY . .

# FastAPIサーバーを起動(Uvicornを使用)
CMD ["uvicorn", "app:app", "--host", "0.0.0.0", "--port", "5000"]
3.api/requirements.txt(FastAPIの依存関係)
fastapi
uvicorn
redis
Step 2 Nginxの設定
1.docker/nginx.conf(Nginxの設定)
server {
    listen 80;
    server_name localhost;

    root /usr/share/nginx/html;
    index index.html;

    # WebGLのルートパス設定
    location / {
        try_files $uri /index.html;
    }

    # WebAssembly(.wasm)のMIMEタイプ設定
    location ~* \.wasm$ {
        types { application/wasm wasm; }
        default_type application/wasm;
        add_header Cache-Control "public, max-age=31536000, immutable";
        add_header Access-Control-Allow-Origin *;
    }

    # JavaScript(.js)のMIMEタイプ設定
    location ~* \.js$ {
        types { application/javascript js; }
        default_type application/javascript;
        add_header Cache-Control "public, max-age=31536000, immutable";
        add_header Access-Control-Allow-Origin *;
    }

    # WebGLのビルドキャッシュ設定
    location /Build/ {
        add_header Cache-Control "public, max-age=31536000, immutable";
    }
}
2. Dockerfile(NginxのDocker設定)
# Nginxの公式イメージを使用
FROM nginx:latest

# Nginxの設定ファイルをコピー
COPY ./docker/nginx.conf /etc/nginx/conf.d/default.conf

# WebGLビルド済みファイルをNginxの公開ディレクトリにコピー
COPY ./build/WebGL /usr/share/nginx/html
Step 3: Docker Compose の設定
docker-compose.yml
services:
  # Unity WebGLを配信するNginxコンテナ
  webgl:
    build: .
    ports:
      - "8080:80"
    volumes:
      - ./build/WebGL:/usr/share/nginx/html
      - ./docker/nginx.conf:/etc/nginx/conf.d/default.conf
    restart: always

  # Redisコンテナ(データベース)
  redis:
    image: "redis:latest"
    container_name: redis
    ports:
      - "6379:6379"
    volumes:
      - redis_data:/data

  # FastAPIサーバー
  api:
    build: ./api
    container_name: fastapi-server
    ports:
      - "5000:5000"
    depends_on:
      - redis
    environment:
      - REDIS_HOST=redis
      - REDIS_PORT=6379

volumes:
  redis_data:
Step 4: 環境の起動
docker-compose up -d --build
これで以下のサービスが起動します。
-
http://localhost:8080→ Unity WebGL -
http://localhost:5000→ FastAPI - Redis は内部で動作
Step 5: 動作確認
FastAPI 動作確認
curl http://localhost:5000/
レスポンス:
{"message": "Redis FastAPI Server Running!"}
データの保存と取得
curl -X POST "http://localhost:5000/set/test_key" -d "value=test_value"
curl "http://localhost:5000/get/test_key"
レスポンス:
{"key": "test_key", "value": "test_value"}
Step 6: Unity WebGL との連携
Unity の C# コード (APIManager.cs)
以下をhierarchyの適当なオブジェクトにアタッチします。
using UnityEngine;
using UnityEngine.Networking;
using System.Collections;

public class APIManager : MonoBehaviour
{
    private string apiUrl = "http://localhost:5000/get/test_key";

    IEnumerator GetData()
    {
        UnityWebRequest request = UnityWebRequest.Get(apiUrl);
        yield return request.SendWebRequest();

        if (request.result == UnityWebRequest.Result.Success)
        {
            Debug.Log("Response: " + request.downloadHandler.text);
        }
        else
        {
            Debug.LogError("Error: " + request.error);
        }
    }

    void Start()
    {
        StartCoroutine(GetData());
    }
}
Unityのビルドファイルについて
Unityでのビルド時の操作について説明します。
-
File>Build Settingを開く -
PlatformからWebGLを選択し、Switch Platformをクリックする。 -
PlayerSettings...をクリック -
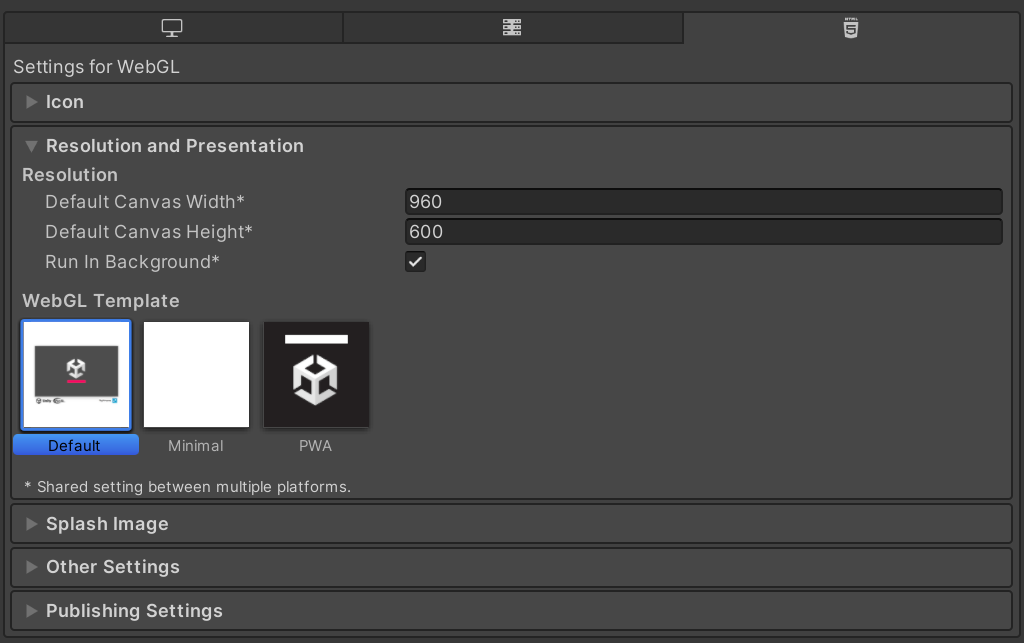
Resolusion and Presentation>WebGL TemplateをDefaultに設定する。
-
Publishiing Settings>Compression FormatをDisabledに設定する。

-
BuildSettingsに戻り、Buildをクリックする。 - ビルドしたファイルを出力したい任意のフォルダを選択する(今回はWebGLフォルダ)
- 出力されたファイルをそのまま
/project-root/build/WebGL内に移動する。
Unity WebGL 動作確認
- ブラウザ(GoogleChrome等推奨)から
http://localhost:8080にアクセスします。 - F12を押して、Consoleを確認。(Debug.Logはここに出力される。)
- 以下のレスポンスが出ていれば成功。
レスポンス:
Response: {"key": "test_key", "value": "test_value"}
3. まとめ
本記事では、Unity WebGL、FastAPI、Redis を連携させる環境を構築しました。
この環境をベースに、さらに認証機能やデータベース接続を追加することで、実際のプロジェクトに活用できます。

株式会社ラグザイア(luxiar.com)の技術広報ブログです。 ラグザイアはRuby on RailsとC#に特化した町田の受託開発企業です。フルリモートでの開発を積極的に推進しており、全国からの参加を可能にしています。柔軟な働き方で最新のソフトウェアソリューションを提供します。
Discussion