はじめに
AWS アカウントに対する海外からの不正アクセスをお手頃な価格で監査できるようにしたい
という想いで OpenSearch Serverless [1]と OpenSearch Ingestion [2]を試してみました。
この仕組みに期待したのはコストです。
SIEM のようなリアルタイム性のある監視ではなく、たまにチェックする環境とすることで OpenSearch にかかるコストを抑えられないかが検討のポイントでした。
本ブログは、その際の構築手順と検証結果(主にコスト)をまとめたものになります。

前提
・AWS アカウントの不正アクセスを監査するために CloudTrail 管理イベントを利用します
・CloudTrail 証跡は logs-123456789012/CloudTrail/AWSLogs/123456789012 配下にあります
・S3 バケットに出力されている CloudTrail を毎晩バッチで OpenSearch に取り込みます
・OpenSearch に取り込まれたログは週次でチェックすることを想定しています
システム構成のポイント
・対象 AWS アカウント の CloudTrail を Log-Archive アカウントの S3 バケットに集約します
・OpenSearch Serverless のコレクションは時系列タイプでパブリックアクセス可とします
・海外のアクセスを識別するため OpenSearch Ingestion の Geoip Processor [3]を利用します

全体構成図
先に結論ですが...
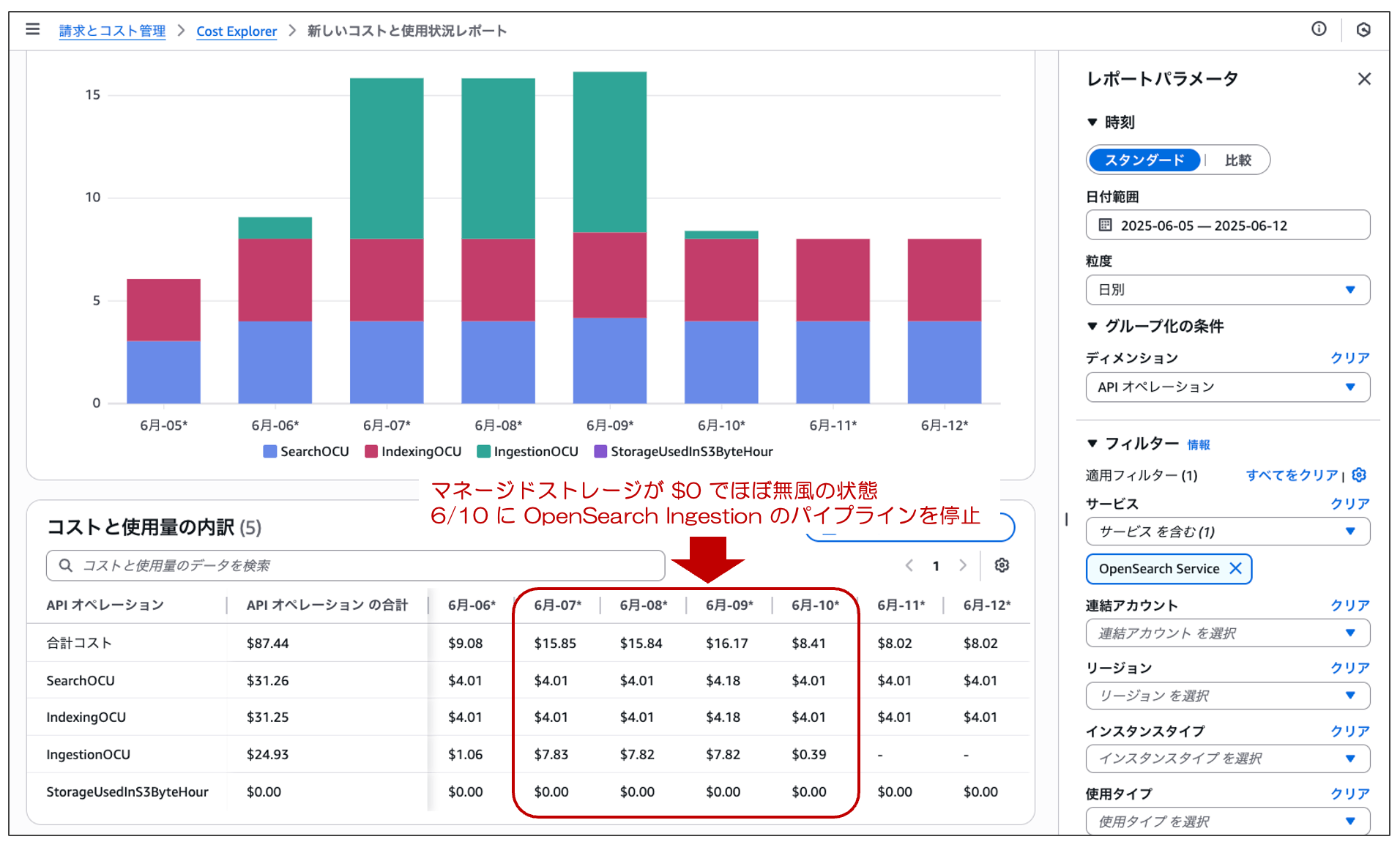
構築前に OpenSearch Service の料金表を確認した上で構築していましたが、構築後に AWS Cost Explorer を見て認識を違えていたことに気がつきました。
【参考】
・Amazon OpenSearch Service の料金
OpenSearch Service Serverless の料金
OpenSearch Service Serverless の料金は、以下の 3 つの要素で料金が決まります。

OpenSearch Service Serverless の料金
データの取り込み(インデックス作成)やデータの参照(検索とクエリ)をしなければ、マネージドストレージ(S3 標準の料金とほぼ同等)しかかからないと勘違いしていました。
料金ページやデベロッパーガイド [4]に下記記載があることに気がつきました。
コレクションを作成し、冗長アクティブレプリカを有効にすると、取り込み用に 1 OCUs (0.5 OCU x 2)、検索用に 1 OCU (0.5 OCU x 2) 以上の料金が請求されます。冗長アクティブレプリカを無効にすると、アカウントの最初のコレクションに対して最低 1 OCU (0.5 OCU x 2) の料金が請求されます。後続のすべてのコレクションは、これらの OCU を共有できます。
つまり、取り込んだログデータを冗長化しない場合、ログ取り込みと検索を一切行わない無風状態でも毎月 34,870円はかかり続けることになります。
【計算式】
・1 OCU $0.334 × 24h × 30日 × ¥145換算 = ¥34,870/月
OpenSearch Service Ingestion の料金
次に OpenSearch Service Ingestion の料金ですが、取り込みに使った OCU がかかります。

OpenSearch Service Ingestion の料金
24 時間 / 回のバッチ処理であれば、そこまで OCU を消費しないと勘違いしていましたが、こちらも Serverless 同様に料金ページやデベロッパーガイド [5]に下記記載がありました。
パイプラインを流れるデータがあるかどうかにかかわらず、特定の時点で、パイプラインに割り当てられた Ingestion OCU の数に基づく料金のみをお支払いいただきます。
OpenSearch Ingestion のパイプラインはスケールイン・アウトできるように最小・最大の OCU 数が指定できます。つまり、最低でも 1 OCU は動き続けることになります。

OpenSearch Ingestion のメトリックス
よって、バッチ取り込みでも毎月 34,035円はかかり続けることになります。
【計算式】
・1 OCU $0.326 × 24h × 30日 × ¥145換算 = ¥34,035/月
最低限かかる OpenSearch Service の料金
以上のことから、利用頻度が低くくても最低でも毎月 68,905 円はかかります。
Cost Explorer で見た OpenSearch service の実コスト
この料金にプラスでログの取り込み、毎週の OpenSearch Dashboard での監査によるクエリ、取り込んだログのマネージドストレージなどにかかる費用が加わるため、ログ量によりますが、毎月 10 万円以上は覚悟しておく必要がありそうです。
それなら小さいインスタンスで OpenSearch ドメインを立てるか、EC2 インスタンスで構築したほうがコストメリットは大きそうです。当然、バージョンアップやパッチ適用、インフラ監視などの運用負荷がかかるため、そのコストは考える必要がありますが。。
以降はせっかく環境構築したので、その際の手順をまとめておきました。
環境構築
以下、構築手順になります。
- OpenSearch Serverless コレクションの作成
1-1. セキュリティポリシー(暗号化)の作成
1-2. セキュリティポリシー(ネットワーク)の作成
1-3. セキュリティポリシー(データアクセス)の作成
1-4. コレクションの作成 - OpenSearch Ingestion パイプラインの作成
2-1. パイプライン用 IAM ロールの作成
2-2. セキュリティポリシー(データアクセス)の更新
2-3. パイプラインの作成 - OpenSearch Dashboard の確認
3-1. Index Pattern の作成
3-2. Discover の設定
1. OpenSearch Serverless コレクションの作成
コレクションに割り当てる 3 つのセキュリティポリシーを作成後、コレクションを作成します。
1-1. セキュリティポリシー(暗号化)の作成
まずは暗号化用のセキュリティポリシーを作成します。
AWS が所有するキーを使ってデータの暗号化をするように設定します。
CloudShell を起動し、sudo su -コマンドで root ユーザーに昇格します。
下記操作で encryption-policy.json を作成します。
cat > encryption-policy.json << 'EOF'
{
    "Rules": [
        {
            "Resource": [
                "collection/sec-log-auditor"
            ],
            "ResourceType": "collection"
        }
    ],
    "AWSOwnedKey": true
}
EOF
上記ファイルを用いてセキュリティポリシー(sec-log-auditor-encryption)を作成します。
aws opensearchserverless create-security-policy \
    --name sec-log-auditor-encryption \
    --type encryption \
    --policy file://encryption-policy.json
1-2. セキュリティポリシー(ネットワーク)の作成
次はネットワークアクセス用のセキュリティポリシーを作成します。
今回はアクセスの種類をパブリックとします。
下記操作で network-policy.json を作成します。
cat > network-policy.json << 'EOF'
[
    {
        "Rules": [
            {
                "Resource": [
                    "collection/sec-log-auditor"
                ],
                "ResourceType": "collection"
            },
            {
                "Resource": [
                    "collection/sec-log-auditor"
                ],
                "ResourceType": "dashboard"
            }
        ],
        "AllowFromPublic": true
    }
]
EOF
上記ファイルを用いてセキュリティポリシー(sec-log-auditor-network)を作成します。
aws opensearchserverless create-security-policy \
    --name sec-log-auditor-network \
    --type network \
    --policy file://network-policy.json
1-3. セキュリティポリシー(データアクセス)の作成
最後はデータアクセス用のセキュリティポリシーを作成します。
今回は IAM ユーザー(h_hibino) にコレクションの持つデータへのアクセス権を付与します。
下記操作で data-access-policy.json を作成します。
cat > data-access-policy.json << 'EOF'
[
    {
        "Rules": [
            {
                "Resource": [
                    "collection/sec-log-auditor"
                ],
                "Permission": [
                    "aoss:CreateCollectionItems",
                    "aoss:DeleteCollectionItems",
                    "aoss:UpdateCollectionItems",
                    "aoss:DescribeCollectionItems"
                ],
                "ResourceType": "collection"
            }
        ],
        "Principal": [
            "arn:aws:iam::123456789012:user/h_hibino"
        ],
        "Description": "Data access policy for sec-log-auditor collection"
    }
]
EOF
上記ファイルを用いてセキュリティポリシー(sec-log-auditor-access)を作成します。
aws opensearchserverless create-access-policy \
    --name sec-log-auditor-access \
    --type data \
    --policy file://data-access-policy.json
1-4. コレクションの作成
OpenSearch Serverless のコレクションを作成します。
コレクション名はセキュリティポリシーに記載した名前(sec-log-auditor)とします。
コレクションタイプは時系列(TIMESERIES)を指定します。
aws opensearchserverless create-collection \
    --name sec-log-auditor \
    --type TIMESERIES \
    --description "Security log auditor collection for time series data"
2. OpenSearch Ingestion パイプラインの作成
S3 に保存された CloudTrail を加工してコレクションに投入するパイプラインを作成します。
2-1. パイプライン用 IAM ロールの作成
パイプラインに割り当てる IAM ロールとそのロールに割り当てる IAM ポリシーを作成します。
パイプライン用 IAM ロールの信頼ポリシー(pipeline-trust-policy.json)を作成します。
cat > pipeline-trust-policy.json << 'EOF'
{
    "Version": "2012-10-17",
    "Statement": [
        {
            "Effect": "Allow",
            "Principal": {
                "Service": "osis-pipelines.amazonaws.com"
            },
            "Action": "sts:AssumeRole"
        }
    ]
}
EOF
パイプライン用 IAM ロール(OpenSearchIngestionPipelineRole)を作成します。
aws iam create-role \
    --role-name OpenSearchIngestionPipelineRole \
    --assume-role-policy-document file://pipeline-trust-policy.json \
    --description "Role for OpenSearch Ingestion Pipeline"
S3 からデータを読み取るためのポリシー(s3-access-policy.json)を作成します。
cat > s3-access-policy.json << 'EOF'
{
    "Version": "2012-10-17",
    "Statement": [
        {
            "Effect": "Allow",
            "Action": [
                "s3:GetObject",
                "s3:ListBucket"
            ],
            "Resource": [
                "arn:aws:s3:::logs-123456789012",
                "arn:aws:s3:::logs-123456789012/CloudTrail/*"
            ]
        }
    ]
}
EOF
上記ファイルを用いて S3 アクセス用 IAM ポリシー(OpenSearchIngestionS3Policy)を作成します。
aws iam create-policy \
    --policy-name OpenSearchIngestionS3Policy \
    --policy-document file://s3-access-policy.json \
    --description "S3 access policy for OpenSearch Ingestion"
コレクションにデータを投入するためのポリシー(opensearch-access-policy.json)を作成します。
cat > opensearch-access-policy.json << 'EOF'
{
    "Version": "2012-10-17",
    "Statement": [
        {
            "Effect": "Allow",
            "Action": [
                "aoss:APIAccessAll",
                "aoss:BatchGetCollection",
                "aoss:CreateSecurityPolicy",
                "aoss:GetSecurityPolicy",
                "aoss:UpdateSecurityPolicy"
            ],
            "Resource": "*"
        }
    ]
}
EOF
上記ファイルを用いて OpenSearch Serverless アクセス用 IAM ポリシー(OpenSearchIngestionOSSPolicy)を作成します。
aws iam create-policy \
    --policy-name OpenSearchIngestionOSSPolicy \
    --policy-document file://opensearch-access-policy.json \
    --description "OpenSearch Serverless access policy for ingestion"
作成した 2 つの IAM ポリシーを IAM ロール(OpenSearchIngestionPipelineRole)に割り当てます。
aws iam attach-role-policy \
    --role-name OpenSearchIngestionPipelineRole \
    --policy-arn arn:aws:iam::123456789012:policy/OpenSearchIngestionS3Policy

aws iam attach-role-policy \
    --role-name OpenSearchIngestionPipelineRole \
    --policy-arn arn:aws:iam::123456789012:policy/OpenSearchIngestionOSSPolicy
2-2. セキュリティポリシー(データアクセス)の更新
パイプラインからのインデックス作成およびユーザーによるデータ検索操作のため、前手順で作成したデータアクセス用のセキュリティポリシーを更新します。
下記操作でセキュリティポリシー(updated-data-access-policy.json)を作成します。
cat > updated-data-access-policy.json << 'EOF'
[
    {
        "Rules": [
            {
                "Resource": [
                    "collection/sec-log-auditor"
                ],
                "Permission": [
                    "aoss:CreateCollectionItems",
                    "aoss:DeleteCollectionItems",
                    "aoss:UpdateCollectionItems",
                    "aoss:DescribeCollectionItems"
                ],
                "ResourceType": "collection"
            }
        ],
        "Principal": [
            "arn:aws:iam::123456789012:user/h_hibino"
        ],
        "Description": "Data access policy for sec-log-auditor collection"
    },
    {
        "Rules": [
            {
                "Resource": [
                    "index/sec-log-auditor/*"
                ],
                "Permission": [
                    "aoss:CreateIndex",
                    "aoss:UpdateIndex",
                    "aoss:DescribeIndex",
                    "aoss:ReadDocument",
                    "aoss:WriteDocument"
                ],
                "ResourceType": "index"
            }
        ],
        "Principal": [
            "arn:aws:iam::123456789012:user/h_hibino",
            "arn:aws:iam::123456789012:role/OpenSearchIngestionPipelineRole"
        ],
        "Description": "Data access policy for OpenSearch Ingestion Pipeline - write only access"
    }
]
EOF
上記ファイルを用いて OpenSearch Serverless のデータアクセス用セキュリティポリシー(sec-log-auditor-access)を更新します。
aws opensearchserverless update-access-policy \
    --name sec-log-auditor-access \
    --type data \
    --policy file://updated-data-access-policy.json \
    --policy-version <ポリシーバージョン>
2-3. パイプラインの作成
24 時間ごとに S3 バケットに保存された CloudTrail 証跡をスキャンし、送信元 IP アドレス(sourceIPAddress)に対して、国コードと国名を付与して OpenSearch Serverless コレクションのインデックス(aws-cloudtrail-%{yyyy.MM.dd})に格納します。
下記操作でコンフィグ(pipeline-config.yaml)を作成します。
cat > pipeline-config.yaml << 'EOF'
version: '2'
cloudtrail-ingest-pipeline:
  source:
    s3:
      workers: '1'
      acknowledgments: true
      delete_s3_objects_on_read: false
      compression: gzip
      codec:
        json: {}
      aws:
        region: ap-northeast-1
        sts_role_arn: arn:aws:iam::123456789012:role/OpenSearchIngestionPipelineRole
      scan:
        buckets:
          - bucket:
              name: logs-123456789012
              filter:
                include_prefix:
                  - CloudTrail/
        scheduling:
          interval: PT24H
  processor:
    - geoip:
        entries:
          - source: sourceIPAddress
            target: geoip
            include_fields:
              - country_iso_code
              - country_name
    - date:
        match:
          - key: eventTime
            patterns: ["yyyy-MM-dd'T'HH:mm:ss'Z'"]
        destination: '@timestamp'
        source_timezone: UTC
  sink:
    - opensearch:
        hosts:
          - 'https://xxxxxxxxxxxxxxxxxxx.ap-northeast-1.aoss.amazonaws.com'
        index: 'aws-cloudtrail-%{yyyy.MM.dd}'
        aws:
          region: ap-northeast-1
          sts_role_arn: arn:aws:iam::123456789012:role/OpenSearchIngestionPipelineRole
          serverless: true
          serverless_options:
            network_policy_name: sec-log-auditor-network
        index_type: custom
EOF
【補足】
・JSON パース処理は source s3 の codec jsonで実施します
・scan scheduling interval を PT24H とすることで 24 時間ごとに実行されます
・GeoIP は送信元 IP アドレス(sourceIPAddress)に対して実施します
・eventTimeのイベント発生時刻(UTC)を @timestampに利用します
【参考】
・Amazon OpenSearch Ingestion パイプラインの作成(公式)
・OpenSearch Ingestion パイプラインを Amazon S3 で使用する(公式)
・S3 Source(公式)
・Parse_json(公式)
・Date Processor(公式)
・Sink OpenSearch Serverless(公式)
上記ファイルを用いて、パイプライン(cloudtrail-ingest-pipeline)を作成します。
ここでは OCU を最小 1、最大 4 としています。
aws osis create-pipeline \
    --pipeline-name cloudtrail-ingest-pipeline \
    --min-units 1 \
    --max-units 4 \
    --pipeline-configuration-body file://pipeline-config.yaml
3. OpenSearch Dashboard の確認
AWS 管理コンソールから OpenSearch Dashboard へログインし、CloudTrail 用の Index Pattern を作成します。
3-1. Index Pattern の作成
Opensearch Service Serverless の [Collections] で [OpenSearch ダッシュボード] を開きます。

OpenSearch ダッシュボードを開く
OpneSearch Dashboard の Home 画面の [Visualize & analyze] をクリックします。

OpenSearch Dashboard Home 画面
何もデータが入っていない状態なので、[Add your data] をクリックします。

Add your data
[Create index pattern] をクリックします。

Create index pattern
index pattern name に [aws-cloudtrail-*] と入力し、[Next step] をクリックします。

Define an index pattern
Time field で [@timestamp] を指定し、[Create index pattern] をクリックします。

Configure settings (Time field)
3-2. Discover の設定
Index Pattern が作成されたため、Disocver に移動し、データを検索します。
画面左上のメニューから [Discover] を開きます。
Available fields から以下のフィールド名を [+] で追加します。
- eventName
- eventSource
- userIdentity.accountId
- userIdentity.sessionContext.sessionIssuer.userName
- geoip.country_name
- sourceIPAddress

Selected fields
画面上部の右側の [Save] をクリックし、追加したフィールドをサーチ条件として保存します。

Save search
まとめ
いかがでしたでしょうか?
コストの件は想定していた以上にかかることが判明したため、この方式の採用は見送りましたが geoip.country_name を利用することで sourceIPAddress だけでは海外からの不正アクセスなのか、判断できなかったところが判定できるようになったため、非常に効果的で便利でした。
もう少しコストメリットのある方式で GeoIP を使えるように模索していこうと思います。
Discussion