Win 10 × Unity 2021 で VR Template からプロジェクトをセットアップする。
まずは、新規プロジェクトの作成で、VR Template を選ぶ。
プロジェクトが作られるとダイアログが出る。
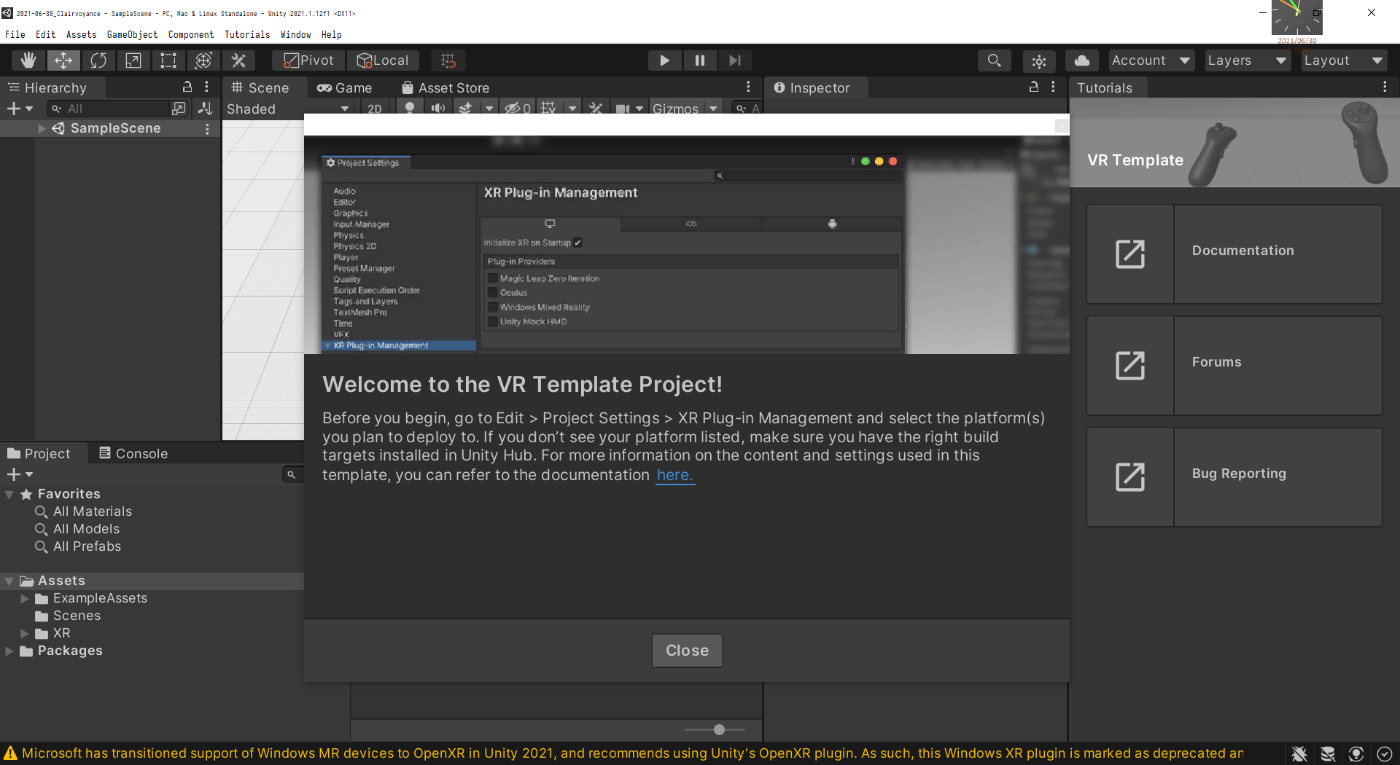
動作させるプラットフォームを選ぶよう言われている。
自分は、Quest 2 向けに開発するので、指示に従って、Edit > Project Settings > XR Plug-in Management で Android のタブから Oculus を選択した。
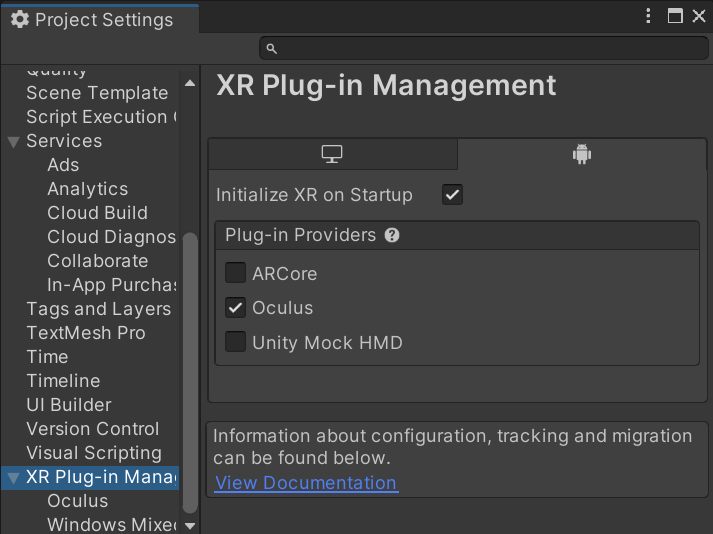
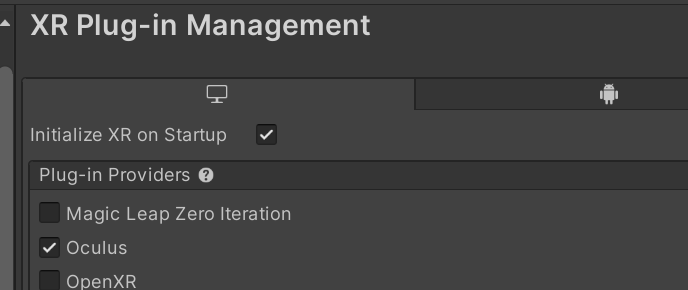
ちなみに、このときに PC のタブでも Oculus をチェックしていないと、Oculus Link での動作確認ができなくなるので注意。

レンダリングモードは最初からマルチビュー(シングルパスと同義?)に設定されていた。
セットアップ手順の確認は、こりんさんのページを見る。
さりげなく省いたが、プロジェクト作成前のセットアップ(Quest 本体の開発者モードの有効化など)も載っている。
では早速、Build Settings (Ctrl + Shift + B) で Android に Switch Platform する…のは気が早い。
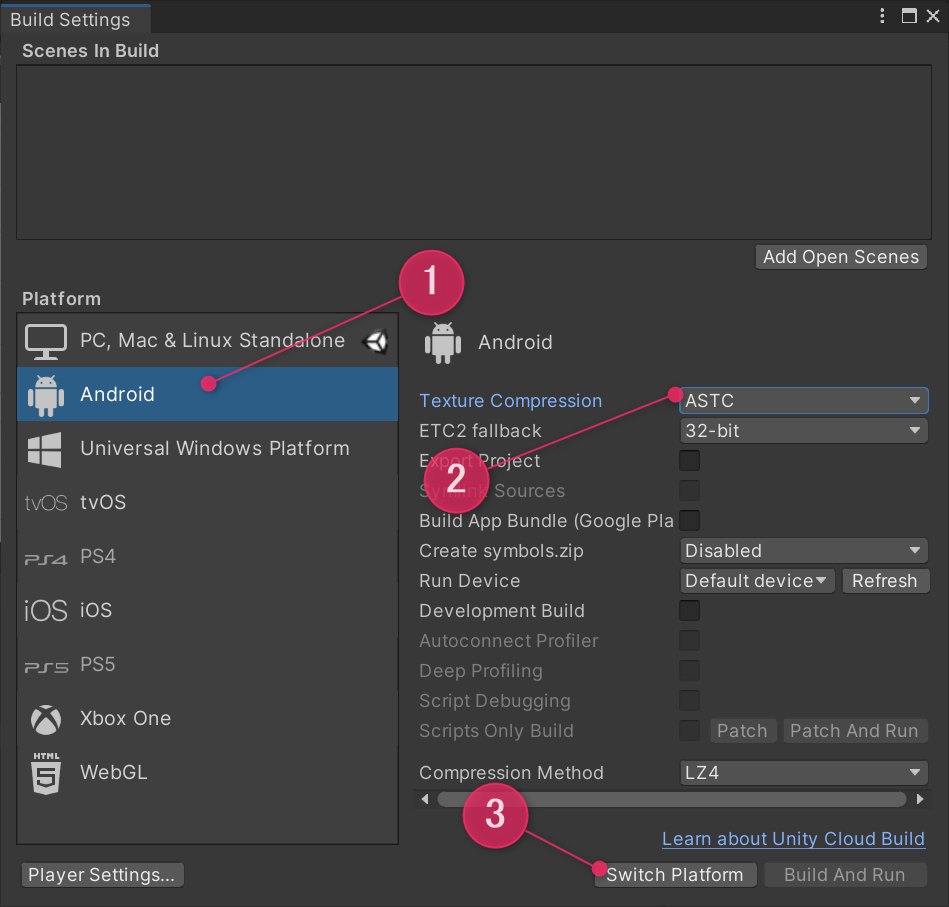
先に、Texture Compression を Facebook 推奨の ASTC に切り替える。Switch Platformを押すのはそのあと。
Switch Platform したあと、コンソールに何か Error⛔ が出てきた。
初めから出ていた Warning⚠️等も含めてここで確認しておく。
Warning⚠️
-
Microsoft has transitioned support of Windows MR devices to OpenXR in Unity 2021, and recommends using Unity's OpenXR plugin. As such, this Windows XR plugin is marked as deprecated and will be removed in the 2021.2 release. It will continue to be supported in the 2020 LTS.
UnityEditor.EditorApplication:Internal_CallUpdateFunctions () -
Vulkan is currently experimental on Oculus Quest. It has been removed from your list of Android graphics APIs.
If you would like to use experimental Quest Vulkan support, you can add it back into the list of graphics APIs in the Player settings.
UnityEngine.Debug:LogWarning (object)
Unity.XR.Oculus.OculusLoader:RemoveVulkanFromAndroidGraphicsAPIs () (at Library/PackageCache/com.unity.xr.oculus@1.9.1/Runtime/OculusLoader.cs:342)
Unity.XR.Oculus.OculusLoader:WasAssignedToBuildTarget (UnityEditor.BuildTargetGroup) (at Library/PackageCache/com.unity.xr.oculus@1.9.1/Runtime/OculusLoader.cs:363)
UnityEditor.EditorApplication:Internal_CallUpdateFunctions ()
Message🗨
-
The Android Minimum API Level has been changed to 23 in Player Settings as this is required for Oculus builds.
UnityEngine.Debug:Log (object)
Unity.XR.Oculus.OculusLoader:SetAndroidMinSdkVersion () (at Library/PackageCache/com.unity.xr.oculus@1.9.1/Runtime/OculusLoader.cs:354)
Unity.XR.Oculus.OculusLoader:WasAssignedToBuildTarget (UnityEditor.BuildTargetGroup) (at Library/PackageCache/com.unity.xr.oculus@1.9.1/Runtime/OculusLoader.cs:364)
UnityEditor.EditorApplication:Internal_CallUpdateFunctions ()
Error⛔
-
DeploymentOperationFailedException: Failed to find device UnityEditor.DeploymentTargets.DeploymentTargetId in 'adb devices'.
UnityEditor.Android.AndroidDeploymentTargetsExtension.EnsureDeviceIsValid (UnityEditor.DeploymentTargets.IDeploymentTargetsMainThreadContext context, UnityEditor.DeploymentTargets.DeploymentTargetId targetId, UnityEditor.ProgressHandler progressHandler) (at <1eaf4a8e7f364ff486d2470048a27112>:0)
UnityEditor.Android.AndroidDeploymentTargetsExtension.GetTargetInfo (UnityEditor.DeploymentTargets.IDeploymentTargetsMainThreadContext context, UnityEditor.DeploymentTargets.DeploymentTargetId targetId, UnityEditor.ProgressHandler progressHandler) (at <1eaf4a8e7f364ff486d2470048a27112>:0)
UnityEditor.DeploymentTargets.DeploymentTargetManager.GetTargetInfo (UnityEditor.DeploymentTargets.DeploymentTargetId targetId) (at <cb5f6353539a46708761eca227df3590>:0)
UnityEditor.Android.AndroidBuildWindowExtension+<>c__DisplayClass31_0.<SpawnFetchTargetsThread>b__0 () (at <1eaf4a8e7f364ff486d2470048a27112>:0)
System.Threading.ThreadHelper:ThreadStart()
エラー以外はひとまず無視しておく。
エラーの内容は ADB (Android Debug Bridge) の認識周りっぽいので、こっちもひとまず放置。
ADB は Oculus Developper Hub でセットアップしているものがあるので、これ↓と同じ話かなと思う。
タスクマネージャーでadb.exeを探し、
adb.exeを起動させているソフトを右クリック→ファイルの場所で特定し、削除または停止させればいいと思います!
ADB の二重起動はエラー起こすっぽい。
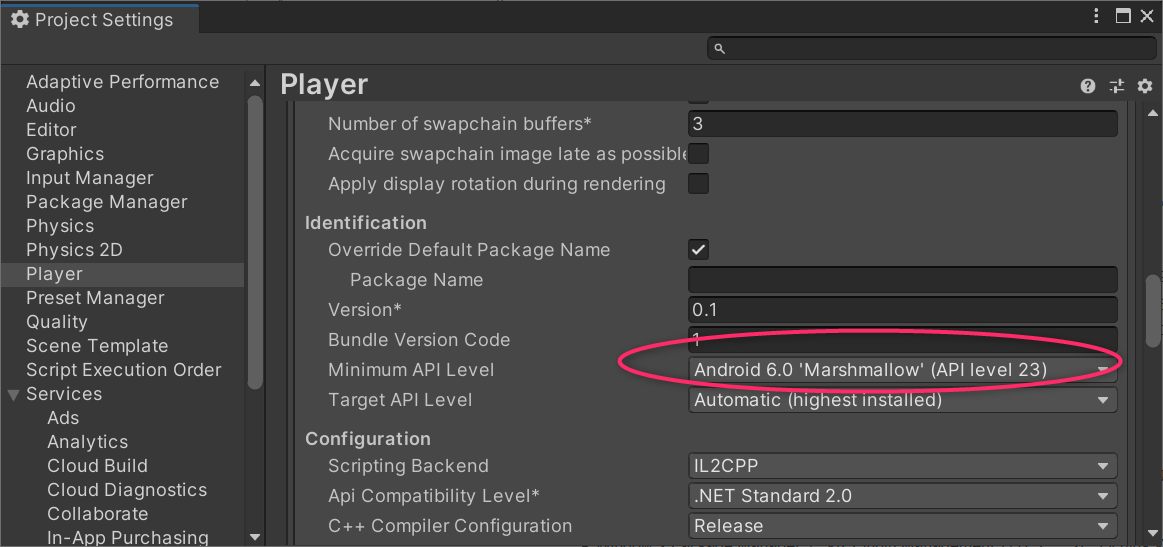
Project Settings > Player > Other Settings > Renderingを見ると、
Color Space は Linear に設定済みだった。
Graphics APIs も Vulkan が削除済みだった。

Project Settings > Player > Other Settings > Identification を見ると、Minimum API Level も Android 6.0 'Marshmallow' (API level 23) に設定済みだった。(これは、さっき Console に出てたメッセージにも、Oculus build のために設定変更したと書いてあった。)
Window > Package Managerを開いて、ウィンド左上のボタンで [Packages: My Asstes] を選び、Oculus Integration をインポートする。
Download ボタンが Update になっていた。
DL 済のパッケージのバージョンは28、新しいのは29らしい。

Import だけしても良いし、Update してから Import しても良い。
自分はせっかくなので、Update しておく。
そういえば、さっき挙げたこりんさんのページでも書かれていたが、インポートの処理がかなり重い。(Unity のインポートはCPU 頼りなので、Oculus Integration に限らず、すごく重い。)マシンスペックに自信がなければ、内容選択時にAvatar周りのデータをキャンセルしておくと良いかもしれない。
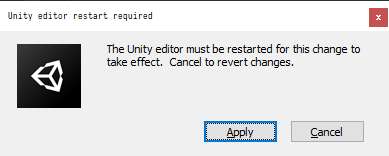
重い Import が終わったら、ダイアログが出る。
問題なければひたすら Enter。(既存プロジェクト上など、変なバグに出会いたくないときはキャンセルしたほうが良いかも。Oculus Integration をアップデートするときは、そうしてる。というか、まずプロジェクトごとバックアップとろう。今回は新規で作成しているので気にしない。)


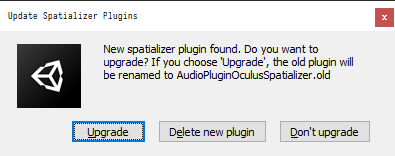
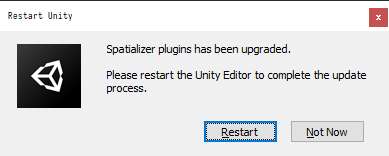
Restart のダイアログが2回出てくるけど、本当に再起動するのは2回目。Audio Spatializer のアップデート or 2回目の再起動をキャンセルしたときにどうなるのかは知らない。
ふと思い出して再起動後に Console ウィンドウを確認したところ、さっき出ていたエラーは消えていた。ただ、Micorsoft の OpenXR 移行の Warning⚠️は残っている。
試しに、XR Plug-in Management の PC の項目から、Open XR を選択してみる。
すると、Input Manager から Input System への切り替えを要求された。

古い方も新しい方も両方使いたいので、ここは、いったん No を選択して、自分で設定しに行く。
Project Settings > Player > Other Settings > Configuration > Active Input Handling で Both を選択すると、再起動が要求されるので、そうする。
改めての再起動後、なんか色々 Warning⚠️ が出たが、Play Mode (Ctrl + P) に入ったら消えた。
代わりに、新しい Error⛔が出た。
Lock Input to Game View in order for tracked pose driver to work in editor playmode.
UnityEngine.XR.Management.XRGeneralSettings:AttemptInitializeXRSDKOnLoad () (at Library/PackageCache/com.unity.xr.management@4.0.5/Runtime/XRGeneralSettings.cs:148)
さらに、なんとなくエディタを再起動してみたところ、今度は上の Error⛔ が消え、OpenXR の Warning⚠️ が再発した。しかし、そのまま Play Mode に入ると消えてくれたので、もう気にしないことにする。(内容的にも、ただの注意喚起っぽいし。)
Oculus Integration を入れたついでなので、必要なアセットを揃えておく。
まず、XR Interaction Toolkit を入れる。XRiTK(と勝手に呼んでいる)は Preview パッケージなので、それをパッケージマネージャ上で選択できるようにする。ついでに依存関係も表示するようにする。
あとで、紹介するかもしれないもの:
- SA Collider Builder https://assetstore.unity.com/packages/tools/sacolliderbuilder-15058
- VR Tunneling Pro https://assetstore.unity.com/packages/tools/camera/vr-tunnelling-pro-106782
- Extended Transform Editor https://assetstore.unity.com/packages/tools/utilities/extended-transform-editor-141487
- Layer Manager https://assetstore.unity.com/packages/tools/utilities/layer-manager-142014
- Console Enhanced Free https://assetstore.unity.com/packages/tools/utilities/console-enhanced-free-42381
- Play Mode Save https://assetstore.unity.com/packages/tools/utilities/play-mode-save-177452
- Scene Keeper https://assetstore.unity.com/packages/tools/utilities/scene-keeper-184494
- Taggler: Tags & Layers Backup and Import https://assetstore.unity.com/packages/tools/utilities/taggler-tags-layers-backup-and-import-185155
- Custom Toolbar https://assetstore.unity.com/packages/tools/utilities/custom-toolbar-189047
- Scene Save Advanced https://assetstore.unity.com/packages/tools/utilities/scene-save-advanced-113611
- Unity Forge Property Drawers https://baba-s.hatenablog.com/entry/2018/01/05/092300
◤ Project ウィンドウでファイルの拡張子を表示する
検索したら2種類ヒットした。
まず、いつも使ってない方を試してみる。

拡張子の位置が残念な感じ。
アイコン表示のときには拡張子が見えない。
やっぱりいつも使ってるこっちのほうが良い。


インポートの仕方:
Zipファイルを解凍して、中身を直接 Project ウィンドウに Drag & Drop すれば OK。
ただし、Assets の階層に解凍したファイルを Plugins フォルダごと放り込むと、Plugins 1 フォルダが作成されて、そこにデータが入ってしまう。解凍した Plugins フォルダ内の Listwon フォルダを選択して、Unity の Plugins 配下に D&D すると良い。
※ 余談だが、Plugins フォルダは特殊フォルダらしい。スクリプトのコンパイル順序に影響するフォルダなので、名前を変えないほうが良いかも?。場所は Assets 直下のみ。置ける数も1つだけとのこと。
ただし、Unity 2019 以降のドキュメントでは、なぜか特殊なフォルダー名の一覧から消えている。コンパイル順のほうには記載があるので、どっちかが間違っていると思われる。

あと、実際のところ、Plugins という名前のフォルダは1つしか置けないわけではなく、正式な Plugins フォルダとして認識されるのが、Assets 直下の1つだけ、ということなのではという気がしている。(Oculus Integaration など、子孫フォルダに Plugins という名前のフォルダを置いているものもあるので。)それとも、1つしか置けないという記述も間違っているのか…、あるいは、バージョンごとの差異を吸収するために、エディタ側の実装が柔軟になっているのだろうか。
そう考えると、Listwon のアセットも、そのまま UnityFileExtentions フォルダをAssets 直下に投げても良さそうに思える。でも、Plugins/Listwon の下にも UnityFileExtentions フォルダがあるので、RootMotionさんみたいに、Plugins 配下に置くことを想定していそう。(どの環境でもその必要があるかはともかく。)
◤ アセットをアンインストールできるようにする。
公式で提供されているパッケージについては、Unity Package Manager の [Packages: Unity Registry] や [Package: InProject] から削除できる。
ただ、AssetStore 経由で配布されているものは、Remove ボタンが表示されず、削除できない。
昔、自分が Unity を触り始めたころに見つけたアセットはこれ。 当時は無料だったのだけど、最近アセットストアに確認しに行ったら、「Package Uninstaller 2」に名称変更 & 有料化していた。
最近気づいた問題点として、なにか1つでもコンパイルエラーが起きていると、こっちのアセットまで無効化されてしまい、使えなくなるという部分がある。「試しに何かアセットをインポートしてみたらエラーが出た」なんてときには、削除対象のフォルダかどうかを自分で確認しながら逐一削除を行う必要があり面倒。
ほかに何かないかと探していたら見つけたのが baba_s さんのアセット。
コンパイルエラーがあっても正常稼働するのでありがたい。
インストール方法は2つ。
- GitHubから Download ZIP したものを解凍し、中にある Editor フォルダを Assets 配下 の任意の場所に D&D 。
- UPM が使えるなら、UPM のウィンドウ左上のプラスマークから、GitHub の URL を指定してインストールすることもできる。
注意点は、パッケージに含まれるスクリプトから2次的にインストールされた部分は、これでは削除できないということ。unitypakage の内容を読み込んで処理する仕様っぽいので仕方ない。同様の方法でアンインストールを行うエディタ拡張は当然同じ問題を持つ。Assets の兄弟フォルダ?の Packages にゴミが残ってしまうこともある。UPM の新形式で配布されてるアセットだと解決できるらしい。
とはいえだいたいはこれで事足りるので、最近は baba_s さんのアセットを使っている。
ちなみに、unitypackage のダウンロード先は Windows だと、%AppData%\Unity\Asset Store-5.x になる。ユーザーフォルダのAppData(通常は非表示)> Roaming…と辿っても見つけることができる。
ほかのエディタ拡張をインストールするまえに、エディタの各部の名称を確認しておく。
というか、ここに載っている。
◤ Inspector ウィンドウを使いやすくする。
Inspector を拡張するなら、Odin をお勧めされることが多い。非常に多機能で魅力的なので、仕事で使うなら買っておいて損はないと思う。ただ、「機能が少なくても良いので、無料のものが使いたい」というなら、OSS を使うこともできる。
自分の場合、Odin をすでに持っているものの、ほかの人とコードを共有する可能性もあるプロジェクトでは、Naughty Attributes も使っている。ライセンスは MIT。
UPM (Unity Package Manager) で直接インストールできるアセット集にも載っている。
詳しい使い方は公式ドキュメントに載っている。
関数をボタン化する [Button]
操作を禁止する [ReadOnly]
指定必須にする [Required]
タグを候補から選択できる [Tag]
など、汎用的に使える属性が揃っている。
どちらも using ディレクティブが必要。
Odin なら、using Sirenix.OdinInspector;
NaughtyAttributes なら、using NaughtyAttributes;
Cody Anderson の ReadOnly Attribute のように、using ディレクティブが不要のものもある。
using ディレクティブについては以下参照。
Toolbar を拡張する Custom Toolbar が Unity 2021 では動かなかった。
そのうち対応してくれるのだろうか。
.
Unity 2020 では使えていた。
インストールはこちらから。
画面幅が狭いと収まりきらないので、そこは注意。
個人的にはシーン切り替えとTimeScaleの操作が直接できるのが便利。
◤ Hierarchy を使いやすくする。
マウスホイール押下でオブジェクトのactive/deactiveを切り替えできたり、地味に重宝している。
◤ Console ウィンドウを見やすくする。
Console Enhanced Free
最近よくバグって表示ができなくなるけど原因は分からない(自分の環境や使い方の問題かもしれない)
◤ XR Rig を設定する。
XR Interaction Toolkit を入れると、XR Rig が出せるようになる。
先に、Package Manager の XR Interaction Toolkit > Sample > Default Input Actions をインポートしておく。
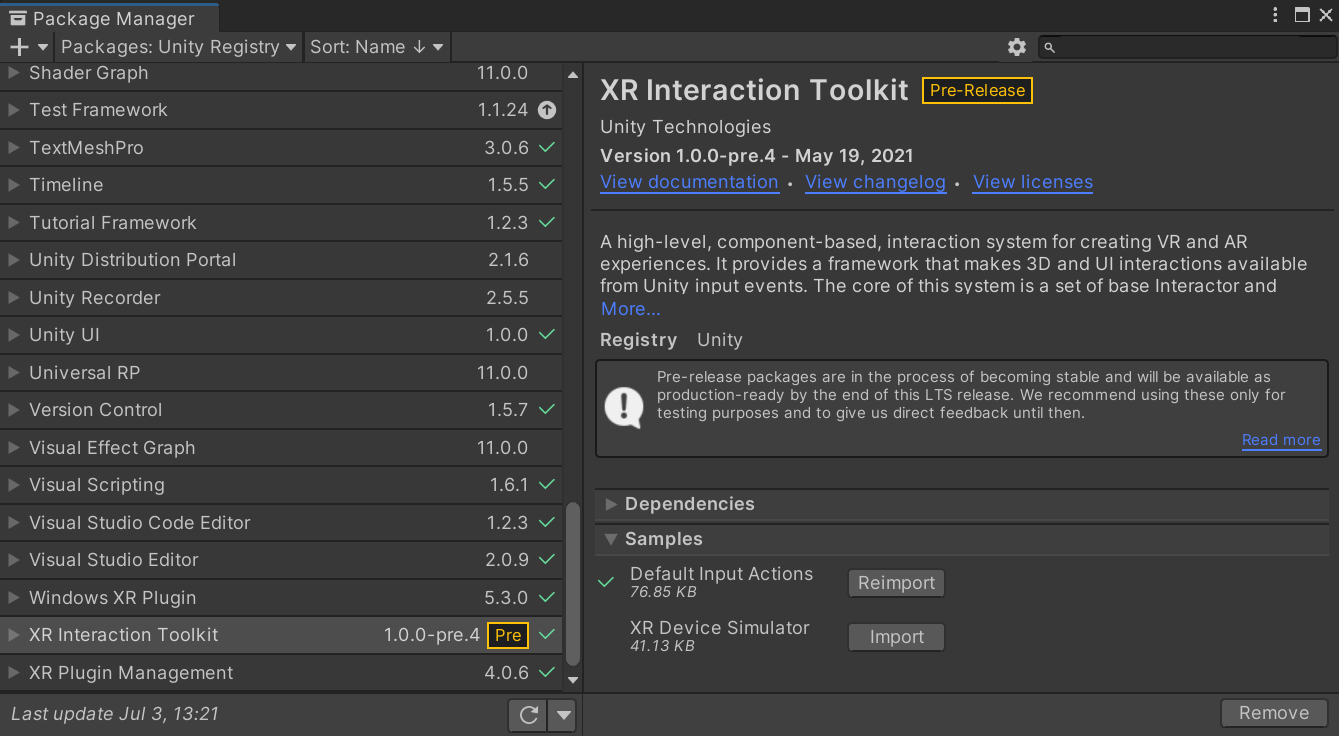
Assets > Samples > XR Interaction Toolkit > {バージョン番号} > Default Input Actions に設定ファイルがインポートされるので、XRI Default Left Controller.preset, XRI Default Right Controller.preset 等を選択して、それぞれのインスペクターで [Add to ~~~ default] を押下する。
次に、Project Settings > Preset Manager で、さっき選んだ preset にフィルターを設定する。

left, right だけでも良い。
フィルターを設定した後に XR Rig を配置すると、preset が自動適用された状態で XR Rig を生成してもらえる。
あと、Hierarchy ウィンドウの任意のオブジェクト(XR Rig とかが分かりやすいかも)に、[Add Component] から Input Action Manager コンポーネントを追加して、Action Assets の項目に、XRI Default Input Actions.inputactions をアタッチする。
Play Mode に入って動作確認しておく。
自分の環境では、Action-based の HMD が上手くトラッキングできなかったので、ワークアラウンドとして Camera に、手動で Tracked Pose Driver コンポーネントを追加した。(Tracked Pose Driver (New Input System) はひとまず無効化しても良い?)
XRiTK の大体のセットアップ方法はドキュメントに載っている。
XR Direct Interactor 付きのオブジェクトは、Ray Interactor 付きのオブジェクトをコピーして作ると楽。Ray 関連のスクリプトを外すときは依存関係の親のほうを先に消す。
Direct Interactor は コライダが付いてないと使えない点も注意。
気が向いたら他の部分もちゃんと書く。
.
Oculus 向けの部分も設定しておく。
Assets > Oculus > VR > Prefabs から、OVRCameraRig.prefab を配置する。
~~Anchor の下に、OVRControllerPrefab_L/R.prefab等を配置する。Hand model のオンオフを自動でやってほしいなら、OVRHandPrefab.prerfab も置く。OVRCustomHandPrefab.prefab は自分で管理スクリプトを用意する必要あり。
あとで書くもの:
自分で作った拡張。
ほかの借り物。
ちょっと忘れてたけど、Scripting Backend は 開発中は Mono が良い。
IL2CPP だと、ほぼ中身なしのプロジェクトでもビルドに5分以上かかる。
⛔
UnityException: Target architecture not specified
Select at least one Android CPU architecture in Player Settings.
UnityEngine.GUIUtility:ProcessEvent(Int32, IntPtr, Boolean&) (at ?)
ストアに出すときは、IL2CPPかつ、Target Architectures を ARM64 に指定する。
Monoだと、ARM64はグレーアウトしているので、ARMv7を指定する。指定しないと上のエラーが出る。
そのほかのエラー
UnityEvent を Reordable にする拡張