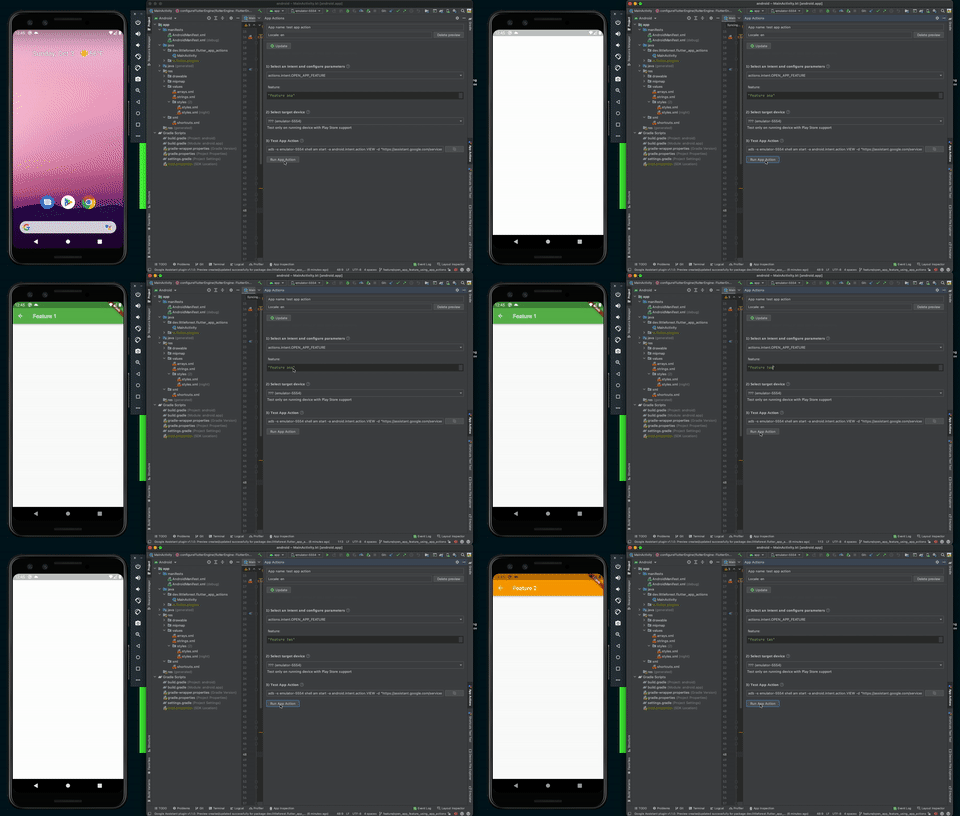
Google AssistantからFlutterアプリの特定の画面を開いてみる
App Actionsを使用して、Google AssistantからAndroidアプリの操作ができるようになったということで(だいぶ前ですが)、Flutterでもできないかなと思い、試してみました。
今回は、「Google AssistantからFlutterアプリの特定の画面(履歴や設定など)を開く」というところまで実装できました。
必要なもの
- Android Studio
- Google Play Consoleを利用できるGoogleアカウント
- アプリを実行する端末(物理/仮想)
※ Android Studioと端末はGoogle Play Consoleと同じアカウントでログインしている必要があります。
Built-in intents (BII)
事前に定義されたIntent。よく使われる(と想定される?)ものはGoogleが用意してくれています。
BIIでは不十分な場合は、自分でカスタマイズしたIntentを使用することもできるようです。
例
-
OPEN_APP_FEATURE: アプリ内の機能を起動
"Open ExampleFeature on ExampleApp." -
CREATE_CALL: 音声通話またはビデオ通話を開始
"Call John on ExampleApp." -
START_EXERCISE: フィットネスに関するアクティビティを開始
"Start jogging for twenty minutes using ExampleApp."
今回はBIIの1つであるOPEN_APP_FEATUREを使用します。
実装手順
Google AssistantからAndroidが受け取ったパラメータをMethod Channelを通してFlutterに伝える形で実現します。
Flutterアプリ起動時にAndroid側からFlutter側にパラメータを渡したかったんですが、Flutterのドキュメントを参考にして、Flutterアプリ起動後にFlutter側からAndroid側にアクセスする形で取りに行くことにしました。
Method Channelについての解説はすでに多くの記事が存在すると思うので、それらを参考にされるといいと思います。
Flutter側
main.dart
void main() {
runApp(const App());
}
class App extends StatelessWidget {
const App({Key? key}) : super(key: key);
Widget build(BuildContext context) {
return MaterialApp(
title: 'Flutter Demo',
theme: ThemeData(
primarySwatch: Colors.blue,
),
home: const HomeScreen(),
);
}
}
feature_one.dart
class FeatureOneScreen extends StatelessWidget {
const FeatureOneScreen({Key? key}) : super(key: key);
Widget build(BuildContext context) {
return Scaffold(
appBar: AppBar(
backgroundColor: Colors.green,
title: const Text('Feature 1'),
),
);
}
}
feature_two.dart
class FeatureTwoScreen extends StatelessWidget {
const FeatureTwoScreen({Key? key}) : super(key: key);
Widget build(BuildContext context) {
return Scaffold(
appBar: AppBar(
backgroundColor: Colors.orange,
title: const Text('Feature 2'),
),
);
}
}
class HomeScreen extends StatefulWidget {
const HomeScreen({Key? key}) : super(key: key);
State<HomeScreen> createState() => _HomeScreenState();
}
class _HomeScreenState extends State<HomeScreen> {
static const _featureChannel = MethodChannel('your.package.name/feature');
static const _featureOne = 'feature_one';
static const _featureTwo = 'feature_two';
Future<void> _checkOpenAppFeatureIntent() async {
try {
final String? result = await _featureChannel.invokeMethod('openFeature');
switch (result) {
case null:
break;
case _featureOne:
_goToFeatureOne();
break;
case _featureTwo:
_goToFeatureTwo();
break;
default:
ScaffoldMessenger.of(context).showSnackBar(
SnackBar(
content: Text('There is no feature: $result'),
),
);
break;
}
} on PlatformException catch (e) {
ScaffoldMessenger.of(context).showSnackBar(
const SnackBar(
content: Text('Failed to open feature'),
),
);
}
}
void _goToFeatureOne() {
Navigator.of(context).push(
MaterialPageRoute(builder: (_) => const FeatureOneScreen()),
);
}
void _goToFeatureTwo() {
Navigator.of(context).push(
MaterialPageRoute(builder: (_) => const FeatureTwoScreen()),
);
}
void initState() {
super.initState();
_checkOpenAppFeatureIntent();
}
Widget build(BuildContext context) {
return Scaffold(
appBar: AppBar(
title: Text(widget.title),
),
body: Center(
child: Column(
mainAxisAlignment: MainAxisAlignment.center,
children: [
ElevatedButton(
style: ElevatedButton.styleFrom(primary: Colors.green),
onPressed: _goToFeatureOne,
child: const Text('Go to Feature 1'),
),
const SizedBox(height: 16),
ElevatedButton(
style: ElevatedButton.styleFrom(primary: Colors.orange),
onPressed: _goToFeatureTwo,
child: const Text('Go to Feature 2'),
)
],
),
),
);
}
}
チャンネル名はユニークでなければならないため、prifixとしてパッケージ名をつけることが多いようです。
Android側
<?xml version="1.0" encoding="utf-8"?>
<shortcuts xmlns:android="http://schemas.android.com/apk/res/android">
    <!-- 使用したいIntent(ここではOPEN_APP_FEATURE)を追加 -->
    <capability android:name="actions.intent.OPEN_APP_FEATURE">
        <intent
            android:action="android.intent.action.VIEW"
            android:targetClass="dev.littleforest.flutter_app_actions.MainActivity"
            android:targetPackage="dev.littleforest.flutter_app_actions">
            <parameter
                android:name="feature"
                android:key="feature" />
        </intent>
    </capability>

    <!-- feature_oneという機能へのショートカットを追加 -->
    <shortcut
        android:enabled="false"
        android:shortcutId="feature_one"
        android:shortcutShortLabel="@string/label_feature_one">
        <!-- OPEN_APP_FEATUREと紐付ける -->
        <capability-binding android:key="actions.intent.OPEN_APP_FEATURE">
            <!-- 受け付けるキーワードを設定し、それらをfeatureパラメータと紐付ける -->
            <parameter-binding
                android:key="feature"
                android:value="@array/feature_one_synonyms" />
        </capability-binding>
    </shortcut>

    <shortcut
        android:enabled="false"
        android:shortcutId="feature_two"
        android:shortcutShortLabel="@string/label_feature_two">
        <capability-binding android:key="actions.intent.OPEN_APP_FEATURE">
            <parameter-binding
                android:key="feature"
                android:value="@array/feature_two_synonyms" />
        </capability-binding>
    </shortcut>
</shortcuts>
shortcutShortLabelは、文字列リソースとして登録する必要があります。ドキュメントに書いてありますが、はじめ知らずに直接書いていてうまくいきませんでした。
ちなみに、shortcutIdは逆に文字列リソースにしてはいけないようです。こちらもドキュメントに書いてあります。
<?xml version="1.0" encoding="utf-8"?>
<resources>
    ...
    <string name="label_feature_one">Feature One</string>
    <string name="label_feature_two">Feature Two</string>
</resources>
<?xml version="1.0" encoding="utf-8"?>
<resources>
    <!-- feature_oneとして扱われるパターンを登録 -->
    <array name="feature_one_synonyms">
        <item>feature one</item>
        <item>feature 1</item>
        <item>feature first</item>
        <item>first feature</item>
    </array>
    <array name="feature_two_synonyms">
        <item>feature two</item>
        <item>feature 2</item>
        <item>feature second</item>
        <item>second feature</item>
    </array>
</resources>
OPEN_APP_FEATUREのfeatureパラメータには、実際に入力された値ではなく、shortcutIdに設定した値が入るようです。
例: "Open feature 1 on XX." → "feature_one"
<manifest xmlns:android="http://schemas.android.com/apk/res/android"
    package="your.package.name">
    <application
        android:icon="@mipmap/ic_launcher"
        android:label="your_app_name">
        <activity
            android:name=".MainActivity"
            ...>
            ...
            <!-- 以下を追加 -->
            <intent-filter>
                <action android:name="android.intent.action.VIEW" />
                <category android:name="android.intent.category.BROWSABLE" />
                <category android:name="android.intent.category.DEFAULT" />
                <data
                    android:host="your.host"
                    android:scheme="https" />
            </intent-filter>
            <meta-data
                android:name="android.app.shortcuts"
                android:resource="@xml/shortcuts" />
        </activity>
        ...
    </application>
</manifest>
class MainActivity : FlutterActivity() {
    companion object {
        const val FEATURE_CHANNEL = "your.package.name/feature"
    }

    override fun configureFlutterEngine(flutterEngine: FlutterEngine) {
        super.configureFlutterEngine(flutterEngine)

        MethodChannel(
            flutterEngine.dartExecutor.binaryMessenger,
            FEATURE_CHANNEL
        ).setMethodCallHandler { call, result ->
            if (call.method == "openFeature") {
                val feature = intent.extras?.getString("feature")
                result.success(feature)
            } else {
                result.notImplemented()
            }
        }
    }
}
実行
GoogleのCodelabsの通りに進めれば問題ないと思います。
-
リリースビルド
※上記リンク先のビルドに関するパートは、純粋なAndroidアプリの手順となっているので、こちらを参考にしてFlutterアプリをビルドしてください。 -
Google Play Consoleで内部テストを作成
テストを作成するだけで大丈夫です。公開する必要はありません。 -
Android StudioにてGoogle Assistant pluginをインストール
手順はこちらを参考に。 -
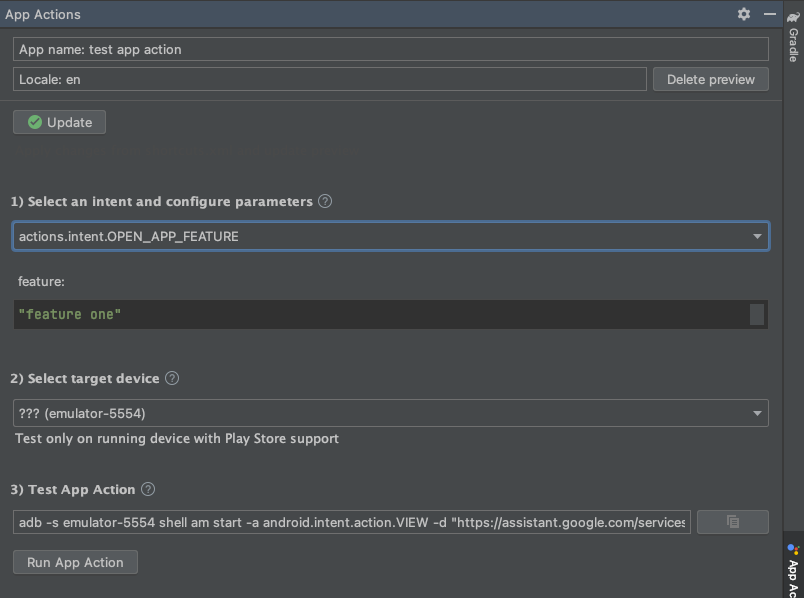
App Actions Test Tool
- Android Studioで、Tools > Google Assistant > App Actions Test Toolsを起動。
- Create Previewを押してプレビューを作成。
-
featureの値を更新。 - Run App Actionで実行。


さいごに
App Actions自体が日本語には未対応ということもあり、App Actions × Flutterの情報を探している人はあまりいないかもしれませんが、少しでも誰かの役に立てればと思い、投稿しました。
より良い方法をご存知の方がいらっしゃいましたら、ぜひコメントにてお知らせください。(というか詳しい人いたら記事書いてほしい🙏)
参考
- [Android] ショートカットの作成
- [Google Assistant] App Actions
- [Google Assistant] Build App Actions
- [Google Assistant] Google Assistant plugin for Android Studio
- [Google Codelabs] Extend an Android app to Google Assistant with App Actions (Beta)
- [Flutter] Build and release an Android app
- [Flutter] How do I handle incoming intents from external applications in Flutter?
Discussion