【Move/Aptos】Aptos Network に Move の Dapps を作ってみる
はじめに
今回は、Move language で開発したスマートコントラクトを実際の chain である Aptos で動かしてみることをやってみます。
Aptos 自体は元 Meta のチームが開発したブロックチェーンで、2022年10月にメインネットリリースがされました。
Aptos Framework
Aptos は Move ベースでリッチなアプリケーションを構築するための Framework を提供してくれています。
- Coin, Token 実装のためのフレーム
- Map, Table などの Utility type
- Blockchain で共通してある Block 情報や Event
- Access Control などのシステム仕様としての要件
などこういったものを Move で実装しやすくしてくれるための Library があり、これらを利用していきます。
参考
ハンズオン
今回は、Coin を投入して LpCoin を獲得できる簡単な Lending を作ります。
(他の記事を見ていただいている方向けですが、いつも同じ題材ですみません...)
各ステップで実際のコードを記載していますが、下記リポジトリに完成版がありますので必要であれば参考にしてください。
またステップを意識して commit 作成しているので、commit log 見つつ照らし合わせてもらえると良いかもしれません。
セットアップ & プロジェクト生成
まずは aptos cli をインストールする必要があります。
下記を参考にしてインストールをし、コマンドを使えるか確認してみてください。
% aptos --version
aptos 1.0.0
インストールができたら、aptos move initを利用してプロジェクトを生成してみましょう。
% mkdir move-aptos_hands-on & cd move-aptos_hands-on
% aptos move init --name Handson
{
  "Result": "Success"
}
開発環境が整っているかどうか確認するために、テストとコンパイルを実行してみましょう。
- テスト:
aptos move test - コンパイル:
aptos move compile
そのために1つサンプルとしてのモジュールとテストを実装する必要があるので下記のようにモジュールを用意してみましょう。
+ [addresses]
+ handson="0xaaa"
module handson::pool {
    #[test]
    fun test_sample() {
        assert!(3 - 2 == 1, 0);
    }
}
その上でコマンドを実行してみます。
% aptos move test
...
Running Move unit tests
[ PASS    ] 0xaaa::pool::test_sample
Test result: OK. Total tests: 1; passed: 1; failed: 0
{
  "Result": "Success"
}

% aptos move compile
...
{
  "Result": [
    "0000000000000000000000000000000000000000000000000000000000000aaa::pool"
  ]
}
上記のような出力を確認できたでしょうか、ここまでくればセットアップ完了です!
モジュールの初期化
ここでは、このモジュール自体が Deposit/Withdraw により Coin を保持/移動が可能になるように初期化を行うロジックを記述します。
先になぜこの"初期化"が必要なのか、という説明をします。
事前知識の解説
Move におけるデータ管理
そもそも Move ではどのように Blockchain でのデータを管理しているかというと、
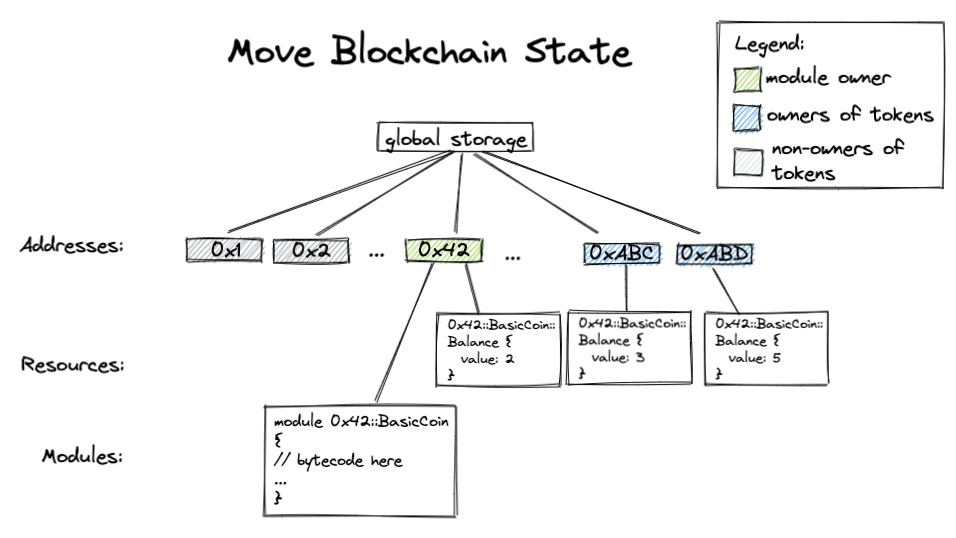
引用元: move/move_state.png at main · move-language/move
上記の図のように、
- Global Storage として巨大な Key/Value Map がある
- 直下に Address 単位ごとにデータ保存領域が確保されている
という状態で、Account 生成直後はこの Account のデータ保存領域は空なので、ここに"Coin"を保存するための準備が必要です。
今回作る Module が Coin を保持するためのこの準備を行う必要があります。
Aptos における Coin
次に Aptos において、
- その保持したい Coin というのはどのように定義されているか?
- 保持するために何を準備すればいいのか?
という話をします。Aptos における Coin はこちらに説明があります。
Aptos における Coin の定義 (Struct) はこちらです。
- u64 の value を持っているシンプルな構造
- Genericsを使うことで Coin の種類ごとに Resource を準備できるようになっている
struct Coin<phantom CoinType> has store {
    /// Amount of coin this address has.
    value: u64,
}
Module ではこれを保存できるように Resource 生成をします。
実装
では実際にコーディングを始めていきましょう。
Library & Struct
まず最初に、必要となる Library の宣言と struct の宣言をします。
use aptos_framework::coin;

struct HandsonCoin {}
struct Pool has key {
    balance: coin::Coin<HandsonCoin>
}
use aptos_framework::coin
- (先ほど解説した) AptosFramework の Coin を使用するために必要な宣言
-
aptos_frameworkにあるcoinmodule を使う、という意図-
aptos_framework自体の参照先はMove.tomlで宣言されているものになります
-
struct HandsonCoin {}
- Coin の種類を示すために Generics で使用されている Struct の宣言
- 補足
- 本来は AptosCoin や他 Protocol で宣言されているような Coin を使用するのをイメージしていますが、今回は自身のモジュールで定義します
struct Pool has key ...
- ここが Coin を格納するための Resource になります
- 今回は、そのリソース名を
Poolと名付けています
- 今回は、そのリソース名を
- これを直接 Storage に保存するために
keyability を付与する必要があります - フィールドについて
- 宣言した (aptos_framework の) coin module の coin resource が入ることを意味するので
coin::Coin<...>と宣言します。- Library の宣言方法に合わせた他の記述方法は下記を参照してください
- 宣言した (aptos_framework の) coin module の coin resource が入ることを意味するので
Function
次に先ほど定義した Coin を管理する箱である Pool Resource を作成するための処理を追加してみましょう。
public entry fun initialize(owner: &signer) {
    move_to(owner, Pool {
        balance: coin::zero<HandsonCoin>()
    });
}
public entry fun initialize(owner: &signer) { ... }
-
public entry= Visibility の定義-
public-> 任意の module や script から呼び出すことができる-
publicがない場合は、宣言した module 内の関数からしか呼び出すことができません - https://move-language.github.io/move/functions.html#visibility
-
-
-
fun= function の宣言 -
initialize(owner: &signer)= 関数名と引数の設定- 今回は
&signerという署名者を表すsignerの参照を引数に設定します- これが必要な理由は後述します
- https://move-language.github.io/move/signer.html
- 今回は
move_to(owner, Pool {...})
-
move_toを利用することで実際にリソースを指定したユーザー配下に配置することができます- つまり、今回は
owner変数にある署名者データのデータ領域にPoolというリソースを配置することになります - この
ownerが&signerである必要があるため、関数の引数にowner: &signerを設定しました
- つまり、今回は
Pool { balance: coin::zero<HandsonCoin>() }
- Pool の初期化
- struct が宣言された module 内でのみ、struct の実体を生成することができます
-
balance: coin::zero<HandsonCoin>()- Pool は引数に
coin::Coin<HandsonCoin>をとるので、balance field に該当するデータを設定する必要があります - Coin の初期化は、
coin::zero<T>()で行うことができるので、自モジュールで宣言したHandsonCoinを設定して初期化します - 補足
- Coin module の方の実装を確認すればわかるのですが、
coin::zero<T>()という形で function を公開することで、間接的に外の module からでも struct の実体を生成できるようにしています - このように、想定する使われ方となるように struct の実体を生成するための関数を公開しておく、というのがパターンになっています
- Coin module の方の実装を確認すればわかるのですが、
- Pool は引数に
上記の関数によって、Coin を保持するためのリソース作成ができるようになりました。
Test
Move / AptosFramework では UT に関しても外部ライブラリに依存せずテストコードをかけるので、こまめに書いていきましょう。
今回は、先ほど作成した関数で実際にリソースが作成できているのか、というテストを書いてみます。
そもそもテストを記述するためには、各種宣言の前に以下を記述します
-
#[test_only]... テスト時のみ利用される宣言 -
#[test] or #[test(...)]... 実際のテスト - これらで記述された宣言は通常の build では対象外になります。
- 参考: https://move-language.github.io/move/unit-testing.html
#[test_only]
use std::signer;
#[test(owner = @handson)]
fun test_initialize(owner: &signer) {
    initialize(owner);
    assert!(exists<Pool>(signer::address_of(owner)), 0);
}
#[test(owner = @handson)]
- テストに利用する署名者を生成する際に必要な宣言です
- 上記宣言をした上でテストの関数の引数を設定することで Signer が利用できます
assert!(exists<Pool>(signer::address_of(owner)), 0);
-
assert!... assertion を行います- 第一引数 ... 比較するためのロジック
- 計算結果が boolean になる値/処理が記述される
- 第二引数 ... エラーコード
- テスト時には一律
0で良いと思います -
assert!自体はアプリケーションロジックでも使用し、その際にエラーコードを定義し設定します
- テスト時には一律
- 第一引数 ... 比較するためのロジック
-
exists<Pool>(signer::address_of(owner))-
exists<Pool>(...): address に Pool Resource が存在するかどうか-
...には address が入ります
-
-
signer::address_of: signer から address を取得します-
std::signermodule の function です
-
-
こちらが先述の記述によって一旦完成したコードになります!
手元のコードと付き合わせて確認してみてください。
module handson::pool {
    use aptos_framework::coin;

    struct HandsonCoin {}
    struct Pool has key {
        balance: coin::Coin<HandsonCoin>
    }

    public entry fun initialize(owner: &signer) {
        move_to(owner, Pool {
            balance: coin::zero<HandsonCoin>()
        });
    }

    #[test_only]
    use std::signer;
    #[test(owner = @handson)]
    fun test_initialize(owner: &signer) {
        initialize(owner);
        assert!(exists<Pool>(signer::address_of(owner)), 0);
    }
}
Refactor: validation
一旦最低限のコードは実装済みですが、もしこの initialize を2回実行したらどうなるかみてみましょう
#[test(owner = @handson)]
fun test_initialize_twice(owner: &signer) {
    initialize(owner);
    initialize(owner);
}
上記のテストを実行すると、下記のエラーが出力されます。
┌── test_initialize_twice ──────
│ ITE: An unknown error was reported. Location: error[E11001]: test failure
│    ┌─ /Users/.../github.com/linnefromice/move-aptos_hands-on/sources/pool.move:12:9
│    │
│ 10 │     public entry fun initialize(owner: &signer) {
│    │                      ---------- In this function in 0xaaa::pool
│ 11 │         // assert!(!exists<Pool>(signer::address_of(owner)), 1);
│ 12 │         move_to(owner, Pool {
│    │         ^^^^^^^
│
│
│ VMError (if there is one): VMError {
│     major_status: RESOURCE_ALREADY_EXISTS,
│     sub_status: None,
│     message: None,
│     exec_state: None,
│     location: Module(
│         ModuleId {
│             address: 0000000000000000000000000000000000000000000000000000000000000aaa,
│             name: Identifier(
│                 "pool",
│             ),
│         },
│     ),
│     indices: [],
│     offsets: [
│         (
│             FunctionDefinitionIndex(0),
│             3,
│         ),
│     ],
│ }
└──────────────────
major_status: RESOURCE_ALREADY_EXISTS
RESOURCE_ALREADY_EXISTS というエラーが出ています。
おそらく既に想像できている方も多いと思いますが一応補足をします。
簡単に日本語で書くと、"該当する Resource を既に保持している"ということですね。
initialize を2回実行することで、Pool の move_to を2回やろうとしているので、原因も直感的にわかると思います。
許可されない結果になるので Transaction が通らないことは問題ないと思いますが、
VMError と出ているように VM Layer からのエラーになってしまっているので、Application 側でハンドリングしたいです。
initialize 実行時に既にリソースが存在するかチェックしましょう。
module handson::pool {
+   use std::signer;
    use aptos_framework::coin;
    ...
    public entry fun initialize(owner: &signer) {
+       assert!(!exists<Pool>(signer::address_of(owner)), 1);
        move_to(owner, Pool {
            balance: coin::zero<HandsonCoin>()
        });
    }

-   #[test_only]
-   use std::signer;
    ...
+   #[test(owner = @handson)]
+   #[expected_failure(abort_code = 1)]
+   fun test_initialize_twice(owner: &signer) {
+       initialize(owner);
+       initialize(owner);
+   }
}
- 実際のロジックで
signer::address_ofを使用することになったので、#[test_only]を外してstd::signerを宣言します
#[expected_failure(abort_code = 1)]
-
expected_failureを付与したテストケースは fail することを期待する、という意味になります -
abort_codeにて失敗時のエラーコードを指定します- ロジック側で
assert!(!exists<Pool>(signer::address_of(owner)), 1)としているように、失敗時のエラーコードは 1 なので、abort_code = 1とします。
- ロジック側で
この状態でテストを実行すると以下のように全て正常終了すると思います、確認してみてください!
% aptos move test
INCLUDING DEPENDENCY AptosFramework
INCLUDING DEPENDENCY AptosStdlib
INCLUDING DEPENDENCY MoveStdlib
BUILDING Handson
Running Move unit tests
[ PASS    ] 0xaaa::pool::test_initialize
[ PASS    ] 0xaaa::pool::test_initialize_twice
Test result: OK. Total tests: 2; passed: 2; failed: 0
{
  "Result": "Success"
}
Deposit
ここからやっとユーザーに向けた直接的な機能となる Deposit です。
早速 Pool に向けて Deposit をする Function を追加してみましょう。
public entry fun deposit(account: &signer, amount: u64) acquires Pool {
    let coin = coin::withdraw<HandsonCoin>(account, amount);
    let pool_ref = borrow_global_mut<Pool>(@handson);
    coin::merge(&mut pool_ref.balance, coin);
}
今回新しく出てきた Move の記述方法について解説をします
-
acquires Pool-> Acquires -
borrow_global_mut-> Global Storage Operators
Acquires
- その関数が以下の関数でリソースにアクセスする時に明示的に宣言する必要がある
move_fromborrow_globalborrow_global_mut
- "関数がそのリソースを取得する"ことを示す
その上で、上記で出てきた borrow_global_mut とはなんでしょうか?
Global Storage Operators
- グローバルストレージから(/に対して)、リソースを作成・削除・更新することができるAPI
-
move_to<T>(&signer,T)- signer の address にリソースTを移動する
-
move_from<T>(address): T- address からリソースTを抜き出す
-
borrow_global_mut<T>(address): &mut T- address からリソースTの更新可能な参照を取得
-
borrow_global<T>(address): &T- address からリソースTの更新不可能な参照を取得
-
exists<T>(address): bool- address にリソースTが存在するか確認する
-
- T は
keyability を持つ必要がある- (
keyability がないと address 直下に保存できないため)
- (
これらの事前知識を踏まえた上で、実装してみたいと思います。
public entry fun deposit(account: &signer, amount: u64) acquires Pool {
    let coin = coin::withdraw<HandsonCoin>(account, amount);
    let pool_ref = borrow_global_mut<Pool>(@handson);
    coin::merge(&mut pool_ref.balance, coin);
}
- ユーザーから直接 call されるため
entryを付与します - ユーザーからの引数
- 誰からの deposit であるか ->
account: &signer - どれくらいの数量か ->
amount: u64
- 誰からの deposit であるか ->
-
coin::withdraw<T>- 指定した signer から指定した amount 分 Coin を抽出する
-
coin::merge- 第一引数の Coin に第二引数の Coin をマージする
coin::xxx は aptos_framework::coin に既にある関数で、Coin の操作はこれをできるだけ利用しています。
coin::merge の前に、borrow_global_mut<Pool>(@handson) で Pool リソースの更新可能な参照を取得しておいて、その Coin のフィールドを引数に指定することで、Deposit による Pool への Coin 追加を実現しています。
次にテストを実装してみましょう。
initialize して deposit するだけです。
#[test(owner = @handson, account = @0x111)]
fun test_deposit(owner: &signer, account: &signer) acquires Pool {
    initialize(owner);
    deposit(account, 100);
}
ここで aptos move test でテストを実行してみます。
Tips: Coin 向けの初期化
が、下記のようなエラーが出てしまいました。
managed_coin::initialize, coin::register, account::create_account_for_test なし
┌── test_deposit ──────
│ error[E11001]: test failure
│     ┌─ /.../.move/https___github_com_aptos-labs_aptos-core_git_main/aptos-move/framework/aptos-framework/sources/coin.move:454:9
│     │
│ 449 │       public fun withdraw<CoinType>(
│     │                  -------- In this function in 0x1::coin
│     ·
│ 454 │ ╭         assert!(
│ 455 │ │             is_account_registered<CoinType>(account_addr),
│ 456 │ │             error::not_found(ECOIN_STORE_NOT_PUBLISHED),
│ 457 │ │         );
│     │ ╰─────────^ Test was not expected to abort but it aborted with 393221 here
│
│
└──────────────────
aptos_framework::coin::withdraw のところでエラーが出てしまっています。
今回作成した Handson Coin (厳密には Handson を type に指定した aptos_framework にのっとった Coin) をアプリケーションで利用するためには、
- Coin 自体を初期化する ->
aptos_framework::managed_coin::initialize<T> - Coin をユーザーに対して初期化する ->
aptos_framework::coin::register<T>
という操作が必要です。
下記のように修正してみましょう。
-
initializeで Coin の初期化を行う -
registerというユーザーに Coin の登録をする function を追加する - テストで
depositの前にregisterを実行することで、Coin を扱う前の前提条件を満たすようにします
public entry fun initialize(owner: &signer) {
    assert!(!exists<Pool>(signer::address_of(owner)), 1);
    move_to(owner, Pool {
        balance: coin::zero<HandsonCoin>()
    });
+   managed_coin::initialize<HandsonCoin>(
+       owner,
+       b"Handson Coin",
+       b"HANDSON",
+       0,
+       false
+   );
}

+public entry fun register(account: &signer) {
+    coin::register<HandsonCoin>(account);
+}

public entry fun deposit(account: &signer, amount: u64) acquires Pool {
  ...
}

#[test(owner = @handson, account = @0x111)]
fun test_deposit(owner: &signer, account: &signer) acquires Pool {
    initialize(owner);
+   register(account);
    deposit(account, 100);
}
この状態で再度テストを実行してみましょう。
┌── test_deposit ──────
│ ITE: An unknown error was reported. Location: error[E11001]: test failure
│     ┌─ /.../.move/https___github_com_aptos-labs_aptos-core_git_main/aptos-move/framework/aptos-framework/sources/account.move:492:23
│     │
│ 491 │     public(friend) fun register_coin<CoinType>(account_addr: address) acquires Account {
│     │                        ------------- In this function in 0x1::account
│ 492 │         let account = borrow_global_mut<Account>(account_addr);
│     │                       ^^^^^^^^^^^^^^^^^
ですがまたエラーが出てしまいました。
今度は aptos_framework::coin::register を実行した時の呼び出し先の aptos_framework::account::register_coin で"Account"リソースが指定したユーザーに存在しないとエラーが出ています。
テスト用のユーザーに対して下記のようにし、address に紐づく Account を生成する必要があります。
...
+#[test_only]
+use aptos_framework::account;
...
#[test(owner = @handson, account = @0x111)]
fun test_deposit(owner: &signer, account: &signer) acquires Pool {
+   let account_addr = signer::address_of(account);
+   account::create_account_for_test(account_addr);
+
    initialize(owner);
    register(account);
    deposit(account, 100);
}
これで、再度テストを実行してみます。が、再度エラーが...
(先に言っておきますがこれで最後ですm(_ _)m)
┌── test_deposit ──────
│ error[E11001]: test failure
│     ┌─ /.../.move/https___github_com_aptos-labs_aptos-core_git_main/aptos-move/framework/aptos-framework/sources/coin.move:269:9
│     │
│ 268 │     public fun extract<CoinType>(coin: &mut Coin<CoinType>, amount: u64): Coin<CoinType> {
│     │                ------- In this function in 0x1::coin
│ 269 │         assert!(coin.value >= amount, error::invalid_argument(EINSUFFICIENT_BALANCE));
│     │         ^^^^^^^^^^^^^^^^^^^^^^^^^^^^^^^^^^^^^^^^^^^^^^^^^^^^^^^^^^^^^^^^^^^^^^^^^^^^^ Test was not expected to abort but it aborted with 65542 here
│
│
└──────────────────
一番実際のアプリケーションに近いエラーです。
指定した amount を満たす残高を持っていない、というエラーが出ています。
テスト用に Deposit を実行したユーザーに対して Coin を mint しましょう。
aptos_framework::managed_coin::mint で mint が可能です。
#[test(owner = @handson, account = @0x111)]
fun test_deposit(owner: &signer, account: &signer) acquires Pool {
    let account_addr = signer::address_of(account);
    account::create_account_for_test(account_addr);

    initialize(owner);
    register(account);
+
+   managed_coin::mint<HandsonCoin>(owner, account_addr, 100);
    deposit(account, 100);
}
これでテストを実行すると...
% aptos move test
...
Running Move unit tests
[ PASS    ] 0xaaa::pool::test_deposit
[ PASS    ] 0xaaa::pool::test_initialize
[ PASS    ] 0xaaa::pool::test_initialize_twice
Test result: OK. Total tests: 3; passed: 3; failed: 0
{
  "Result": "Success"
}
無事テスト実行できました!
最後にもう少しだけコードを追加して、Deposit により Coin が移動しているか確認してみましょう。
- Pool に Coin が追加されたか
-
borrow_globalで Pool を取得し、coin::valueを使って格納している Coin の量を確認する
-
- account から Coin が減っているか
-
coin::balanceで account にある Coin の量を確認する
-
#[test(owner = @handson, account = @0x111)]
fun test_deposit(owner: &signer, account: &signer) acquires Pool {
    let account_addr = signer::address_of(account);
    account::create_account_for_test(account_addr);

    initialize(owner);
    register(account);

    managed_coin::mint<HandsonCoin>(owner, account_addr, 100);
    deposit(account, 100);

+   assert!(coin::value(&borrow_global<Pool>(signer::address_of(owner)).balance) == 100, 0);
+   assert!(coin::balance<HandsonCoin>(account_addr) == 0, 0);
}
再度テストを実行して成功を確認してみてください!
以上で Deposit は完了です。
Withdraw
Deposit で学んだことのほとんどで Withdraw を実装することができます。
コードを見てみましょう。
...
public entry fun withdraw(account: &signer, amount: u64) acquires Pool {
    let coin = coin::extract(&mut borrow_global_mut<Pool>(@handson).balance, amount);
    coin::deposit(signer::address_of(account), coin)
}
...
一点だけ新しい要素があります。
let coin = coin::extract(&mut borrow_global_mut<Pool>(@handson).balance, amount);
-
coin::extract- 第一引数の更新可能な参照である Coin から第二引数で指定した amount 分の Coin を抽出します
- そのため、関数の実行結果として Coin が取得されます
-
coin::withdrawではcoin::registerによって作成された Resource で Coin を管理している address に対しては利用可能ですが、今回作成した Pool は独自に Coin の置き場を定義したので、coin::mergeを利用する必要があります
- 第一引数の更新可能な参照である Coin から第二引数で指定した amount 分の Coin を抽出します
上記に対するテストは以下の通りです。
withdraw を行う前に、Pool に Coin を追加しなければならないので、Deposit でのテストで実行した内容を最初に実行し、実際に withdraw を行うというフローになっています。
#[test(owner = @handson, account = @0x111)]
fun test_withdraw(owner: &signer, account: &signer) acquires Pool {
    let account_addr = signer::address_of(account);
    account::create_account_for_test(account_addr);

    initialize(owner);
    register(account);

    managed_coin::mint<HandsonCoin>(owner, account_addr, 100);
    deposit(account, 100);

    withdraw(account, 75);

    assert!(coin::value(&borrow_global<Pool>(signer::address_of(owner)).balance) == 25, 0);
    assert!(coin::balance<HandsonCoin>(account_addr) == 75, 0);
}
Refactor: Test Code
Deposit のテストである test_deposit と Withdraw のテストである test_borrow で同じ事前処理を行なっているので、この辺りを共通化して Refactor しましょう。
以下のように共通の事前処理を行うための setup function を実装します。
+#[test_only]
+fun setup(owner: &signer, account: &signer) {
+    account::create_account_for_test(signer::address_of(account));
+
+    initialize(owner);
+    register(account);
+}
#[test(owner = @handson, account = @0x111)]
fun test_deposit(owner: &signer, account: &signer) acquires Pool {
+    setup(owner, account);
    let account_addr = signer::address_of(account);
-    account::create_account_for_test(account_addr);

-    initialize(owner);
-    register(account);

    managed_coin::mint<HandsonCoin>(owner, account_addr, 100);
    deposit(account, 100);

    assert!(coin::value(&borrow_global<Pool>(signer::address_of(owner)).balance) == 100, 0);
    assert!(coin::balance<HandsonCoin>(account_addr) == 0, 0);
}
#[test(owner = @handson, account = @0x111)]
fun test_withdraw(owner: &signer, account: &signer) acquires Pool {
+    setup(owner, account);
    let account_addr = signer::address_of(account);
-    account::create_account_for_test(account_addr);

-    initialize(owner);
-    register(account);

    managed_coin::mint<HandsonCoin>(owner, account_addr, 100);
    deposit(account, 100);

    withdraw(account, 75);

    assert!(coin::value(&borrow_global<Pool>(signer::address_of(owner)).balance) == 25, 0);
    assert!(coin::balance<HandsonCoin>(account_addr) == 75, 0);
}
Refactor を実行したらテストを回しましょう。
(余談ですが move はテストが爆速でそこは最高です。)
% aptos move test
...
Running Move unit tests
[ PASS    ] 0xaaa::pool::test_deposit
[ PASS    ] 0xaaa::pool::test_initialize
[ PASS    ] 0xaaa::pool::test_initialize_twice
[ PASS    ] 0xaaa::pool::test_withdraw
Test result: OK. Total tests: 4; passed: 4; failed: 0
{
  "Result": "Success"
}
Enhance: Deposit & Withdraw
ここまでで Deposit, Withdraw を実装してきましたが、持っている Coin の出し入れをするだけなので、もう少しやれることを増やそうと思います。
今回は LpCoin を扱うようにして、Deposit 時に Mint, Withdraw 時に Burn するようにします。
LpCoin の初期化
HandsonCoin の LpCoin として LpHandsonCoin を用意します。
HandsonCoin のように初期化をしたいのですが、今回は HandsonCoin を Deposit/Withdraw されることに合わせて、後続のフローで自動で Mint/Burn をする必要があります。
これを実現するために、新しく Capabilities を考慮する必要があります。
coin::initialize により、Mint や Burn を行うための権限にあたる Capability が同時に返され、これを用いて Burn や Mint を行う必要がある。
(つまり Coin の初期化を実行したユーザー/処理が、Burn / Mint に関する権限を最初にコントロールできる、ということ)
公式ではないですが、このデザインパターンに関する解説もあるので参照ください。
上記を踏まえて以下のように実装修正しましょう。
struct HandsonCoin {}
+struct LpHandsonCoin {}
+struct CapabilitiesForLp has key {
+    burn_cap: coin::BurnCapability<LpHandsonCoin>,
+    freeze_cap: coin::FreezeCapability<LpHandsonCoin>,
+    mint_cap: coin::MintCapability<LpHandsonCoin>,
+}

struct Pool has key {
    balance: coin::Coin<HandsonCoin>
}

public entry fun initialize(owner: &signer) {
    assert!(!exists<Pool>(signer::address_of(owner)), 1);
    move_to(owner, Pool {
        balance: coin::zero<HandsonCoin>()
    });
    managed_coin::initialize<HandsonCoin>(
        owner,
        b"Handson Coin",
        b"HANDSON",
        0,
        false
    );
+    let (burn_cap, freeze_cap, mint_cap) = coin::initialize<LpHandsonCoin>(
+        owner,
+        string::utf8(b"Lp Handson Coin"),
+        string::utf8(b"LPHANDSON"),
+        0,
+        false
+    );
+    move_to(owner, CapabilitiesForLp {
+        burn_cap,
+        freeze_cap,
+        mint_cap,
+    });
}

public entry fun register(account: &signer) {
    coin::register<HandsonCoin>(account);
+    coin::register<LpHandsonCoin>(account);
}
- struct の追加
-
LpHandsonCoin- 新たに利用する HandsonCoin に対する LpCoin
-
CapabilitiesForLp- 先述の Capabilities を格納するための Resource
- Account 直下に直接保存するので、
keyability を設定します
-
-
initialize,registerともにHandsonCoinに対して行なっていることと同様の操作をします
let (burn_cap, freeze_cap, mint_cap) = coin::initialize<LpHandsonCoin>(...)
- Capability を取得するために、
managed_coin::initializeではなくcoin::initializeを利用しています - Tips
- 関数から複数の戻り値が存在する場合は、上記のように記述することで、それぞれを変数に格納することができます
LpCoin の Burn/Mint
初期化時に保存した Capability を利用して、
- Coin の Deposit 時に LpCoin の Mint
- Coin の Withdraw 時に LpCoin の Burn
を実際に実装してみましょう。
Deposit
coin::mintを利用して、LpCoin の Mint を行います。
-public entry fun deposit(account: &signer, amount: u64) acquires Pool {
+public entry fun deposit(account: &signer, amount: u64) acquires Pool, CapabilitiesForLp {
    let coin = coin::withdraw<HandsonCoin>(account, amount);
    let pool_ref = borrow_global_mut<Pool>(@handson);
    coin::merge(&mut pool_ref.balance, coin);

+    // for lpcoin
+    let cap = &borrow_global<CapabilitiesForLp>(@handson).mint_cap;
+    let lpcoin = coin::mint(amount, cap);
+    coin::deposit(signer::address_of(account), lpcoin);
}
- LpCoin の Mint まで
-
borrow_globalでcoin::MintCapability<LpHandsonCoin>の参照を取得 -
coin::mintを利用して、新規 LpCoin を発行する- この時に Deposit で入れられた amount を利用することで同量の Coin を生成する
- この amount の計算部分に独自のロジックを入れたりすることで、より Lending らしくできます
- この段階では
Coin<LpCoin>を生成するまで -> 次の操作で deposit する
- この時に Deposit で入れられた amount を利用することで同量の Coin を生成する
-
- で生成した LpCoin を関数の呼び出しをしたユーザーに
coin::depositで Deposit する
- で生成した LpCoin を関数の呼び出しをしたユーザーに
-
-
... acquires ..., CapabilitiesForLp- LpCoin の Mint のために CapabilitiesForLp の参照を取得する必要があるために、この宣言を追加します
Withdraw
coin::burnを利用して、LpCoin の Burn を行います。
- public entry fun withdraw(account: &signer, amount: u64) acquires Pool {
+ public entry fun withdraw(account: &signer, amount: u64) acquires Pool, CapabilitiesForLp {
    let coin = coin::extract(&mut borrow_global_mut<Pool>(@handson).balance, amount);
    coin::deposit(signer::address_of(account), coin);

+    // for lpcoin
+    let lpcoin = coin::withdraw<LpHandsonCoin>(account, amount);
+    let cap = &borrow_global<CapabilitiesForLp>(@handson).burn_cap;
+    coin::burn(lpcoin, cap);
}
- LpCoin の Burn まで
-
borrow_globalでcoin::BurnCapability<LpHandsonCoin>の参照を取得 - Burn する LpCoin を
coin::withdrawでユーザーから引き出す -
- で取得した LpCoin を
coin::burnで実際に Burn する
- で取得した LpCoin を
-
Test
詳細は省略しますが、下記のようにテストも実装しましょう。
HandsonCoinに対するチェックと同じようにLpHandsonCoinの数量チェックをしましょう。
#[test(owner = @handson, account = @0x111)]
-fun test_deposit(owner: &signer, account: &signer) acquires Pool {
+fun test_deposit(owner: &signer, account: &signer) acquires Pool, CapabilitiesForLp {
    ...
    assert!(coin::value(&borrow_global<Pool>(signer::address_of(owner)).balance) == 100, 0);
    assert!(coin::balance<HandsonCoin>(account_addr) == 0, 0);
+    assert!(coin::balance<LpHandsonCoin>(account_addr) == 100, 0);
}
#[test(owner = @handson, account = @0x111)]
-fun test_withdraw(owner: &signer, account: &signer) acquires Pool {
+fun test_withdraw(owner: &signer, account: &signer) acquires Pool, CapabilitiesForLp {
    ...
    assert!(coin::value(&borrow_global<Pool>(signer::address_of(owner)).balance) == 25, 0);
    assert!(coin::balance<HandsonCoin>(account_addr) == 75, 0);
+    assert!(coin::balance<LpHandsonCoin>(account_addr) == 25, 0);
}
aptos move test で再度テストを実行して、オールOKであれば完了です!
ここまでで今回の Lending のコアロジックの実装はおしまいです、お疲れ様でした。
Others
ここでは、Blockchain application によくあるいくつかの開発 Topic について move/aptos でも紹介していきたいと思います。
Event
Application や 3rd Party がブロックチェーンのヒストリカルデータなどを取得/格納していくために、トランザクションごとに Event が発行される、のは多くのチェーンが持つ仕様です。
Aptos でも同様の概念が存在するので、ここではこの Event を実装してみましょう。
Aptos での Event 発行は、aptos_framework::event で実装することができます。
ざっくり実装することを列挙すると、
- Event 自体が持つ、Event として保持しておきたい value の field を持つ Struct を定義する
-
aptos_framework::event::EventHandleを格納する Struct を定義する- 上記 struct から Resource 生成し、それを保存する Account に保持させる
- Event を発行させたい処理フロー上で
event::emit_eventを利用し Event を発行する
となります。
これを実際に実装したのが下記の内容です。
...
use aptos_framework::coin;
+use aptos_framework::event;
use aptos_framework::managed_coin;

...

struct Pool has key {
    balance: coin::Coin<HandsonCoin>
}

+// for event
+struct DepositEvent has store, drop {
+    caller: address,
+    amount: u64,
+}
+struct WithdrawEvent has store, drop {
+    caller: address,
+    amount: u64,
+}
+struct PoolEventHandle has key, store {
+    deposit_event: event::EventHandle<DepositEvent>,
+    withdraw_event: event::EventHandle<WithdrawEvent>,
+}

public entry fun initialize(owner: &signer) {
    ...
+    move_to(owner, PoolEventHandle {
+        deposit_event: account::new_event_handle<DepositEvent>(owner),
+        withdraw_event: account::new_event_handle<WithdrawEvent>(owner),
+    });
}

...

-public entry fun deposit(account: &signer, amount: u64) acquires Pool, CapabilitiesForLp {
+public entry fun deposit(account: &signer, amount: u64) acquires Pool, CapabilitiesForLp, PoolEventHandle {
    ...
+    event::emit_event<DepositEvent>(
+        &mut borrow_global_mut<PoolEventHandle>(@handson).deposit_event,
+        DepositEvent {
+            caller: signer::address_of(account),
+            amount,
+        },
+    );
}

-public entry fun withdraw(account: &signer, amount: u64) acquires Pool, CapabilitiesForLp {
+public entry fun withdraw(account: &signer, amount: u64) acquires Pool, CapabilitiesForLp, PoolEventHandle {
    ...
+    event::emit_event<WithdrawEvent>(
+        &mut borrow_global_mut<PoolEventHandle>(@handson).withdraw_event,
+        WithdrawEvent {
+            caller: signer::address_of(account),
+            amount,
+        },
+    );
}

...
struct DepositEvent has store, drop {...}
struct WithdrawEvent has store, drop {...}
- Event 自体を定義した Struct
-
event::EventHandleに利用するために、store,dropability が必要です - 今回は呼び出し元の caller と数量の amount を定義していますが、自身で任意のものを設定することが可能です
-
その他
-
struct PoolEventHandle has key, store {}- EventHandle を格納する Struct
-
account::new_event_handle<T>(...)-
accountmodule の関数により EventHandle を生成することができます
-
-
event::emit_eventで Event の発行をします- 実装方法の詳細は先述の diff でご確認ください
これでロジック側の実装は完了です、合わせてテストを記述しましょう。
event::counter で発行された Event 数を確認します。
以下のようになります。
...
#[test(owner = @handson, account = @0x111)]
-fun test_deposit(owner: &signer, account: &signer) acquires Pool, CapabilitiesForLp {
+fun test_deposit(owner: &signer, account: &signer) acquires Pool, CapabilitiesForLp, PoolEventHandle {
    ...
+    let event_handle = borrow_global<PoolEventHandle>(signer::address_of(owner));
+    assert!(event::counter<DepositEvent>(&event_handle.deposit_event) == 1, 0);
}
#[test(owner = @handson, account = @0x111)]
-fun test_withdraw(owner: &signer, account: &signer) acquires Pool, CapabilitiesForLp {
+fun test_withdraw(owner: &signer, account: &signer) acquires Pool, CapabilitiesForLp, PoolEventHandle {
    ...
+    let event_handle = borrow_global<PoolEventHandle>(signer::address_of(owner));
+    assert!(event::counter<WithdrawEvent>(&event_handle.withdraw_event) == 1, 0);
}
...
これで Event に関する実装も完了です!
Ownership
次に Ownership による Access Control を実装してみようと思います。
これ自体は Blockchain の概念ではなく Blockchain の実装における一つのプラクティスみたいなものです。
Solidity でいうと、OpenZeppelin がライブラリを提供していたりします。
今回はモジュールの初期化を行なっている initialize を Owner とする Account のみが実行できるようなバリデーションを入れてみたいと思います。
OpenZeppelin のライブラリで使用できる onlyOwner modifier と同じようなイメージです。
実装方法は簡単で、実行者と Owner とする Address が一致するかどうかを確認するバリデーションを追加します。
実際にコードを書いてみましょう。
...
+fun owner(): address {
+    @handson
+}

public entry fun initialize(owner: &signer) {
    let owner_addr = signer::address_of(owner);
+    assert!(owner_addr == owner(), 1);
-    assert!(!exists<Pool>(signer::address_of(owner)), 1);
+    assert!(!exists<Pool>(signer::address_of(owner)), 2);
    move_to(owner, Pool {
        balance: coin::zero<HandsonCoin>()
    });
    ...
}
...
-
owner()で owner address である@handsonを取得する処理を抽出する -
assert!(owner_addr == owner(), 1)-
signer::address_ofで取得した実行者のアドレスと owner address を比較する
-
バリデーション追加をしたのでそのためのテストも追加してみましょう。
#[test(owner = @handson)]
#[expected_failure(abort_code = 2)]
fun test_initialize_twice(owner: &signer) {
    account::create_account_for_test(signer::address_of(owner));
    initialize(owner);
    initialize(owner);
}
以上で、Ownership を考慮した Validation の実装は完了です。
Aptos Framework には Access Control List のための Module も存在するのでこちらを利用するともう少し機能が多い ACL の導入ができます。
以上でハンズオンは終了です!
まとめ
今回は Move language を Aptos Network で、という新しい言語で実際のチェーンで動かすための開発をテーマにしてハンズオンを作成してみました。
Move language 自体はスマートコントラクトを構築する上で必要な要素をわかりやすく、設計コンセプトを満たすような(良い意味で)最低限のスコープでできている言語ですが、それを実際のプロダクトとして使えるようにするために Aptos (あるいは Aptos Framework) が様々な機能を追加提供したり拡張しています。
ベースとして選定した言語をどのようにチェーン(もう少し汎用的な開発の言葉に置き換えるとインフラ)に適用させるかはチェーンごとに違いがあったりしてそういうのも面白いです。
Aptos では Move のリソース操作である move_to, borrow_global などをそのまま生かしていますが、同じく Move 言語ベースの Sui Blockchain では全く新しいAPIを利用するようにしていたりします。
このような言語設計そのものと、ブロックチェーン提供者が Dapps 開発者に向けて提供する Framework で双方の開発者のそれぞれの工夫を意識するきっかけだったり、それ自体を感じられるハンズオンになっていたら良いなと思います。
次は実際にこのスマートコントラクトを実際のチェーンにデプロイし操作してみる、ということまで紹介できたらなと思います。
最後までお読みいただきありがとうございました!
参考
Discussion