Ethereum 上のデータを照会しやすくする The Graph をローカルで使ってみる
はじめに
今回は、The Graph を自前の環境で動かす方法としてローカルで動作させる方法を紹介します。
The Graph は Dapps を構築する上でよく利用される仕組みなのですが、実装レベルで解説している日本語の記事は多くなかったので、今回対象にしてみました。
The Graph から有名な DeFi の Uniswap や Aave, Curve などの subgraph もつくられており、ethereum mainnet で利用されていたりします。
The Graph
The Graph とは一言で紹介すると、Ethereum 上のデータを照会しやすくする仕組みです。
ethereum 上で発生した event を取得してデータ更新/永続化し、取得するための GraphQL エンドポイントを提供してくれます。
これを subgraph という名前で誰でも The Graph に対して追加し誰でも利用できる基盤そのものを提供しています。
または protocol 本体およびエコシステムが github で公開されています。
今回 The Graph そのものは深く説明しませんが、記事後半にて参考リンクなどを展開しておきます。
ハンズオン
公開されているエコシステムと docker-compose を利用することでローカルでの開発をしていきます。
- graph-node
- graph-cli
- graph-ts
しかしいきなり Graph を起動できるわけではなく、Contract の準備など色々必要なので、以下の流れでやっていきます。
- Contract
- Contract の作成
- Hardhat Network を利用した Local Network へのデプロイ
- Graph
- Graph 周りの実装
- Graph のデプロイ
- docker-compose の利用
Contract の実装とデプロイ
今回のメインは、Graph の方なので細かい実装手順などは紹介しません。
このステップを簡単に済ませるために下記の repository を利用します。
README に起動方法まで記述しているので、利用してください。
Graph 利用するまでにやるべきことがわかるように紹介していきます。
実装
Graph は event 発生を検知してデータの更新/永続化を行うために、実装する function で event を emit する必要があります。
今回は下記のような流れで利用される Protocol を構築しています。
ユーザーがDeFiで、 Deposit to Pool -> Stake to StakingPool するのをイメージして、
- ERC20を
PoolContract に deposit する -> Gov Token がもらえる - Gov Token を
StakingPoolContract に deposit する -> Vote Escrow Token がもらえる
というフローとなるような Protocol の構成にしました

ざっくりと実装しているコードを示すと以下のようなイメージです。
contract Pool is Ownable {
  // ...
  IERC20 public token;       // ERC20 (ex stable coin)
  IERC20 public rewardToken; // Governance Token
  // ...
  event Deposited(address indexed user, uint256 amount);
  // ...
  function deposit(uint256 _amount) public returns (bool) {
    _totalSupply = _totalSupply.add(_amount);
    _balances[msg.sender] = _balances[msg.sender].add(_amount);

    token.safeTransferFrom(msg.sender, address(this), _amount);

    rewardToken.safeApprove(msg.sender, 0);
    rewardToken.safeApprove(msg.sender, _amount);
    rewardToken.safeTransfer(msg.sender, _amount);

    emit Deposited(msg.sender, _amount);
    return true;
  }
}

contract StakingPool is Ownable {
  // ...
  IERC20 public token;       // Governance Token
  IERC20 public rewardToken; // Vote Escrow Token
  // ...
  event Staked(address indexed user, uint256 amount);
  // ...
  function stake(uint256 _amount) public returns (bool) {
    _totalSupply = _totalSupply.add(_amount);
    _balances[msg.sender] = _balances[msg.sender].add(_amount);

    token.safeTransferFrom(msg.sender, address(this), _amount);

    rewardToken.safeApprove(msg.sender, 0);
    rewardToken.safeApprove(msg.sender, _amount);
    rewardToken.safeTransfer(msg.sender, _amount);

    emit Staked(msg.sender, _amount);
    return true;
  }
}
event を発生させるためには、event を宣言し
event Deposited(address indexed user, uint256 amount);
event 発生元となる function にて emit event を行う必要があります
function deposit() {
  // ...
  emit Deposited(msg.sender, _amount);
}
従って先ほどの実装により、今回の Protocol では、
- Pool#deposit -> event Deposited
- StakingPool#stake -> event Staked
というように event が発生するようになります。
デプロイ
Graph においてはデプロイ時に特別考慮することはないので、使用するネットワークにコントラクト同士の依存関係を正しく解決して、デプロイできれば問題ありません。
今回利用するコントラクトにおいては、README にある通りの手順で Hardhat network 内にデプロイできていれば大丈夫です。
(どこかでデプロイスクリプトの解説ができればと思います...🙇♂️)
yarn && yarn compile
npx hardhat node --hostname 0.0.0.0
yarn hardhat run scripts/deploy.ts --network localhost
正しく deploy できていれば下記の通りログが確認できると思います。
# network を起動している terminal
...
eth_sendTransaction
  Contract call:       SampleVeToken#setOperator
  Transaction:         0xf69b3b7f544e95d3fa0048da6198fbec5f198f6473e9c60756001e22b249c2a6
  From:                0xf39fd6e51aad88f6f4ce6ab8827279cfffb92266
  To:                  0x5fc8d32690cc91d4c39d9d3abcbd16989f875707
  Value:               0 ETH
  Gas used:            29260 of 29260
  Block #8:            0xebb32d584e71cfddf13cc6287acdbe2c22633b57ef5ecc382e616e8a5a525f79

eth_chainId
eth_getTransactionByHash
# scripts/deploy.ts 実行した terminal
START deploy-single
> Deploy mockDai
> Deploy mockTrueUsd
> Deploy GovToken
> Deploy daiPool
> Deploy trueUsdPool
> Deploy VeToken
> Deploy StakingToken
> SampleVeToken.setOperator
FINISH deploy
{
  mocks: {
    dai: '...',
    trueUsd: '...'
  },
  pools: {
    dai: '...',
    trueUsd: '...'
  },
  stakingPool: '...',
  tokens: {
    govToken: '...',
    veToken: '...'
  }
}
Graph の実装とデプロイ
先述した Protocol の情報を取得するための Graph を構築します。
本項目で実装するコードを格納している Repository はこちらです。
ここでは Graph を利用するための大枠の流れを説明し、個別での実装/対応詳細については後述します。
Graph が収集/提供する情報を定義するためには大きく下記リソースの実装が必要です。
Manifest (subgraph.yaml) - The manifest defines what datasources your subgraph will index
Schema (schema.graphql) - The GraphQL schema define what data you wish to retrieve from the subgraph
AssemblyScript Mappings (mapping.ts) - This is the code that translates data from your datasources to the entities defined in the schema
引用元
Manifest
1つの Subgraph が管理する情報のソースとなる下記情報を yaml 形式で記述して作成します
- 購読する event の定義
- 購読対象の event を確認した際に発行するロジックの function name
- ロジック自体は
AssemblyScript Mappingsの方で記述されます
- ロジック自体は
- event を発行する Contract の abi, 購読対象とする Contract address など
参考
(まさに Graph 独自の項目なので理解が難しいと思いますが、サンプルをまず真似したりしてもらえると良いかと思います...)
Schema
Subgraph にて index するデータの定義を行います
GraphQL形式なので、利用したことある開発者にとっては馴染みがあると思います。
スキーマ定義に入る際に、下記の点を注意すると良いとのことです。
Before defining entities, it is important to take a step back and think about how your data is structured and linked. All queries will be made against the data model defined in the subgraph schema and the entities indexed by the subgraph. Because of this, it is good to define the subgraph schema in a way that matches the needs of your dapp. It may be useful to imagine entities as "objects containing data", rather than as events or functions.
定義する際に何をイメージするかというと、"index したいデータ" をイメージし、アプリケーションで扱うモデルに近い形をイメージして実装できるとよさそうです。
Subgraph でこのデータを構築する際に input となるのは、
- 発生した event に含まれる value
- transaction の情報含め
- contract に対する参照リクエスト
であり、これらから構築可能なアプリケーションで扱うモデルを考えられると良いです。
参考
AssemblyScript Mappings
取得した event から、index するデータを更新/永続化するロジックそのものです。
TypeScriptでコーディングします。
- 各 event ごとの handler となる function の input の型
- contract, indexed data へのアクセス
など Graph 特有な部分はあるのですが、基本的には普通に function を実装するだけです。
参考
実装
graph-cli で初期化
graph-cliを利用して雛形を作成し、こちらを修正していく方針とします。
$ yarn global add @graphprotocol/graph-cli
graph initにより雛形を作成します。
参考として、以下に実行結果および入力内容を記載しておきます。
% graph init
✔ Protocol · ethereum
✔ Product for which to initialize · hosted-service
✔ Subgraph name · linnefromice/sample-staking-graph
✔ Directory to create the subgraph in · sample-staking-graph
✔ Ethereum network · mainnet
✔ Contract address · 0x0000000000000000000000000000000000000000
✖ Failed to fetch ABI from Etherscan: ABI not found, try loading it from a local file
✔ ABI file (path) · ../sample-staking-graph/abis/Pool.json
✔ Contract Name · Pool
———
  Generate subgraph
  Write subgraph to directory
✔ Create subgraph scaffold
✔ Initialize networks config
✔ Initialize subgraph repository
✔ Install dependencies with yarn
✔ Generate ABI and schema types with yarn codegen

Subgraph linnefromice/sample-staking-graph created in sample
これにより下記のような構成でプロジェクトが作成されます
|- abis
|  L Pool.json
|- generated // AssemblyScript Mappings で使用する schema / abi からの自動生成コード
|- node_modules
|- src
|  L mapping.ts // AssemblyScript Mappings
|- network.json
|- package.json
|- schema.graphql // Schema
|- subgraph.yml // Manifest
|- tsconfig.json
L yarn.lock
ここまで確認できたらプロジェクトの初期化はOKです
後続で、Manifest, Schema, AssemblyScript Mappings を修正していきましょう
Manifest の修正
Manifest にて今回実装した Pool, StakingPool のコントラクトの event を購読し、event handler に mapping させましょう。
成果物をベースに各所解説していきます。
全体
specVersion: 0.0.2
schema:
  file: ./schema.graphql
dataSources:
  - kind: ethereum
    name: Pool
    network: mainnet
    source:
      abi: Pool
    mapping:
      kind: ethereum/events
      apiVersion: 0.0.5
      language: wasm/assemblyscript
      entities:
        - Deposit
      abis:
        - name: Pool
          file: ./abis/Pool.json
      eventHandlers:
        - event: Deposited(indexed address,uint256)
          handler: handleDeposit
      file: ./src/mapping-pool.ts
  - kind: ethereum
    name: StakingPool
    network: mainnet
    source:
      address: "0x0165878A594ca255338adfa4d48449f69242Eb8F"
      abi: StakingPool
    mapping:
      kind: ethereum/events
      apiVersion: 0.0.5
      language: wasm/assemblyscript
      entities:
        - Deposit
      abis:
        - name: StakingPool
          file: ./abis/StakingPool.json
      eventHandlers:
        - event: Staked(indexed address,uint256)
          handler: handleStake
      file: ./src/mapping-staking-pool.ts
大枠の構成
主に dataSource が修正部分です
- specVersion ... manifest の仕様を定める version です
- 初期生成生成時に自動で定義されます
- schema ... Schemaの配置先です
- 今回は元々の
schema.graphqlを修正するので更新不要です
- 今回は元々の
- dataSource ... event を購読する contract の abi, event そのもの, mapping させる function などを定義します
- 今回は、Pool, StakingPool 2つの Contract を利用するので2つ分記述しています
specVersion: 0.0.2
schema:
  file: ./schema.graphql
dataSources:
  - kind: ethereum
    name: Pool
    network: mainnet
...
  - kind: ethereum
    name: StakingPool
    network: mainnet
...
1つの Data Source に関して
StakingPool の方を参考に記述内容を解説します
- kind ... 固定で問題ないです (ethereum)
- name ... ex Contract名
- 自動生成される TypeScript のコードで使用されるので、コントラクトごとに一位が良いと思います
- network ... ethereum network 名
- サポートされているネットワークは下記です
- 今回は local network 内で ethereum を使用するのでそのままで問題ないです
- source ... event 発行元の filter をします
- abi (must) ... Contract の abi
- address (Optional) ... 収集対象の Contract
- address でフィルタリングしたい時は記述します
- mapping ... AssemblyScript Mappings 関連
- entities ... 利用するエンティティ
- Schema で定義するものを指定します
- eventHandlers ... event と handler の mapping
- file ... AssemblyScript Mappings の実装があるファイル
- 一つの yaml 内で複数の data source 定義をしている場合には、別々で ts ファイルを作成する必要があり、ここで path を設定します
- entities ... 利用するエンティティ
  - kind: ethereum
    name: StakingPool
    network: mainnet
    source:
      address: "0x0165878A594ca255338adfa4d48449f69242Eb8F"
      abi: StakingPool
    mapping:
      kind: ethereum/events
      apiVersion: 0.0.5
      language: wasm/assemblyscript
      entities:
        - Deposit
      abis:
        - name: StakingPool
          file: ./abis/StakingPool.json
      eventHandlers:
        - event: Staked(indexed address,uint256)
          handler: handleStake
      file: ./src/mapping-staking-pool.ts
Schema の修正
今回は最低限のエンティティのみ作成しています
Graph における特徴としては、
-
@entityで entity を示す - データの一意性を担保するための
idfield が必要
上記以外の項目については基本 Contract の field を mapping するように定義していますが、
Pool.depositCount, StakingPool.stakeCount のみは、event が発行されるたびに +1 するイメージの field になります。
type Pool @entity {
  id: ID!
  token: Bytes! # address
  rewardToken: Bytes! # address
  totalSupply: BigDecimal!
  depositCount: BigInt!
}

type StakingPool @entity {
  id: ID!
  token: Bytes! # address
  rewardToken: Bytes! # address
  totalSupply: BigDecimal!
  stakeCount: BigInt!
}
AssemblyScript Mappings の修正
こちらも StakingPool の方を参考に記述内容を解説します
成果物をベースに各所解説していきます
import { Address, BigDecimal, BigInt } from "@graphprotocol/graph-ts";
import { Staked, StakingPool } from "../generated/StakingPool/StakingPool"
import { StakingPool as StakingPoolEntity } from "../generated/schema"

function getStakingPool(address: Address): StakingPoolEntity {
  const entity = StakingPoolEntity.load(address.toHexString())
  if (entity) return entity
  const newEntity = new StakingPoolEntity(address.toHexString())
  const _instance = StakingPool.bind(address)
  const _token = _instance.try_token()
  newEntity.token = _token.reverted ? Address.zero() : _token.value
  const _rewardToken = _instance.try_rewardToken()
  newEntity.rewardToken = _rewardToken.reverted ? Address.zero() : _rewardToken.value
  const _totalSupply = _instance.try_totalSupply()
  newEntity.totalSupply = _totalSupply.reverted ? BigDecimal.zero() : _totalSupply.value.toBigDecimal()
  newEntity.stakeCount = BigInt.fromString("0")
  return newEntity
}

export function handleStake(event: Staked): void {
  const entity = getStakingPool(event.address)
  entity.totalSupply = entity.totalSupply.plus(event.params.amount.toBigDecimal())
  entity.stakeCount = entity.stakeCount.plus(BigInt.fromString("1"))
  entity.save()
}
発生した event のハンドリング
実際に event が発行されるたびに call される場所は
function handleStake(event: Staked): void
で、このeventに Staked の event 情報が格納されています。
後続の下記ロジックにて、
  entity.totalSupply = entity.totalSupply.plus(event.params.amount.toBigDecimal())
  entity.stakeCount = entity.stakeCount.plus(BigInt.fromString("1"))
  entity.save()
- StakingPool Entity の totalSupply field を計算する -> event に含まれる
amount分を追加する- event に含まれる value は
event.paramsで参照できます
- event に含まれる value は
- StakingPool Entity の stakeCount field を計算する -> +1 する
- このように、特に event の value や、transaction を利用しないことも可能です
- Entity を更新する
ということを実施しています。
Entitynの生成
function getStakingPool(address: Address): StakingPoolEntity
...
  const entity = getStakingPool(event.address)
...
こちらでは、Entity の取得(存在しなければ生成)を行なっています。
function getStakingPool(address: Address): StakingPoolEntity {
  const entity = StakingPoolEntity.load(address.toHexString())
  if (entity) return entity
  const newEntity = new StakingPoolEntity(address.toHexString())
  const _instance = StakingPool.bind(address)
  const _token = _instance.try_token()
  newEntity.token = _token.reverted ? Address.zero() : _token.value
  const _rewardToken = _instance.try_rewardToken()
  newEntity.rewardToken = _rewardToken.reverted ? Address.zero() : _rewardToken.value
  const _totalSupply = _instance.try_totalSupply()
  newEntity.totalSupply = _totalSupply.reverted ? BigDecimal.zero() : _totalSupply.value.toBigDecimal()
  newEntity.stakeCount = BigInt.fromString("0")
  return newEntity
}
- 生成時には、再取得を容易にするために、address のみを利用しています
const newEntity = new StakingPoolEntity(address.toHexString())
- 生成後に下記の通り、contract の field 情報を Entity に mapping しています
- Contract 接続
- ex)
const _instance = StakingPool.bind(address)
- ex)
- Contract の view function call
- ex)
const _token = _instance.try_token()- Contract の view function の接頭辞に
tryをつけた function が自動生成されています
- Contract の view function の接頭辞に
- ex)
- Entity への格納
- ex)
newEntity.token = _token.reverted ? Address.zero() : _token.value-
_token.revertedで Contract 接続できなかった場合を考慮する必要があります
-
- ex)
- Contract 接続
  const _instance = StakingPool.bind(address)
  const _token = _instance.try_token()
  newEntity.token = _token.reverted ? Address.zero() : _token.value
  const _rewardToken = _instance.try_rewardToken()
  newEntity.rewardToken = _rewardToken.reverted ? Address.zero() : _rewardToken.value
  const _totalSupply = _instance.try_totalSupply()
  newEntity.totalSupply = _totalSupply.reverted ? BigDecimal.zero() : _totalSupply.value.toBigDecimal()
  newEntity.stakeCount = BigInt.fromString("0")
ここまでで実装自体は完了です。
プロジェクトルートで下記が実行できればここまで正しく対応できていることが確認できます。
yarn codegen && yarn build
$ graph codegen
  Skip migration: Bump mapping apiVersion from 0.0.1 to 0.0.2
  Skip migration: Bump mapping apiVersion from 0.0.2 to 0.0.3
  Skip migration: Bump mapping apiVersion from 0.0.3 to 0.0.4
  Skip migration: Bump mapping apiVersion from 0.0.4 to 0.0.5
  Skip migration: Bump mapping specVersion from 0.0.1 to 0.0.2
✔ Apply migrations
✔ Load subgraph from subgraph.yaml
  Load contract ABI from abis/Pool.json
  Load contract ABI from abis/StakingPool.json
✔ Load contract ABIs
  Generate types for contract ABI: Pool (abis/Pool.json)
  Write types to generated/Pool/Pool.ts
  Generate types for contract ABI: StakingPool (abis/StakingPool.json)
  Write types to generated/StakingPool/StakingPool.ts
✔ Generate types for contract ABIs
✔ Generate types for data source templates
✔ Load data source template ABIs
✔ Generate types for data source template ABIs
✔ Load GraphQL schema from schema.graphql
  Write types to generated/schema.ts
✔ Generate types for GraphQL schema

Types generated successfully

✨  Done in 1.65s.
yarn run v1.22.17
$ graph build
  Skip migration: Bump mapping apiVersion from 0.0.1 to 0.0.2
  Skip migration: Bump mapping apiVersion from 0.0.2 to 0.0.3
  Skip migration: Bump mapping apiVersion from 0.0.3 to 0.0.4
  Skip migration: Bump mapping apiVersion from 0.0.4 to 0.0.5
  Skip migration: Bump mapping specVersion from 0.0.1 to 0.0.2
✔ Apply migrations
✔ Load subgraph from subgraph.yaml
  Compile data source: Pool => build/Pool/Pool.wasm
  Compile data source: StakingPool => build/StakingPool/StakingPool.wasm
✔ Compile subgraph
  Copy schema file build/schema.graphql
  Write subgraph file build/Pool/abis/Pool.json
  Write subgraph file build/StakingPool/abis/StakingPool.json
  Write subgraph manifest build/subgraph.yaml
✔ Write compiled subgraph to build/

Build completed: /../../sample-staking-graph/build/subgraph.yaml
デプロイ
今回のローカル開発では docker-compose を利用して、container 内で Graph を起動させ、
subgraph を構築し、local network にある Contract と連携します。
docker-compose
graph-nodeには、公式の docker イメージと、それを docker-compose で起動できる yml ファイルを提供してくれているため、そのまま利用します。
graph-node に加え、Graph に必要な ipfs, database (postgres) のイメージも含んでいます。
こちらのファイルを docker folder に配置します。
少し補足すると、network を選択する際に以下の修正をする必要があります。(今回は local なので不要になります)
services.graph-node.environment.ethereum にて、
- Network name
- RPC endpoint url
を定義する必要があり、こちらを修正する必要があります。
services:
  graph-node:
    ...
    environment:
      ...
      ethereum: 'mainnet:http://host.docker.internal:8545'
こちらのファイルを持ち込むことができたら、下記のコマンドで docker-compose が起動できるか確認してみてください
docker-compose -f docker/docker-compose-localhost.yml up
※ 前提として、Contract を deploy 済みの local network が起動している必要があります。
起動が問題なければ下記のようなログが出力されます。
graph-node_1  | May 10 15:24:45.267 INFO Starting JSON-RPC admin server at: http://localhost:8020, component: JsonRpcServer
graph-node_1  | May 10 15:24:45.280 INFO Starting GraphQL HTTP server at: http://localhost:8000, component: GraphQLServer
graph-node_1  | May 10 15:24:45.283 INFO Starting index node server at: http://localhost:8030, component: IndexNodeServer
graph-node_1  | May 10 15:24:45.286 INFO Starting metrics server at: http://localhost:8040, component: MetricsServer
graph-node_1  | May 10 15:24:45.286 INFO Starting GraphQL WebSocket server at: ws://localhost:8001, component: SubscriptionServer
graph-node_1  | May 10 15:24:45.288 INFO Started all assigned subgraphs, node_id: default, count: 0, component: SubgraphRegistrar
graph-node_1  | May 10 15:24:45.298 INFO Downloading latest blocks from Ethereum, this may take a few minutes..., provider: mainnet-rpc-0, component: BlockIngestor
http://localhost:8000で、GraphQL endpoint が提供されており、
http://localhost:8000/subgraphs/name/(project-name)/graphqlで GraphiQL にアクセス可能です。
subgraph の deploy
ここまでで Graph platform を docker で起動させることまではできています。
最後に、Manifest, Schema, AssemblyScript Mappings を実装することで定義した Subgraph を デプロイできます。
以下のコマンドでデプロイできます
yarn create-local # 初回のみ
yarn deploy-local
-
create-local(graph create) で追加する subgraph の name space を作成 -
graph deploy(graph deploy) で指定した name space に subgraph をデプロイ
デプロイまでできると下記のようなログが出力されます
% yarn deploy-local
yarn run v1.22.17
$ graph deploy --node http://localhost:8020/ --ipfs http://localhost:5001 linnefromice/sample-staking-graph
✔ Version Label (e.g. v0.0.1) ·
  Skip migration: Bump mapping apiVersion from 0.0.1 to 0.0.2
  Skip migration: Bump mapping apiVersion from 0.0.2 to 0.0.3
  Skip migration: Bump mapping apiVersion from 0.0.3 to 0.0.4
  Skip migration: Bump mapping apiVersion from 0.0.4 to 0.0.5
  Skip migration: Bump mapping specVersion from 0.0.1 to 0.0.2
✔ Apply migrations
✔ Load subgraph from subgraph.yaml
  Compile data source: Pool => build/Pool/Pool.wasm
  Compile data source: StakingPool => build/StakingPool/StakingPool.wasm
✔ Compile subgraph
  Copy schema file build/schema.graphql
  Write subgraph file build/Pool/abis/Pool.json
  Write subgraph file build/StakingPool/abis/StakingPool.json
  Write subgraph manifest build/subgraph.yaml
✔ Write compiled subgraph to build/
  Add file to IPFS build/schema.graphql
                .. QmNmYmHyAU9KxaVF3Typ9EUxkcL9JZnTKeNk9WRng6whz3
  Add file to IPFS build/Pool/abis/Pool.json
                .. QmUkZdzdNANRNwHPoscyibvykaKJtmUDAUBxY3DJpYXvKf
  Add file to IPFS build/StakingPool/abis/StakingPool.json
                .. QmW2RaMGJD4TLkQtdoUtDxSPpJ1QzamXHGXtytjCnBG7qR
  Add file to IPFS build/Pool/Pool.wasm
                .. QmQcRcX8Fs5iWXFgGVuKnEkzp2zcLuLoLN3XW9JBWJXzw6
  Add file to IPFS build/StakingPool/StakingPool.wasm
                .. QmaiXi5hM4fvNN3RotK77SpNDXCStkB4w1BrjxiBUTGZxm
✔ Upload subgraph to IPFS

Build completed: QmSZ7SMPHdu76yxmusjhHhMRU5sve3Kn22DTFnVJtK75H5

Deployed to http://localhost:8000/subgraphs/name/linnefromice/sample-staking-graph/graphql

Subgraph endpoints:
Queries (HTTP):     http://localhost:8000/subgraphs/name/linnefromice/sample-staking-graph
Subscriptions (WS): http://localhost:8001/subgraphs/name/linnefromice/sample-staking-graph
やっとローカル環境に Graph の構築、subgraph のデプロイまで行うことができました。
あとちょっとです、最後に動作確認をして終わりにしましょう。
動作確認
GraphQL endpoint にアクセスしてみましょう。
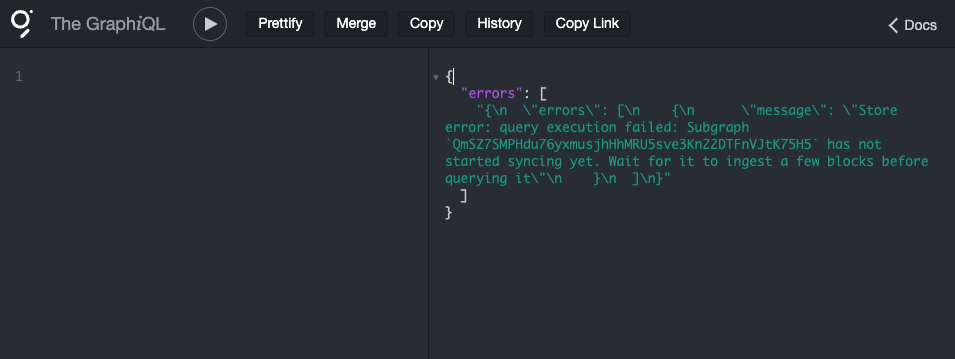
最初は上記のようなエラーが出てしまいます。
これは Subgraph に指定している event の発行をまだ検知できていないためです。(なので local 以外で基本見ることはないと思います。)
実際に Contract に対し event を発生させるための script を protocol 側に準備しているので、実行してみましょう。
cd sample-staking-protocol
yarn mock-mint:local # Pool に deposit するための Mock Token を mint します
yarn scenario:local # Pool への deposit, StakingPool への stake まで行います
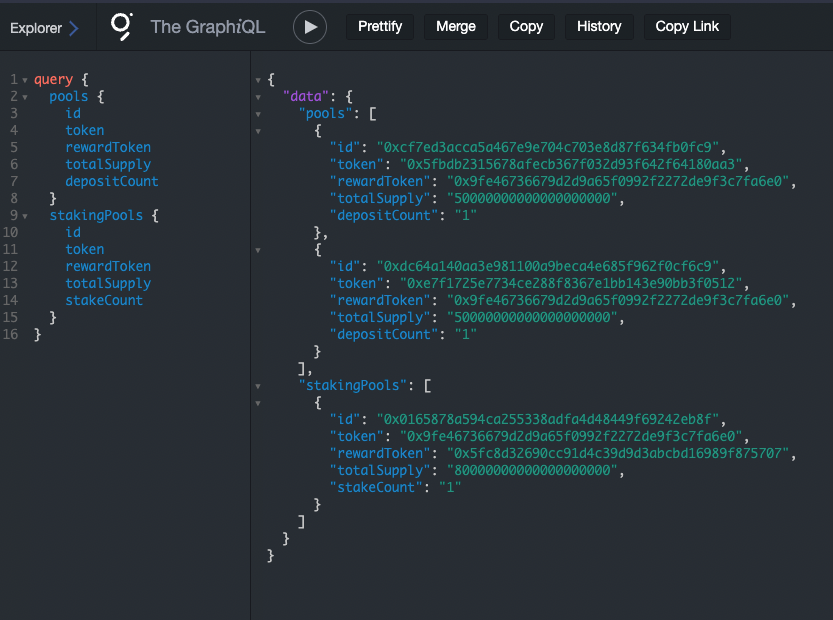
上記実行後、GraphQL endpoint にアクセスして query を実行すると以下の通りデータ取得ができます!
(totalSupply など script にある値と一致していることが確認できると思います、興味がある方は確認してみて下さい)
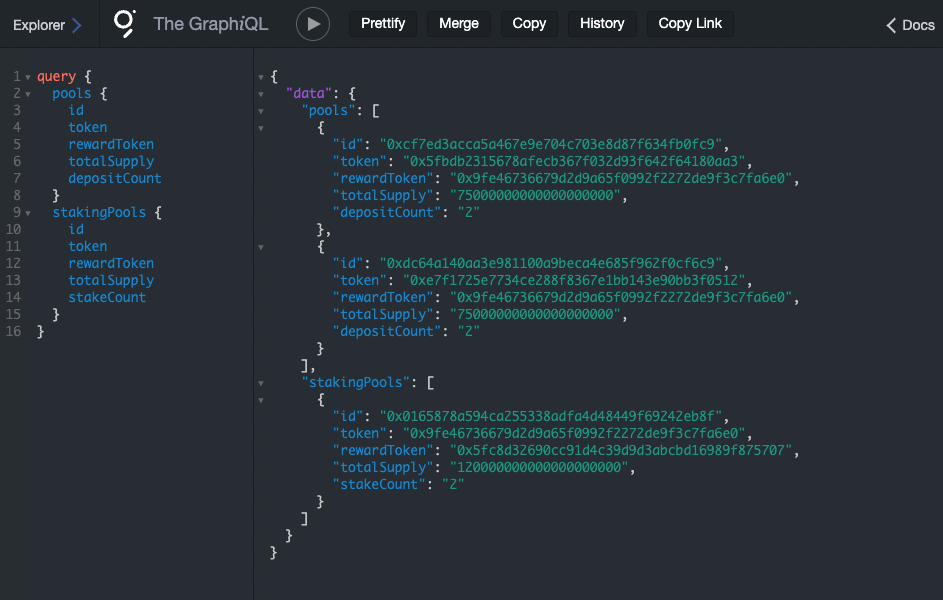
再度 script を実行してみると、
yarn scenario:local
以下の通り、totalSupply, depositCount/stakeCount が更新されていることが確認できます。
大変手順が多く、ボリューミーでしたが、無事にローカルで Graph を動作させることができました。
おわりに
The Graph / Subgraph の構築自体は、それまでに理解することも多いですが、
一度理解できるとどんな Protocol にも横展開可能であり、何よりも圧倒的にフロントエンドの助けになります。(Bot などにも利用できます)
The Graph があることで Dapps 開発を Web 開発の延長に近づけることができ、モダンな GraphQL をフロント開発に提供し、Reading のほとんどで GraphQL ecosystem の恩恵を受けることができます。
本ハンズオンを参考に実際に手を動かしていただき、ぜひ機会があれば本番利用してみてほしいなと思います。
参考
(本文有料)
Discussion