NewRelicのAWSインテグレーションをTerraformで書いてみた
弊社でNewRelicを入れ始めているのでAWSとのインテグレーション設定をしているのですが
画面ポチポチで複数環境設定していくのが思ったよりめんどくさかったのでTerraform化してみました!
Provider設定
Terraformのインストールなどの部分は割愛させてもらって
AWSとNewRelicのTerraformプロバイダの設定から書いていきます。
# Configure terraform
terraform {
  required_providers {
    newrelic = {
      source = "newrelic/newrelic"
    }
    aws = {
      source  = "hashicorp/aws"
      version = "~> 5.0"
    }
  }
}

# Configure the New Relic provider
provider "newrelic" {
  account_id = var.account_id
  api_key    = var.user_api_key
  region     = "US"
}

provider "aws" {
  region = "ap-northeast-1"
}
普段AWSの認証部分はAWS SSOを使ってターミナル上でログインして取得しているんですが
NewRelicはAPIキーを発行してそのキーをTerraform実行時に指定する必要があるため
variableで設定しました。
インテグレーション部分の実装
次に肝心のインテグレーション部分の実装を行っていきます。
インテグレーションの方法として
- CloudWatchのメトリクスをFirehose越しに取得するCloudWatchメトリクスストリーム
- AWSが提供しているAPIを利用したAPIポーリング
の2つがあります。
NewRelic的にはCloudWatchメトリクスストリームのほうを推奨されているみたいなのですが
まだ始めたてで使用感がつかめていない部分があったのとAPIポーリングのほうがコストが安い、という理由で
弊社ではAPIポーリングの運用から始めました。
# NewRelicのAWSアカウントに権限を与えるArrumeRoleポリシー
data "aws_iam_policy_document" "newrelic_assume_policy" {
  statement {
    actions = ["sts:AssumeRole"]

    principals {
      type = "AWS"
      // NewRelicのAWSアカウントID
      identifiers = [754728514883]
    }

    condition {
      test     = "StringEquals"
      variable = "sts:ExternalId"
      values   = [var.account_id]
    }
  }
}

# NewRelicに送るデータを取得する用のIAMロール
resource "aws_iam_role" "newrelic_aws_role" {
  name               = "NewRelicInfrastructure-Integrations"
  description        = "New Relic Cloud integration role"
  assume_role_policy = data.aws_iam_policy_document.newrelic_assume_policy.json
}

# AWSのマネージドポリシーReadOnlyAccessでは許可されていないけど取得したいリソースに関するポリシー(あんまり細かくは見れてないです><)
resource "aws_iam_policy" "newrelic_aws_permissions" {
  name        = "NewRelicCloudStreamReadPermissions"
  description = ""
  policy      = <<EOF
{
  "Version": "2012-10-17",
  "Statement": [
    {
      "Action": [
        "budgets:ViewBudget",
        "cloudtrail:LookupEvents",
        "config:BatchGetResourceConfig",
        "config:ListDiscoveredResources",
        "ec2:DescribeInternetGateways",
        "ec2:DescribeVpcs",
        "ec2:DescribeNatGateways",
        "ec2:DescribeVpcEndpoints",
        "ec2:DescribeSubnets",
        "ec2:DescribeNetworkAcls",
        "ec2:DescribeVpcAttribute",
        "ec2:DescribeRouteTables",
        "ec2:DescribeSecurityGroups",
        "ec2:DescribeVpcPeeringConnections",
        "ec2:DescribeNetworkInterfaces",
        "ec2:DescribeVpnConnections",
        "health:DescribeAffectedEntities",
        "health:DescribeEventDetails",
        "health:DescribeEvents",
        "tag:GetResources",
        "xray:BatchGet*",
        "xray:Get*"
      ],
      "Effect": "Allow",
      "Resource": "*"
    }
  ]
}
EOF
}

data "aws_iam_policy" "read_only_access" {
  arn = "arn:aws:iam::aws:policy/ReadOnlyAccess"
}

resource "aws_iam_role_policy_attachment" "newrelic_aws_policy_attach" {
  role       = aws_iam_role.newrelic_aws_role.name
  policy_arn = aws_iam_policy.newrelic_aws_permissions.arn
}

resource "aws_iam_role_policy_attachment" "read_only_access_policy_attach" {
  role       = aws_iam_role.newrelic_aws_role.name
  policy_arn = data.aws_iam_policy.read_only_access.arn
}


# ここからはNewRelicプロバイダを利用したNewRelic側のインテグレーション設定部分
resource "newrelic_cloud_aws_link_account" "newrelic_cloud_integration_pull" {
  account_id             = var.account_id
  arn                    = aws_iam_role.newrelic_aws_role.arn
  metric_collection_mode = "PULL"
  name                   = "integration name"
  depends_on             = [aws_iam_role_policy_attachment.newrelic_aws_policy_attach]
}

# こんな感じでAWSの各リソースに対してポーリング設定を行っていきます。
resource "newrelic_cloud_aws_integrations" "newrelic_cloud_integration_pull" {
  account_id        = var.account_id
  linked_account_id = newrelic_cloud_aws_link_account.newrelic_cloud_integration_pull.id
  billing {
    metrics_polling_interval = 6000
  }
  cloudtrail {
    metrics_polling_interval = 6000
    aws_regions              = ["region名"]
  }
  health {
    metrics_polling_interval = 6000
  }
  trusted_advisor {
    metrics_polling_interval = 6000
  }
  vpc {
    aws_regions              = ["region名"]
    fetch_nat_gateway        = true
    fetch_vpn                = false
    metrics_polling_interval = 6000
  }
  s3 {
    metrics_polling_interval = 6000
  }
  sqs {
    fetch_extended_inventory = true
    fetch_tags               = true
    aws_regions              = ["region名"]
    tag_key                  = "任意のタグキー"
    tag_value                = "任意のタグ値"
  }
  ebs {
    fetch_extended_inventory = true
    aws_regions              = ["region名"]
    tag_key                  = "任意のタグキー"
    tag_value                = "任意のタグ値"
  }
  alb {
    fetch_extended_inventory = true
    fetch_tags               = true
    aws_regions              = ["region名"]
    tag_key                  = "任意のタグキー"
    tag_value                = "任意のタグ値"
  }
  elasticache {
    fetch_tags  = true
    aws_regions              = ["region名"]
    tag_key                  = "任意のタグキー"
    tag_value                = "任意のタグ値"
  }
  api_gateway {
    aws_regions              = ["region名"]
    tag_key                  = "任意のタグキー"
    tag_value                = "任意のタグ値"
  }
  # ... 以下同じ用に設定していく
}
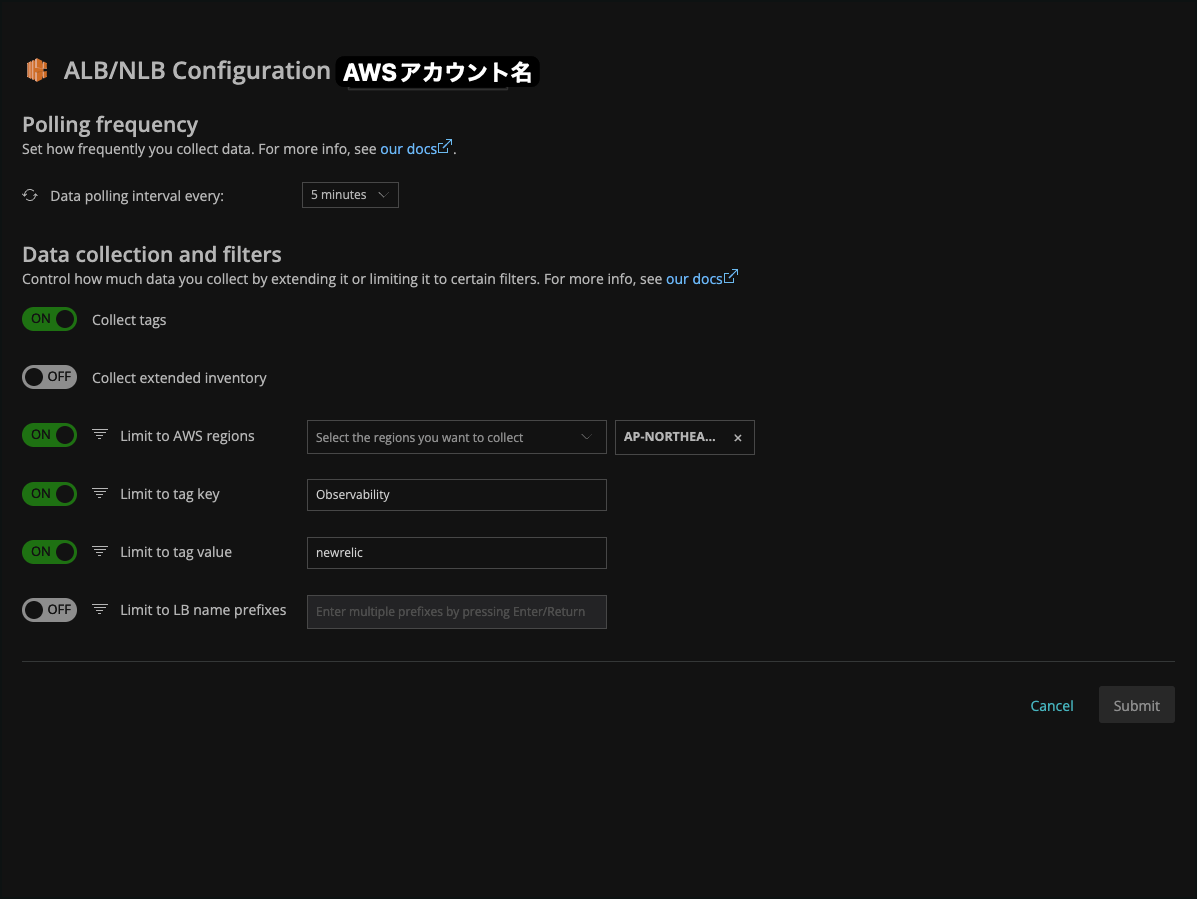
弊社の設定ではAWSのリソースにタグを付けて、そのタグが付いているものだけポーリング対象にしています。
タグで制限できない種類のリソースはポーリングの頻度を落としたりしてコストをかけないようにしています。
結果
全体

リソースごとの設定画面

最初ポーリングのData collection and filtersに何も設定してなかったら
AWSアカウントで設定していたGuardDutyから普段使ってないリージョンでAPIアクセスされてるでって警告来てビビりました、、
扱うAWSのリソースが増えてきたり環境いっぱい使ってると設定が面倒なので
こうやってIaC化しておくとよいなと思いました!
Discussion