【Next.js】モダンなフォームの作り方について知る
はじめに
Server Actionsやreact-hook-form、 zodといったモダンな技術を使ったフォームについて、作り方をキャッチアップするためのスクラップです。
参考
Server Actionsとは
「Server Actions」とはNext.jsのバージョン13.4で追加されたApp Routerの機能の一部、非同期関数です
form要素のsubmit時のサーバ側の処理を簡単に制御する機能
Next.js 13で紹介され、v14で安定となった
公式ドキュメントでは、「Next.jsはServer Actionsを使った、formのsubmitとデータ変換を制御するパワフルな機能を提供します。Server Actionsでは、エンドポントを手動で作成する必要はありません。代わりに、コンポーネントから直接呼び出すことのできる、非同期のサーバー関数を定義します。」と記載されています
formのsubmitの場合、通常は/api/helloのようなエンドポイントを定義してサーバ側の処理を記述します。
Server Actionsを使えば、サーバ側の処理を直接呼び出すことができるため、エンドポイントを作成する必要がなく、簡単に処理が書けるというのがメリットのようです。
Client Actionとは
Server Component が"use client"ディレクティブを境界に Client Component となるように、Client モジュールとして扱われる関数は「Client Action」となります。
Next.js 公式ドキュメントの Server Action を Client Component で使用する例をみてみましょう。myAction関数はサーバーのコードであるため、process.env.MY_SECRET_VALUEが参照でき、サーバーログとして出力されます。これは紛れもなく「Server Action」です。
"use client";

import { myAction } from "./actions";

export default function ClientComponent() {
  return (
    <form action={myAction}>
      <button type="submit">Add to Cart</button>
    </form>
  );
}
"use server";

export async function myAction() {
  console.log(process.env.MY_SECRET_VALUE);
}
ここでactoins.tsの"use server"ディレクティブを"use client"ディレクティブに変更してみましょう。すると今度は、ブラウザにログが出力されるようになります。ただし、出力されるログはundefinedです。
actions.ts
"use client"; // <- 📌

export async function myAction() {
  console.log(process.env.MY_SECRET_VALUE);
}
ディレクティブを変更しただけですが、この 2 つは別物としてみなせます。Client モジュールとして import された後者は、ブラウザ向けにバンドルされるモジュールです。そのため機密情報に相当するprocess.env.MY_SECRET_VALUEはバンドルされないようになっています。これが「Client Action」です。
Next.js の公式ドキュメントでは、この一見同じに見える「Server Actions / Client Actions」を併せて「React Actions」と呼んでいるようです。
従来のform要素のaction属性はURL 文字列しか渡せなかったが、関数 = React Actionを渡せるようになった
action属性は Server Action に限らず、React Action を渡すことが可能です。極端な話をすると、React Action の中で「外部 API サーバーと通信してデータ更新をする」という処理は必須ではありません。
試しに Client Action でwindow.alertを呼び出してみましょう。これが動作するのは、Server Action ではなく Client Action だと考えれば当然のことです。
'use client';

function ContactForm() {
    function formAction(formData: FormData) {
        window.alert(`Hello ${formData.get('message')}`);
    }
    return (
        <form action={formAction}>
            <input type="hidden" name="message" value={'world'} />
            <button>window.alert</button>
        </form>
    );
}

export default ContactForm;
React Action 向けの React 標準 Hook
React Action を使用するコードは、React Action 向けの React 標準 Hook が使用できます。いずれも Canary の Hook ですが、React Action と連携するための Hook です。
- useFormStatus
- useFormState
- useOptimistic
useFormStatus
useFormStatusHook は Form 送信中の状態を参照できる
以下の例だとdisable属性にuseFormStatusHookから取り出したpendingを渡しているので、1000 ms 経過前は Form の「送信中」にあたるため、ボタンはdisabledになる
'use client';

import { useFormStatus } from 'react-dom';

function Button() {
    // Form 送信中は pending: true になる
    const { pending } = useFormStatus();
    return <button disabled={pending}>window.alert</button>;
}

function ContactForm() {
    async function formAction(formData: FormData) {
        await new Promise((resolve) => setTimeout(resolve, 1000));
        window.alert(`Hello ${formData.get('message')}`);
    }
    return (
        <form action={formAction}>
            <input type="hidden" name="message" value={'world'} />
            <Button />
        </form>
    );
}

export default ContactForm;
useFormState
useFormStateHook は、第 1 引数に React Action を、第 2 引数に初期値をとる
初期値は「0」から始まり、ボタンを押下すると 100ms 遅延してインクリメントされる
先ほど同様に Form の送信中、ボタンはdisabledになる
'use client';

import { useFormState, useFormStatus } from 'react-dom';

function Button() {
    // Form 送信中は pending: true になる
    const { pending } = useFormStatus();
    return <button disabled={pending}>icnrement</button>;
}

function ContactForm() {
    async function formAction(prevValue: number) {
        await new Promise((resolve) => setTimeout(resolve, 1000));
        return prevValue + 1;
    }
    // count は React Action の戻り値で更新される
    const [count, formDispatch] = useFormState(formAction, 0);

    return (
        <form action={formDispatch}>
            <input type="hidden" name="message" value={'world'} />
            <p>count: {count}</p>
            <Button />
        </form>
    );
}

export default ContactForm;
Server Action と Client Action の違い
React Action 向けの React 標準 Hook は「Server Action / Client Action」を分け隔てることなく使用できる
ただし、Client Action として使用する場合、以下の「Server Action」のメリットを満たすことができない
-
API Client が不要になる
-
ハイドレーションを待たずに反応できる
-
Progressive Enhancement を維持できる
Progressive Enhancement
Progressive Enhancement とは「基本的機能を損なわないようにしつつ、JS が有効な環境では最良の体験を提供する」という実装方針です。From の場合、送信ができてバックエンド処理が行えるまでが基本的機能にあたります。ここまで紹介したコードはブラウザで動作していたため、JS をオフにしたら From の基本的機能が動かなくなってしまいます。
以下のように、Client Action の中で Server Action を呼ぶことが出来ます。この例では Server Action の戻り値をsetStateで保持しエラー表示していますが、Progressive Enhancement は維持できていません。 Client Action をaction属性に渡しているため、JS OFF 環境では動かないのが理由です。同時に、ハイドレーションを待たずに反応できるといった面も損なわれます。
Progressive Enhancement以下
'use client';

import { serverAction } from '@/domains/contact/contact.actions';
import { useState } from 'react';
import { useFormStatus } from 'react-dom';

function Button() {
    // Form 送信中は pending: true になる
    const { pending } = useFormStatus();
    return <button disabled={pending}>icnrement</button>;
}

function ContactForm() {
    const [message, setMessage] = useState<string | null>(null);
    const clientAction = async (formData: FormData) => {
        const res = await serverAction(formData);
        setMessage(res.message);
    };

    return (
        <form action={clientAction}>
            <input type="hidden" name="message" value={'world'} />
            {message && <p>error: {message}</p>}
            <Button />
        </form>
    );
}

export default ContactForm;
"use server";

export async function serverAction(formData: FormData) {
  if (Math.random() < 0.5) {
    return { message: "Internal Server Error" };
  }
  return { message: `${new Date().toLocaleTimeString()}` };
}
Progressive Enhancement が維持できている例
Progressive Enhancement を維持しつつ動かすためには、Server Action と useFormState を使用します。JS オフにした場合、ボタン押下で画面が毎回リロードされます。しかし、状態が更新されて表示されることが確認できます。「useFormStateを何故使うのか?」という問いに対しては、Progressive Enhancement を維持するためだと言い切れるでしょう。
'use client';

import { serverAction } from '@/domains/contact/contact.actions';
import {} from 'react';
import { useFormState } from 'react-dom';

export type State = {
    message: string | null;
};

export const initialState: State = {
    message: null,
};

function ContactForm() {
    const [formState, formDispatch] = useFormState(serverAction, initialState);

    return (
        <form action={formDispatch}>
            {formState.message && <p>error: {formState.message}</p>}
            <button>push me</button>
        </form>
    );
}

export default ContactForm;
'use server';

import { State } from '@/components/ContactForm/ContactForm';

export async function serverAction(_: State, formData: FormData): Promise<State> {
    if (Math.random() < 0.5) {
        return { message: 'Internal Server Error' };
    }
    return { message: `${new Date().toLocaleTimeString()}` };
}
react-hook-form と zod による、基本的なバリデーション付きフォーム
react-hook-form と zod を使えば、最小限のコードでバリデーション付きフォームを実装できる
React Hook Form とは
React Hook FormはReactでフォームを簡単に扱うことのできるライブラリ
ReactのHooksを使用して、フォームの管理状態やバリデーションを行うことができる
React Hook Formを使ったフォームの例
'use client';

import { useForm, SubmitHandler } from 'react-hook-form';

type Inputs = {
    firstName: string;
    lastName: string;
    comment: string;
    submit: any;
};

export type State = {
    message: string | null;
};

export const initialState: State = {
    message: null,
};

function ContactForm() {
    const {
        register,
        handleSubmit,
        watch,
        formState: { errors },
    } = useForm<Inputs>();
    const onSubmit: SubmitHandler<Inputs> = (data) => console.log(data);

    // watch
    const lastName = watch('lastName');
    return (
        <div className="wrapper">
            <h1>React Form</h1>
            <section className="section">
                <h2>useState Form</h2>
                <p>React Hook Formを使用してformを作成した例です。</p>
                <form onSubmit={handleSubmit(onSubmit)}>
                    <div className="form-item">
                        <label>
                            <span className="label required">必須</span>
                            <span>姓</span>
                            <input
                                type="text"
                                {...register('lastName', {
                                    required: '姓を入力してください',
                                })}
                            />
                        </label>
                        {errors.lastName?.message && (
                            <p className="error-message">{errors.lastName?.message}</p>
                        )}
                    </div>
                    <div className="form-item">
                        <label>
                            <span className="label required">必須</span>
                            <span>名</span>
                            <input
                                type="text"
                                {...register('firstName', {
                                    required: '名を入力してください',
                                })}
                            />
                        </label>
                        {errors.firstName?.message && (
                            <p className="error-message">{errors.firstName?.message}</p>
                        )}
                    </div>
                    <div className="form-item">
                        <label>
                            <span className="label required">必須</span>
                            <span>コメント</span>
                            <textarea
                                {...register('comment', {
                                    required: true,
                                    minLength: {
                                        value: 10,
                                        message: '10文字以上で入力してください',
                                    },
                                    maxLength: {
                                        value: 20,
                                        message: '20文字以下で入力してください',
                                    },
                                })}
                            />
                        </label>
                        {errors.comment?.message && (
                            <p className="error-message">{errors.comment.message}</p>
                        )}
                    </div>
                    <div className="submit-button">
                        <input type="submit" />
                    </div>
                </form>
            </section>
            <p>姓: {lastName}</p>
        </div>
    );
}

export default ContactForm;
useForm
useFormは、React Hook Formのライブラリ内で提供されるカスタムフックです。
フォームの状態管理やバリデーションルールを設定するために使用します。
register
register関数は、使用することでバリデーションルールを追加することができます。
このルールの追加が直感的というかかなりわかりやすくて良い点だと個人的に思っています。
ちなみに公式ドキュメントでは以下のように書かれていますが、サンプルコードで書いている通り、textareaタグでも普通に使えそうです。
This method allows you to register an input or select element and apply validation rules to React Hook Form.
訳(DeepL)このメソッドでは、input または select 要素を登録し、React Hook Form にバリデーションルールを適用します。
必須項目の指定
<input
  {...register("firstName", {
    required: true,
  })}
/>;
requiredの値をbooleanではなく文字列にすることで、このあとに説明するformStateのerrorsオブジェクトにここで指定したエラーの文字列が返ってくるようになります。とても便利ですね
<input
  {...register("firstName", {
    required: "名を入力してください",
  })}
/>;
文字数指定
文字数の指定もできます。
最低文字数を指定したい場合は、minLengthで、最大文字数を指定したい場合はmaxLengthで指定することができます。
<textarea
  {...register("comment", {
    minLength: 10, // 最低文字数
    maxLength: 20, // 最大文字数
  })}
/>;
また以下のように書くことで条件に達していない場合のエラー文を指定することもできます。
<textarea
  {...register("comment", {
    minLength: {
      value: 10,
      message: "10文字以上で入力してください",
    },
    maxLength: {
      value: 20,
      message: "20文字以下で入力してください",
    },
  })}
/>;
他のオプションなどについては以下を参照
handleSubmit
handleSubmit関数は、フォームが送信されるときに実行される関数を指定することができる
バリデーションルールにエラーがある場合はフォームの送信がされず、エラーがない場合にのみhandleSubmit関数に指定した関数が実行されるようになっています。
// バリデーションルールにエラーがなければonSubmit関数が実行される
<form onSubmit={handleSubmit(onSubmit)}>
watch
watch関数はその名の通り特定のフォームの入力フィールドの値を監視することができます。
監視されているフィールドの値をリアルタイムで取得することができたり、その値に基づいて他のアクションを実行することができます。
サンプルコードでは、姓の入力フィールドを監視しており、姓の入力フィールドに入力した値をリアルタイムでコンポーネント上に表示しています。
const lastName = watch("lastName");
formState
formStateオブジェクトは、フォームの状態の情報を保持している
Zodでバリデーションする
React Hook Formを使ったフォームの例で作成したフォームを、以下を参考にZodでバリデーションする
最終的に以下のようになった
'use client';

import { useForm } from 'react-hook-form';
import * as E from './Elements';
import { useFormState } from 'react-dom';
import { sendContactAction } from '@/domains/contact/contact.action';
import { produce } from 'immer';
// Zodと統合するためのライブラリ
import { zodResolver } from '@hookform/resolvers/zod';
import { ContactSchema } from '@/domains/contact/contact.schemas';
import { Contact, ContactActionState } from '@/domains/contact/contact.types';

/** フォームの各入力要素のID */
const INPUT_IDS = {
    name: 'name',
    email: 'email',
    comment: 'comment',
} as const satisfies Record<keyof Contact, string>;

/** フォームの初期状態 */
export const initialState = {
    contact: {
        name: '',
        email: '',
        comment: '',
    },
    currentTime: '',
    isSucceeded: false,
    errors: [],
} as const satisfies ContactActionState;

function ContactForm() {
    const [actionState, serverAction] = useFormState(
        sendContactAction,
        // produce は immer の関数で、初期値をイミュータブルに扱う事ができる
        produce(initialState, (state) => state),
    );

    /** フォームの状態を管理する */
    const { register, handleSubmit, watch, reset, formState } = useForm({
        // バリデーションスキーマを設定
        resolver: zodResolver(ContactSchema),
        // フォームの初期値を設定
        defaultValues: {
            name: '',
            email: '',
            comment: '',
        },
        // フォームのバリデーションを行うタイミングを設定
        mode: 'onChange',
    });

    return (
        <E.Root className="wrapper">
            <E.Header>
                <E.Title>React Form</E.Title>
                <h2>useState Form</h2>
                <p>React Hook Formを使用してformを作成した例です。</p>
            </E.Header>
            <E.FormSection className="section">
                {actionState.errors.length > 0 && (
                    <E.ErrorMessage className="error-message">
                        messages={actionState.errors}
                    </E.ErrorMessage>
                )}
                <form action={serverAction}>
                    <E.FormItem className="form-item">
                        <E.Label>
                            <label htmlFor={INPUT_IDS.name}>名前</label>
                            <E.Input id={INPUT_IDS.name} {...register('name')} />
                        </E.Label>
                        {formState.errors.name?.message && (
                            <E.ErrorMessage className="error-message">
                                {formState.errors.name?.message}
                            </E.ErrorMessage>
                        )}
                    </E.FormItem>
                    <E.FormItem className="form-item">
                        <E.Label>
                            <label htmlFor={INPUT_IDS.email}>メールアドレス</label>
                            <E.Input
                                id={INPUT_IDS.email}
                                {...register('email')}
                            />
                        </E.Label>
                        {formState.errors.email?.message && (
                            <E.ErrorMessage className="error-message">
                                {formState.errors.email?.message}
                            </E.ErrorMessage>
                        )}
                    </E.FormItem>
                    <E.FormItem className="form-item">
                        <E.Label>
                            <label htmlFor={INPUT_IDS.comment}>コメント</label>
                            <E.TextArea id={INPUT_IDS.comment} {...register('comment')} />
                        </E.Label>
                        {formState.errors.comment?.message && (
                            <E.ErrorMessage className="error-message">
                                {formState.errors.comment.message}
                            </E.ErrorMessage>
                        )}
                    </E.FormItem>
                    <E.ButtonContainer>
                        <E.SubmitButton type="submit">送信</E.SubmitButton>
                        <E.SubmitButton type="button" onClick={() => reset()}>
                            リセット
                        </E.SubmitButton>
                    </E.ButtonContainer>
                </form>
            </E.FormSection>
            {/* サーバーからの送信結果を表示 */}
            {actionState.isSucceeded && (
                <div>
                    <h2>送信結果</h2>
                    <p>名前: {actionState.contact?.name}</p>
                    <p>Email: {actionState.contact?.email}</p>
                    <p>コメント: {actionState.contact?.comment}</p>
                    <p>送信時間: {actionState.currentTime}</p>
                </div>
            )}
        </E.Root>
    );
}

export default ContactForm;
import { z } from 'zod';

/** 問い合わせフォームのバリデーションスキーマ */
export const ContactSchema = z.object({
    /** 名前 必須 */
    name: z
        .string({
            message: '名前が無効です',
        })
        .trim()
        .min(1, {
            message: '名前を入力してください',
        })
        .max(30, {
            message: '名前は30文字以内で入力してください',
        }),
    /** メールアドレス 必須 */
    email: z
        .string({
            message: 'メールアドレスが無効です',
        })
        .trim()
        .min(1, {
            message: 'メールアドレスを入力してください',
        })
        .email({
            message: 'メールアドレスが無効です',
        }),
    /** コメント 任意 */
    comment: z
        .string({
            message: 'コメントが無効です',
        })
        .trim()
        .max(1000, {
            message: 'コメントは1000文字以内で入力してください',
        })
        .optional(),
});
import { z } from 'zod';
import { ContactSchema } from './contact.schemas';

/** 問い合わせフォームのバリデーションスキーマ */
export type Contact = z.infer<typeof ContactSchema>;

/** 問い合わせフォーム送信アクションのステート */
export interface ContactActionState {
    /** 受け付けた問い合わせ情報 */
    contact: Contact | null;
    /** 送信時間 */
    currentTime: string;
    /** お問い合わせの送信が成功したかどうか */
    isSucceeded: boolean;
    /** お問い合わせの送信に失敗した場合のエラーメッセージ */
    errors: string[];
}
import { ContactSchema } from './contact.schemas';
import { Contact } from './contact.types';

/**
 * FormDataから正しい型の問い合わせ情報モデルを生成する
 */
export function formDataToContact(formData: FormData): Contact {
    return {
        name: formData.get('name')?.toString() ?? '',
        email: formData.get('email')?.toString() ?? '',
        comment: formData.get('comment')?.toString() ?? '',
    };
}

/**
 * 問い合わせ情報が正しいかどうかを検証し、エラーメッセージを返す
 */
export function validateContact(contact: Contact): string[] {
    const result = ContactSchema.safeParse(contact);

    if (result.success) {
        return [];
    }

    const errorsMessages = result.error.issues.map((issue) => issue.message);

    return errorsMessages;
}
'use server';

import { ContactActionState } from './contact.types';
import { formDataToContact, validateContact } from './contact.utils';

export async function sendContactAction(
    state: ContactActionState,
    formData: FormData,
): Promise<ContactActionState> {
    const contact = formDataToContact(formData);

    /** 問い合わせ情報が正しいかどうかを検証し、エラーメッセージを返す */
    const validationErrorMessages = validateContact(contact);

    /** 送信時間 */
    const currentTime = new Intl.DateTimeFormat('ja-JP', {
        timeZone: 'Asia/Tokyo',
        year: 'numeric',
        month: '2-digit',
        day: '2-digit',
        hour: '2-digit',
        minute: '2-digit',
        second: '2-digit',
    }).format(new Date());

    return {
        ...state,
        contact,
        currentTime,
        isSucceeded: true,
        errors: validationErrorMessages,
    };
}
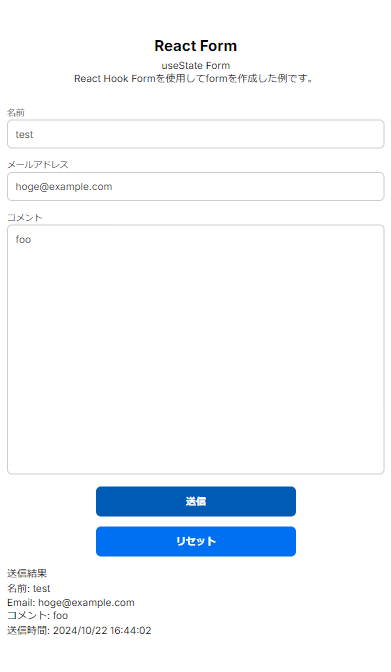
完成したフォーム

適当に入力すると、バリデーションによりエラーメッセージが表示される

input要素でtype属性を指定していないのは、デフォルトのエラーメッセージを表示させないためです
形式に問題がなければ送信できます

これでモダンなフォームのサンプルが完成しました
refainについて
ここでは、passwordとconfirmPasswordという 2 つのパスワード入力欄を設け、それらが一致することを検証しています。
zod のrefineメソッドを使うと、複数のフィールドを跨いだバリデーションを行えます。この例では、passwordとconfirmPasswordが等しいかどうかをチェックし、一致しない場合はエラーを設定しています。
const schema = z
  .object({
    password: z
      .string()
      .min(8, "パスワードは8文字以上で入力してください")
      .regex(/^[a-zA-Z0-9]+$/, "パスワードは英数字のみで入力してください"),
    confirmPassword: z.string(),
  })
  .refine((data) => data.password === data.confirmPassword, {
    message: "パスワードが一致しません",
    path: ["confirmPassword"],
  });
useFormStatusが常にfalseになる
useFormStatusを用いてボタンのdisable属性にpendingを渡そうとしたところ、pendingが常にfalseを返していました
調べてみるとReact Hook Form(RHF)のhandleSubmit()関数が React Actions と互換性がないことが原因で、useFormStatus が期待通りに機能していないと考えられるみたいです
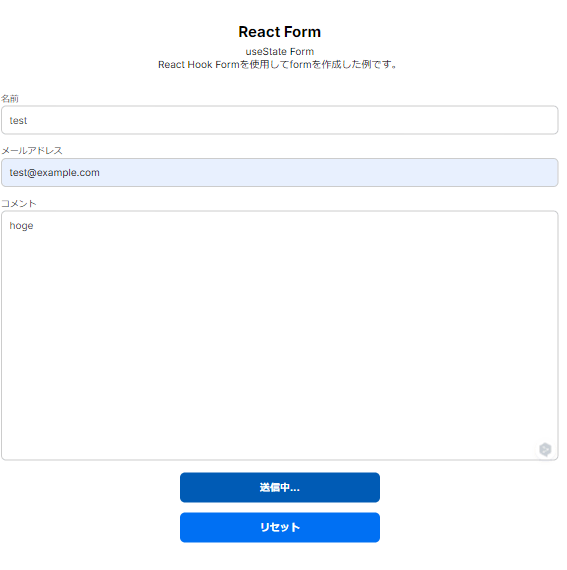
またこの問題とは直結するわけではありませんが、冒頭で紹介したuseActionState の取り組みやuseFormStatusの使用を避けるという記事を見る限り、現時点で useFomStatus の変わりに startTransition を利用することがよさそうです。
この情報を基に、フォームを以下のように更新
これで送信状態がUI上で確認できるようになりました
'use client';

import { useForm } from 'react-hook-form';
import * as E from './Elements';
import { useFormState, useFormStatus } from 'react-dom';
import { sendContactAction } from '@/domains/contact/contact.action';
import { produce } from 'immer';
// Zodと統合するためのライブラリ
import { zodResolver } from '@hookform/resolvers/zod';
import { ContactSchema } from '@/domains/contact/contact.schemas';
import { Contact, ContactActionState } from '@/domains/contact/contact.types';
import { useCallback, useTransition } from 'react';

/** フォームの各入力要素のID */
const INPUT_IDS = {
    name: 'name',
    email: 'email',
    comment: 'comment',
} as const satisfies Record<keyof Contact, string>;

/** フォームの初期状態 */
export const initialState = {
    contact: {
        name: '',
        email: '',
        comment: '',
    },
    currentTime: '',
    isSucceeded: false,
    errors: [],
} as const satisfies ContactActionState;

function ContactForm() {
    const [actionState, serverAction] = useFormState(
        sendContactAction,
        // produce は immer の関数で、初期値をイミュータブルに扱う事ができる
        produce(initialState, (state) => state),
    );
    const [isPending, startTransition] = useTransition();

    /** フォームの状態を管理する */
    const { register, reset, formState, handleSubmit } = useForm({
        // バリデーションスキーマを設定
        resolver: zodResolver(ContactSchema),
        // フォームの初期値を設定
        defaultValues: {
            name: '',
            email: '',
            comment: '',
        },
        // フォームのバリデーションを行うタイミングを設定
        mode: 'onChange',
    });

    /** フォームの送信アクション */
    const formAction = useCallback(
        async (formData: FormData) => {
            startTransition(() => {
                handleSubmit(() => {
                    serverAction(formData);
                })();
            });
        },
        [serverAction, startTransition],
    );

    return (
        <E.Root className="wrapper">
            <E.Header>
                <E.Title>React Form</E.Title>
                <h2>useState Form</h2>
                <p>React Hook Formを使用してformを作成した例です。</p>
            </E.Header>
            <E.FormSection className="section">
                {actionState.errors.length > 0 && (
                    <E.ErrorMessage className="error-message">
                        messages={actionState.errors}
                    </E.ErrorMessage>
                )}
                <form action={formAction}>
                    <E.FormItem className="form-item">
                        <E.Label>
                            <label htmlFor={INPUT_IDS.name}>名前</label>
                            <E.Input id={INPUT_IDS.name} {...register('name')} />
                        </E.Label>
                        {formState.errors.name?.message && (
                            <E.ErrorMessage className="error-message">
                                {formState.errors.name?.message}
                            </E.ErrorMessage>
                        )}
                    </E.FormItem>
                    <E.FormItem className="form-item">
                        <E.Label>
                            <label htmlFor={INPUT_IDS.email}>メールアドレス</label>
                            <E.Input
                                id={INPUT_IDS.email}
                                {...register('email')}
                            />
                        </E.Label>
                        {formState.errors.email?.message && (
                            <E.ErrorMessage className="error-message">
                                {formState.errors.email?.message}
                            </E.ErrorMessage>
                        )}
                    </E.FormItem>
                    <E.FormItem className="form-item">
                        <E.Label>
                            <label htmlFor={INPUT_IDS.comment}>コメント</label>
                            <E.TextArea id={INPUT_IDS.comment} {...register('comment')} />
                        </E.Label>
                        {formState.errors.comment?.message && (
                            <E.ErrorMessage className="error-message">
                                {formState.errors.comment.message}
                            </E.ErrorMessage>
                        )}
                    </E.FormItem>
                    <E.ButtonContainer>
                        <E.SubmitButton type="submit" disabled={isPending}>
                            {isPending ? '送信中...' : '送信'}
                        </E.SubmitButton>
                        <E.SubmitButton type="button" disabled={isPending} onClick={() => reset()}>
                            リセット
                        </E.SubmitButton>
                    </E.ButtonContainer>
                </form>
            </E.FormSection>
            {/* サーバーからの送信結果を表示 */}
            {actionState.isSucceeded && (
                <div>
                    <h2>送信結果</h2>
                    <p>名前: {actionState.contact?.name}</p>
                    <p>Email: {actionState.contact?.email}</p>
                    <p>コメント: {actionState.contact?.comment}</p>
                    <p>送信時間: {actionState.currentTime}</p>
                </div>
            )}
        </E.Root>
    );
}

export default ContactForm;
