AWS Lambdaで銀行名を取得するための関数を作る
はじめに
Lambda関数についてキャッチアップしつつ、銀行名を取得する関数を作成します
参考
AWS Lambda とは何か
AWS Lambda を使用すると、サーバーをプロビジョニングしたり管理したりすることなくコードを実行できます。
Lambda は、高可用性コンピューティング インフラストラクチャ上でコードを実行し、サーバーとオペレーティング システムのメンテナンス、容量のプロビジョニングと自動スケーリング、ログ記録など、コンピューティング リソースのすべての管理を実行します。Lambda を使用する場合、必要なのは、Lambda がサポートする言語ランタイムのいずれかでコードを提供することだけです。
コードを Lambda 関数に整理します。Lambda サービスは必要なときにのみ関数を実行し、自動的にスケールします。消費したコンピューティング時間に対してのみ料金が発生します。
チュートリアルを実践
関数の作成
- AWS Lambdaの管理画面へ行き「関数の作成」をクリック

- 以下のように設定
- 設計図の使用
- 設計図名: Hello world function
- 関数名: myHelloName
- 実行ロール: 基本的なLamdaアクセス権限で新しいロールを作成
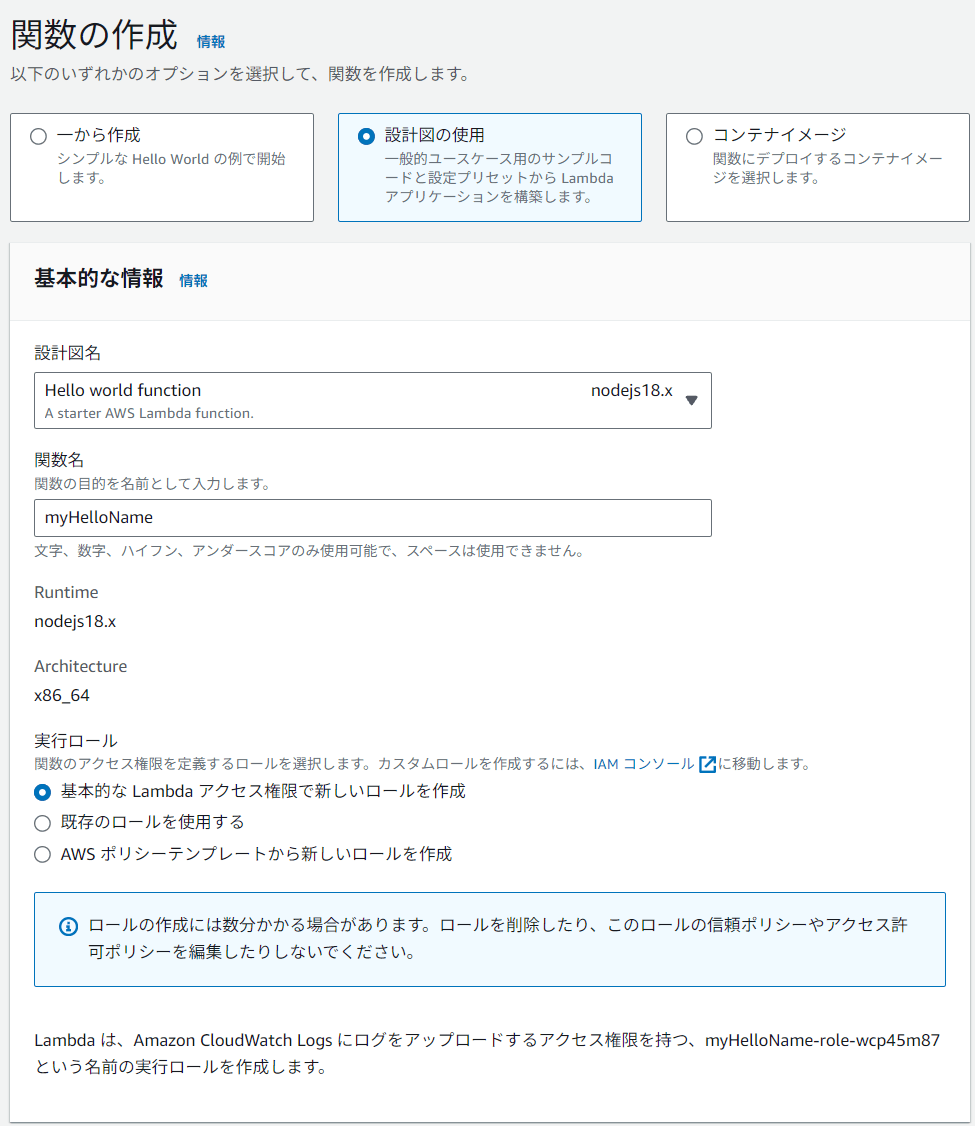
- 関数作成をクリック
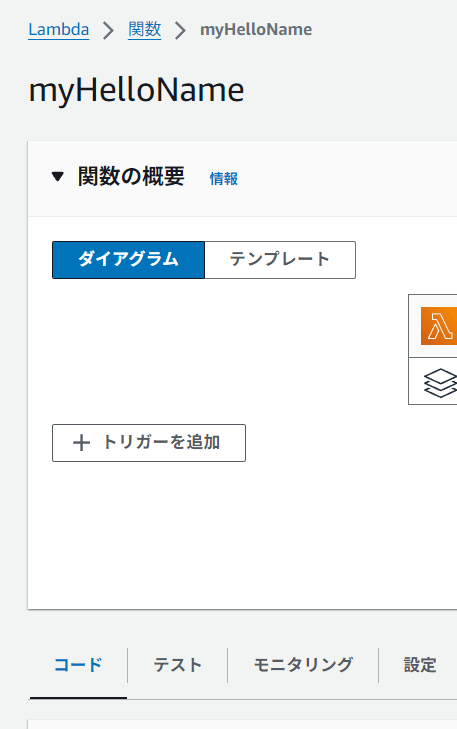
関数の実行
- 関数が作成されたら「テスト」タブを開く
- 以下のように設定
- イベントアクションをテスト: 新しいイベントを作成
- イベント名: MyEventName
- イベントの共有の設定: プライベート
- イベントJSON: "key1"のvalueを適当に変更
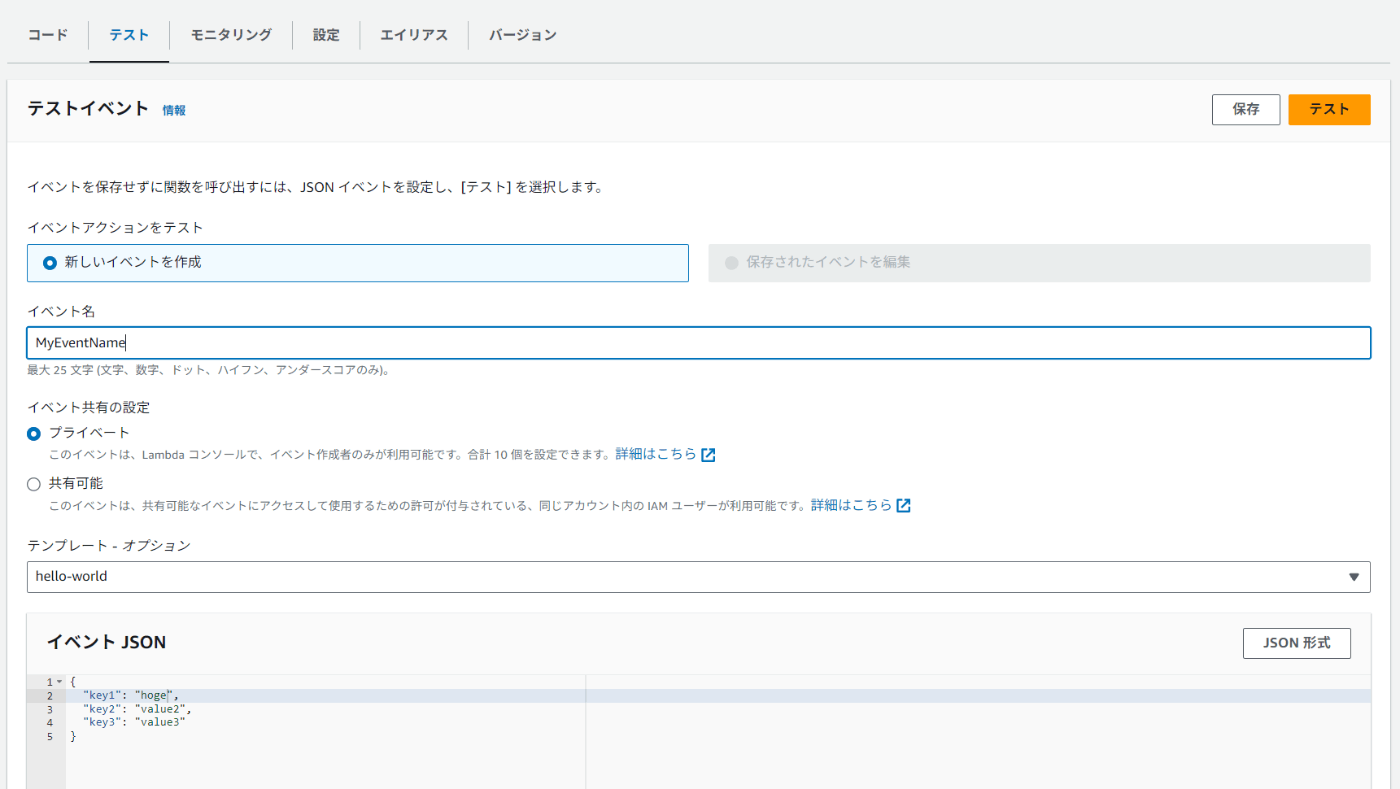
- 保存をクリック
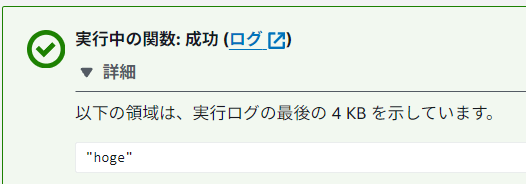
- テストをクリック
- 上部に実行結果がでる
関数の削除
右上の「アクション」から削除可能

ログ
CloudWatchのロググループを確認すると、作成したLambda関数のロググループが自動で作成されており、ここからログを確認できます

AWS SAM CLIでTypescript (esbuild) をビルドする
AWS サーバーレスアプリケーションモデル (AWS SAM) とは?
AWS SAMとはサーバレスアプリケーションの開発とデプロイを支援するためのフレームワークです。
CloudFormationの拡張機能として用意されており、SAMテンプレートとSAM CLIで構成されています。
サーバレスアプリケーションを構築するためには処理を行うLambdaだけではなく多数のコンポーネントを作る必要があります。
例えば、Lambdaの前段に外部IFとしてのAPI Gateway/AppSyncや、Lambdaの後段にデータストレージとしてのDynamoDBやS3が必要になります。
これらをCloudFormationと比較して短いテンプレートで作れるようにしたのがAWS SAMです。AWS SAM は追加料金なしで使用できます。手動で作成した場合と同様に、SAM を使用して作成した AWS リソースについてお支払いいただきます。
https://aws.amazon.com/jp/serverless/sam/faqs/
参考
AWS SAM CLIのインストール
# ファイルをDL
$ curl -L -o aws-sam-cli-linux-x86_64.zip https://github.com/aws/aws-sam-cli/releases/latest/download/aws-sam-cli-linux-x86_64.zip

# 解凍
$ unzip aws-sam-cli-linux-x86_64.zip -d sam-installation

# インストール
$ sudo ./sam-installation/install

# インストール確認
$ sam --version

# 不要になったファイルの削除
$ rm -rf aws-sam-cli-linux-x86_64.zip
$ rm -rf sam-installation
プロジェクト作成
- リポジトリを作成
-
sam initでプロジェクト(雛形)を作成します$ sam init - いくつかの質問に回答します
$ sam init Which template source would you like to use? 使用するテンプレートソースを選択してください: 1 - AWS Quick Start Templates(AWSクイックスタートテンプレート) 2 - Custom Template Location(カスタムテンプレートの場所) 選択: 1 Choose an AWS Quick Start application template AWSクイックスタートアプリケーションテンプレートを選択してください: 1 - Hello World Example(Hello Worldの例) 2 - Data processing(データ処理) 3 - Hello World Example with Powertools for AWS Lambda(AWS Lambda用Powertoolsを使用したHello Worldの例) 4 - Multi-step workflow(複数ステップのワークフロー) 5 - Scheduled task(スケジュールされたタスク) 6 - Standalone function(スタンドアロン関数) 7 - Serverless API(サーバーレスAPI) 8 - Infrastructure event management(インフラストラクチャイベント管理) 9 - Lambda Response Streaming(Lambdaレスポンスストリーミング) 10 - Serverless Connector Hello World Example(サーバーレスコネクターHello Worldの例) 11 - Multi-step workflow with Connectors(コネクター付き複数ステップワークフロー) 12 - GraphQLApi Hello World Example(GraphQL API Hello Worldの例) 13 - Full Stack(フルスタック) 14 - Lambda EFS example(Lambda EFSの例) 15 - DynamoDB Example(DynamoDBの例) 16 - Machine Learning(機械学習) 選択: 6 Use the most popular runtime and package type? (Python and zip) [y/N]: 最も人気のあるランタイムとパッケージタイプを使用しますか?(PythonとZIP) [y/N]: N Which runtime would you like to use? 使用したいランタイムを選択してください: 1 - dotnet8(.NET 8) 2 - dotnet6(.NET 6) 3 - nodejs20.x(Node.js 20.x) 4 - nodejs18.x(Node.js 18.x) 5 - nodejs16.x(Node.js 16.x) 選択: 3 Based on your selections, the only Package type available is Zip. 選択に基づき、利用可能なパッケージタイプはZipのみです。 We will proceed to selecting the Package type as Zip. パッケージタイプをZipとして進めます。 Based on your selections, the only dependency manager available is npm. 選択に基づき、利用可能な依存関係マネージャーはnpmのみです。 We will proceed copying the template using npm. npmを使用してテンプレートをコピーします。 Would you like to enable X-Ray tracing on the function(s) in your application? [y/N]: アプリケーション内の関数でX-Ray追跡を有効にしますか? [y/N]: n Would you like to enable monitoring using CloudWatch Application Insights? CloudWatch Application Insightsを使用した監視を有効にしますか? For more info, please view https://docs.aws.amazon.com/AmazonCloudWatch/latest/monitoring/cloudwatch-application-insights.html [y/N]: n Would you like to set Structured Logging in JSON format on your Lambda functions? [y/N]: Lambda関数で構造化ロギング(JSON形式)を設定しますか? [y/N]: y ----------------------- Generating application: アプリケーションを生成中: ----------------------- Name: lambda-functions Runtime: nodejs18.x Architectures: x86_64 Dependency Manager: npm Application Template: hello-world Output Directory: . Next steps can be found in the README file at ./ambda-functions/README.md 次のステップは./lambda-functions/README.mdのREADMEファイルに記載されています Commands you can use next 次に使用できるコマンド ========================= [*] Create pipeline: cd lambda-functions && sam pipeline init --bootstrap [*] パイプラインの作成: cd lambda-functions && sam pipeline init --bootstrap [*] Validate SAM template: sam validate [*] SAMテンプレートの検証: sam validate [*] Test Function in the Cloud: sam sync --stack-name {stack-name} --watch [*] クラウドで関数をテスト: sam sync --stack-name {スタック名} --watch - 選択が終わると、ディレクトリにファイルが作成される
ビルドとデプロイのテスト
- 以下を実行
$ sam build -u # 以下のメッセージが表示されれば成功 Build Succeeded - ビルドが成功すると、プロジェクトディレクトリの
.aws-sam/build/helloFromLambdaFunction以下にhello-from-lambda.mjsが作成されているので見てみる -
sam deploy --guidedでデプロイしてみる※sam deployの初回実行時は、samconfig.tomlがまだないため、--guidedを付けて実行する必要して各質問に答える必要があります。二回目以降は--guidedをつける必要はありません。
Stack Name [sam-app]: lambda-functions
# スタック名をプロジェクト名に合わせて変更

AWS Region [ap-northeast-1]: [Enterキーを押して既定値を受け入れる]
# 日本リージョンなので、そのまま使用

Confirm changes before deploy [y/N]: y
# 変更を確認してから実行したいので、yを入力

Allow SAM CLI IAM role creation [Y/n]: Y
# SAM CLIにIAMロールの作成を許可するので、Yを入力

Disable rollback [y/N]: N
# ロールバックを無効にしないので、Nを入力(またはEnterキーを押す)

HelloWorldFunction may not have authorization defined, Is this okay? [y/N]: y
# テスト段階なので、認証なしでも問題ないため、yを入力

Save arguments to configuration file [Y/n]: Y
# 設定を保存するので、Yを入力

SAM configuration file [samconfig.toml]: [Enterキーを押して既定値を受け入れる]
# デフォルトのファイル名で問題ない

SAM configuration environment [default]: [Enterキーを押して既定値を受け入れる]
# デフォルトの環境名で問題ない

# 成功
Successfully created/updated
TypeScriptでLambda関数を作成
- 必要な依存関係をインストールする
$ npm install --save-dev typescript @types/node @types/aws-lambda esbuild -
src/以下に関数を追加
金融機関コードを検索するライブラリ
今回は以下のライブラリを使用します
このライブラリを使用することで、金融機関名や支店名から対応するコードを簡単に検索できます。
$ npm install --save zengin-code
実装例
import * as path from 'path';
import { APIGatewayProxyHandlerV2 } from 'aws-lambda';
import zenginCode, { Bank, Branch } from 'zengin-code';

/**
 * 銀行および支店情報を取得する関数
 */
const findBankAndBranchInfo = (
  bankKeyword: string = '',
  branchKeyword?: string
): Bank[] | Branch[] => {
  const sanitizedBankKeyword = decodeURI(bankKeyword);

  const matchingBanks: Bank[] = Object.values(zenginCode).filter((bank: Bank) =>
    bank.name.startsWith(sanitizedBankKeyword)
  );

  if (matchingBanks.length === 0) {
    return [];
  }

  if (!branchKeyword) {
    return matchingBanks;
  }

  const sanitizedBranchKeyword = decodeURI(branchKeyword);

  const matchingBranches = Object.values(matchingBanks[0].branches).filter(
    (branch: Branch) => branch.name.startsWith(sanitizedBranchKeyword)
  );

  return matchingBranches;
};

/**
 * API Gateway のリクエストに応答するLambda関数
 */
export const handler: APIGatewayProxyHandlerV2 = async (event) => {
  try {
    const pathSegments = event.pathParameters?.proxy?.split(path.sep) || [];
    const searchResults = findBankAndBranchInfo(...pathSegments);

    return {
      statusCode: 200,
      headers: { 'Content-Type': 'application/json' },
      body: JSON.stringify(searchResults),
    };
  } catch (error) {
    console.error('Error in processBankSearchRequest:', error);
    return {
      statusCode: 500,
      headers: { 'Content-Type': 'application/json' },
      body: JSON.stringify({ message: 'Internal server error' }),
    };
  }
};
コードの説明
searchInstitutionAndBranchInfo関数:
- 金融機関名と支店名(オプション)を受け取り、該当する情報を返します
- 金融機関名は部分一致で検索し、該当する機関が見つからない場合は空配列を返します
- 支店名が指定された場合、最初に見つかった金融機関の支店を検索します
handleInstitutionSearch関数:
- イベントハンドラー関数です
- パスパラメータから金融機関名と支店名を取得し、検索を実行します
- 結果をJSON形式で返します
SAMテンプレートの作成
SAMテンプレートはCloudFormationをラッピングしたものです。
扱えるリソースがサーバレスアプリケーションで使うものに特化している代わりにCloudFormationよりも短く直感的な書き方でテンプレートを作ることができます。
- ルートディレクトリーに
template.yamlファイルが生成されているので開き、以下のようにする
AWSTemplateFormatVersion: '2010-09-09'
Transform: AWS::Serverless-2016-10-31

Globals:
  Function:
    Runtime: nodejs20.x
    Architectures:
      - x86_64
    Timeout: 30

Resources:
  ProcessBankSearchRequest:
    Type: AWS::Serverless::Function
    Properties:
      CodeUri: src/ProcessBankSearchRequest/
      Handler: processBankSearchRequest.handler
      Events:
        ApiEvent:
          Type: HttpApi
          Properties:
            Path: /bankcode/{proxy+}
            Method: GET
Lambda関数をSAMでデプロイする
準備が整ったのでデプロイします
-
sam buildを実行 -
sam deployを実行 - 以下のようになれば成功
----------------------------------------------------------------------------------------------------------------- Successfully created/updated stack - lambda-functions in ap-northeast-1 * ターミナルはタスクで再利用されます、閉じるには任意のキーを押してください。 - マネジメントコンソールでLambdaの管理画面へ行き、デプロイした関数が確認できれば完了
詰まった箇所
デプロイした関数を実行したところ次のエラーになりました
{
  "errorType": "Runtime.ImportModuleError",
  "errorMessage": "Error: Cannot find module 'processBankSearchRequest'\nRequire stack:\n- /var/runtime/index.mjs",
  "trace": [
    "Runtime.ImportModuleError: Error: Cannot find module 'searchZenginCode'",
    "Require stack:",
    "- /var/runtime/index.mjs",
    "    at _loadUserApp (file:///var/runtime/index.mjs:1087:17)",
    "    at async UserFunction.js.module.exports.load (file:///var/runtime/index.mjs:1119:21)",
    "    at async start (file:///var/runtime/index.mjs:1282:23)",
    "    at async file:///var/runtime/index.mjs:1288:1"
  ]
}
モジュールが見つからないとのこと・・・
SAMはTSをネイティブサポートしているのでtsconfigは不要だと思いましたが、jsにコンパイルする必要があるみたいです
ここでとても詰まりましたが、template.yamlに以下の記述が必要だったことがわかりました
この記述がtsconfigの代わりのようなものみたいです
    Metadata:
        BuildMethod: esbuild
        BuildProperties:
          Minify: true
          Target: "es2020"
          Sourcemap: true
          EntryPoints:
          - processBankSearchRequest.ts
完成版temllate.yaml
AWSTemplateFormatVersion: '2010-09-09'
Transform: AWS::Serverless-2016-10-31

Globals:
  Function:
    Runtime: nodejs20.x
    Architectures:
      - x86_64
    Timeout: 30

Resources:
  ProcessBankSearchRequest:
    Type: AWS::Serverless::Function
    Properties:
      CodeUri: src/ProcessBankSearchRequest/
      Handler: processBankSearchRequest.handler
      Events:
        ApiEvent:
          Type: HttpApi
          Properties:
            Path: /bankcode/{proxy+}
            Method: GET
  Metadata:
        BuildMethod: esbuild
        BuildProperties:
          Minify: true
          Target: "es2020"
          Sourcemap: true
          EntryPoints:
          - processBankSearchRequest.ts