
例のごとく og:image 設定できないので泣く泣く先頭に配置されたアイキャッチ画像
LayerX AI Agent ブログリレー 33 日目の記事です。 どこまでいくんだろう。
バクラク事業部 スタッフエンジニアの @izumin5210 です。
Platform Engineering 部 Enabling チームでいろいろなことをしています。
Vercel AI SDK 6
AI SDK 6 の Beta がリリースされました。
せっかくなのでいくつかアツい機能をピックアップして紹介します。
AI SDK 6 便利機能①: needsApproval による HITL 対応
Agent をプロダクトに組み込む際におそらく避けては通れないのがツール実行承認の HITL(Human-in-the-loop) の対応です。 最近だと Claude Code などがファイルを触るときなどにユーザの許可を求めてくることがありますが、まさにアレです。
従来の AI SDK で HITL 対応をするにはハックじみた実装が必要でしたが、それが AI SDK 6 では簡単に実装できるようになります。
これまでの AI SDK HITL 対応
そもそもの Tool calling がどのような動作をしているかをおさらいしましょう。以下に OpenAI のドキュメントを引用します。
- Make a request to the model with tools it could call
- Receive a tool call from the model
- Execute code on the application side with input from the tool call
- Make a second request to the model with the tool output
- Receive a final response from the model (or more tool calls)
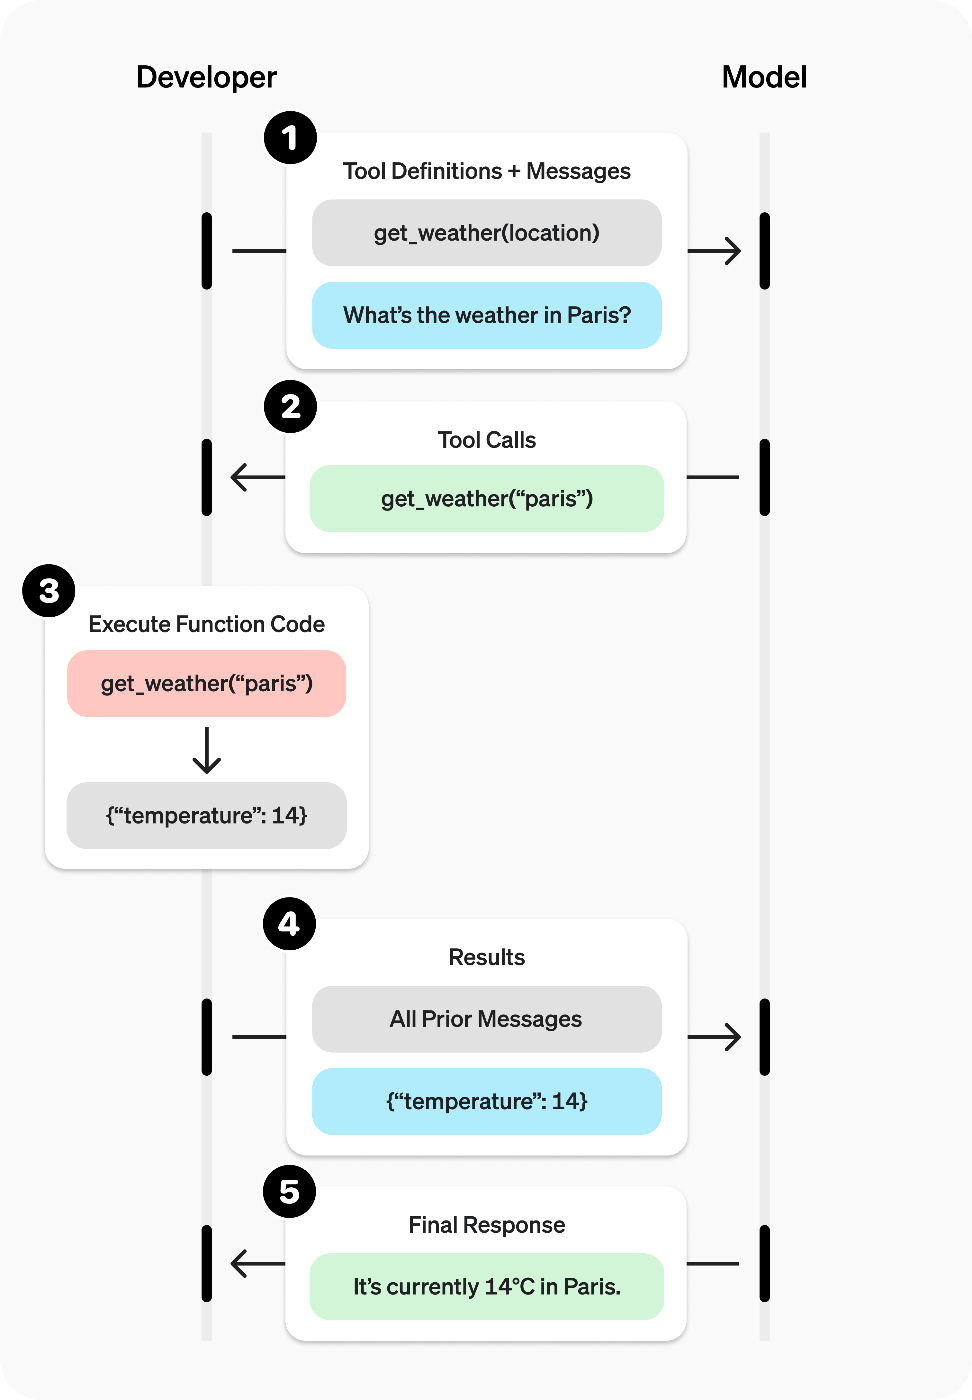
より簡略化すると以下のようになるでしょうか。
- ①,② モデルが実行するツールとそのパラメタを決定して返す
- ③ そのレスポンスをアプリケーションで受け取りツール実行
- ④ ツール実行結果をモデルに渡す
ツール実行承認の HITL を実現するには、③の手前でユーザに確認を取ればいいわけです。
これまでの AI SDK では「tool の execute 関数を定義しない」ことで実行前に無理やり停止させる方法を取っていました。
const tools = {
  weather: tool({
    description: "Get the weather in a location (fahrenheit)",
    inputSchema: z.object({
      location: z.string().describe("The location to get the weather for"),
    }),
    // execute 関数を省略すると実行できないので処理が止まる
  }),
} satisfies ToolSet;
execute できないツール実行は state == "input-available" で止まります。
{
  "type": "tool-weather",
  "toolCallId": "call_j4SySwNYFuNxvye9FJTvaKpP",
  "state": "input-available",
  "input": {
    "location": "Tokyo"
  }
}
streamText と useChat を使ったチャット実装の場合、これを捕まえることで承認 UI を出すことになります。
const { messages, addToolResult } = useChat();
return (
  <div>
    {messages.map((message) => (
    <div key={message.id}>
      {message.parts.map((part, i) => {
        if (isToolUIPart(part) && part.state === "input-available") {
          // 承認 UI を出す
          // Yes/No の onClick で `addToolResult` を呼ぶ
        }
        // ...
      })}
    </div>
  ))}
  </div>
);
この Yes/No の結果を API 側でハンドリングし、Yes であれば「③ tool を実行」して「④その結果をモデルに渡す」ことで承認付きのツール実行を実現します。
export async function POST(req: Request) {
  const { messages }: { messages: MyUIMessage[] } = await req.json();

  const stream = createUIMessageStream({
    originalMessages: messages,
    execute: async ({ writer }) => {
      const lastMessage = messages[messages.length - 1];

      lastMessage.parts = await Promise.all(
        lastMessage.parts?.map(async (part) => {

          // 最新のメッセージが tool calling のうち output-available でない(実行してない)もの以外はスルー
          if (!isToolUIPart(part)) return part;
          const toolName = getToolName<MyUITools>(part);
          if (part.state !== "output-available") return part;

          switch (part.output) {
            // フロントから Yes が渡れば
            case "Yes, confirmed.": {
              // ③ ツール実行
              const result = await executeWeatherTool(part.input as any);
              writer.write({
                type: "tool-output-available",
                toolCallId: part.toolCallId,
                output: result,
              });
              // ④ モデルに結果を渡す(parts を更新して streamText に渡す)
              return { ...part, output: result };
            }
            // No のときも適切に処理
            case "No, denied.": {
              // ...
            }
            default:
              return part;
          }
        }) ?? [],
      );

      const result = streamText({
        model: openai("gpt-4o"),
        messages: convertToModelMessages(messages),
        tools,
        stopWhen: stepCountIs(5),
      });

      writer.merge(result.toUIMessageStream({ originalMessages: messages }));
    },
  });

  return createUIMessageStreamResponse({ stream });
}
これでもだいぶ簡略化していますが、これは AI SDK のドキュメントで紹介されてるツール実行承認 HITL を実装する方法になります。
詳しくは以下のドキュメントを参照してみてください。大変でしょう?
考古学用にドキュメントのソースのスナップショットも貼っておきます。
AI SDK 6 でツール実行承認 HITL を実装する
これまでの AI SDK でツール実行承認の HITL 実装がかなり大変であることは伝わったと思います。 ではこれが AI SDK 6 でどう変わるかをここから解説します。
AI SDK 6 では tool のパラメタに needsApproval が追加されます。 これは boolean あるいは boolean を返す関数を取ります。
 export const tools = {
   weather: tool({
     description: "Get the weather in a location (fahrenheit)",
     inputSchema: z.object({
       location: z.string().describe("The location to get the weather for"),
     }),
+    execute: async ({ location }) => {
+      // execute 関数は省略せず、普通に tool 定義に含める
+    },
+    needsApproval: true,
   }),
 } satisfies ToolSet;
needsApproval が true になると tool 実行前に処理が停止し、 state === "approval-requested" で戻ってきます。
{
  "type": "tool-weather",
  "toolCallId": "call_7uHiP76vEfW8FbYrCnDeyvtv",
  "state": "approval-requested",
  "input": {
    "location": "Tokyo, Japan"
  },
  "approval": {
    "id": "aitxt-XknmqO4T6yjzLQQ8mcxU8bVf"
  }
}
フロントは今度は approval-requested を捕まえて承認 UI を出します。 使う関数などは微妙に変わりますが、全体の構造はこれまでとほぼ同じです。
const { messages, addToolApprovalResponse } =
  useChat({
    sendAutomaticallyWhen:
      lastAssistantMessageIsCompleteWithApprovalResponses,
  });
return (
  <div>
    {messages.map((message) => (
    <div key={message.id}>
      {message.parts.map((part, i) => {
        if (isToolUIPart(part) && part.state === "approval-requested") {
          // 承認 UI を出す
          // Yes/No の onClick で `addToolApprovalResponse` を呼ぶ
        }
        // ...
      })}
    </div>
  ))}
  </div>
);
大きく変わるのは API 側、モデルとやり取りする実装です。 今までの「Yes ぽかったら tool 実行して message 更新して…」というややこしい処理を全て省略することができます。
export async function POST(req: Request) {
  const { messages }: { messages: MyUIMessage[] } = await req.json();

  const result = streamText({
    model: openai("gpt-4o"),
    messages: convertToModelMessages(messages),
    tools,
    stopWhen: stepCountIs(5),
  });

  return result.toUIMessageStreamResponse();
}
これまで API 側で対応していたツール実行承認 HITL にまつわる状態管理やロジックは全て generateText, streamText の内部に隠蔽されるようになります。
以下のコミットは Cookbook の Human-in-the-Loop with Next.js の実装を AI SDK 6 の needsApproval を利用するように変更したものです。 かなり見通しやすくなったのではないでしょうか。
AI SDK 6 便利機能②: ToolLoopAgent
AI SDK 5 から Experimental_Agent という名前で class が提供されていましたが、これが ToolLoopAgent と名前を変えて導入されています。
この ToolLoopAgent は上記のドキュメントでは「LLM」「ツール」「ループ制御(コンテキスト管理・終了条件)」の3要素を管理するものとなっています。 generateText や streamText の引数を、「Agent の挙動を制御する設定値」と「処理開始直前に決定される引数」の2つに分け、前者を ToolLoopAgent class のインスタンスとして抽象化してしまうイメージです。
従来は以下のように streamText に全てを渡していました。
const result = streamText({
  model: openai("gpt-4o"),
  messages: convertToModelMessages(messages),
  tools,
  stopWhen: stepCountIs(5),
});
これが ToolLoopAgent に Agent の挙動を制御する設定値を最初に渡し。作成された agent instance の関数を呼ぶことで処理を実行するようになります。
const agent = new ToolLoopAgent({
  model: openai("gpt-4o"),
  tools,
  stopWhen: stepCountIs(5),
});

const result = await agent.stream({
  messages: convertToModelMessages(messages),
});
単純に reusable になることやテストや eval などでも使いやすくなるのもそうですが、 Agent の設定を宣言的に管理できるものとそれ以外を分けておけることでコードの見通しも維持しやすくなるのではないでしょうか。
ちなみに、この ToolLoopAgent の実装は非常に薄く、処理のほとんどは generateText あるいは streamText に移譲されています。 このことからも ToolLoopAgent class はあくまで Agent 概念の抽象度に合わせた実装をするための機構でしかないことがうかがえます。
AI SDK 6 便利機能③: callOptionsSchema/prepareCalls による実行時パラメタの追加・注入
Agent 実行時に動的なパラメタをコンテキストに注入したくなることはよくあります。
例えば、モデルは基本的に「今が何月何日か」ということは知りません。これを毎回 tool 実行で取得してもらうのもいいですが、 システムプロンプトに埋め込んでおくことでよりシンプル・高速に現在の日付をモデルに与えることができます。
 const result = streamText({
   model: openai("gpt-4o"),
+  system: `Today's date is ${today}`,
   messages: convertToModelMessages(messages),
   tools,
   stopWhen: stepCountIs(5),
 });
しかし、この値はモデルにリクエストを投げる直前まで決定できません。
一方でシステムプロンプトは「Agent の挙動を制御する設定」であり、なるべくごちゃごちゃ処理とは分離して宣言的に扱いたいところです。
ここで利用できるのが callOptionsSchema と prepareCalls です。
callOptionsSchema は ToolLoopAgent のオプションで、stream() や generate() を呼ぶ際に追加の引数を要求できるようになります。
 const agent = new ToolLoopAgent({
   model: openai("gpt-4o"),
   tools,
   stopWhen: stepCountIs(5),
+  callOptionsSchema: z.object({
+    today: z.iso.date(),
+  }),
 });

 const result = await agent.stream({
   messages: convertToModelMessages(messages),
+  options: { today },
 });
ここで渡した options を受け取るのが prepareCalls です。これは関数で Agent の設定値(ToolLoopAgent のコンストラクタから渡せる諸々の値)を受け取り、実際に利用する設定値を返すことが期待されます。ここでシステムプロンプトも渡すことができるので、日付など動的なパラメタをプロンプトに注入することができます。
 const agent = new ToolLoopAgent({
   model: openai("gpt-4o"),
   tools,
   stopWhen: stepCountIs(5),
   callOptionsSchema: z.object({
     today: z.iso.date(),
   }),
+  prepareCall({ options: { today }, ...args }) {
+    return { ...args, instructions: `Today's date is ${today}` };
+  },
 });
これでこの Agent は「今日が何月何日か」を正確に答えることができるようになります。

「今日の東京の天気を教えて!」というメッセージから、 { "date": "2025-10-27", "location": "東京" } を導き出せている
日時は最も単純な例ですが、例えば現在のユーザ名やそのユーザから見えるエンティティのリストなどリクエストに応じて決まる値をプロンプトに入れたいケースなどで有用そうです。
また、システムプロンプト以外にも model やそのオプション, activeTools など多くのパラメタを制御できるので活用範囲は広いでしょう。
ちなみにこのオプションはまだドキュメントがなく、コード読んでて見つけました。
おわりに
AI Agent 実装のためのライブラリ・フレームワークはまだまだ戦国時代真っ只中です。 そもそも適切な抽象やそのレベル感のプラクティスも十分に集まっていない状態です。 Vercel AI SDK はその中でも低レベル・愚直な実装から他を参考にしつつ(?)徐々に抽象レベルを上げてきており、そのアップデートを追うことで AI Agent 開発のための知識獲得の近道になるなと感じています。 ここからどこが覇権を取るのか、あるいは自分たちで覇権を取る余地がないか、なかなかに楽しい状況ですね。

Discussion