😺
【Roblox開発】CaptureServiceを利用してゲーム内スクリーンショットを撮ってUIのイメージに表示させてみた
はじめに
今回はCaptureServiceを利用してゲーム内スクリーンショットを撮ってUIのイメージに表示させてみます。
公式Reference
CaptureService使ってみる
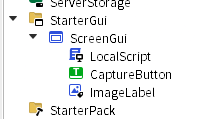
UIの配置
ボタンとイメージラベルを配置します。


コード
local CaptureService = game:GetService("CaptureService")

local gui = script.Parent

local captureButton = gui.CaptureButton
local imageLabel = gui.ImageLabel

captureButton.Activated:Connect(function()
	CaptureService:CaptureScreenshot(function(contentId)
		print(contentId)
		imageLabel.Image = contentId
	end)
end)
- CaptureService: スクリーンショット撮影を行うためのサービスを取得します。
- CaptureScreenshot: スクリーンショットを撮影する関数です。撮影が完了すると、コールバック関数にコンテンツIDが渡されます。
- contentId: 撮影した画像の識別子です。このIDをイメージラベルのImageプロパティに設定することで、画像を表示できます。
実行
まとめ
CaptureServiceを利用すれば、ゲーム内のスクリーンショットを簡単に撮影し、UIに表示することができます。さらに、撮影した画像をDiscordなどのSNSに共有したり、招待用の画像を作成したりといった活用も期待できます。
Discussion