RemixでESLint,Prettier,Vitest,React Testing Libraryの環境を作る
修正履歴
- 2023/03/01
@vitejs/plugin-react@2.2.0のインストールをnpm install @vitejs/plugin-reactに修正
Remixのプロジェクトで以下の環境を整えてみました。
Remix Stack のもっとミニマルなものを作ってみました。
- Lint
- prettier
- vitest
- React Testing Library
-
Github Actions
- TypeScript による静的型チェック
- ESLint によるチェック
- prettier によるフォーマットチェック
- vitest と React Testing Library による Unit テスト
Remix プロジェクトの作成
Pemix プロジェクトを作成します。
npx create-remix@latest
以下の内容で作成しました。アプリ名は remix-minimal-stack にしていますが、なんでもよいです。
PS C:\workspace> npx create-remix@latest
? Where would you like to create your app? remix-minimal-stack
? What type of app do you want to create? Just the basics
? Where do you want to deploy? Choose Remix App Server if you're unsure; it's easy to change deployment targets. Remix App Server
? TypeScript or JavaScript? TypeScript
? Do you want me to run `npm install`? Yes
作成したプロジェクトに移動して、npm run devを入力して画面が表示されるか確認します。
セッティング
TypeScript
package.json の scripts に以下を追記します。
  "scripts": {
    "build": "remix build",
   "dev": "remix dev",
    "start": "remix-serve build",
+   "typecheck": "tsc -b"
  },
ここでターミナルで以下のコマンドを入力します。
npm run typecheck
するとFound 2 errors.と表示されます。エラー内容を見てみると node_modules 内の*.d.tsに対しても型チェックを行っています。*.d.ts に対してチェックを行わないよう、tsconfig.json を修正します。
//
    "paths": {
      "~/*": ["./app/*"]
    },
+   "skipLibCheck": true,
//
もう一度npm run typecheckを実行すると、チェックが通ります。
prettier
以下のコマンドを入力します。
npm install -D prettier
.prettierrc.jsonを tsconfig.json と同じ階層に作成し、以下のように記述します。詳しい設定については Prettier のOptionをご確認ください。
{
  "arrowParens": "always",
  "bracketSameLine": false,
  "bracketSpacing": true,
  "jsxSingleQuote": false,
  "printWidth": 80,
  "semi": true,
  "singleQuote": false,
  "trailingComma": "es5",
  "tabWidth": 2,
  "useTabs": false
}
package.json の scripts に以下を追記します。
  "scripts": {
    "build": "remix build",
    "dev": "remix dev",
    "start": "remix-serve build",
-   "typecheck": "tsc -b"
+   "typecheck": "tsc -b",
+   "format": "prettier --check ./{app,tests}/**/*.{ts,tsx}",
+   "format-run": "npx prettier --write ./{app,tests}/**/*.{ts,tsx}"
  },
ターミナルでコマンドを実行してみましょう。問題なければ以下のような文言が表示されます。
npm run format

> format
> prettier --check ./{app,tests}/**/*.{ts,tsx}

Checking formatting...
All matched files use Prettier code style!
warn や error が表示されたら、ファイルを開いて編集するか、先ほど設定したformat-runを実行します。app フォルダ配下のファイルがフォーマットされます。tests フォルダ配下のファイルもフォーマットされますが、今は tests フォルダがないのでフォーマットは行われません。
npm run format-run

app\entry.client.tsx 262ms
app\entry.server.tsx 57ms
app\root.tsx 15ms
app\routes\index.tsx 12ms
ESLint
以下のコマンドを入力します。
npm install -D eslint eslint-config-prettier eslint-config-standard @typescript-eslint/eslint-plugin
.eslintrc.jsonを tsconfig.json と同じ階層に作成し、以下のように記述します。
{
  "extends": [
    "@remix-run/eslint-config",
    "@remix-run/eslint-config/node",
    "eslint:recommended",
    "plugin:@typescript-eslint/recommended",
    "prettier"
  ],
  "parser": "@typescript-eslint/parser",
  "parserOptions": {
    "project": "./tsconfig.json"
  },
  "plugins": [
    "@typescript-eslint"
  ]
}
また、.eslintrc.jsというファイルがあるので、こちらは削除しておきます。
package.json の scripts に以下を追記します。
  "scripts": {
    "build": "remix build",
    "dev": "remix dev",
    "start": "remix-serve build",
    "typecheck": "tsc -b",
    "format": "prettier --check ./{app,tests}/**/*.{ts,tsx}",
-   "format-run": "npx prettier --write ./{app,tests}/**/*.{ts,tsx}"
+   "format-run": "npx prettier --write ./{app,tests}/**/*.{ts,tsx}",
+   "lint": "eslint ./{app,tests}/**/*.{ts,tsx} --max-warnings=0",
+   "lint-run": "npx eslint --fix ./{app,tests}/**/*.{ts,tsx}"
  },
warning が出ることを確認するために、app/routes/index.tsx に以下を追加します。
+ const warningTest = "warningTest";

export default function Index() {
  //
ターミナルでコマンドを実行してみましょう。warningTest が定義されているが使われていないという旨の warning が表示されます。
npm run lint

> lint
> eslint ./{app,tests}/**/*.{ts,tsx} --max-warnings=0

  1:7  warning  'warningTest' is assigned a value but never used  @typescript-eslint/no-unused-vars

✖ 1 problem (0 errors, 1 warning)

ESLint found too many warnings (maximum: 0).
warningTest を消して、もう一度npm run lintを実行します。何も表示されないので、warning や error はありません。
npm run lint

> lint
> eslint ./{app,tests}/**/*.{ts,tsx} --max-warnings=0
Vitest
以下のコマンドを入力します。
npm install -D vitest
Vitest で React のアプリをテストする場合はプラグインが必要になるので、以下を入力します。
npm install @vitejs/plugin-react
2023/03/01 修正 (参照しないでください)
2022/12/10 現在、最新バージョンの 3.0.0 をインストールすると、vitest.config.ts 内のplugins: [react()],で TypeScript の型チェックに引っかかるので、2.2.0 をインストールしています。
npm install @vitejs/plugin-react@2.2.0
vitest.config.tsを作成します。作成する場所は package.json 等と同じ階層です。
import * as path from "path";
import * as VitestConfig from "vitest/config";
import react from "@vitejs/plugin-react";

export default VitestConfig.defineConfig({
  test: {
    environment: "jsdom",
    globals: true,
    includeSource: ["app/**/*.{ts,tsx}"],
    exclude: ["node_modules", "e2e"],
  },
  resolve: {
    alias: {
      "~": path.resolve(__dirname, "app"),
    },
  },
  plugins: [react()],
});
jsdomもインストールします。
npm install jsdom
テストの作成
app/routes/index.tsxのテストを作成します。testsフォルダを作成し、その中にroutesフォルダを作成します。/tests/routes/index.tsxを作成します。
import { expect, test } from "vitest";

test("test1", () => {
  expect(1 + 2).toBe(3);
});
package.json に"test": "vitest"を追加します。
  "scripts": {
    "build": "remix build",
    "dev": "remix dev",
    "start": "remix-serve build",
    "typecheck": "tsc -b",
    "format": "prettier --check ./{app,tests}/**/*.{ts,tsx}",
    "format-run": "npx prettier --write ./{app,tests}/**/*.{ts,tsx}",
    "lint": "eslint ./{app,tests}/**/*.{ts,tsx} --max-warnings=0"
-   "lint-run": "npx eslint --fix ./{app,tests}/**/*.{ts,tsx}"
+   "lint-run": "npx eslint --fix ./{app,tests}/**/*.{ts,tsx}",
+    "test": "vitest"
  },
ターミナルでnpm run testを実行すると、テストが通ります。
React Testing Library
React Testing Libraryをインストールします。
npm install -D @testing-library/dom @testing-library/jest-dom @testing-library/react @testing-library/user-event
vitest.config.ts と同じ階層にsetup-test-env.tsを作成します。
import { installGlobals } from "@remix-run/node";
import "@testing-library/jest-dom/extend-expect";

installGlobals();
vitest.config.ts に以下を追加します。
    //
    environment: "jsdom",
    globals: true,
+   setupFiles: ["./setup-test-env.ts"],
    includeSource: ["app/**/*.{ts,tsx}"],
    exclude: ["node_modules", "e2e"],
    //
app/routes/index.tsxのテストを以下のように書き換えます。
import { expect, test } from "vitest";
import { render, screen } from "@testing-library/react";
import Index from "~/routes/index";

test("test1", () => {
  render(<Index />);
  expect(screen.getByText("Welcome to Remix")).toBeInTheDocument();
});
これは app/routes/index.tsx をレンダリングして getByText()で要素を取得します。toBeInTheDocument()でその要素がドキュメント内に存在するかを判定しています。
再度ターミナルでnpm run testを実行すると、テストが通ります。
npm run test

> test
> vitest


 DEV  v0.25.6 C:/workspace/remix-minimal-stack

 ✓ tests/routes/index.test.tsx (1)

 Test Files  1 passed (1)
      Tests  1 passed (1)
   Start at  14:44:59
   Duration  2.48s (transform 723ms, setup 307ms, collect 189ms, tests 36ms)


 PASS  Waiting for file changes...
       press h to show help, press q to quit
GitHub Actions の設定
プルリクエスト時に以下の処理が行われるようにします。
- TypeScript の型チェック
- Lint によるチェック
- Prettier によるフォーマットチェック
- vitest による Unit テスト
まずは remix-minimal-stack を GitHub に publish しておきます。
ついでに develop ブランチも作成しましょう。
develop ブランチから適当なブランチを切って、その中で GitHub Actions の設定をしていきます。
今回は、develop ブランチからfeature/set-github-actionsブランチを切りました。
develop ブランチにプルリクエストされた時に GitHub Actions が動くように設定します。
app フォルダと同じ階層に.githubフォルダを作り、その中にworkflowsフォルダを作成します。さらにその中に action.yml を書いていきます。action の部分は任意で決めてよいです。
name: 🚀 GitHub Actions
on:
  push:
    branches:
      - develop
  pull_request: {}

jobs:
  typecheck:
    name: TypeScript
    runs-on: ubuntu-latest
    steps:
      - name: Cancel Previous Runs
        uses: styfle/cancel-workflow-action@0.11.0

      - name: Checkout repo
        uses: actions/checkout@v3

      - name: Setup node
        uses: actions/setup-node@v3
        with:
          node-version: 16

      - name: Install packages
        run: npm ci

      - name: Run TypeScript Check
        run: npm run typecheck

  Lint:
    name: Lint
    runs-on: ubuntu-latest
    steps:
      - name: Cancel Previous Runs
        uses: styfle/cancel-workflow-action@0.11.0

      - name: Checkout repo
        uses: actions/checkout@v3

      - name: Setup node
        uses: actions/setup-node@v3
        with:
          node-version: 16

      - name: Install packages
        run: npm ci

      - name: Run Lint
        run: npm run lint

  Prettier:
    name: Prettier
    runs-on: ubuntu-latest
    steps:
      - name: Cancel Previous Runs
        uses: styfle/cancel-workflow-action@0.11.0

      - name: Checkout repo
        uses: actions/checkout@v3

      - name: Setup node
        uses: actions/setup-node@v3
        with:
          node-version: 16

      - name: Install packages
        run: npm ci

      - name: Run Prettier
        run: npm run format

  vitest:
    name: Vitest
    runs-on: ubuntu-latest
    steps:
      - name: Cancel Previous Runs
        uses: styfle/cancel-workflow-action@0.11.0

      - name: Checkout repo
        uses: actions/checkout@v3

      - name: Setup node
        uses: actions/setup-node@v3
        with:
          node-version: 16

      - name: Install packages
        run: npm ci

      - name: Run vitest
        run: npm run test
作成したら、feature/set-github-actions ブランチから develop ブランチに対してプルリクエストを作成します。するとこのように GitHub Actions が開始されます。
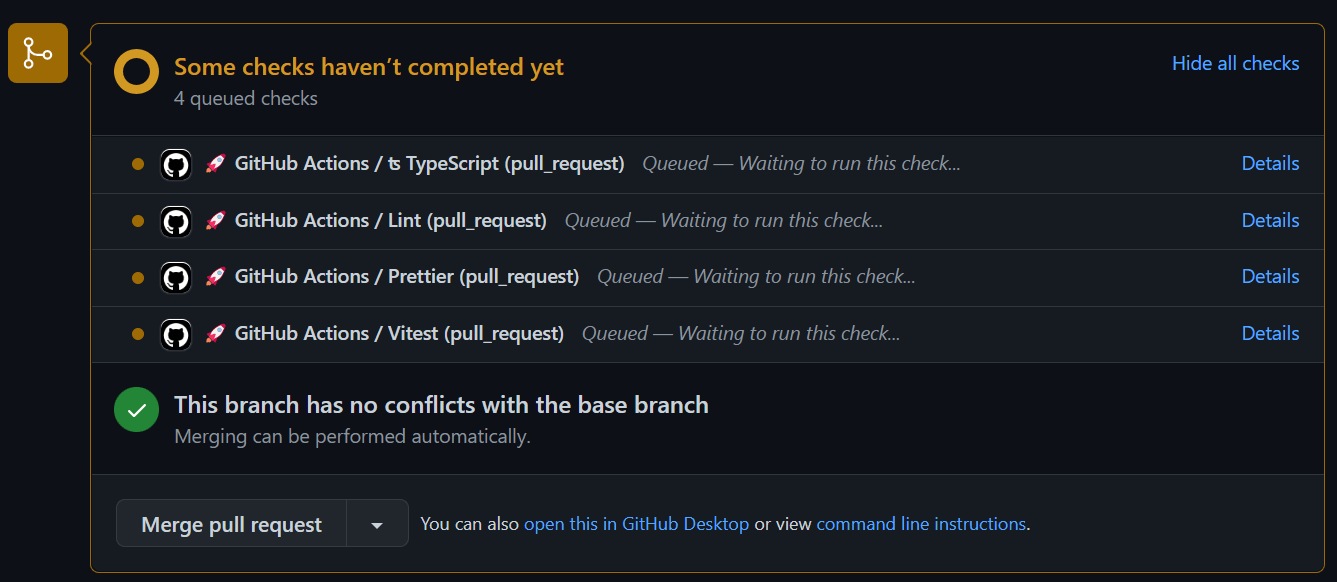
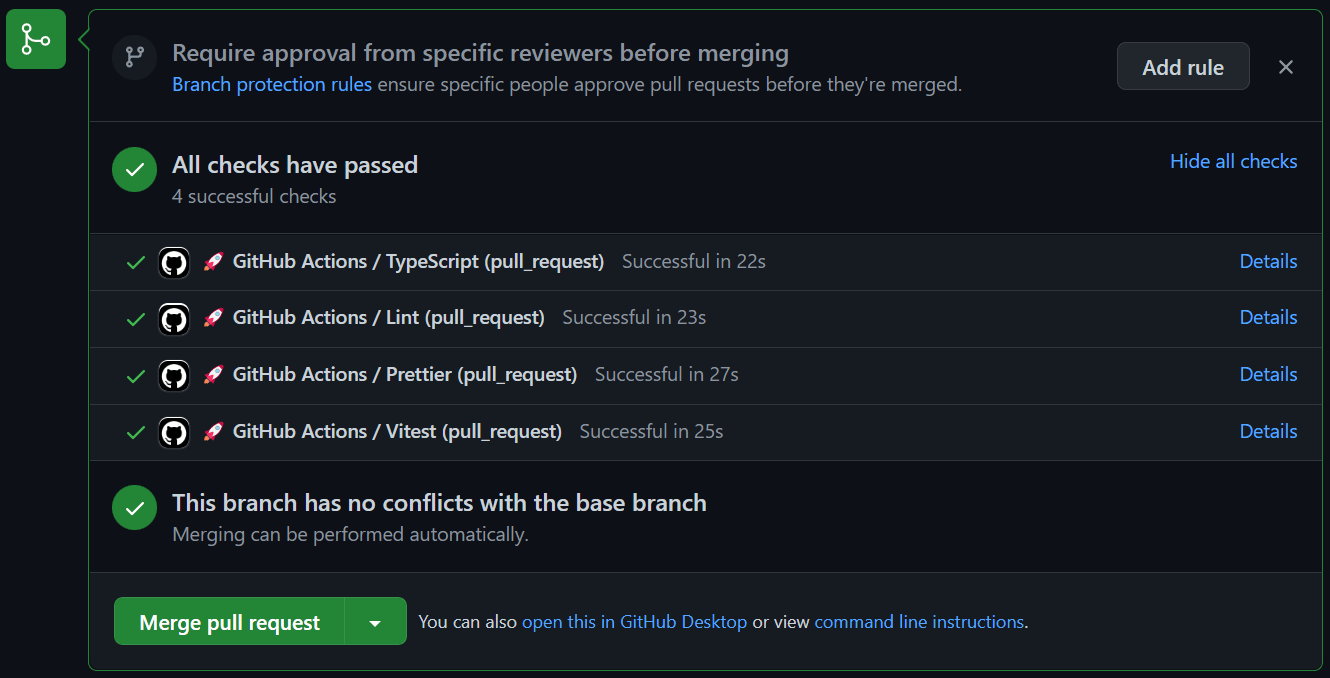
チェックが成功すると、以下の画像のようになります。
最後に
remix で ESLint と Prettier と Vitest と React TestingLibrary をインストールして GitHub Actions で実行してみました。
自分で諸々インストールしてセッティングしなくても、Remix の公式に 3 つのStackが用意されています。
でも自分でセッティングすることが大事だよね!
Discussion