AppKit × Combine でシンプルな MVVM を実装
最近iOS アプリ設計パターン入門を読みながらアーキテクチャの勉強をしています。Twitter でとりあえず身につけるべき GUI アーキテクチャは何かアンケートをとったところ(MVC/MVP/MVVM/VIPER/その他)圧倒的に MVVM だったため注力して取り組むことにしました。
ありがたいことに、iOS アプリ設計パターン入門には GitHub にサンプルが公開されており、参考にしながら学習を進めることができるのですが、Combineが発表される直前ごろに出版されたということもあり、データバインディングの手法がNotificationCenter、KVO、またはRxSwiftとなっています。そこで、Combine の練習も兼ねて自分でサンプルをまねて実装してみました。なお、個人プロジェクトではまだSwiftUIを導入できていないこともあり、View に関してはAppKitとStoryboardを用いることにしました。
成果物
ユーザー名とパスワードのテキストフィールドの入力が埋まっているかどうかを判断(バリデーション)するサンプルになっています。テキストフィールドへの状態に対して即時動的に判断結果のラベルが更新されます。
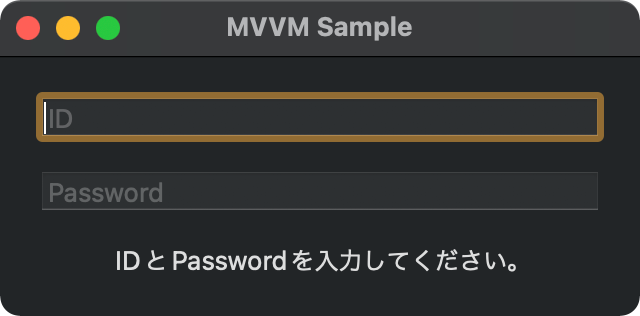
初期状態
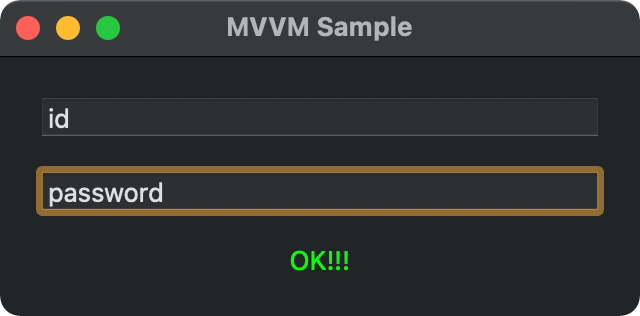
入力後
構造
┬─ Model
│   ├─ AppDelegate
│   ├─ SampleModel (SampleModelProtocol)
│   └─ SampleModelError
│
├─ ViewModel
│   ├─ SampleViewModel
│   └─ Extension+SampleModelError
│
└─ View
    ├─ Main.storyboard
    └─ SampleViewController
ポイント
- Model は他のコンポーネントに依存させない(View や ViewModel がなくてもビルドが可能)。
- ViewModel は View の参照を保持しない。
- Combine を使う場合、View と ViewModel、ViewModel と Model のやりとりに必要なので、結果的に全ての層で Combine を import することになる。
- SampleModel はユーザー名とパスワードの入力状態のバリデーションを担当する。
- SampleViewModel はバリデーション結果の文字列とラベルの色の2項目の状態を管理する、SampleViewController からのイベントを受けて SampleModel にバリデーションを要求する、バリデーションの結果に従って状態を更新するという責務を持つ。
- SampleViewController は Storyboard の UI コンポーネントの参照を持ち、ユーザーの入力を SampleViewModel に伝える。また、SampleViewModel の状態を購読(sink)して UI コンポーネントの見た目を更新する。
- Error のケース(SampleModelError)は Model の持ち物だが、各ケースのメッセージ(Extension+SampleModelError)は ViewModel の持ち物とした。View に表示するデータという扱い。
SampleModel
- 今回は通信などの非同期処理を必要としないこともありテストをする際に Mock を用意する必要はないが、テストコードで Model を差し替えられるように Protocol を定義している。テスタブルにするために、Protocol を使うのは大事。
FailとJustをAnyPublisherに変換するためにいちいちeraseToAnyPublisher()をコールしてから return している。なにこれ。- Error を何度も
send()するために Result を用いる。(PassthroughSubject は一度Error を流すと complete してしまい send できなくなる。)
import Combine

typealias SampleModelResult = Result<Void, SampleModelError>

protocol SampleModelProtocol {
    var validatePublisher: AnyPublisher<SampleModelResult, Never> { get }
    func validate(idText: String, passwordText: String)
}

final class SampleModel: SampleModelProtocol {
    private let validateSubject = PassthroughSubject<SampleModelResult, Never>()

    var validatePublisher: AnyPublisher<SampleModelResult, Never> {
        return validateSubject.eraseToAnyPublisher()
    }

    func validate(idText: String, passwordText: String) {
        let result: SampleModelResult
        switch (idText.isEmpty, passwordText.isEmpty) {
        case (true, true):
            result = SampleModelResult.failure(.invalidIdAndPassword)
        case (true, false):
            result = SampleModelResult.failure(.invalidId)
        case (false, true):
            result = SampleModelResult.failure(.invalidPassword)
        case (false, false):
            result = SampleModelResult.success(())
        }
        validateSubject.send(result)
    }
}
SampleViewModel
- SampleViewController に状態の変化を伝えるために、
PassthroughSubjectを用意して変化の際にsendしている。 - SampleViewController が状態を購読する際は、PassthroughSubject のままでは危険なため subject は
privateなプロパティにして、eraseToAnyPublisher()で AnyPublisher に変換したものを公開している。 -
validationTextSubjectは入力を受け付ける前の初期状態でのラベル文言を指定するために、prepend()を使っている。これはsinkした瞬間に流れる。
import AppKit.NSColor
import Combine

final class SampleViewModel {
    private let model: SampleModelProtocol
    private var cancellables = Set<AnyCancellable>()

    private let validationTextSubject = PassthroughSubject<String, Never>()
    private let loadLabelColorSubject = PassthroughSubject<NSColor, Never>()

    var validationText: AnyPublisher<String, Never> {
        return validationTextSubject
            .prepend("IDとPasswordを入力してください。")
            .eraseToAnyPublisher()
    }
    var loadLabelColor: AnyPublisher<NSColor, Never> {
        return loadLabelColorSubject.eraseToAnyPublisher()
    }

    init(model: SampleModelProtocol = SampleModel()) {
        self.model = model
        model.validatePublisher
            .sink(receiveValue: { [weak self] result in
                guard let self = self else { return }
                switch result {
                case .success():
                    self.validationTextSubject.send("OK!!!")
                    self.loadLabelColorSubject.send(NSColor.green)
                case .failure(let error):
                    self.validationTextSubject.send(error.errorText)
                    self.loadLabelColorSubject.send(NSColor.red)
                }
            })
            .store(in: &cancellables)
    }

    func idPasswordChanged(id: String, password: String) {
        model.validate(idText: id, passwordText: password)
    }
}
SampleViewController
- ここで、SampleViewModel の参照を持つ。
- UI コンポーネントの初期設定や SampleViewModel の状態購読を行う。
-
NSTextFieldの入力イベントを受け付けるにはNSTextFieldDelegateを実装する方法と、NotificationCenter.Publisherでイベントを購読する方法があるが、今回は Delegate の方が都合が良かったのでそちらにした(ユーザー名とパスワードの入力イベントを別々に購読する必要がなく、まとめてcontrolTextDidChangeで監視できれば良かった)。
import Cocoa
import Combine

class SampleViewController: NSViewController {
    @IBOutlet weak var idTextField: NSTextField!
    @IBOutlet weak var passwordTextField: NSTextField!
    @IBOutlet weak var validationLabel: NSTextField!

    private let viewModel = SampleViewModel()
    private var cancellables = Set<AnyCancellable>()

    override func viewDidLoad() {
        super.viewDidLoad()

        idTextField.placeholderString = "ID"
        passwordTextField.placeholderString = "Password"

        idTextField.delegate = self
        passwordTextField.delegate = self

        viewModel.validationText
            .sink(receiveValue: { [weak self] text in
                self?.validationLabel.stringValue = text
            })
            .store(in: &cancellables)

        viewModel.loadLabelColor
            .sink(receiveValue: { [weak self] color in
                self?.validationLabel.textColor = color
            })
            .store(in: &cancellables)

        idTextField.becomeFirstResponder()
    }

    override func viewDidAppear() {
        super.viewDidAppear()
        self.view.window?.makeFirstResponder(idTextField)
    }
}

extension SampleViewController: NSTextFieldDelegate {
    func controlTextDidChange(_ obj: Notification) {
        viewModel.idPasswordChanged(id: idTextField.stringValue,
                                    password: passwordTextField.stringValue)
    }
}
テストコード
そもそも、GUI アーキテクチャの勉強をしている理由はコードをテスタブルにしたかったからなので、ついでに UnitTest と UITest の実装も挑戦してみた。
UnitTest
SampleModel と SampleViewModel のテストを書いてみた。
- Combine の非同期処理のテストを書く時は
XCTestExpectationとwaitを利用する。- expectation を作って timeout の秒数だけ wait する。
- timeout までに
expectation.fulfill()が必要回数コールされれば wait を抜けられる。 -
fulfill()の必要回数はexpectedFulfillmentCountで指定できる。 -
fulfill()は非同期処理の必要処理が終わったところに書く。 - wait を抜けた後に普通のテストと同様に
XCTAssertEqualなどを使って期待通りの挙動かチェックする。
import XCTest
import Combine
@testable import MVVM_Sample_Combine_AppKit

class SampleModelTests: XCTestCase {
    private var cancellables: Set<AnyCancellable>!

    override func setUp() {
        super.setUp()
        cancellables = []
    }

    override func tearDown() {
        super.tearDown()
        cancellables.removeAll()
    }

    func testValidate_OK() {
        let model = SampleModel()
        var actualError: SampleModelError?
        let expectation = self.expectation(description: "Validate")

        model.validatePublisher
            .sink(receiveValue: { result in
                if case .failure(let error) = result {
                    actualError = error
                }
                expectation.fulfill()
            })
            .store(in: &cancellables)

        model.validate(idText: "id", passwordText: "password")

        self.wait(for: [expectation], timeout: 3)
        XCTAssertNil(actualError)
    }
}
import XCTest
import AppKit.NSColor
import Combine
@testable import MVVM_Sample_Combine_AppKit

class SampleViewModelTests: XCTestCase {
    private var cancellables: Set<AnyCancellable>!

    override func setUp() {
        super.setUp()
        cancellables = []
    }

    override func tearDown() {
        super.tearDown()
        cancellables.removeAll()
    }

    func testIdPasswordChanged_finished() {
        let viewModel = SampleViewModel()
        var actualText: String?
        var actualColor: NSColor?
        let expectation = self.expectation(description: "IdPasswordChanged")
        // validationTextのprependと状態変化(validationTextとloadLabelColorの2種)で計3回
        expectation.expectedFulfillmentCount = 3

        viewModel.validationText
            .sink(receiveValue: { text in
                actualText = text
                expectation.fulfill()
            })
            .store(in: &cancellables)

        viewModel.loadLabelColor
            .sink(receiveValue: { color in
                actualColor = color
                expectation.fulfill()
            })
            .store(in: &cancellables)

        viewModel.idPasswordChanged(id: "id", password: "password")

        self.wait(for: [expectation], timeout: 3)
        XCTAssertEqual(actualText, "OK!!!")
        XCTAssertEqual(actualColor, NSColor.green)
    }
}
UITest
- 要素を見つけるために、必要な UI コンポーネントには Identifier を指定しておく。今回は Storyboard 上で指定した。
-
textFieldsで入力用 NSTextField のXCUIElementが取得できる。 -
staticTextsでラベル用 NSTextField のXCUIElementが取得できる。 - 非同期処理なので UI コンポーネントの変化を少し待ちたい場合は、
XCTNSPredicateExpectationとXCTWaiter().waitで XCUIElement の状態が期待の状態になるまで timeout 秒待つようにする。 - 一度テキストフィールドに入力した文字を消したい場合は、
XCUIKeyboardKey.deleteで削除コマンド文字列を作ってtypeText()する。
import XCTest

class MVVMSampleUITests: XCTestCase {

    override func setUp() {
        continueAfterFailure = false
        let app = XCUIApplication()
        app.launch()
    }

    override func tearDown() {}

    func testInputAndClear() {
        let window = XCUIApplication().windows["main-window"]

        let idTextField = window.textFields["text-field-id"]
        idTextField.tap()
        idTextField.typeText("id")
        let deleteString = String(repeating: XCUIKeyboardKey.delete.rawValue, count: 2)
        idTextField.typeText(deleteString)

        let validationLabel = window.staticTexts["label-validation"]
        let expect = "IDとPasswordが未入力です。"
        let predicate = NSPredicate(format: "value == %@", expect)
        let expectation = XCTNSPredicateExpectation(predicate: predicate, object: validationLabel)
        let result = XCTWaiter().wait(for: [expectation], timeout: 5)
        XCTAssertEqual(result, .completed)
    }

    func testInputIdAndPassword() {
        let window = XCUIApplication().windows["main-window"]

        let idTextField = window.textFields["text-field-id"]
        idTextField.tap()
        idTextField.typeText("id")

        let passwordTextField = window.textFields["text-field-password"]
        passwordTextField.tap()
        passwordTextField.typeText("password")

        let validationLabel = window.staticTexts["label-validation"]
        let expect = "OK!!!"
        let predicate = NSPredicate(format: "value == %@", expect)
        let expectation = XCTNSPredicateExpectation(predicate: predicate, object: validationLabel)
        let result = XCTWaiter().wait(for: [expectation], timeout: 5)
        XCTAssertEqual(result, .completed)
    }
}
CI でテストを動かしたかった。 👉 CI でテスト動かせました。
CI 上で iOS シミュレーターでの UITest 実行は経験があるのですが、macOS アプリの実行は一筋縄では行かないようです。
実行対象が CI マシンの Mac そのものになるため、色々権限周りを解決しないといけません。
Apple DeveloperID の SIGNING Certificate をしないといけないらしいのですが、GitHub Actions で実行するのに手こずっていてまだできていません。(どなたかやり方知っていたら教えていただけると嬉しいです。)
SIGNING まわりが原因でxcodebuildでビルドができない状態でしたが、リリースアーカイブを AppStoreConnect にアップロードするわけではなく、ただテストを実行したいだけなら SIGNING しなければ良いようです。CODE_SIGN_IDENTITY="",CODE_SIGNING_REQUIRED=NO,CODE_SIGNING_ALLOWED=NOをオプション引数につけてxcodebuildを叩けば SIGNING しないでビルドできます。
また、なにも対策せずに-configuration Releaseでビルドしようとすると、UnitTest の@testable importでメインのターゲットが import できずにコケます。これは Build Settings の Enable Testability の Release が No になっているからです。Yes にするか、-configuration Debugでビルドすればコケません。
# ビルド
xcodebuild clean build-for-testing \
-project MVVM-Sample-Combine-AppKit.xcodeproj \
-scheme MVVM-Sample-Combine-AppKit \
-configuration Debug \
-destination "platform=macOS" \
-derivedDataPath DerivedData \
CODE_SIGN_IDENTITY="" \
CODE_SIGNING_REQUIRED=NO \
CODE_SIGNING_ALLOWED=NO

# UnitTest / UITest
xcodebuild test-without-building \
-project MVVM-Sample-Combine-AppKit.xcodeproj \
-scheme MVVM-Sample-Combine-AppKit \
-destination "platform=macOS" \
-derivedDataPath DerivedData \
-resultBundlePath results/result_bundle_ui.xcresult \
-only-testing:[テストのターゲットを指定]
Discussion