俺的ElasticStackチュートリアル
俺的なElasticStackチュートリアル作ってみた
レベル1
コンソールで入力した文字列を受け付ける
input {
    stdin { }

}

output {
    stdout { codec => rubydebug }

}
実行してみる
logstashコマンドに作成したconfファイルを渡します。
いくつかWARNINGが出ていますが、お構いなく。。。
[opc@elastic ~]$ /usr/share/logstash/bin/logstash -f /etc/logstash/logstash.conf
Using bundled JDK: /usr/share/logstash/jdk
           ~略~
[INFO ] 2022-06-05 02:34:01.962 [Agent thread] agent - Pipelines running {:count=>1, :running_pipelines=>[:main], :non_running_pipelines=>[]}
aaa
{
    "@timestamp" => 2022-06-05T02:34:05.399462Z,
         "event" => {
        "original" => "aaa"
    },
          "host" => {
        "hostname" => "elastic-181174"
    },
       "message" => "aaa",
      "@version" => "1"
}
test
{
    "@timestamp" => 2022-06-05T02:34:37.075366Z,
         "event" => {
        "original" => "test"
    },
          "host" => {
        "hostname" => "elastic-181174"
    },
       "message" => "test",
      "@version" => "1"
}
レベル2
CSVファイルを読み取る
適当なCSVファイルを用意し、それを読み込みます。
input {
    file {
        path => ["/home/opc/test.csv"]
        start_position => "beginning"
       tags => "CSV"
    }
}
output {
    stdout { codec => rubydebug }
}
読み込ませてみる
[opc@elastic ~]$ sudo /usr/share/logstash/bin/logstash -f /etc/logstash/conf.d/first-pipeline.conf
Using bundled JDK: /usr/share/logstash/jdk
           ~略~
{
      "@version" => "1",
          "host" => "elastic",
       "message" => "IK152942,平田 裕次郎,2019-01-01 00:25:33,ひらた ゆうじろう,hirata_yuujirou@example.com,M,29,1990/6/10,石川県",
          "path" => "/home/opc/test.csv",
    "@timestamp" => 2022-06-05T03:37:16.230Z,
          "tags" => [
        [0] "CSV"
    ]
}
{
      "@version" => "1",
          "host" => "elastic",
       "message" => "AS834628,久野 由樹,2019-01-01 02:00:14,ひさの ゆき,hisano_yuki@example.com,F,63,1956/1/2,茨城県",
          "path" => "/home/opc/test.csv",
    "@timestamp" => 2022-06-05T03:37:16.231Z,
          "tags" => [
        [0] "CSV"
    ]
}
{
      "@version" => "1",
          "host" => "elastic",
       "message" => "GD892565,大内 高史,2019-01-01 04:54:51,おおうち たかし,oouchi_takashi@example.com,M,54,1965/8/5,千葉県",
          "path" => "/home/opc/test.csv",
    "@timestamp" => 2022-06-05T03:37:16.232Z,
          "tags" => [
        [0] "CSV"
    ]
}
{
      "@version" => "1",
          "host" => "elastic",
       "message" =1行"customer_id,customer_name,registration_date,customer_name_kana,email,gender,age,birth,pref",
          "path" => "/home/opc/test.csv",
    "@timestamp" => 2022-06-05T03:37:16.205Z,
          "tags" => [
        [0] "CSV"
    ]
}
レベル3
CSV形式のデータを分割する
先ほどの取り込み方だと、messageに1行すべてが入っています。
"message" => "AS345469,鶴岡 薫,2019-01-01 04:48:22,つるおか かおる,tsuruoka_kaoru@example.com,M,74,1945/3/25,東京都",
CSVのカラム毎に分割して取り込めるようにします。
first-pipeline.confの編集
今回新たに[filter]を追加し、"csv"プラグを使います。
input {
    file {
        path => ["/home/opc/test.csv"]
        start_position => "beginning"
        tags => "CSV"
    }
}
filter {
    csv { }
}
output {
    stdout { codec => rubydebug }
}
CSV形式で取り込んでみた
実際に実行してみました。
{
          "path" => "/home/opc/test.csv",
       "column5" => "hirata_yuujirou@example.com",
       "column9" => "石川県",
    "@timestamp" => 2022-06-05T04:27:23.435Z,
       "column6" => "M",
          "host" => "elastic",
       "column1" => "IK152942",
       "column4" => "ひらた ゆうじろう",
       "column8" => "1990/6/10",
       "column2" => "平田 裕次郎",
       "column7" => "29",
       "message" => "IK152942,平田 裕次郎,2019-01-01 00:25:33,ひらた ゆうじろう,hirata_yuujirou@example.com,M,29,1990/6/10,石川県",
          "tags" => [
        [0] "CSV"
    ],
      "@version" => "1",
       "column3" => "2019-01-01 00:25:33"
}
レベル4
不要なカラムは取り込まないようにする
必要なカラムだけ取り込みます。
まずは不要なカラムを洗い出します。
["path","@timestamp","host","message"]
それではこのカラムのみ取り出すようfirst-pipeline.confを編集していきます。
input {
    file {
        path => ["/home/opc/test.csv"]
        start_position => "beginning"
        tags => "CSV"
    }
}
filter {
    csv {
        remove_field => [ "path","@timestamp","host","message" ]
    }
}
output {
    stdout { codec => rubydebug }
}
ほしいカラムのみ収出してみた
{
    "@version" => "1",
     "column7" => "29",
     "column3" => "2019-01-01 00:25:33",
     "column2" => "平田 裕次郎",
     "column5" => "hirata_yuujirou@example.com",
     "column9" => "石川県",
     "column4" => "ひらた ゆうじろう",
     "column6" => "M",
        "tags" => [
        [0] "CSV"
    ],
     "column8" => "1990/6/10",
     "column1" => "IK152942"
}
{
    "@version" => "1",
     "column7" => "63",
     "column3" => "2019-01-01 02:00:14",
     "column2" => "久野 由樹",
     "column5" => "hisano_yuki@example.com",
     "column9" => "茨城県",
     "column4" => "ひさの ゆき",
     "column6" => "F",
        "tags" => [
        [0] "CSV"
    ],
     "column8" => "1956/1/2",
     "column1" => "AS834628"
}
おまけ
"@timestamp"に"column3"(データの日時)を反映させてみる
input {
    file {
        path => ["/home/opc/test.csv"]
        start_position => "beginning"
        sincedb_path => "/usr/share/logstash/data/plugins/inputs/file/sincedb"
        tags => "CSV"
    }
}
filter {
    csv {
        remove_field => [ "path","host","message" ]
    }
    date {
        match => [ "column3","yyyy-MM-dd HH:mm:ss" ]
        remove_field => [ "column3" ]
    }
}
output {
    stdout { codec => rubydebug }
}
{
    "@version" => "1",
     "column7" => "74",
     "column3" => "2019-01-01 04:48:22",
     "column2" => "鶴岡 薫",
     "column5" => "tsuruoka_kaoru@example.com",
     "column9" => "東京都",
     "column4" => "つるおか かおる",
     "column6" => "M",
        "tags" => [
        [0] "CSV"
    ],
     "column8" => "1945/3/25",
     "column1" => "AS345469"
}
{
    "@timestamp" => 2019-01-01T04:48:22.000Z,
       "column1" => "AS345469",
       "column9" => "東京都",
       "column4" => "つるおか かおる",
          "tags" => [
        [0] "CSV"
    ],
       "column5" => "tsuruoka_kaoru@example.com",
       "column8" => "1945/3/25",
       "column6" => "M",
       "column2" => "鶴岡 薫",
      "@version" => "1",
       "column7" => "74"
}
レベル5
カラム名をリネームする
"column7"や"column2"はぱっと見何を意味するのか分かりません。
なので、リネームしていきます。
元々のカラムの名前は下記のとおりです。
| customer_id | customer_name | registration_date | customer_name_kana | gender | age | birth | pref | |
|---|---|---|---|---|---|---|---|---|
| IK152942 | 平田 裕次郎 | 2019-01-01 00:25:33 | ひらた ゆうじろう | hirata_yuujirou@example.com | M | 29 | 1990/6/10 | 石川県 |
first-pipeline.confの編集
input {
    file {
        path => ["/home/opc/test.csv"]
        start_position => "beginning"
        sincedb_path => "/usr/share/logstash/data/plugins/inputs/file/sincedb"
        tags => "CSV"
    }
}
filter {
    csv {
        remove_field => [ "path","host","message" ]
    }
    date {
        match => [ "column3","yyyy-MM-dd HH:mm:ss" ]
        remove_field => [ "column3" ]
    }
    mutate {
        rename => { "column1" => "customerid"}
        rename => { "column2" => "customer_name" }
        rename => { "@timestamp" => "registration_date"}
        rename => { "column4" => "customer_name_kana" }
        rename => { "column5" => "email"}
        rename => { "column6" => "gender"}
        rename => { "column7" => "age"}
        rename => { "column8" => "birth"}
        rename => { "column9" => "pref"}
    }
}
output {
    stdout { codec => rubydebug }
}
{
                 "email" => "tsuruoka_kaoru@example.com",
                "gender" => "M",
     "registration_date" => 2019-01-01T04:48:22.000Z,
                  "pref" => "東京都",
            "customerid" => "AS345469",
                  "tags" => [
        [0] "CSV"
    ],
                 "birth" => "1945/3/25",
         "customer_name" => "鶴岡 薫",
                   "age" => "74",
              "@version" => "1",
    "customer_name_kana" => "つるおか かおる"
}
うまくリネームされています。
レベル6
データの型変換
いくつか型変換します。
こちらの型が文字列型なので、数値型に変換します。
["age"]
{
                 "email" => "tsuruoka_kaoru@example.com",
                "gender" => "M",
     "registration_date" => 2019-01-01T04:48:22.000Z,
                  "pref" => "東京都",
            "customerid" => "AS345469",
                  "tags" => [
        [0] "CSV"
    ],
                 "birth" => "1945/3/25",
         "customer_name" => "鶴岡 薫",
                   "age" => "74",
              "@version" => "1",
    "customer_name_kana" => "つるおか かおる"
}
first-pipeline.confの編集
input {
    file {
        path => ["/home/opc/test.csv"]
        start_position => "beginning"
        sincedb_path => "/usr/share/logstash/data/plugins/inputs/file/sincedb"
        tags => "CSV"
    }
}
filter {
    csv {
        remove_field => [ "path","host","message" ]
    }
    date {
        match => [ "column3","yyyy-MM-dd HH:mm:ss" ]
        remove_field => [ "column3" ]
    }
    mutate {
        rename => { "column1" => "customerid"}
        rename => { "column2" => "customer_name" }
        rename => { "@timestamp" => "registration_date"}
        rename => { "column4" => "customer_name_kana" }
        rename => { "column5" => "email"}
        rename => { "column6" => "gender"}
        rename => { "column7" => "age"}
        rename => { "column8" => "birth"}
        rename => { "column9" => "pref"}
            convert => {
                "age" => "integer"
            }
    }
}
output {
    stdout { codec => rubydebug }
}
"age"が数値型に変換されていることが分かります。
年齢を括っていたダブルクォーテーションが消えたと思います。
{
    "customer_name_kana" => "つるおか かおる",
                 "email" => "tsuruoka_kaoru@example.com",
                  "pref" => "東京都",
                 "birth" => "1945/3/25",
                   "age" => 74,
              "@version" => "1",
         "customer_name" => "鶴岡 薫",
                "gender" => "M",
            "customerid" => "AS345469",
     "registration_date" => 2019-01-01T04:48:22.000Z,
                  "tags" => [
        [0] "CSV"
    ]
}
レベル7
Elasticsearchにデータを送る
ようやく面白くなってきました。
これまではコンソール上での表示しかしてませんでしたが、ここでElasticsearchへ送りKibanaで確認してみます。
first-pipeline.confの編集
input {
    file {
        path => ["/home/opc/test.csv"]
        start_position => "beginning"
        sincedb_path => "/usr/share/logstash/data/plugins/inputs/file/sincedb"
        tags => "CSV"
    }
}
filter {
    csv {
        remove_field => [ "path","host","message" ]
    }
    date {
        match => [ "column3","yyyy-MM-dd HH:mm:ss" ]
        remove_field => [ "column3" ]
    }
    mutate {
        rename => { "column1" => "customerid"}
        rename => { "column2" => "customer_name" }
        rename => { "@timestamp" => "registration_date"}
        rename => { "column4" => "customer_name_kana" }
        rename => { "column5" => "email"}
        rename => { "column6" => "gender"}
        rename => { "column7" => "age"}
        rename => { "column8" => "birth"}
        rename => { "column9" => "pref"}
            convert => {
                "age" => "integer"
            }
    }
}
output {
    stdout { codec => rubydebug }
    elasticsearch {
        hosts => "http://localhost:9200/"
        index => "python-100knocks-%{+YYYY.MM.DD}"
    }
}
Kibanaで確認してみる
kibanaにログインします。http://{Server_IP_Address}:5601
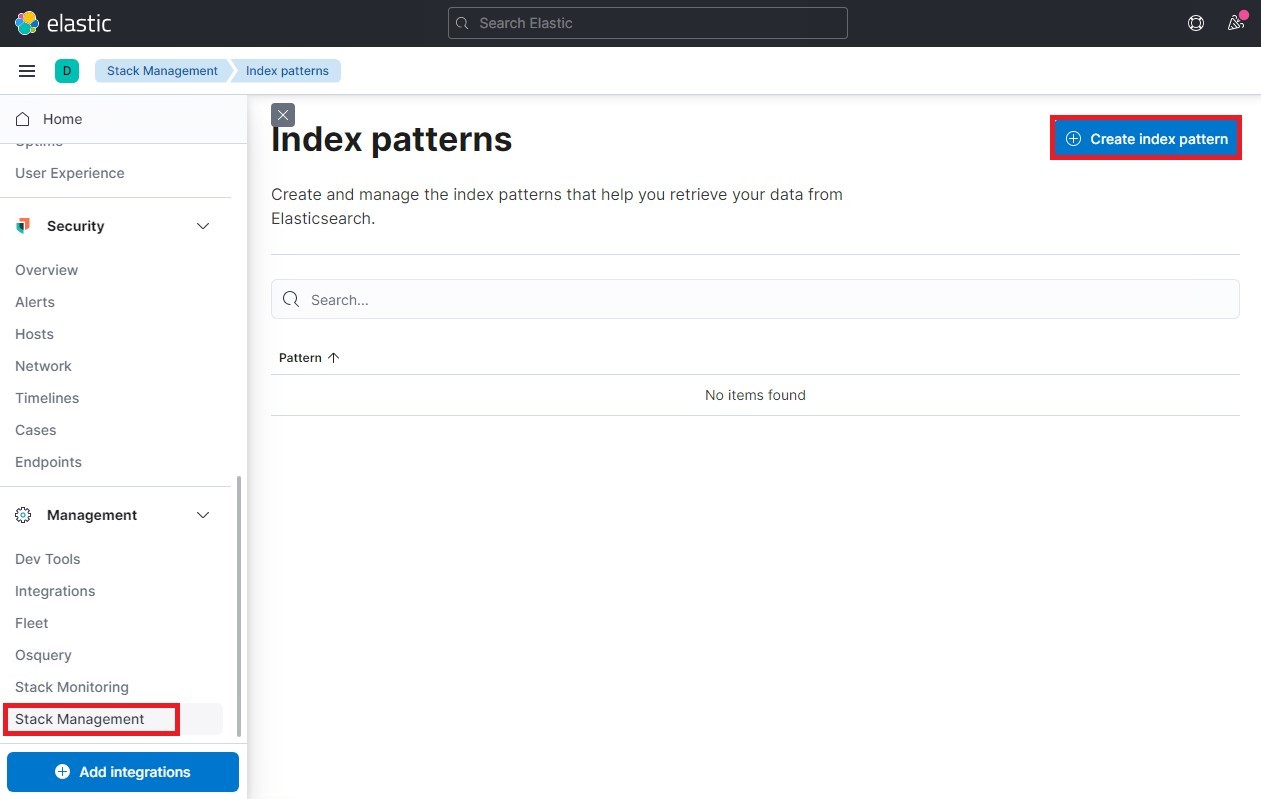
画面左上のハンバーガーメニューから「Stack Management」をクリックします。
次に「Create index pattern」をクリックします。

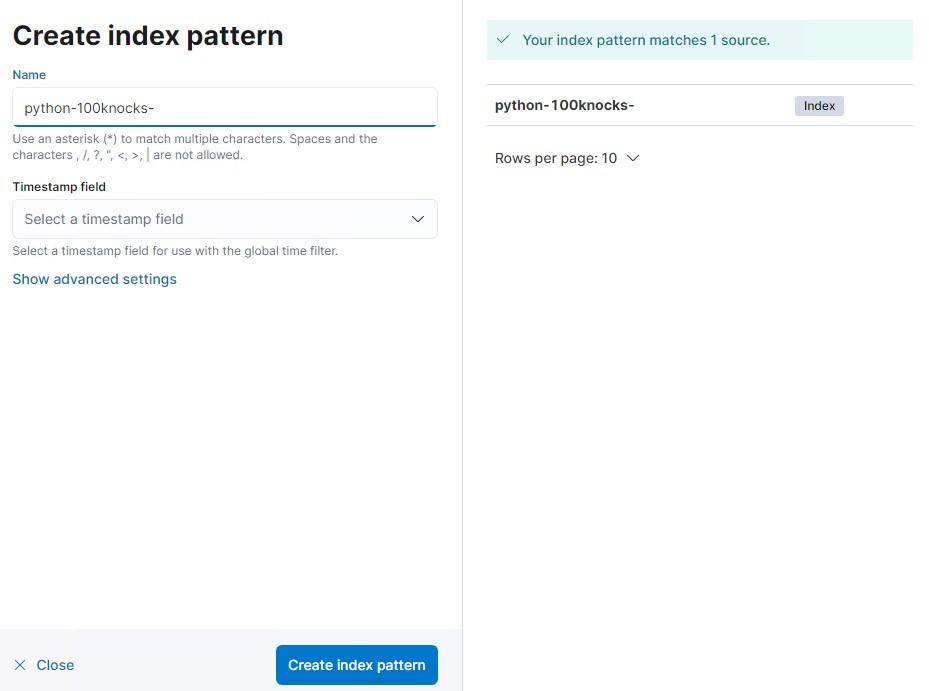
すると先ほどfirst-pipeline.confで定義したindex名が表示されています。
Name欄にIndexと同じ名前を入力し、「Create index pattern」をクリックします。
Timestamp field欄には「timestamp」を選択します。

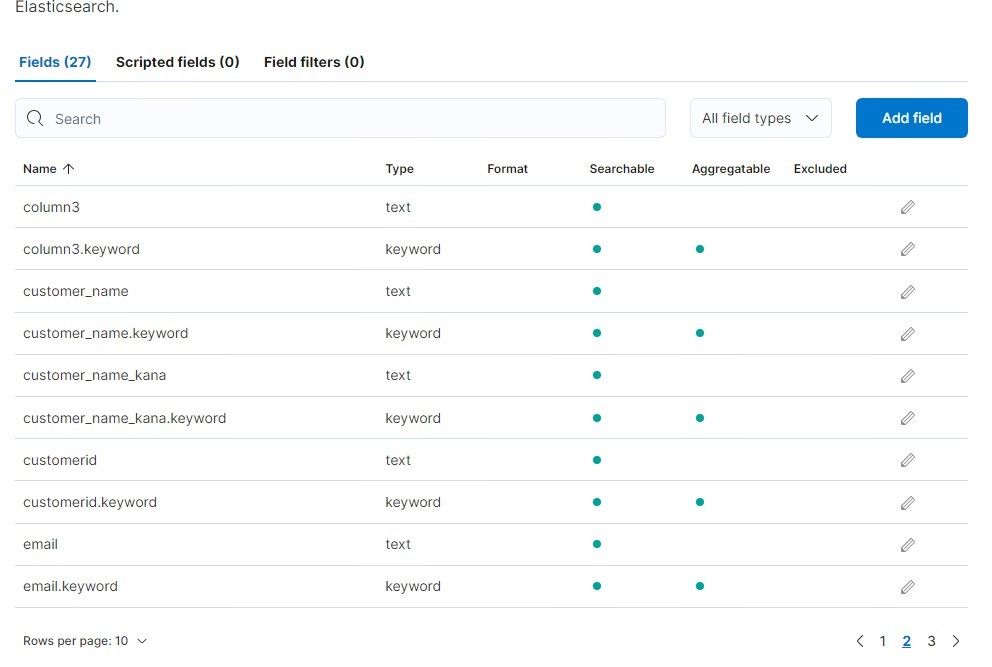
見覚えのあるカラム名が表示されています。

レベル8
Metricbeatを使ってインスタンスのCPU/Memory等の情報を収集する
インストール方法
sudo yum install metricbeat
Metricbeatの起動
sudo systemctl start metricbeat
これだけでkibanaにメトリックが送られます。
Discussion