【Vercel】Next.jsアプリをデプロイしてみる
Next.js で作ったアプリを Vercel へデプロイしてみます。
今回はVercel のコンソールを使用して構築していきます
Terraform での設定方法はこちら
Vercel とは??
公式 HP
Vercel とは、ゼロコンフィグで WEB アプリケーションをデプロイできるサービスです。
Angular、React、Vue など様々なフレームワークに対応しています。
特に、サービスの提供元である Vercel 社が開発してるNext.jsを簡単にデプロイできます。
なんと、GitHub 等のリポジトリを連携するだけでデプロイでき、
PR をもとにアプリのプレビューを作成したり、自動デプロイが可能です!
本記事のゴール
・Next.js のアプリを作成し、Vercel にデプロイする。
・ブラウザからアクセスできることを確認する
・自動デプロイできることを確認する。
前提
想定読者
- Node.js がインストールされている
- Next.js について詳細な解説がなくても大丈夫
- GitHub のアカウントがある
本記事で使用しているバージョン
~$ npx -version
9.8.1
~$ npx create-next-app --version
13.4.13
参考記事
GitHub 等のリポジトリを連携してデプロイする手順が公式ドキュメントにあったので、 それを参考にします
Next.js のアプリケーション
アプリケーション作成
こちらのテンプレートを使用してデプロイするアプリを作成します!
// アプリ作成
~$ npx create-next-app --example blog-starter sample-blog-nextjs-app
Creating a new Next.js app in *********/sample-blog-nextjs-app.

Downloading files for example blog-starter. This might take a moment.

Installing packages. This might take a couple of minutes.


added 215 packages, and audited 216 packages in 48s

89 packages are looking for funding
  run `npm fund` for details

found 0 vulnerabilities

Initialized a git repository.

Success! Created sample-blog-nextjs-app at *********/sample-blog-nextjs-app
Inside that directory, you can run several commands:

  npm run dev
    Starts the development server.

  npm run build
    Builds the app for production.

  npm start
    Runs the built app in production mode.

We suggest that you begin by typing:

  cd sample-blog-nextjs-app
  npm run dev
作成出来たら、動作確認しておきましょう
// ディレクトリ移動
~$ cd sample-blog-nextjs-app

// アプリを起動
sample-blog-nextjs-app$ npm run dev

> dev
> next

- ready started server on 0.0.0.0:3000, url: http://localhost:3000
- event compiled client and server successfully in 191 ms (18 modules)
- wait compiling / (client and server)...
- event compiled client and server successfully in 1948 ms (301 modules)
- wait compiling /posts/[slug]...
- event compiled client and server successfully in 355 ms (324 modules)
^C

sample-blog-nextjs-app$
ブラウザから、http://localhost:3000にアクセスして下記が表示されれば OK!

確認ができたら、Ctrl + c でアプリを停止させましょう。
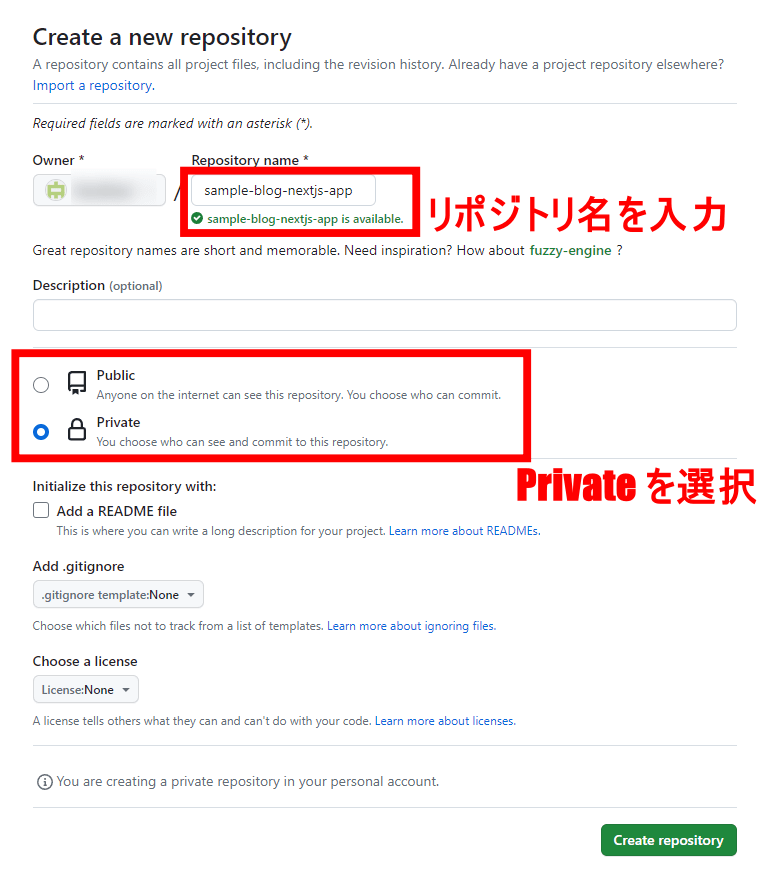
GitHub のリポジトリを作成
この画面でリポジトリを作成します。
GitHub へ push
リポジトリの画面を参考に Git へ push します。
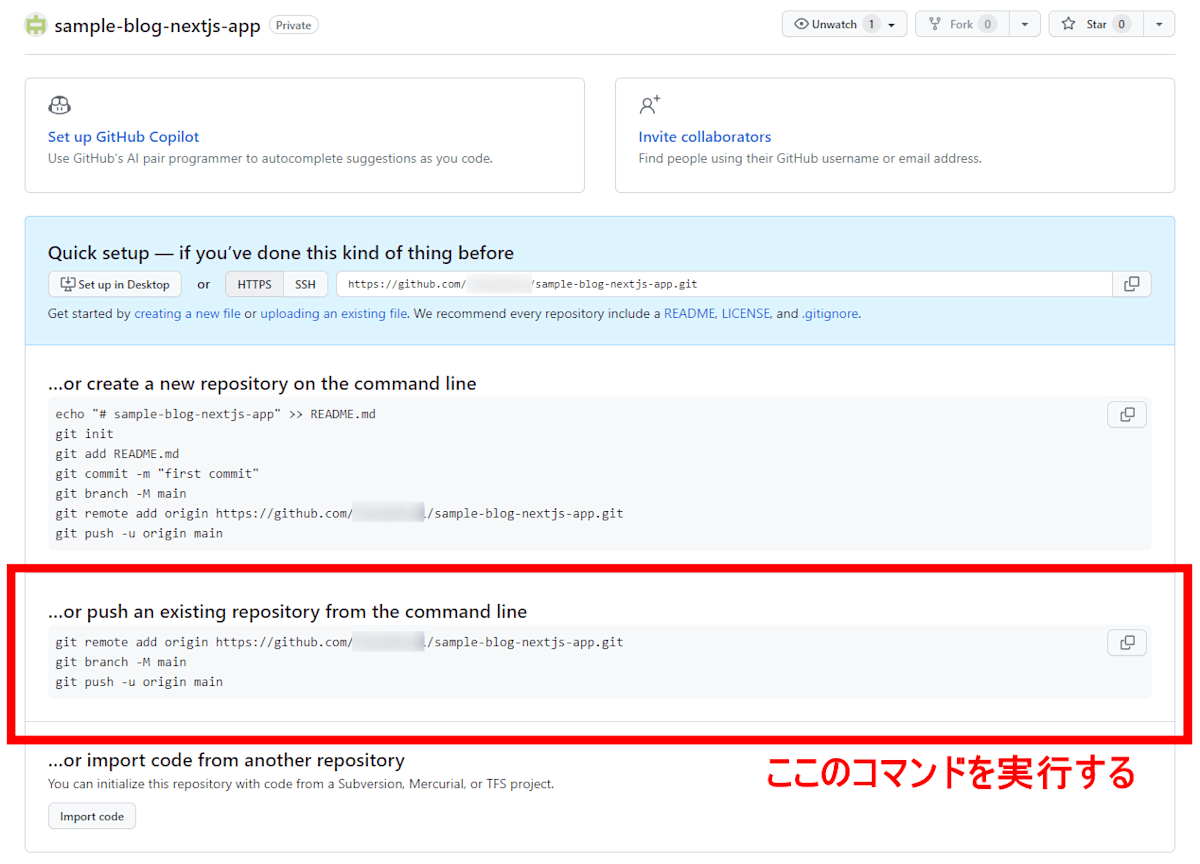
sample-blog-nextjs-app$ git remote add origin https://github.com/********/sample-blog-nextjs-app.git
sample-blog-nextjs-app$ git branch -M main
sample-blog-nextjs-app$ git push -u origin main
Enumerating objects: 73, done.
Counting objects: 100% (73/73), done.
Delta compression using up to 16 threads
Compressing objects: 100% (65/65), done.
Writing objects: 100% (73/73), 308.55 KiB | 11.02 MiB/s, done.
Total 73 (delta 6), reused 0 (delta 0), pack-reused 0
remote: Resolving deltas: 100% (6/6), done.
To https://github.com/********/sample-blog-nextjs-app.git
 * [new branch]      main -> main
Branch 'main' set up to track remote branch 'main' from 'origin'.
Vercel にて設定
サインアップ
こちらからサインアップしていきます。
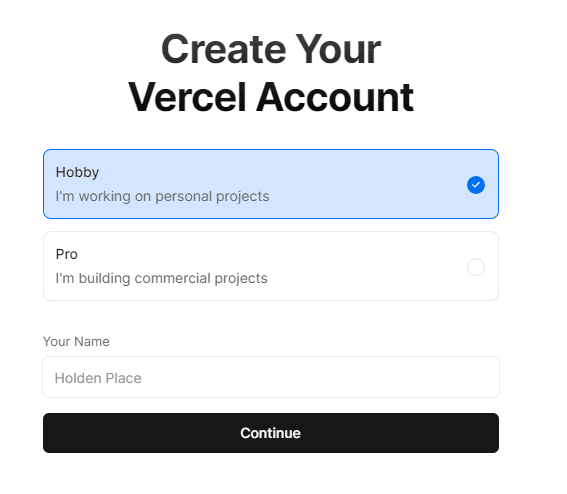
今回は試しにデプロイしてみるだけなので、プランは「Hobby」※無料を選択します。
アカウント名を入力したら、Continue をクリックし次に進みます。
GitHub のリポジトリを使用したいので、「Continue with GitHub」を選択

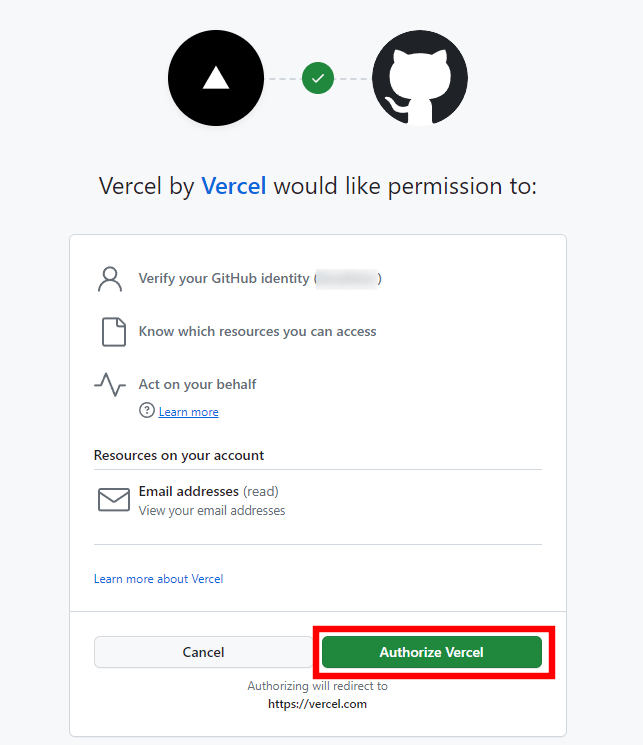
Vercel から GitHub をアクセスできるよう、「Authorize Vercel」をクリックします
アカウントの作成が完了し、ホーム画面(?)に遷移します

デプロイ
ホーム画面にて、
Import Git Repository > Select a Git Namespace > Add GitHub Accountを選択

今回は、先ほど作成した GitHub リポジトリのみを Import していきます。
「Only select repositories」を選び、Select repositories にて GitHub リポジトリを選択。
選択できたら、Installをクリックします。
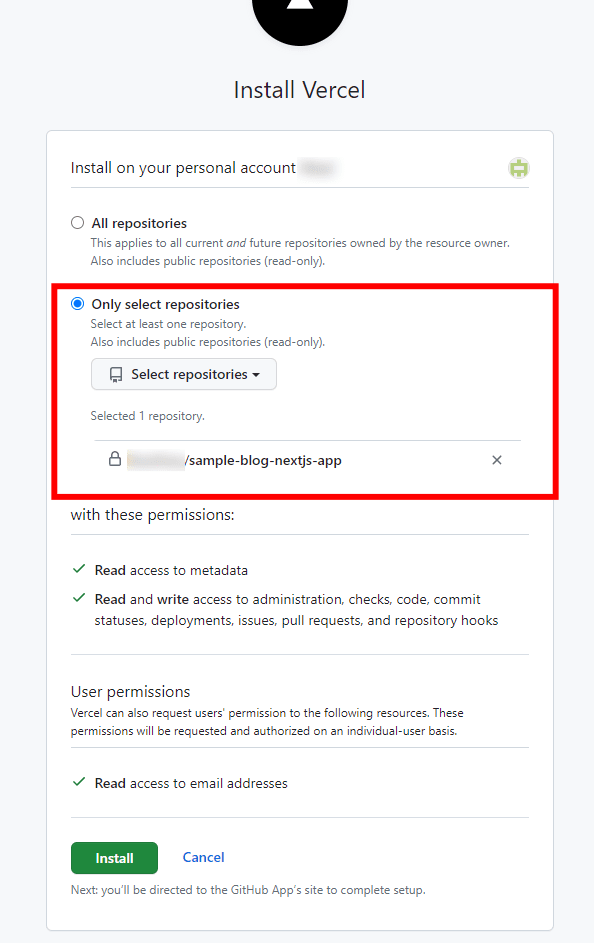
GitHub のパスワードを入力すると、ホーム画面に遷移しリポジトリが表示されています
Importをクリックし、デプロイ設定画面に遷移します

フレームワークやルートディレクトリ、ビルド設定、環境変数に変更はないため、
Deployをクリックします

デプロイがスタートしました!!!

デプロイが完了すると画面が変わります!

ブラウザからアクセスして動作確認
先ほどの画面にて、Continue to Dashboardをクリックしてダッシュボードに遷移します
右上の Visitをクリックします

下記のように表示されれば OK です!

自動デプロイ
commit
テスト用のブランチ(test)を切り、checkout します
sample-blog-nextjs-app$ git checkout -b test
Switched to a new branch 'test'
sample-blog-nextjs-app$ git branch
  main
* test
components/intro.tsxに少し変更を加えます(ハイライト部)
import { CMS_NAME } from '../lib/constants'

const Intro = () => {
  return (
    <section className="flex-col md:flex-row flex items-center md:justify-between mt-16 mb-16 md:mb-12">
      <h1 className="text-5xl md:text-8xl font-bold tracking-tighter leading-tight md:pr-8">
        Auto Deploy Test Success!!
      </h1>
      <h4 className="text-center md:text-left text-lg mt-5 md:pl-8">
        A statically generated blog example using{' '}
        <a
          href="https://nextjs.org/"
          className="underline hover:text-blue-600 duration-200 transition-colors"
        >
          Next.js
        </a>{' '}
        and {CMS_NAME}.
      </h4>
    </section>
  )
}

export default Intro
commit および push します
sample-blog-nextjs-app$ git add .
sample-blog-nextjs-app$ git commit -m"test_commit"
[test a92755f] test_commit
 1 file changed, 1 insertion(+), 1 deletion(-)
sample-blog-nextjs-app$ git push origin test
Enumerating objects: 7, done.
Counting objects: 100% (7/7), done.
Delta compression using up to 16 threads
Compressing objects: 100% (4/4), done.
Writing objects: 100% (4/4), 385 bytes | 385.00 KiB/s, done.
Total 4 (delta 3), reused 0 (delta 0), pack-reused 0
remote: Resolving deltas: 100% (3/3), completed with 3 local objects.
remote:
remote: Create a pull request for 'test' on GitHub by visiting:
remote:      https://github.com/********/sample-blog-nextjs-app/pull/new/test
remote:
To https://github.com/********/sample-blog-nextjs-app.git
 * [new branch]      test -> test
PR を作成
GitHub のリポジトリの画面から PR を作成していきます
Compare & pull requestをクリックします

適当にコメントして、Create pull requestをクリックし、PR を作成します
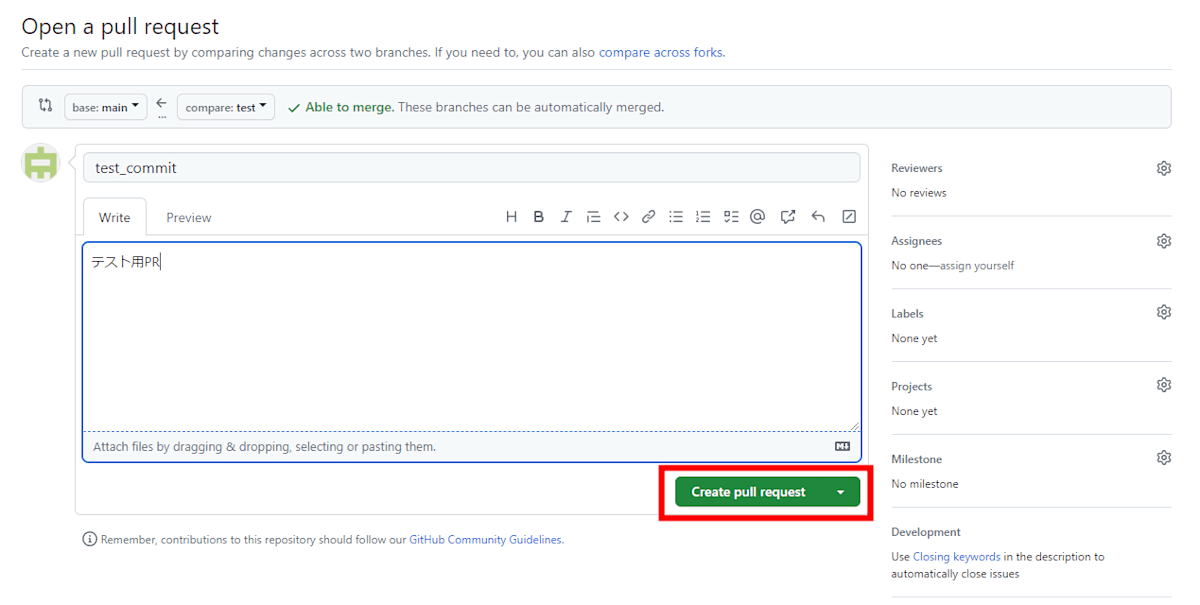
Preview を確認
PR を作成すると、vercel の bot がコメントを残してくれます
そこからPR マージ後のプレビューを確認できます。
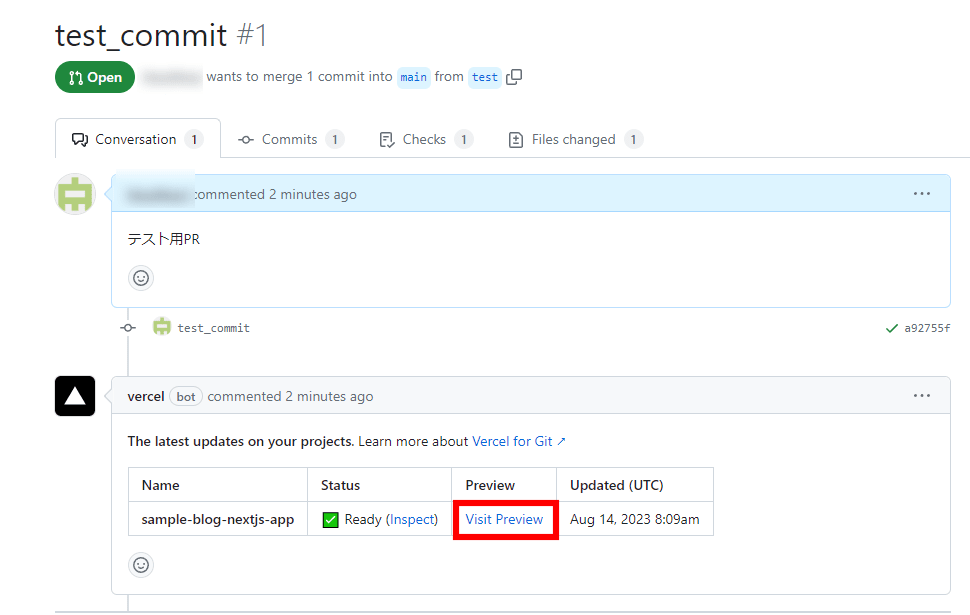
Visit Previewをクリックし、下記のように表示されれば OK です!
(Auto Deploy Test Success!! と表示されるはず。。。)

コメントを残せるなど、見るだけではなくレビューしやすいものとなっています
PR をマージ
プレビューにて確認できたので、PR をマージしていきます。
Merge pull request → Confirm mergeをクリックします。
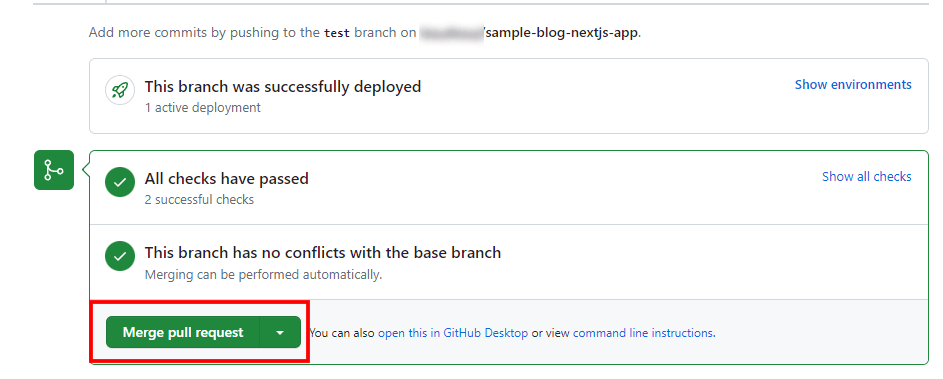

マージ出来たら、Delete branch でマージ元のブランチを消しておきましょう

自動デプロイを確認
ダッシュボードの Visitからデプロイの結果を確認します。
Created が更新されていれば、デプロイが成功しています。

下記のように表示されれば OK です!
(Auto Deploy Test Success!! と表示されるはず。。。)

削除
今回は、Vercel を触ってみる目的でデプロイしたので、削除していきます。
Project の Settings にいき、Deleteをクリックします

プロジェクト名などなどを記載して、Continue をクリックしたら削除完了です

まとめ
すごい簡単にデプロイできましたー!!
さらに
- カスタムドメインを使用する
- スピードインサイトを有効にする
などをしていきたいと思いますー。
Discussion