[Unity]FungusにTimeline用のコマンドを追加する
Unityの会話イベント用アセットであるFungusにTimeline用のコマンドを追加するメモです。
Fungusの公式サイト
FungusのGitHub
Fungusのコマンドを追加する
Fungusのコマンドを追加するには、Commandクラスを継承したカスタムのCommandクラスを作成します。
using UnityEngine;
using Fungus;

[CommandInfo("Test","Test Command", "test command.")]
[AddComponentMenu("")]
public class TestCommand: Command
{
	public override void OnEnter()
	{
		Debug.Log("Test");

		// 次のコマンドへ
		Continue();
	}
}
上記のクラスを追加すると、自動的にTest/Test Commandというコマンドが追加されます。
このコマンドを実行すると、OnEnterの中身が実行され、Testというログが出力されます。
Continue()を呼び出すことで、次のコマンドを遷移します。逆に言うと、Continueを呼び出すまでは次のコマンドに遷移しないので、他の処理を待機したい場合は、処理の完了までContinueの呼び出しを遅らせることで、待機することができます。
コマンドの見た目を変更する
GetSummaryメソッドをオーバーライドすることで、コマンドに表示される文章を変更することができます。
また、GetButtonColorメソッドをオーバーライドすることで、コマンドの色を変更できます。
[CommandInfo("Test","Test Command", "test command.")]
[AddComponentMenu("")]
public class TestCommand: Command
{
	// ~~~中略~~~

	// コマンドに表示されるテキストを変更する
	public override string GetSummary()
	{
		return "hogehoge";
	}

	// コマンドの色を変更する
	public override Color GetButtonColor()
	{
		return Color.red;
	}
}
Timelineを操作するコマンドを追加する
以下のような、Timelineを再生するコマンドを追加してみます。
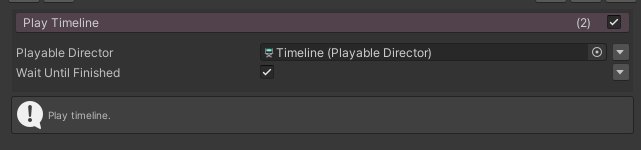
Timelineの再生は、playableDirector.Playで実行できます。このメソッドをOnEnterメソッドの中で呼び出します。
また、WaitUntilFinished変数を追加して、Timelineの再生を待機できるようにします。
using System.Collections;
using UnityEngine;
using UnityEngine.Playables;
using Fungus;

[CommandInfo("Timeline","Play Timeline","Play Timeline.")]
[AddComponentMenu("")]
public class PlayTimeline : Command
{
	// PlayableDirectorへの参照
	[Tooltip("Playable Director")]
	[SerializeField]
	protected PlayableDirector playableDirector;

	// Timelineの再生が完了するまで待機する
	[Tooltip("Wait Until Finished")]
	[SerializeField]
	protected BooleanData waitUntilFinished = new BooleanData(true);

	public override void OnEnter()
	{
		if (playableDirector == null)
		{
			Continue();
			return;
		}

		playableDirector.Play();
		if (waitUntilFinished.Value)
		{
			StartCoroutine(WaitTimeline());
		}
		else
		{
			Continue();
		}
	}

	private IEnumerator WaitTimeline()
	{
		while (playableDirector.state == PlayState.Playing) yield return null;
		Continue();
	}

	public override string GetSummary()
	{
		if (playableDirector == null)
		{
			return "Error: No PlayableDirector selected";
		}
		return playableDirector.name;
	}

	public override Color GetButtonColor()
	{
		return new Color32(235, 191, 217, 255);
	}

	public override bool HasReference(Variable variable)
	{
		return base.HasReference(variable) ||
			(waitUntilFinished.booleanRef == variable);
	}
}
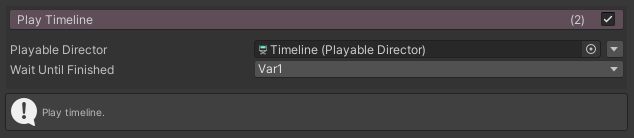
コマンドの引数は、通常のインスペクター同様、public変数にするか、SerializeField属性をつけることで表示されるようになります。
また、基本的な型に関しては、BooleanDataなどの型を使用することで、FungusのVairiableとして設定できるようになります。FungusのVariableを使用している場合、HasReferenceメソッドをオーバーライドすることで、コマンドが使用している最中のVariableがハイライトされるようになります。

その他
以下に一通りのコードを掲載しています。
Discussion