「DSPy 3.0」を改めて試す ③Tutorials: Tools, Development, and Deployment: Debugging & Observability
ちょっと前後しちゃうけども、以下の続き。
で、次はチュートリアルを進めようと思っていたのだが、いろいろ挙動を確認するには、トレーシングを先に押さえておいたほうがいいだろうということで。
まずはこのチュートリアルをやる
事前準備
今回は、MLflowを使ったトレーシングを試すことになると思うので、Colaboratoryだと少し使いにくさもありそう。ローカルのMac上にJupyterLabを建てて試してみる。なお、MLflowはあまり良く知らないので、後ほど追加することにする。
作業ディレクトリ作成
mkdir dspy-tracing-work && cd $_
JupyterLabをDockerで起動
docker run --rm \
    -p 8888:8888 \
    -u root \
    -e GRANT_SUDO=yes \
    -v .:/home/jovyan/work \
    quay.io/jupyter/minimal-notebook:latest
workディレクトリ内でノートブックを開き、以降はノートブック内の作業。
パッケージインストール
!pip install -U dspy
!pip show dspy
Name: dspy
Version: 3.0.3
Summary: DSPy
Home-page: https://github.com/stanfordnlp/dspy
Author:
Author-email: Omar Khattab <okhattab@stanford.edu>
License-Expression: MIT
Location: /opt/conda/lib/python3.12/site-packages
Requires: anyio, asyncer, backoff, cachetools, cloudpickle, diskcache, gepa, joblib, json-repair, litellm, magicattr, numpy, openai, optuna, orjson, pydantic, regex, requests, rich, tenacity, tqdm, xxhash
Required-by:
LLMはOpenAIを使うこととする。環境変数をセット。
import getpass
import os

os.environ["OPENAI_API_KEY"] = getpass.getpass('OPENAI_API_KEY')
サンプルコード
まずはベースとなるサンプルコード。Get Startedでも出てきた、ColBERTv2を使ったWikipedia データセットの検索ツールを持つ、ReActエージェントが用意されている。
import dspy

lm = dspy.LM("openai/gpt-4o-mini")
dspy.configure(lm=lm)

colbert = dspy.ColBERTv2(url="http://20.102.90.50:2017/wiki17_abstracts")

def retrieve(query: str):
    """ColBERTで関連情報の上位3件を取得する"""
    results = colbert(query, k=3)
    return [x["text"] for x in results]

agent = dspy.ReAct("question -> answer", tools=[retrieve], max_iters=3)
ただし、この検索エンドポイント、Get Startedの中ではどうも日本語では検索ができないように思えた。そこで、今回は有料にはなるが、Exa を使った検索ツールを用意することにする。
パッケージ追加
!pip install exa-py
!pip show exa-py
Name: exa-py
Version: 1.15.6
Summary: Python SDK for Exa API.
Home-page:
Author: Exa AI
Author-email: hello@exa.ai
License: MIT
Location: /opt/conda/lib/python3.12/site-packages
Requires: httpx, openai, pydantic, requests, typing-extensions
Required-by:
ExaのAPIキーをセット
import getpass
import os

os.environ["EXA_API_KEY"] = getpass.getpass('EXA_API_KEY')
Exaを使った検索ツールに置き換え
import dspy
from exa_py import Exa

lm = dspy.LM("openai/gpt-4o-mini")
dspy.configure(lm=lm)

exa = Exa(os.getenv('EXA_API_KEY'))

def retrieve(query: str):
    """Exaで関連ニュースを3件取得する"""
    result = exa.search_and_contents(
        query,
        type="auto",
        text=True,
        num_results=3
    )
    return [r.text for r in result.results]

agent = dspy.ReAct("question -> answer", tools=[retrieve], max_iters=3)
ではエージェントにシンプルな質問をしてみる。
prediction = agent(question="2025年6月時点で、大谷翔平はどの野球チームでプレーしていますか?")
print(prediction.answer)
大谷翔平は2025年6月時点でロサンゼルス・ドジャースでプレーしています。
正解。チュートリアルでは失敗してここからデバッグ、という感じなのだけども、まあいいか。
inspect_historyを使う
inspect_history()を使えば、LLMとのやり取りを出力できる。
dspy.inspect_history()
出力を一部抜粋。まず、システムプロンプト。
[2025-10-02T08:49:10.251997]

System message:

Your input fields are:
1. `question` (str):
2. `trajectory` (str):
Your output fields are:
1. `next_thought` (str):
2. `next_tool_name` (Literal['retrieve', 'finish']):
3. `next_tool_args` (dict[str, Any]):
All interactions will be structured in the following way, with the appropriate values filled in.

[[ ## question ## ]]
{question}

[[ ## trajectory ## ]]
{trajectory}

[[ ## next_thought ## ]]
{next_thought}

[[ ## next_tool_name ## ]]
{next_tool_name}        # note: the value you produce must exactly match (no extra characters) one of: retrieve; finish

[[ ## next_tool_args ## ]]
{next_tool_args}        # note: the value you produce must adhere to the JSON schema: {"type": "object", "additionalProperties": true}

[[ ## completed ## ]]
In adhering to this structure, your objective is:
        Given the fields `question`, produce the fields `answer`.

        You are an Agent. In each episode, you will be given the fields `question` as input. And you can see your past trajectory so far.
        Your goal is to use one or more of the supplied tools to collect any necessary information for producing `answer`.

        To do this, you will interleave next_thought, next_tool_name, and next_tool_args in each turn, and also when finishing the task.
        After each tool call, you receive a resulting observation, which gets appended to your trajectory.

        When writing next_thought, you may reason about the current situation and plan for future steps.
        When selecting the next_tool_name and its next_tool_args, the tool must be one of:

        (1) retrieve, whose description is <desc>Exaで関連ニュースを3件取得する</desc>. It takes arguments {'query': {'type': 'string'}}.
        (2) finish, whose description is <desc>Marks the task as complete. That is, signals that all information for producing the outputs, i.e. `answer`, are now available to be extracted.</desc>. It takes arguments {}.
        When providing `next_tool_args`, the value inside the field must be in JSON format
1回目のユーザプロンプト
User message:

[[ ## question ## ]]
2025年6月時点で、大谷翔平はどの野球チームでプレーしていますか?

[[ ## trajectory ## ]]


Respond with the corresponding output fields, starting with the field `[[ ## next_thought ## ]]`, then `[[ ## next_tool_name ## ]]` (must be formatted as a valid Python Literal['retrieve', 'finish']), then `[[ ## next_tool_args ## ]]` (must be formatted as a valid Python dict[str, Any]), and then ending with the marker for `[[ ## completed ## ]]`.
それに対するLLMのレスポンス
[[ ## next_thought ## ]]
大谷翔平が2025年6月時点でどの野球チームでプレーしているかを知るためには、最新の情報を取得する必要があります。関連するニュースを検索して、彼の所属チームについての情報を確認します。

[[ ## next_tool_name ## ]]
retrieve

[[ ## next_tool_args ## ]]
{"query":"大谷翔平 2025年6月 チーム 所属"}

[[ ## completed ## ]]
ここで検索を行うという判断が行われて、検索クエリが生成されて、ツールが実行される。
次のターンのユーザプロンプト。検索結果は省略。
User message:

[[ ## question ## ]]
2025年6月時点で、大谷翔平はどの野球チームでプレーしていますか?

[[ ## trajectory ## ]]
[[ ## thought_0 ## ]]
大谷翔平が2025年6月時点でどの野球チームでプレーしているかを知るためには、最新の情報を取得する必要があります。関連するニュースを検索して、彼の所属チームについての情報を確認します。

[[ ## tool_name_0 ## ]]
retrieve

[[ ## tool_args_0 ## ]]
{"query": "大谷翔平 2025年6月 チーム 所属"}

[[ ## observation_0 ## ]]
[1] «««

(検索ツールの出力)

»»»

Respond with the corresponding output fields, starting with the field `[[ ## next_thought ## ]]`, then `[[ ## next_tool_name ## ]]` (must be formatted as a valid Python Literal['retrieve', 'finish']), then `[[ ## next_tool_args ## ]]` (must be formatted as a valid Python dict[str, Any]), and then ending with the marker for `[[ ## completed ## ]]`.
実際には検索ツールの出力がここに含まれていて、これを元にLLMが返したレスポンスは以下。
Response:

[[ ## next_thought ## ]]
大谷翔平は2025年6月時点でロサンゼルス・ドジャースに所属しており、投手として復帰する予定です。これで質問に対する答えが得られたので、タスクを完了します。

[[ ## next_tool_name ## ]]
finish

[[ ## next_tool_args ## ]]
{}

[[ ## completed ## ]]
さらに次のユーザ出力
User message:

[[ ## question ## ]]
2025年6月時点で、大谷翔平はどの野球チームでプレーしていますか?

[[ ## trajectory ## ]]
[[ ## thought_0 ## ]]
大谷翔平が2025年6月時点でどの野球チームでプレーしているかを知るためには、最新の情報を取得する必要があります。関連するニュースを検索して、彼の所属チームについての情報を確認します。

[[ ## tool_name_0 ## ]]
retrieve

[[ ## tool_args_0 ## ]]
{"query": "大谷翔平 2025年6月 チーム 所属"}

[[ ## observation_0 ## ]]
[1] «««

(検索ツールの出力)

»»»

[[ ## thought_1 ## ]]
大谷翔平は2025年6月時点でロサンゼルス・ドジャースに所属しており、投手として復帰する予定です。これで質問に対する答えが得られたので、タスクを完了します。

[[ ## tool_name_1 ## ]]
finish

[[ ## tool_args_1 ## ]]
{}

[[ ## observation_1 ## ]]
Completed.

Respond with the corresponding output fields, starting with the field `[[ ## reasoning ## ]]`, then `[[ ## answer ## ]]`, and then ending with the marker for `[[ ## completed ## ]]`.
で最終的な出力が以下。最終的な回答も含まれていて、reasoningフィールドも確認できる。
Response:

[[ ## reasoning ## ]]
大谷翔平は2025年6月時点でロサンゼルス・ドジャースに所属しており、投手として復帰する予定です。彼の復帰戦はサンディエゴ・パドレスとの試合で、非常に注目されています。この情報は最新のニュースから確認できました。

[[ ## answer ## ]]
大谷翔平は2025年6月時点でロサンゼルス・ドジャースでプレーしています。

[[ ## completed ## ]]
で、一応、ツールの実行結果なんかもわかるので inspect_history は便利ではあるが、より低レベルで、例えばツールが実際に返した生の出力なんかはわからないし、あくまでもLLMとのやり取りだけになる。また、パラメータ値やレイテンシーなども把握できない。
そこでトレースが必要になる。
トレース
DSPyは、自動トレーシング機能についてMLflowとのインテグレーションがサポートされている。
今回はJupyterLabをDockerで動かしているので、ホスト側でMLflowを立ち上げてJupyterLabからアクセスすることとする。
uv init -p 3.12 mlflow-work && cd $_
uv add "mlflow>=2.18.0"
uv run mlflow server --backend-store-uri sqlite:///mydb.sqlite
MLflowはデフォルトだと5000番ポートで立ち上がる。
INFO: Uvicorn running on http://127.0.0.1:5000 (Press CTRL+C to quit)
ブラウザでhttp://127.0.0.1:5000 にアクセスできることを確認しておく。

JupyterLab側に戻って、最初のコードに、DSPyからMLflowへトレーシングを行う設定を追加する。なお、ドキュメントの説明とサンプルコードがあっておらず、サンプルコードにはmlflow.dspy.autolog()が含まれていなかった。
!pip install "mlflow>=2.18.0"
import dspy
from exa_py import Exa
# MLflowをインポート
import mlflow

# MLflowのサーバURIを設定
# 注: Dockerコンテナ内からホストへのアクセス
mlflow.set_tracking_uri("http://host.docker.internal:5000")
# ユニークな実験名を設定
mlflow.set_experiment("DSPy")
# MLflowのトレース機能を有効
mlflow.dspy.autolog()

lm = dspy.LM("openai/gpt-4o-mini")
dspy.configure(lm=lm)

exa = Exa(os.getenv('EXA_API_KEY'))

def retrieve(query: str):
    """Exaで関連ニュースを3件取得する"""
    result = exa.search_and_contents(
        query,
        type="auto",
        text=True,
        num_results=3
    )
    return [r.text for r in result.results]

agent = dspy.ReAct("question -> answer", tools=[retrieve], max_iters=3)

prediction = agent(question="大谷翔平はどの野球チームでプレーしていますか?")
print(prediction.answer)
実行すると以下のように出力され、MLflow側に実験が作成されて回答が生成される。なお、WARNINGもチラホラでているが、これはおそらくExaの出力が大きすぎるためでトレーシングとは直接関係ないと思うが、トレーシング有効にしたことでデバッグ的な出力も表示されるようになったのだろう。
2025/10/03 00:32:25 INFO mlflow.tracking.fluent: Experiment with name 'DSPy' does not exist. Creating a new experiment.
2025/10/03 00:34:22 WARNING dspy.predict.react: Trajectory exceeded the context window, truncating the oldest tool call information.
2025/10/03 00:34:39 WARNING dspy.predict.react: Trajectory exceeded the context window, truncating the oldest tool call information.
2025/10/03 00:34:55 WARNING dspy.predict.react: Trajectory exceeded the context window, truncating the oldest tool call information.
大谷翔平はロサンゼルス・エンゼルスでプレーしています。

インラインだとうまく表示されていないのだけども(ブラウザから見たホストとコンテナ内のホストがあってないため)、コンテナを使わなければ多分表示されるのだろうと思う。
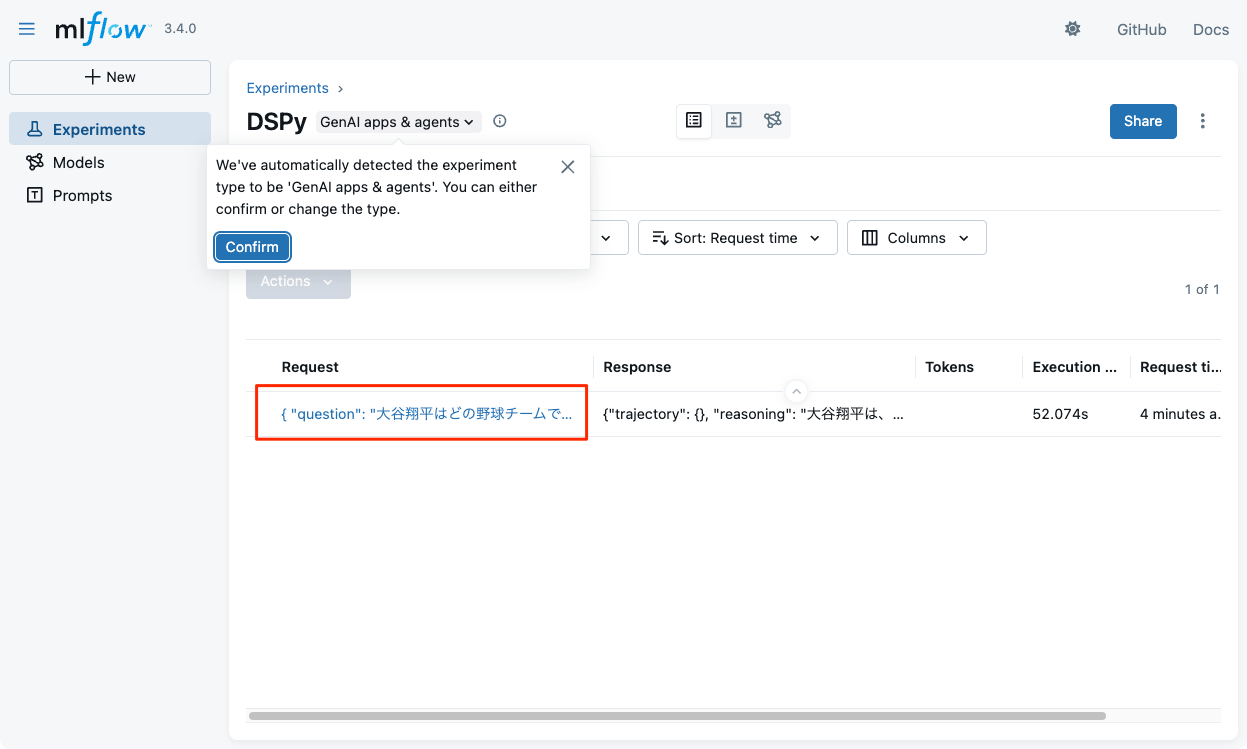
ブラウザでMLflowを見てみると、実験が作成されているので、これをクリック。

トレースが取得できている様子。

回答は期待したものではないのだけど、トレースを見る限り、検索ツールの結果がLLMのコンテキストウインドウを超えてしまっているのが原因。さらにもう一つ、検索ツールの結果が大きくなった要因としては質問が曖昧すぎるところもあったようで、以下のように少し質問の条件を絞ってやるとWARNINGも起きずに正しい回答が得られた。
prediction = agent(question="大谷翔平は2025年時点でどの野球チームでプレーしている?")
print(prediction.answer)

この結果を踏まえると、検索周りの調整(Exaで検索パラメータを調節するとか)を検討することになるのだろう。
カスタムロギングソリューションの構築
DSPyにはコールバック機構があり、特定のイベント発生時にハンドラを実行することができる。これを使えばカスタムなロギングを実装できる。
import dspy
from dspy.utils.callback import BaseCallback
from exa_py import Exa

# 1. BaseCallbackクラスを拡張してカスタムなコールバッククラスを定義
class AgentLoggingCallback(BaseCallback):

    # 2. カスタムなロギングを実装するために、on_module_end ハンドラを実装
    def on_module_end(self, call_id, outputs, exception):
        step = "Reasoning" if self._is_reasoning_output(outputs) else "Acting"
        print(f"== {step} Step ===")
        for k, v in outputs.items():
            print(f"  {k}: {v}")
        print("\n")

    def _is_reasoning_output(self, outputs):
        return any(k.startswith("Thought") for k in outputs.keys())

# 3. コールバックをDSPyの設定にセットする。以降の実行で適用される。
dspy.configure(callbacks=[AgentLoggingCallback()])

lm = dspy.LM("openai/gpt-4o-mini")
dspy.configure(lm=lm)

exa = Exa(os.getenv('EXA_API_KEY'))

def retrieve(query: str):
    """Exaで関連ニュースを3件取得する"""
    result = exa.search_and_contents(
        query,
        type="auto",
        text=True,
        num_results=3
    )
    return [r.text for r in result.results]

agent = dspy.ReAct("question -> answer", tools=[retrieve], max_iters=3)

prediction = agent(question="2025年時点で大谷翔平が何をしているのか知りたい。")
print(prediction.answer)
こんな感じで出力される。
== Acting Step ===
  next_thought: 大谷翔平が2025年にどの野球チームに所属しているかを知るためには、最新のニュースを取得する必要がある。彼のチームに関する情報を得るために、関連するニュースを検索しよう。
  next_tool_name: retrieve
  next_tool_args: {'query': '大谷翔平 2025年 所属 チーム'}

== Acting Step ===
  next_thought: 大谷翔平選手の2025年の活動についての情報を収集した結果、彼はロサンゼルス・ドジャースに所属し、ポストシーズンに向けて活躍していることがわかりました。彼の成績や試合内容についての詳細を整理し、最終的な回答を作成する準備をします。
  next_tool_name: finish
  next_tool_args: {}

(snip)

2025年の大谷翔平選手はロサンゼルス・ドジャースに所属し、ポストシーズンに向けて活躍しています。レギュラーシーズンでは55本のホームランを記録し、打率は.282、打点は102、盗塁は20に達しています。投手としても14試合に登板し、1勝1敗、防御率は2.87です。ポストシーズンでは初戦で2本のホームランを打つなど、チームの勝利に貢献しています。
利用可能なハンドラ
-
on_module_start/on_module_end:dspy.Moduleのサブクラスが呼び出された時にトリガーされるんだし。 -
on_lm_start/on_lm_end:dspy.LMのサブクラスが呼び出された時にトリガーされる。 -
on_adapter_format_start/on_adapter_format_end:dspy.Adapterが入力プロンプトをフォーマットする時にトリガーされる。 -
on_adapter_parse_start/on_adapter_parse_end:dspy.AdapterがLM出力テキストを後処理する時にトリガーされる。 -
on_tool_start/on_tool_end:dspy.Toolのサブクラスが呼び出された時にトリガーされる。 -
on_evaluate_start/on_evaluate_end:dspy.Evaluateインスタンスが呼び出された時にトリガーされる。
まとめ
トレーシングほんとに便利。
なお、DSPyの公式ドキュメントには記載されてないが、LangFuseやArize Phoenixなんかでもトレーシングできるっぽい。
これを踏まえて、次はチュートリアルをいくつか試す。