LlamaIndexのStructured Data Extraction
ドキュメント
notebook
んでもってそういうサービスもどうやら作ったらしい。
んー、もともとこういうのなかったっけ?と思ったけど、あった。
何が違うのかなーと思ってみてみたけど、ざっと見た感じ以前はOutput Parserのように出力時の変換みたいなフィルタ的だったのものが、モデルに直接Pydanticクラスを紐づけるって感じに見える。
とりあえずまあ触ってみるかというところ。
ちょうど以下のようなリリースもあったので、改めてLlamaIndexでもやってみる。
なお、基本的にOpenAI純正のStructured Output以前から、LlamaIndexにはPydanticを使ったStructured Output的なものはある(おそらくFunction Callingやプロンプトを使っているのではないかと思われる)ので、OpenAIの今回の機能についてはまだ反映されていないものと思われる。
A Simple Guide to Structured Outputs
まずはQuick Startから
パッケージインストール。Llama Traceでトレーシングを有効にするためのパッケージも追加している。
!pip install llama-index llama-index-callbacks-arize-phoenix
!pip freeze | egrep -i "llama-|arize"
arize-phoenix==4.21.0
arize-phoenix-evals==0.14.1
llama-cloud==0.0.13
llama-index==0.10.63
llama-index-agent-openai==0.2.9
llama-index-callbacks-arize-phoenix==0.1.6
llama-index-cli==0.1.13
llama-index-core==0.10.63
llama-index-embeddings-openai==0.1.11
llama-index-indices-managed-llama-cloud==0.2.7
llama-index-legacy==0.9.48
llama-index-llms-openai==0.1.29
llama-index-multi-modal-llms-openai==0.1.9
llama-index-program-openai==0.1.7
llama-index-question-gen-openai==0.1.3
llama-index-readers-file==0.1.32
llama-index-readers-llama-parse==0.1.6
llama-parse==0.4.9
openinference-instrumentation-llama-index==2.2.3
Colab側の不具合があってトレーシングが有効にならないらしいので、以下を実行してモジュールを再読み込み。
import importlib
import pkg_resources

importlib.reload(pkg_resources)
Llama Traceを有効にする。ここはオプション。
import llama_index.core
import os
from google.colab import userdata

PHOENIX_API_KEY = userdata.get('PHOENIX_API_KEY')
os.environ["OTEL_EXPORTER_OTLP_HEADERS"] = f"api_key={PHOENIX_API_KEY}"
llama_index.core.set_global_handler(
    "arize_phoenix",
    endpoint="https://llamatrace.com/v1/traces"
)
notebook環境ではイベントループのネストを有効化しておく。
import nest_asyncio

nest_asyncio.apply()
OpenAI APIキーをセット
import os
from google.colab import userdata

os.environ["OPENAI_API_KEY"] = userdata.get('OPENAI_API_KEY')
デフォルトの設定を行う。LLMはgpt-4o-mini、Embeddingsはtext-embedding-3-smallを使う。
from llama_index.llms.openai import OpenAI
from llama_index.embeddings.openai import OpenAIEmbedding
from llama_index.core import Settings

llm = OpenAI(model="gpt-4o-mini")
embed_model = OpenAIEmbedding(model="text-embedding-3-small")
Settings.llm = llm
Settings.embed_model = embed_model
シンプルな構造化出力
出力フォーマットを定義したPydanticクラスを事前に用意、LLMオブジェクトのas_structured_llmメソッドでそれを出力クラスとして渡せば、どのようなLLMでも「構造化LLM」にできる。
音楽のアルバム・曲のモデルを出力モデルとして定義する。
from typing import List
from pydantic.v1 import BaseModel, Field


class Song(BaseModel):
    """曲のデータモデル"""

    title: str
    length_seconds: int


class Album(BaseModel):
    """アルバムのデータモデル"""

    name: str
    artist: str
    songs: List[Song]
from llama_index.core.llms import ChatMessage

sllm = llm.as_structured_llm(output_cls=Album)
input_msg = ChatMessage.from_str("侍戦隊シンケンジャーのアルバムを生成して。")
output = sllm.chat([input_msg])
print(str(output))
assistant: {"name": "\u4f8d\u6226\u968a\u30b7\u30f3\u30b1\u30f3\u30b8\u30e3\u30fc", "artist": "\u9ad8\u6a4b\u79c0\u5e78", "songs": [{"title": "\u4f8d\u6226\u968a\u30b7\u30f3\u30b1\u30f3\u30b8\u30e3\u30fc", "length_seconds": 120}, {"title": "\u52c7\u6c17\u3092\u304f\u3060\u3055\u3044", "length_seconds": 150}, {"title": "\u30b7\u30f3\u30b1\u30f3\u30b8\u30e3\u30fc\u306e\u30c6\u30fc\u30de", "length_seconds": 180}, {"title": "\u6226\u3048\uff01\u30b7\u30f3\u30b1\u30f3\u30b8\u30e3\u30fc", "length_seconds": 200}, {"title": "\u4f8d\u306e\u8a87\u308a", "length_seconds": 160}]}
Unicodeエンコーディングされているので読めないが、定義した出力モデルに合わせたJSONがレスポンスとして返ってきているのがわかる。
オブジェクトとして取り出すとこう。
output_obj = output.raw
print(type(output_obj))
print(output_obj)
<class '__main__.Album'>
name='侍戦隊シンケンジャー' artist='高橋秀幸' songs=[Song(title='侍戦隊シンケンジャー', length_seconds=120), Song(title='勇気をください', length_seconds=150), Song(title='シンケンジャーのテーマ', length_seconds=180), Song(title='戦え!シンケンジャー', length_seconds=200), Song(title='侍の誇り', length_seconds=160)]
辞書にすれば個々の値を取り出せる。
print(output_obj.dict())
{'name': '侍戦隊シンケンジャー', 'artist': '高橋秀幸', 'songs': [{'title': '侍戦隊シンケンジャー', 'length_seconds': 120}, {'title': '勇気をください', 'length_seconds': 150}, {'title': 'シンケンジャーのテーマ', 'length_seconds': 180}, {'title': '戦え!シンケンジャー', 'length_seconds': 200}, {'title': '侍の誇り', 'length_seconds': 160}]}
見やすくするとこう
import json

print(json.dumps(output.raw.dict(), ensure_ascii=False, indent=2))
{
  "name": "侍戦隊シンケンジャー",
  "artist": "高橋秀幸",
  "songs": [
    {
      "title": "侍戦隊シンケンジャー",
      "length_seconds": 120
    },
    {
      "title": "勇気をください",
      "length_seconds": 150
    },
    {
      "title": "シンケンジャーのテーマ",
      "length_seconds": 180
    },
    {
      "title": "戦え!シンケンジャー",
      "length_seconds": 200
    },
    {
      "title": "侍の誇り",
      "length_seconds": 160
    }
  ]
}
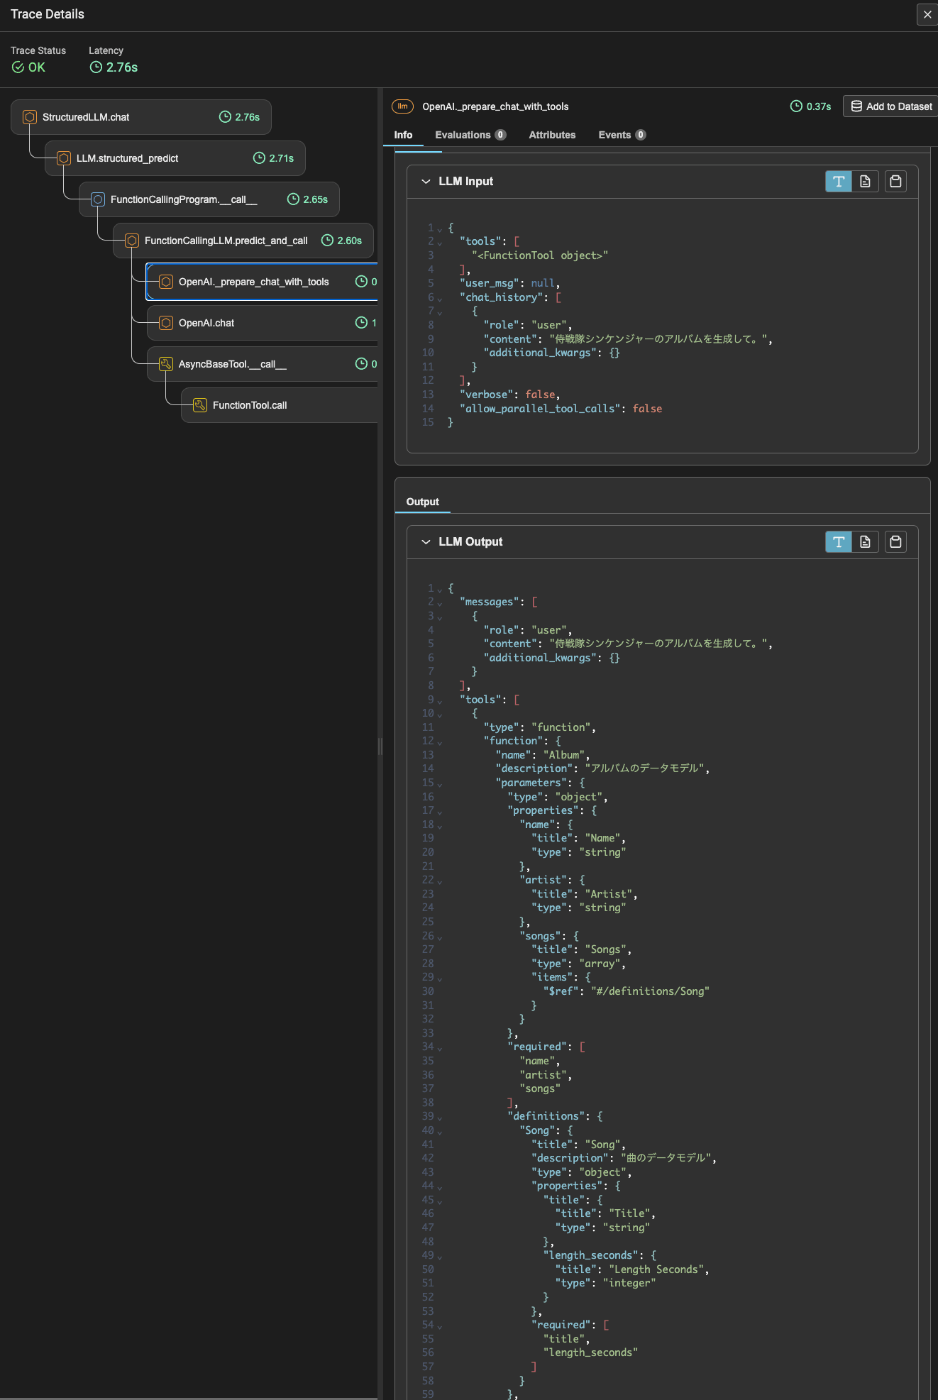
なお、トレースを見るとFunction Callingが使われていて、定義した出力モデルはFunction Callingの関数スキーマとして渡されているのがわかる。

上の例は同期、非同期やストリーミングも可能。
非同期
output = await sllm.achat([input_msg])
print(json.dumps(output.raw.dict(), ensure_ascii=False, indent=2))
{
  "name": "侍戦隊シンケンジャー",
  "artist": "Various Artists",
  "songs": [
    {
      "title": "侍戦隊シンケンジャー",
      "length_seconds": 120
    },
    {
      "title": "シンケンジャーのテーマ",
      "length_seconds": 150
    },
    {
      "title": "戦え!シンケンジャー",
      "length_seconds": 180
    },
    {
      "title": "侍の誇り",
      "length_seconds": 200
    },
    {
      "title": "シンケンジャーの絆",
      "length_seconds": 160
    }
  ]
}
ストリーミング
from IPython.display import clear_output
from pprint import pprint

stream_output = sllm.stream_chat([input_msg])
for partial_output in stream_output:
    clear_output(wait=True)
    pprint(partial_output.raw.dict())
{'artist': '高橋秀幸',
 'name': '侍戦隊シンケンジャー',
 'songs': [{'length_seconds': 120, 'title': '侍戦隊シンケンジャー'},
           {'length_seconds': 150, 'title': '侍の誇り'},
           {'length_seconds': 180, 'title': '戦え!シンケンジャー'},
           {'length_seconds': 160, 'title': '心の絆'},
           {'length_seconds': 140, 'title': '勝利の歌'}]}
ストリーミングの非同期
from IPython.display import clear_output
from pprint import pprint

stream_output = await sllm.astream_chat([input_msg])
async for partial_output in stream_output:
    clear_output(wait=True)
    pprint(partial_output.raw.dict())
{'artist': '高取ヒデアキ',
 'name': '侍戦隊シンケンジャー',
 'songs': [{'length_seconds': 150, 'title': '侍戦隊シンケンジャー'},
           {'length_seconds': 180, 'title': '勇気をください'},
           {'length_seconds': 120, 'title': 'シンケンジャーのテーマ'},
           {'length_seconds': 200, 'title': '侍の心'},
           {'length_seconds': 160, 'title': '戦え!シンケンジャー'}]}
Query Pipelineとの組み合わせた例
as_structured_llmメソッドで「構造化」されたLLMはそのままQuery Pipelineに組み込むことができる。
from llama_index.core.prompts import ChatPromptTemplate
from llama_index.core.query_pipeline import QueryPipeline as QP
from llama_index.core.llms import ChatMessage

chat_prompt_tmpl = ChatPromptTemplate(
    message_templates=[
        ChatMessage.from_str(
            "{movie_name}のアルバムを生成して。", role="user"
        )
    ]
)

qp = QP(chain=[chat_prompt_tmpl, sllm])
response = qp.run(movie_name="仮面ライダーW")
print(response.dict())
{'name': '仮面ライダーW', 'artist': '佐藤健', 'songs': [{'title': 'Wのテーマ', 'length_seconds': 120}, {'title': '風都探偵', 'length_seconds': 150}, {'title': 'サイクロンジョーカー', 'length_seconds': 180}, {'title': '仮面ライダーWのうた', 'length_seconds': 200}, {'title': '運命のダンス', 'length_seconds': 160}]}
structured_predictを使う
as_structured_llmメソッドはLLMオブジェクトそのものを「構造化LLM」にするが、structured_predictメソッドを使うと、通常のcompletionで使うpredictにその時だけ出力モデルを追加する、というような使い方ができる
from llama_index.core.prompts import ChatPromptTemplate
from llama_index.core.llms import ChatMessage
from llama_index.llms.openai import OpenAI

chat_prompt_tmpl = ChatPromptTemplate(
    message_templates=[
        ChatMessage.from_str(
            "{movie_name}のアルバムを生成して。", role="user"
        )
    ]
)

llm = OpenAI(model="gpt-4o-mini")

# 普通にプロンプトを投げる
response = llm.predict(chat_prompt_tmpl, movie_name="仮面ライダーディケイド")
print(response)

print("\n============\n")

# 出力モデルといっしょに投げる
album = llm.structured_predict(
    Album, chat_prompt_tmpl, movie_name="仮面ライダーディケイド"
)
print(album.dict())
もちろんです!仮面ライダーディケイドをテーマにしたアルバムのタイトルや曲のアイデアを提案しますね。

### アルバムタイトル: **「ディケイドの旅路」**

#### トラックリスト:

1. **「時の狭間」**
   - ディケイドの旅の始まりを描いたイントロダクション。

2. **「仮面の誓い」**
   - 主人公の決意と仲間との絆を歌った力強いバラード。

3. **「異世界の扉」**
   - 各ライダーの世界を巡る冒険をテーマにしたアップテンポな曲。

4. **「過去と未来」**
   - 過去のライダーたちとの出会いと未来への希望を描いたメロディックなトラック。

5. **「戦士たちの影」**
   - 敵との戦いを描いた激しいロックナンバー。

6. **「運命の交差点」**
   - さまざまな選択肢が交差する瞬間を表現したドラマティックな曲。

7. **「ライダーの絆」**
   - 仲間との絆をテーマにした感動的なバラード。

8. **「最後の戦い」**
   - クライマックスに向けた緊迫感あふれるトラック。

9. **「新たな旅立ち」**
   - 物語の終わりと新たな始まりを描いた希望に満ちたエンディングソング。

10. **「ディケイドのテーマ」**
    - アルバムの締めくくりとして、ディケイドの象徴的なテーマ曲をアレンジしたもの。

このアルバムは、仮面ライダーディケイドのストーリーやキャラクターの魅力を引き出す内容になっています。各曲は、物語の重要な瞬間や感情を反映しており、ファンにとって特別な体験となることでしょう。

============

{'name': '仮面ライダーディケイド', 'artist': '井上大輔', 'songs': [{'title': 'Journey Through The Decade', 'length_seconds': 240}, {'title': 'Break the Chain', 'length_seconds': 210}, {'title': 'The Last Decade', 'length_seconds': 300}, {'title': 'Kamen Rider Decade Theme', 'length_seconds': 180}, {'title': 'Rider Battle', 'length_seconds': 240}, {'title': 'Final Countdown', 'length_seconds': 270}]}
RAGで使う
RAGと組み合わせてみる。
まずインデックスを作成。
以下のコンテンツをサンプルで使う
ダウンロードしてMarkdownにする
from pathlib import Path
import requests
import re

def replace_heading(match):
    level = len(match.group(1))
    return '#' * level + ' ' + match.group(2).strip()

# Wikipediaからのデータ読み込み
wiki_titles = ["オグリキャップ"]
for title in wiki_titles:
    response = requests.get(
        "https://ja.wikipedia.org/w/api.php",
        params={
            "action": "query",
            "format": "json",
            "titles": title,
            "prop": "extracts",
            # 'exintro': True,
            "explaintext": True,
        },
    ).json()
    page = next(iter(response["query"]["pages"].values()))
    wiki_text = f"# {title}\n\n## 概要\n\n"
    wiki_text += page["extract"]

    wiki_text = re.sub(r"(=+)([^=]+)\1", replace_heading, wiki_text)
    wiki_text = re.sub(r"\t+", "", wiki_text)
    wiki_text = re.sub(r"\n{3,}", "\n\n", wiki_text)
    data_path = Path("data")
    if not data_path.exists():
        Path.mkdir(data_path)

    # markdown(.md)ファイルとして出力
    with open(data_path / f"{title}.md", "w") as fp:
        fp.write(wiki_text)
ちょっといじる
from pathlib import Path
import glob
import os

from llama_index.core.node_parser import MarkdownNodeParser
from llama_index.readers.file import FlatReader
from llama_index.core.schema import MetadataMode

files = glob.glob('data/*.md')

docs = []
for f in files:
    doc = FlatReader().load_data(Path(f))
    docs.extend(doc)

parser = MarkdownNodeParser()
nodes = parser.get_nodes_from_documents(docs)

nodes_for_delete = []
sections_for_delete = ["競走成績", "外部リンク", "参考文献", "関連作品"]

for idx, n in enumerate(nodes):
    # メタデータからセクション情報を取り出す。
    metadatas = []
    header_keys = []
    for m in n.metadata:
        if m.startswith("Header"):
            metadatas.append(n.metadata[m])
            header_keys.append(m)
    if len(metadatas) > 0:
        # セクション情報を新たなメタデータに設定
        n.metadata["section"] = metadata_str = " > ".join(metadatas)
        # 古いセクション情報を削除
        for k in header_keys:
            if k.startswith("Header"):
               del n.metadata[k]

    # コンテンツ整形
    contents = n.get_content().split("\n")
    if len(contents) == 1:
        # コンテンツが1つだけ≒セクションタイトルのみの場合は削除対象
        nodes_for_delete.append(idx)
    elif contents[0] in sections_for_delete:
        # 任意のセクションを削除対象
        nodes_for_delete.append(idx)
    else:
        # コンテンツの冒頭にあるセクションタイトル部分、及びそれに続く改行を削除
        content_for_delete = []
        for c_idx, c in enumerate(contents):
            if c in (metadatas):
                content_for_delete.append(c_idx)
            elif c in ["", "\n", None]:
                content_for_delete.append(c_idx)
            else:
                break
        contents = [item for i, item in enumerate(contents) if i not in content_for_delete]

    # 整形したコンテンツでノードを書き換え
    n.set_content("\n".join(contents))

base_nodes = [item for i, item in enumerate(nodes) if i not in nodes_for_delete]
上記で各チャンクに少しメタデータとしてセクション情報を付与している
print(base_nodes[0].id_)
print(base_nodes[0].metadata)
print(base_nodes[0].get_content()[:50]+"...")
387d3386-10e4-4444-ba7a-9c34a07930a4
{'filename': 'オグリキャップ.md', 'extension': '.md', 'section': 'オグリキャップ > 概要'}
オグリキャップ(欧字名:Oguri Cap、1985年3月27日 - 2010年7月3日)は、日本の...
LlamaIndexではこの情報がRAGのコンテキストに含まれるため、これを使って回答とその引用っぽい感じのものを構造化して出力するようにしてみる。
出力モデルとそれを使った「構造化LLM」の定義。
from pydantic.v1 import BaseModel, Field
from typing import List


class Output(BaseModel):
    """回答、ファイル名、セクション名、信頼度、信頼度の説明を含む出力。"""

    response: str = Field(..., description="質問に対する回答")
    file_name: List[str] = Field(..., description="この質問に答えるために使用したファイル名。文脈が関係ない場合はファイル名を含めないこと。")
    section_name: List[str] = Field(..., description="この質問に答えるために使用したファイルのセクション名。文脈が関係ない場合はセクション名を含めないこと。")
    confidence: float = Field(..., description="結果が正しいかどうかの信頼度スコア(0~1の間)。")
    confidence_explanation: str = Field(..., description="信頼度スコアの説明。")

sllm = llm.as_structured_llm(output_cls=Output)
インデックスを作成してQuery Engineを作成
from llama_index.core import VectorStoreIndex

index = VectorStoreIndex(nodes)

query_engine = index.as_query_engine(
    similarity_top_k=10,
    llm=sllm,
)
ではRAGのクエリを投げてみる。
response = query_engine.query("オグリキャップの主な勝ち鞍について教えて。")
response.response.dict()
{'response': 'オグリキャップの主な勝ち鞍には、1988年のペガサスステークス、毎日杯、高松宮杯、ニュージーランドトロフィー4歳ステークス、毎日王冠、そして1988年の有馬記念があります。特に有馬記念ではGI競走初制覇を達成し、芦毛馬初の有馬記念優勝馬となりました。',
 'file_name': ['オグリキャップ.md'],
 'section_name': ['オグリキャップ > 競走馬時代 > 中央競馬時代 > 4歳(1988年) > 競走内容'],
 'confidence': 0.9,
 'confidence_explanation': 'オグリキャップの勝ち鞍に関する情報は、競走内容のセクションに明確に記載されているため、高い信頼度を持っています。'}
各LLMごとにもStrutured Outputのドキュメントが用意されている。
OpenAI
Anthropic
Mistral
1つ前の例ではOpenAIを使用していたため、今回はAnthropicに変えてみる。
パッケージを追加インストール。
!pip install llama-index-llms-anthropic
AnthropicのAPIキーをセット
import os
from google.colab import userdata

os.environ["ANTHROPIC_API_KEY"] = userdata.get('ANTHROPIC_API_KEY')
与えられた都市名から架空のレストランを生成してそのメニューなどを出力させる。as_structured_llmを使った場合。
from llama_index.llms.anthropic import Anthropic
from llama_index.core.prompts import PromptTemplate
from llama_index.core.bridge.pydantic import BaseModel
from typing import List
import json


class MenuItem(BaseModel):
    """レストランのメニューの品名"""

    course_name: str
    is_vegetarian: bool


class Restaurant(BaseModel):
    """レストラン名と、そのレストランが所在している都市名、料理のカテゴリ、メニューの品名。"""

    name: str
    city: str
    cuisine: str
    menu_items: List[MenuItem]


llm = Anthropic("claude-3-haiku-20240307")
prompt_tmpl = PromptTemplate(
    "与えられた都市名に存在する架空のレストランを生成してください。出力は日本語で。: {city_name}"
)

restaurant = (
    llm.as_structured_llm(Restaurant)
    .complete(prompt_tmpl.format(city_name="マイアミ"))
    .raw
)
print(json.dumps(restaurant.dict(), ensure_ascii=False, indent=2))
{
  "name": "ラ・マー",
  "city": "マイアミ",
  "cuisine": "地中海料理",
  "menu_items": [
    {
      "course_name": "前菜盛り合わせ",
      "is_vegetarian": false
    },
    {
      "course_name": "オリーブオイルとハーブのパスタ",
      "is_vegetarian": true
    },
    {
      "course_name": "グリルした魚のプレート",
      "is_vegetarian": false
    },
    {
      "course_name": "ティラミス",
      "is_vegetarian": false
    }
  ]
}
structured_predictを使った場合
restaurant = llm.structured_predict(Restaurant, prompt_tmpl, city_name="目黒")
print(json.dumps(restaurant.dict(), ensure_ascii=False, indent=2))
{
  "name": "ビストロ・ド・目黒",
  "city": "目黒",
  "cuisine": "フレンチ",
  "menu_items": [
    {
      "course_name": "前菜",
      "is_vegetarian": false
    },
    {
      "course_name": "メイン",
      "is_vegetarian": false
    },
    {
      "course_name": "デザート",
      "is_vegetarian": true
    }
  ]
}
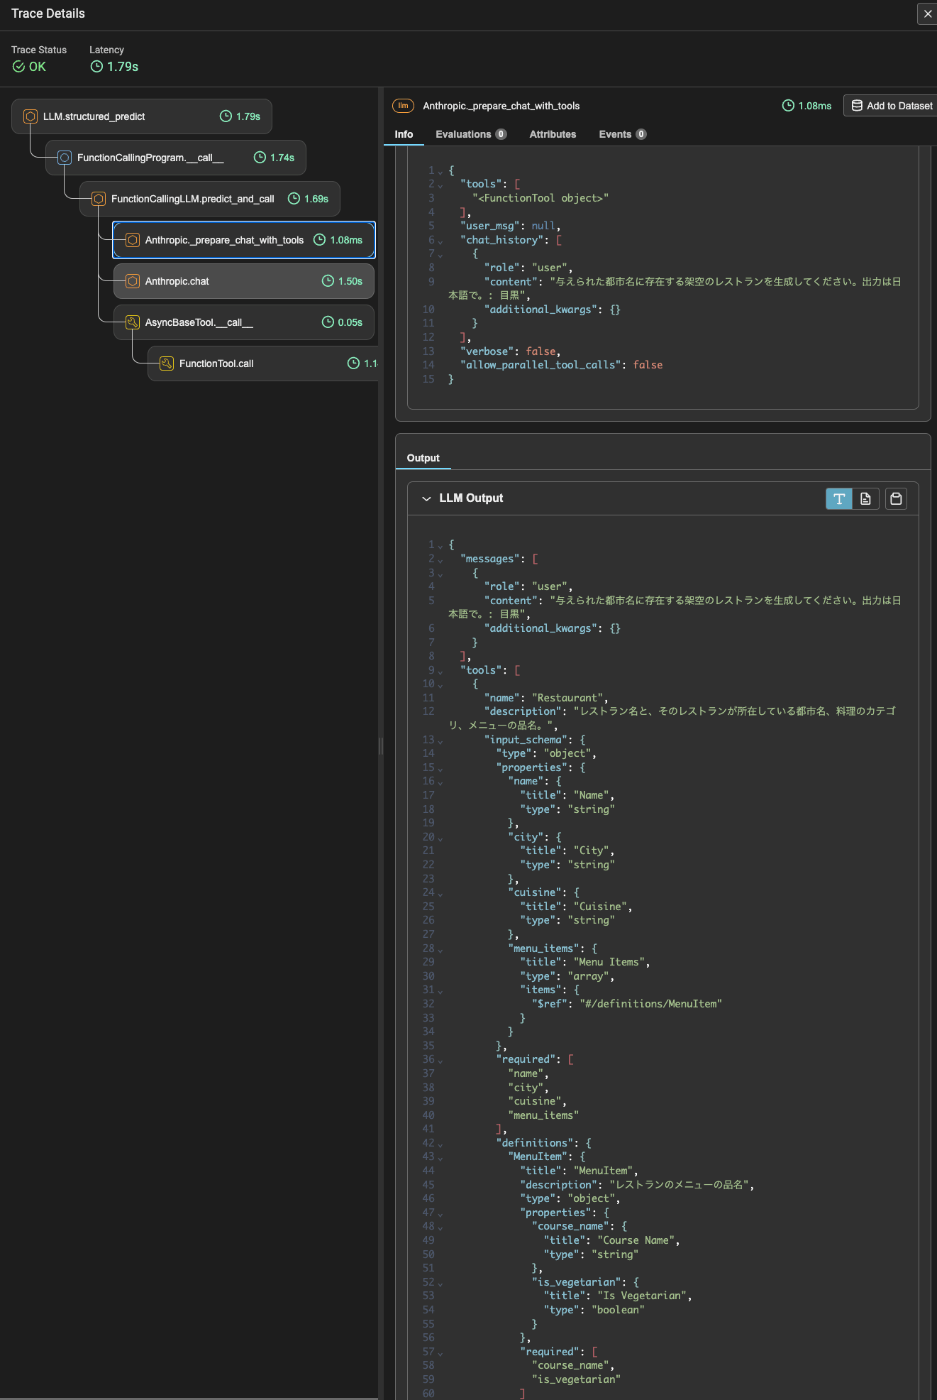
トレースを見るとこちらもFunctionCallingが使用されているのがわかる。

あとは以前とそんなに変わらないかなー。以前のモジュールガイドでやったことばかりだと思う。
Llama Extractについても少しまとめたいのだけど、触ってみた感じ
- 結構な頻度でInternal Server Errorになる
- 日本語はどうもうまくいかない?
- リリースされてから数週間ほど経ったが、レポジトリもあまり更新されていない。
って感じで、まあベータなのでしょうがないかなというところ。進展があればまた追記する。