パフォーマンス/負荷テストツール「Locust」を試す
GitHubレポジトリ
READMEをざっと。GPT-5による翻訳。
Locust
Locustは、HTTPおよびその他のプロトコル向けのオープンソースのパフォーマンス/負荷テストツールです。開発者に優しいアプローチにより、通常のPythonコードでテストを定義できます。
Locustのテストはコマンドラインから、またはWebベースのUIを使って実行できます。スループット、応答時間、エラーをリアルタイムに確認でき、後で分析するためにエクスポートすることもできます。
通常のPythonライブラリをテストにインポートでき、Locustのプラグイン可能なアーキテクチャにより無限に拡張できます。多くの他ツールと異なり、GUIやドメイン固有言語によってテスト設計が制約されることはありません。
すぐに始めるには、ドキュメントを参照してください。
機能
おなじみのPythonでユーザーテストシナリオを記述
ユーザーにループさせたり、条件付きの振る舞いをさせたり、計算を行わせたい場合は、Pythonが提供する通常のプログラミング構文を使うだけです。Locustは、各ユーザーを独自のgreenlet(軽量プロセス/コルーチン)内で実行します。これにより、コールバックやその他の仕組みを使う必要なく、通常の(ブロッキング)Pythonコードのようにテストを書くことができます。シナリオは“ただのPython”なので、普段のIDEを使えますし、XMLやバイナリ形式を用いる他ツールと異なり、テストを通常のコードとしてバージョン管理できます。
from locust import HttpUser, task, between

class QuickstartUser(HttpUser):
   wait_time = between(1, 2)

   def on_start(self):
       self.client.post("/login", json={"username":"foo", "password":"bar"})

   @task
   def hello_world(self):
       self.client.get("/hello")
       self.client.get("/world")

   @task(3)
   def view_item(self):
       for item_id in range(10):
           self.client.get(f"/item?id={item_id}", name="/item")
分散 & スケーラブル — 数十万ユーザーをサポート
Locustは複数マシンに分散して負荷テストを実行することを容易にします。イベント駆動(geventを使用)であるため、単一プロセスで何千もの同時ユーザーを処理できます。特定のハードウェアで秒間リクエスト数がより多いツールもあるかもしれませんが、Locustユーザーあたりのオーバーヘッドが小さいため、高い同時実行性のワークロードのテストに非常に適しています。
WebベースのUI
Locustには、テストの進行状況をリアルタイムに表示するユーザーフレンドリーなWebインターフェイスがあります。テスト実行中に負荷を変更することもできます。UIなしでも実行でき、CI/CDテストでの利用が容易です。
referred from https://github.com/locustio/locust
referred from https://github.com/locustio/locust
referred from https://github.com/locustio/locust
referred from https://github.com/locustio/locustあらゆるシステムをテスト可能
Locustは主にWebサイト/サービスで動作しますが、ほぼあらゆるシステムやプロトコルのテストに利用できます。テスト対象向けのクライアントを書くだけでよく、あるいはコミュニティが作成したものを探索できます。
ハックしやすい設計
Locustのコードベースは、意図的に小さく保たれており、すべてを即座に解決するわけではありません。その代わり、通常のPythonコードで遭遇しうるあらゆる状況に適応しやすくすることを目指しています。以下のようなことを妨げるものは何もありません:


ライセンス
オープンソースであり、MITライセンスの下で公開されています(詳細は LICENSE ファイルを参照)。
なるほど、シナリオをPythonで書きやすいというところが特徴っぽいね。
公式ドキュメントはこちら
Getting Startedにしたがって進める
What is Locust?
ここは読み物。GitHubのREADMEと重複してるかな。まあざっと読んでおけばよさそうだけど、ここがポイントかな。
名前と背景
Locustは既存のソリューションへの不満から生まれました。既存の負荷テストツールは、ほとんどのページがユーザーごとに異なるコンテンツを持つ動的ウェブサイトに対して現実的な負荷を生成するのに十分な機能を備えていませんでした。既存ツールはテストを宣言するために不格好なインターフェースや冗長な設定ファイルを使用していました。Locustでは異なるアプローチを採用しました。設定形式やUIの代わりに、Pythonコードを使用してユーザーの行動を定義できるPythonフレームワークを提供します。
あと、YouTubeの動画もある。
インストール
今回はローカルのMacで。LocustはPythonパッケージで提供されているので、今回はuvでPython環境を作る。uvxでやってもよいと思う。
uv init -p 3.12 locust-work && cd $_
uv add locust
(snip)
 + locust==2.40.0
 + locust-cloud==1.26.3
(snip)
インストールされたパッケージで気づいたけど、クラウドサービスもあるみたい。
とりあえずCLIが使えるようになっている。
uv run locust -V
locust 2.40.0 from /Users/kun432/work/locust-work/.venv/lib/python3.12/site-packages/locust (Python 3.12.10)
Usageも。
uv run locust -h
Usage: locust [options] [UserClass ...]

Common options:
  -h, --help            show this help message and exit
  -f <filename>, --locustfile <filename>
                        The Python file or module that contains your test, e.g. 'my_test.py'. Accepts
                        multiple comma-separated .py files, a package name/directory or a url to a
                        remote locustfile. Defaults to 'locustfile'.
  --config <filename>   File to read additional configuration from. See
                        https://docs.locust.io/en/stable/configuration.html#configuration-file
  -H <base url>, --host <base url>
                        Host to load test, in the following format: https://www.example.com
  -u <int>, --users <int>
                        Peak number of concurrent Locust users. Primarily used together with
                        --headless or --autostart. Can be changed during a test by keyboard inputs w,
                        W (spawn 1, 10 users) and s, S (stop 1, 10 users)
  -r <float>, --spawn-rate <float>
                        Rate to spawn users at (users per second). Primarily used together with
                        --headless or --autostart
  -t <time string>, --run-time <time string>
                        Stop after the specified amount of time, e.g. (300s, 20m, 3h, 1h30m, etc.).
                        Only used together with --headless or --autostart. Defaults to run forever.
  -l, --list            Show list of possible User classes and exit
  --config-users [CONFIG_USERS ...]
                        User configuration as a JSON string or file. A list of arguments or an Array
                        of JSON configuration may be provided

Web UI options:
  --web-host <ip>       Host to bind the web interface to. Defaults to '*' (all interfaces)
  --web-port <port number>, -P <port number>
                        Port on which to run web host
  --headless            Disable the web interface, and start the test immediately. Use -u and -t to
                        control user count and run time
  --autostart           Starts the test immediately (like --headless, but without disabling the web
                        UI)
  --autoquit <seconds>  Quits Locust entirely, X seconds after the run is finished. Only used
                        together with --autostart. The default is to keep Locust running until you
                        shut it down using CTRL+C
  --web-login           Protects the web interface with a login page. See
                        https://docs.locust.io/en/stable/extending-locust.html#authentication
  --tls-cert <filename>
                        Optional path to TLS certificate to use to serve over HTTPS
  --tls-key <filename>  Optional path to TLS private key to use to serve over HTTPS
  --class-picker        Enable select boxes in the web interface to choose from all available User
                        classes and Shape classes
  --web-base-path WEB_BASE_PATH
                        Base path for the web interface (e.g., '/locust'). Default is empty (root
                        path).

Master options:
  Options for running a Locust Master node when running Locust distributed. A Master node need Worker nodes that connect to it before it can run load tests.

  --master              Launch locust as a master node, to which worker nodes connect.
  --master-bind-host <ip>
                        IP address for the master to listen on, e.g '192.168.1.1'. Defaults to * (all
                        available interfaces).
  --master-bind-port <port number>
                        Port for the master to listen on. Defaults to 5557.
  --expect-workers <int>
                        Delay starting the test until this number of workers have connected (only
                        used in combination with --headless/--autostart).
  --expect-workers-max-wait <int>
                        How long should the master wait for workers to connect before giving up.
                        Defaults to wait forever
  --enable-rebalancing  Re-distribute users if new workers are added or removed during a test run.
                        Experimental.

Worker options:
  Options for running a Locust Worker node when running Locust distributed.
  Typically ONLY these options (and --locustfile) need to be specified on workers, since other options (-u, -r, -t, ...) are controlled by the master node.

  --worker              Set locust to run in distributed mode with this process as worker. Can be
                        combined with setting --locustfile to '-' to download it from master.
  --processes <int>     Number of times to fork the locust process, to enable using system. Combine
                        with --worker flag or let it automatically set --worker and --master flags
                        for an all-in-one-solution. Not available on Windows. Experimental.
  --master-host <hostname>
                        Hostname of locust master node to connect to. Defaults to 127.0.0.1.
  --master-port <port number>
                        Port to connect to on master node. Defaults to 5557.

Tag options:
  Locust tasks can be tagged using the @tag decorator. These options let specify which tasks to include or exclude during a test.

  -T [<tag> ...], --tags [<tag> ...]
                        List of tags to include in the test, so only tasks with at least one matching
                        tag will be executed
  -E [<tag> ...], --exclude-tags [<tag> ...]
                        List of tags to exclude from the test, so only tasks with no matching tags
                        will be executed

Request statistics options:
  --csv <filename>      Store request stats to files in CSV format. Setting this option will generate
                        three files: <filename>_stats.csv, <filename>_stats_history.csv and
                        <filename>_failures.csv. Any folders part of the prefix will be automatically
                        created
  --csv-full-history    Store each stats entry in CSV format to _stats_history.csv file. You must
                        also specify the '--csv' argument to enable this.
  --print-stats         Enable periodic printing of request stats in UI runs
  --only-summary        Disable periodic printing of request stats during --headless run
  --reset-stats         Reset statistics once spawning has been completed. Should be set on both
                        master and workers when running in distributed mode
  --html <filename>     Store HTML report to file path specified. Able to parse certain tags - {u},
                        {r}, {t} and convert them to number of users, spawn rate and run time
                        respectively.
  --json                Prints the final stats in JSON format to stdout. Useful for parsing the
                        results in other programs/scripts. Use together with --headless and --skip-
                        log for an output only with the json data.
  --json-file <filename>
                        Prints the final stats in JSON format to file path specified.

Logging options:
  --skip-log-setup      Disable Locust's logging setup. Instead, the configuration is provided by the
                        Locust test or Python defaults.
  --loglevel <level>, -L <level>
                        Choose between DEBUG/INFO/WARNING/ERROR/CRITICAL. Default is INFO.
  --logfile <filename>  Path to log file. If not set, log will go to stderr

Other options:
  --show-task-ratio     Print table of the User classes' task execution ratio. Use this with non-zero
                        --user option if some classes define non-zero fixed_count attribute.
  --show-task-ratio-json
                        Print json data of the User classes' task execution ratio. Use this with non-
                        zero --user option if some classes define non-zero fixed_count attribute.
  --version, -V         Show program's version number and exit
  --exit-code-on-error <int>
                        Sets the process exit code to use when a test result contain any failure or
                        error. Defaults to 1.
  -s <number>, --stop-timeout <number>
                        Number of seconds to wait for a simulated user to complete any executing task
                        before exiting. Default is to terminate immediately. When running
                        distributed, this only needs to be specified on the master.
  --equal-weights       Use equally distributed task weights, overriding the weights specified in the
                        locustfile.
  --profile PROFILE     Set a profile to group the testruns together

User classes:
  <UserClass1 UserClass2>
                        At the end of the command line, you can list User classes to be used
                        (available User classes can be listed with --list). LOCUST_USER_CLASSES
                        environment variable can also be used to specify User classes. Default is to
                        use all available User classes

Locust Cloud:
  Launches a distributed Locust run on locust.cloud infrastructure.

  Example: locust --cloud -f my_locustfile.py --users 1000 ...

  --cloud               Run Locust in cloud mode.
  --login               Launch an interactive session to authenticate your user. Once completed your
                        credentials will be stored and automatically refreshed for quite a long time.
                        Once those expire you will be prompted to perform another login.
  --logout              Removes the authentication credentials
  --delete              Delete a running cluster. Useful if locust-cloud was killed/disconnected or
                        if there was an error.
  --requirements <filename>
                        Optional requirements.txt file that contains your external libraries.
  --non-interactive     This can be set when, for example, running in a CI/CD environment to ensure
                        no interactive steps while executing. Requires that LOCUSTCLOUD_USERNAME,
                        LOCUSTCLOUD_PASSWORD and LOCUSTCLOUD_REGION environment variables are set.
  --workers <int>       Number of workers to use for the deployment. Defaults to number of users
                        divided by 500, but the default may be customized for your account.
  --extra-files [EXTRA_FILES ...]
                        A list of extra files or directories to upload. Space-separated, e.g.
                        `--extra-files testdata.csv *.py my-directory/`.
  --extra-packages [EXTRA_PACKAGES ...]
                        A list of extra packages to upload. Space-separated whl/tar.gz files or
                        directory packages to be installed when running locust.
  --testrun-tags [TESTRUN_TAGS ...]
                        A list of tags that can be used to filter testruns.

Examples:

    locust -f my_test.py -H https://www.example.com

    locust --headless -u 100 -t 20m --processes 4 MyHttpUser AnotherUser

    locust --headless -u 100 -r 10 -t 50 --print-stats --html "test_report_{u}_{r}_{t}.html"
    (The above run would generate an html file with the name "test_report_100_10_50.html")

See documentation for more details, including how to set options using a file or environment variables: https://docs.locust.io/en/stable/configuration.html
クイックスタート
Locustでは送りたいリクエストをPythonコードで定義する。まずこんな感じで locustfile.py を用意。
from locust import HttpUser, task

class HelloWorldUser(HttpUser):
    @task
    def hello_world(self):
        self.client.get("/hello")
        self.client.get("/world")
上記は
-
/helloに GET - その後
/worldに GET - 以後繰り返し
ということになるらしい。
次に、locustfile.py があるディレクトリで locustコマンドを実行する。
uv run locust
[2025-09-05 20:38:02,430] macmini2023/INFO/locust.main: Starting Locust 2.40.0
[2025-09-05 20:38:02,430] macmini2023/INFO/locust.main: Starting web interface at http://0.0.0.0:8089, press enter to open your default browser.
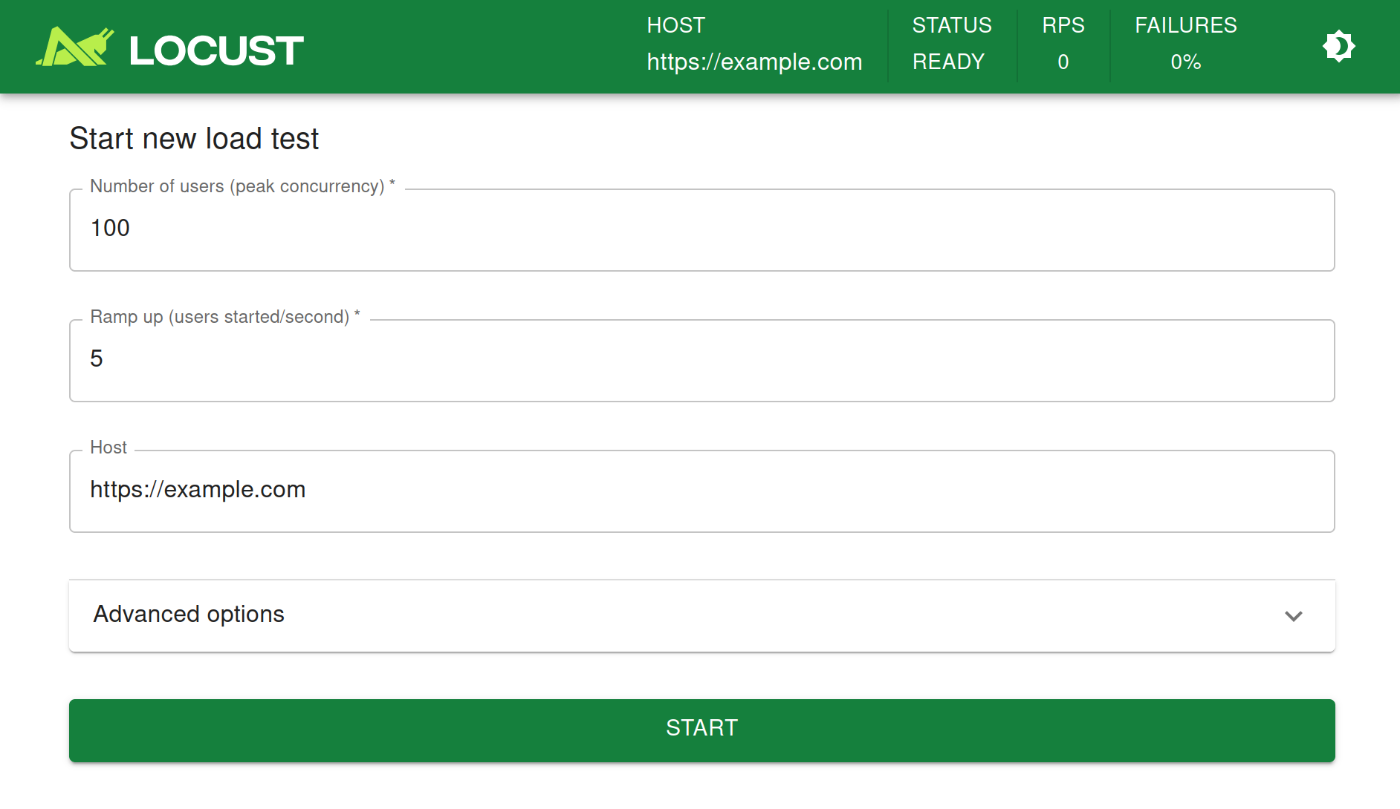
Webのインタフェースが起動したみたい。
アクセスしてみるとこんな感じ。

ここにリクエストを送りたいWebサーバのURLを入力して実行すればよいだけみたい。
ということで、適当なWebサーバをでっち上げる。自分は、LAN内のProxmoxにUbuntu-24.10のVMを用意した。
- VMには、CPU: 2コア、メモリ:4GBを割り当て。
- Webサーバは、Python標準のhttpを使用。
/helloと/worldにそれぞれスタティックなコンテンツを配置。
という感じ。
Webサーバはこんな感じで起動
mkdir -p web-test/{hello,world}
cd web-test
for i in hello world
do
cat << EOF> ${i}/index.html
<!DOCTYPE html>
<html>
<head><title>${i}</title> <meta charset="UTF-8"></head>
<body><h1>${i}のページ</h1></body>
${i}のページにようこそ
</html>
EOF
done
python3 -m http.server 8000
ではLocustにWebサーバのホスト名を入力して実行してみる。リクエスト数などのパラメータは一旦そのままで。

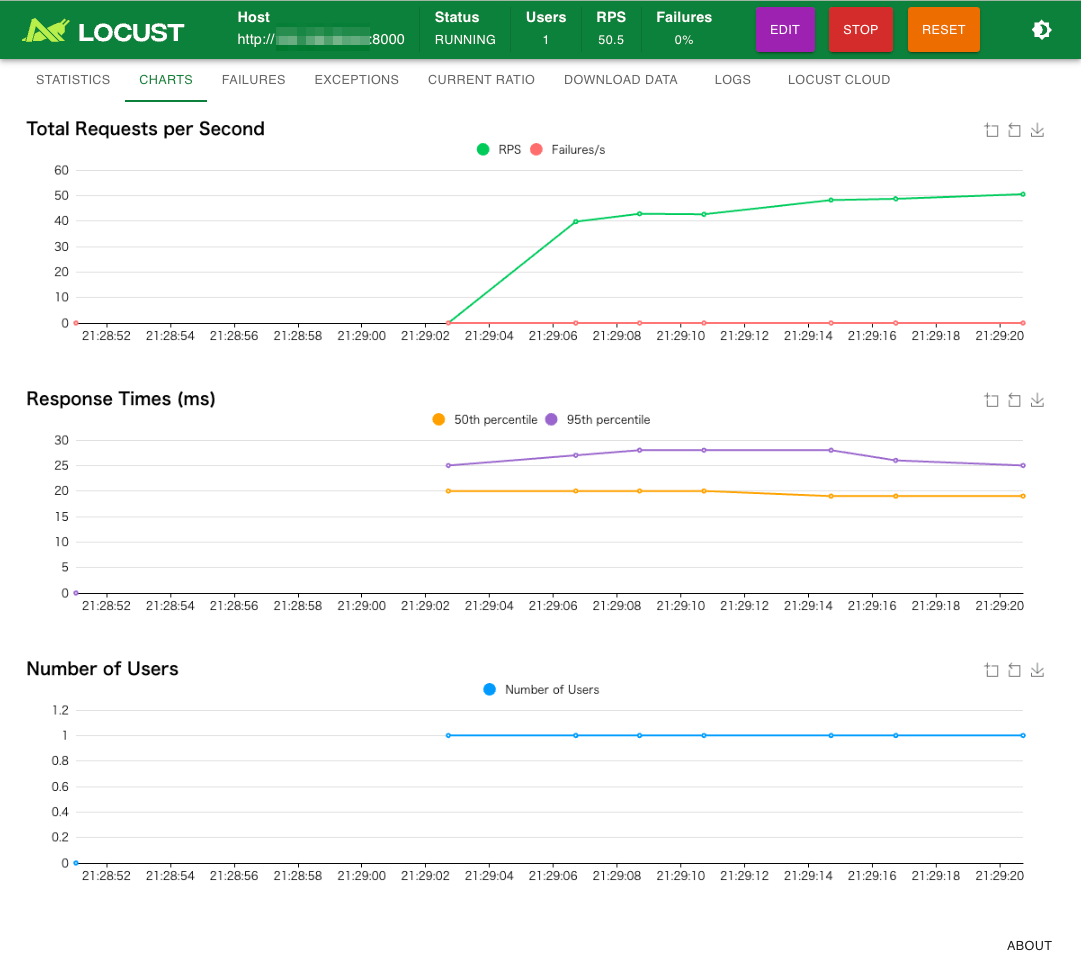
こんな感じで数字が増えていく。

最初に表示されるSTATICSタブではリクエスト状況の統計情報が表示されるが、CHARTSタブにすると推移がグラフで見れる。
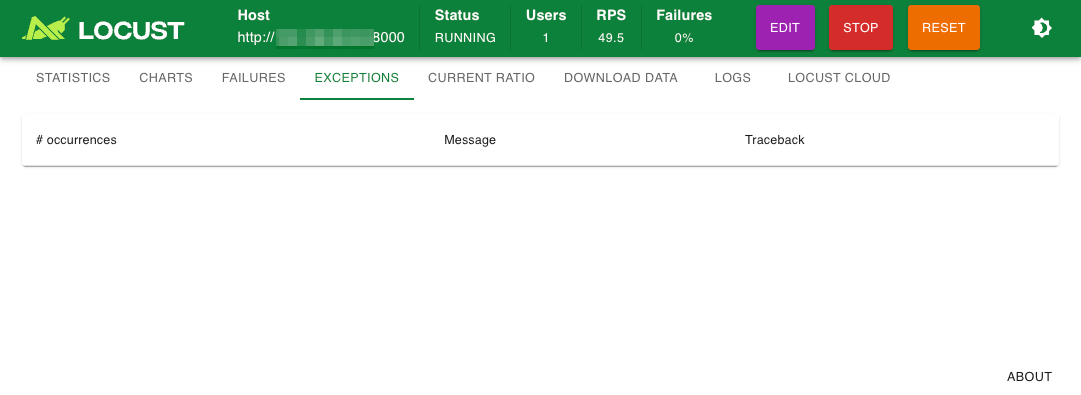
その他今回は起きなかったけども、失敗した場合などは、FAILURES / EXCEPTIONS タブに何かしら出力される模様。

CURRENT RATIOタブではざっくり成功・失敗の割合がわかるみたい。

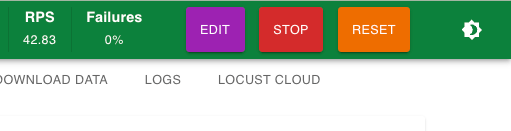
終了する場合は右上のSTOPで。RESETが負荷テストのデータを消去、EDITはリクエスト数などを変更できるみたい。
その他
- 実行した負荷テストの結果をCSVやHTMLでダウンロードできたり
- Locustサーバ自体のログも確認できたり
- Locustクラウドの宣伝もあったり
という感じ。
で、GUIじゃなくてCLIだけで完結することもできるみたい。
uv run locust \
    --headless \
    --users 10 \
    --spawn-rate 1 \
    -H http://<WebサーバのIPアドレス>:<Webサーバのポート>
[2025-09-05 21:56:31,865] macmini2023/INFO/locust.main: Starting Locust 2.40.0
[2025-09-05 21:56:31,865] macmini2023/INFO/locust.main: No run time limit set, use CTRL+C to interrupt
Type     Name                 # reqs      # fails |    Avg     Min     Max    Med |   req/s  failures/s
--------|-------------------|-------|-------------|-------|-------|-------|-------|--------|-----------
--------|-------------------|-------|-------------|-------|-------|-------|-------|--------|-----------
         Aggregated                0     0(0.00%) |      0       0       0      0 |    0.00        0.00

[2025-09-05 21:56:31,866] macmini2023/INFO/locust.runners: Ramping to 10 users at a rate of 1.00 per second
Type     Name                 # reqs      # fails |    Avg     Min     Max    Med |   req/s  failures/s
--------|-------------------|-------|-------------|-------|-------|-------|-------|--------|-----------
GET      /hello                   73     0(0.00%) |     20      14      33     20 |    0.00        0.00
GET      /world                   72     0(0.00%) |     20      14      27     20 |    0.00        0.00
--------|-------------------|-------|-------------|-------|-------|-------|-------|--------|-----------
         Aggregated              145     0(0.00%) |     20      14      33     20 |    0.00        0.00

Type     Name                 # reqs      # fails |    Avg     Min     Max    Med |   req/s  failures/s
--------|-------------------|-------|-------------|-------|-------|-------|-------|--------|-----------
GET      /hello                  205     0(0.00%) |     24      14      38     24 |   16.50        0.00
GET      /world                  202     0(0.00%) |     24      14      41     24 |   16.00        0.00
--------|-------------------|-------|-------------|-------|-------|-------|-------|--------|-----------
         Aggregated              407     0(0.00%) |     24      14      41     24 |   32.50        0.00

Type     Name                 # reqs      # fails |    Avg     Min     Max    Med |   req/s  failures/s
--------|-------------------|-------|-------------|-------|-------|-------|-------|--------|-----------
GET      /hello                  391     0(0.00%) |     26      14      39     27 |   35.75        0.00
GET      /world                  388     0(0.00%) |     26      14      41     27 |   35.25        0.00
--------|-------------------|-------|-------------|-------|-------|-------|-------|--------|-----------
         Aggregated              779     0(0.00%) |     26      14      41     27 |   71.00        0.00

Type     Name                 # reqs      # fails |    Avg     Min     Max    Med |   req/s  failures/s
--------|-------------------|-------|-------------|-------|-------|-------|-------|--------|-----------
GET      /hello                  629     0(0.00%) |     27      14      44     28 |   50.00        0.00
GET      /world                  625     0(0.00%) |     28      14     142     28 |   49.50        0.00
--------|-------------------|-------|-------------|-------|-------|-------|-------|--------|-----------
         Aggregated             1254     0(0.00%) |     28      14     142     28 |   99.50        0.00

[2025-09-05 21:56:40,873] macmini2023/INFO/locust.runners: All users spawned: {"HelloWorldUser": 10} (10 total users)
Type     Name                 # reqs      # fails |    Avg     Min     Max    Med |   req/s  failures/s
--------|-------------------|-------|-------------|-------|-------|-------|-------|--------|-----------
GET      /hello                  910     0(0.00%) |     29      14     153     29 |   65.38        0.00
GET      /world                  906     0(0.00%) |     30      14     142     30 |   64.62        0.00
--------|-------------------|-------|-------------|-------|-------|-------|-------|--------|-----------
         Aggregated             1816     0(0.00%) |     29      14     153     29 |  130.00        0.00

Type     Name                 # reqs      # fails |    Avg     Min     Max    Med |   req/s  failures/s
--------|-------------------|-------|-------------|-------|-------|-------|-------|--------|-----------
GET      /hello                 1204     0(0.00%) |     30      14     153     30 |   78.30        0.00
GET      /world                 1199     0(0.00%) |     31      14     146     30 |   77.90        0.00
--------|-------------------|-------|-------------|-------|-------|-------|-------|--------|-----------
         Aggregated             2403     0(0.00%) |     30      14     153     30 |  156.20        0.00

Type     Name                 # reqs      # fails |    Avg     Min     Max    Med |   req/s  failures/s
--------|-------------------|-------|-------------|-------|-------|-------|-------|--------|-----------
GET      /hello                 1501     0(0.00%) |     31      14     153     31 |  103.80        0.00
GET      /world                 1496     0(0.00%) |     31      14     150     31 |  103.30        0.00
--------|-------------------|-------|-------------|-------|-------|-------|-------|--------|-----------
         Aggregated             2997     0(0.00%) |     31      14     153     31 |  207.10        0.00
(snip)
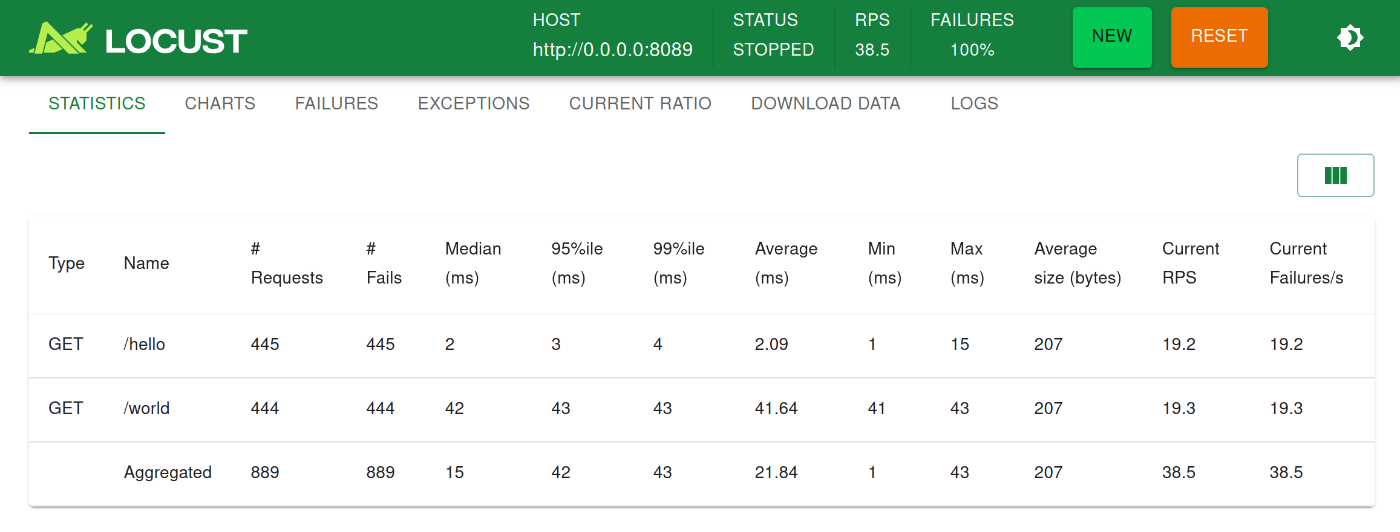
終了する場合はCtrl+Cで止める。サマリが表示される。
KeyboardInterrupt
2025-09-05T12:57:48Z
[2025-09-05 21:57:48,838] macmini2023/INFO/locust.main: Shutting down (exit code 0)
Type     Name                 # reqs      # fails |    Avg     Min     Max    Med |   req/s  failures/s
--------|-------------------|-------|-------------|-------|-------|-------|-------|--------|-----------
GET      /hello                 4543     0(0.00%) |     82      14   35045     31 |   60.82        0.00
GET      /world                 4539     0(0.00%) |     69      14   35045     31 |   60.76        0.00
--------|-------------------|-------|-------------|-------|-------|-------|-------|--------|-----------
         Aggregated             9082     0(0.00%) |     76      14   35045     31 |  121.58        0.00

Response time percentiles (approximated)
Type     Name                         50%    66%    75%    80%    90%    95%    98%    99%  99.9% 99.99%   100% # reqs
--------|-----------------------|--------|------|------|------|------|------|------|------|------|------|------|------
GET      /hello                        31     33     35     36     38     41     45     53  19000  35000  35000   4543
GET      /world                        31     33     35     36     39     42     46     54  10000  35000  35000   4539
--------|-----------------------|--------|------|------|------|------|------|------|------|------|------|------|------
         Aggregated                    31     33     35     36     39     41     45     53  11000  35000  35000   9082
あと、Locust自体を複数のマシンで分散して実行みたいなこともできるみたい。リクエスト数の細かい制御なども含めて、そのあたりはオプションをいろいろ試してみる感じかな。
locustfileの書き方
Locustでは、実際のシナリオは locustfile に書くことになる。サンプルにコメントを入れた。
import time
from locust import HttpUser, task, between

# シミュレーションしたいユーザを HttpUser のサブクラスとして定義。
# `HttpUser` は Pythonのrequests を使用している。geventhttpclientを使った、
# より高速な FastHttpUser も利用できる。
# locustfileには最低1つのUserクラスを定義する必要がある
class QuickstartUser(HttpUser):
    # タスク間での待ち時間。以下の例だと1〜5秒の待ち時間がランダムに入る。
    wait_time = between(1, 5)

    # @taskデコレータを付けたメソッドが実際のユーザのリクエストになる
    # タスク内のコードは上から順に実行され、成功しないと下に進まない
    @task
    def hello_world(self):
        self.client.get("/hello")
        self.client.get("/world")

    # クラス定義にタスクのメソッドが複数ある場合はランダムにどれかが実行される
    # デコレータ引数でタスクの重み付けができる。以下の場合は、上のタスクよりも3倍
    # 実行される可能性が高くなる
    @task(3)
    def view_items(self):
        for item_id in range(10):
            self.client.get(f"/item?id={item_id}", name="/item")
            time.sleep(1)

    # @taskデコレータが付与されていないメソッドはタスクとして実行されない。
    # ヘルパーメソッドを定義すると良い

    # on_start で、各タスク実行前に必ず呼び出される関数を指定できる。
    # 各タスク実行後に必ず呼び出す on_stop もある。
    def on_start(self):
        self.client.post("/login", json={"username":"foo", "password":"bar"})
locustfileの自動生成
以下の har2locust を使うと、ブラウザでの実際の挙動を記録して、locustfile を生成することができるらしい。
その他はドキュメント参照って感じかな。
参考
結構古くからあるみたい。
まとめ
触りだけしかやってないけど、とりあえずシナリオがPythonで柔軟に書けるのは良さそう。やる前は、Pythonなので負荷ツールそのものが重くてスケールしないのでは?と思ってたのだけど、高速性もある程度は考慮されているように思えるので(中味までは理解してないけども)、そのあたりはもう少し使い込んで試してみたいところ。
あと気になったところ
リクエストレートを増やしたい場合のTipsなど
複数台で分散構成
より高速なFastHttpUser
プラグインとか。Goで書かれたWorkerとかもあるみたい。
色々サンプルがある。OpenAI向けもあった。
AWSのサンプルで、Locustを使ったBedrockの負荷テストのレポジトリがあった。
ざっと見てみたけど、
- LocustのQuickstartに出てくる
HttpUserは使わずに、Userを使ってリクエストは自前で処理してる。 - どうもタスク内から
environmentでタスク実行時のプロパティやイベントなどにアクセスできる(?)ようで、独自のメトリクスをそこで入れている
という感じ。
こんな記事も見つけた
Diaによるまとめ
ウチがめっちゃわかりやすくまとめるね!
LLMベンチマークって何?
LLMベンチマークは、「大規模言語モデル(LLM)」のサーバーがどれくらい速く、たくさんのリクエストに対応できるかをチェックするテストだよ。普通の性能テストよりも、リアルタイムでどんな感じで返事してくれるかとか、ユーザーの体感とか、システムのスケールのしやすさに注目してるのがポイント!
主なチェック項目
- 最初のトークンまでの時間(TTFT)
リクエスト送ってから、最初の返事(トークン)が返ってくるまでの時間。これが短いほど「おっ、速い!」ってなるやつ。- 1秒あたりの出力トークン数(tokens/s)
モデルがどれくらいの速さで返事を生成できるか。速いほどサクサク感ある!- トークン間の遅延(Inter-Token Latency)
返事がストリーミングで流れてくる時、トークン同士の間の時間。短いほど自然でリアルタイムっぽい。- 1秒あたりのリクエスト数(RPS)
サーバーが1秒間に何回リクエストをさばけるか。多いほど強い!こういうのをちゃんと測ることで、LLMの性能を比べたり、サーバーの設定を最適化したりできるんだよ。
なんで普通の負荷テストツール(Locust)じゃダメなの?
Locustっていう負荷テストツールは、APIとかのテストにはめっちゃ便利なんだけど、LLMの細かい動き(トークンごとの速度とか)までは測れないんだよね。
Locustのいいところ
- Pythonでシナリオ書けるから自由度高いし、使いやすい!
- 軽い並列処理で大量のユーザーをシミュレートできる
- Web UIでリアルタイムに状況見れる
でも、LLMの「トークンごとの細かい動き」には対応してないのが惜しい…。
問題点
- LLM特有の指標が測れない
TTFTとか、トークンごとの速度とか、そういう細かい指標はLocustじゃ無理。- トークンのストリーミングがバラバラ&CPUがネック
LLMのAPIって、最初ゼロ個返すやつもあれば、1個ずつ返すやつ、まとめて返すやつもあってバラバラ。しかも、返ってきたトークンを再度分けて数え直す作業(トークナイズ)がCPUに負担かかるんだよ。LocustはPythonのGILのせいで、CPU重い作業があると全体の処理が遅くなっちゃう。- カスタムチャートが作れない
TTFTとか、トークンの速度とか、そういうグラフをLocustのUIで見れない。- 他のツールもイマイチ
genai-perfみたいなツールもあるけど、リアルタイムで細かく見たり、自由に設定したりはできない。そこで「LLM Locust」登場!
LLM Locustは、Locustの使いやすさはそのままに、LLMの細かいベンチマークができるようにしたツールだよ!
どうやって動くの?
- 非同期リクエスト生成
ユーザーをシミュレートして、LLM APIにどんどんリクエストを送る。しかも、トークナイズの重い作業は別プロセスでやるから、CPUのネックにならない!- ストリーミングレスポンス収集
返ってきたレスポンスを、専用の「メトリクスデーモン」に送って解析する。- メトリクス処理
デーモンがレスポンスをトークナイズして、TTFTやトークン速度、トークン間の遅延を計算してまとめる。- 集計
2秒ごとにFastAPIのバックエンドにデータを送って、全体の指標を集計。- リアルタイム可視化
カスタムLocustフロントエンドで、TTFTやトークン速度、RPS、遅延などをグラフで見れる!結論
普通のLocustはAPIの負荷テストには最高だけど、LLMの細かいベンチマークには向いてない。
LLM Locustなら、LLMの「ストリーミング」「トークンごとの細かい動き」までしっかり測れるから、
自分でモデルを運用したり、いろんなLLMの性能を比べたりするのにめっちゃ便利だよ!ウケるくらい細かく測れるし、LLM使うなら絶対チェックした方がいいやつだと思う!
気になるならGitHub (https://github.com/truefoundry/llm-locust)も見てみて!
なるほど。たしかにその辺のデータは欲しくなるところ。で、レポジトリはこちら
レポジトリのREADMEには説明とかが一切ないのだけども、見た感じ、Transformersベースが想定されているような感じかなぁ。OpenAI互換API的なケースだといろいろ修正が必要に思えるのだけども。 Transformersを使ってるのはトークナイザーだけでOpenAI互換APIだった。これなら試せそう。
公式やAWSのサンプルを参考に自分でやってみたほうがいいかも。
こちらで少し試してみようと思う