「Amazon Bedrock AgentCore」を試す ①Runtime
Dia によるまとめ(多少加筆修正している)
Amazon Bedrock AgentCoreってなに? 
最近のAIエージェントって、ただ文章を作るだけじゃなくて、自分で考えて計画立てて、いろんなツールやシステムと連携しながら動く、超ハイスペックなソフトウェアになってきてるんだよね。
でも、そういうAIを本番で使うには、セキュリティとかID管理、メモリ(記憶)、監視とか、めっちゃ面倒なインフラ作業が必要で、開発者はそこに時間取られがちだったの。そこで登場したのが「Amazon Bedrock AgentCore」!
これ使えば、AIエージェントを安全に、しかも大規模に、サクッとデプロイ&運用できるようになるんだ。
しかも、AWSだけじゃなくて、他のフレームワークやモデルとも連携できるし、必要な機能だけ選んで使えるから、めっちゃ柔軟!AgentCoreの主な機能
AgentCore Runtime
- サーバーレスで低レイテンシーな安全環境を用意してくれる。
- いろんなAIフレームワークやツールに対応してて、長時間動くエージェントもOK。
- セッションごとに分離されてるから、データ漏えいも防げる!
AgentCore Memory
- エージェントが会話ややりとりを記憶できる。
- 短期も長期もイケるし、過去のやりとりから学んでくれる。
- ユーザーの好みや事実も覚えて、次の対応に活かせる!
AgentCore Observability
- エージェントの動きを可視化できる。
- どこでエラーが起きたとか、どのくらい時間かかったとか、全部見える化!
- ダッシュボードでパフォーマンスやエラーもチェックできるし、Amazon CloudWatchとか他の監視ツールとも連携できる。
AgentCore Identity
- AIエージェントがユーザーや自分自身のIDで、AWSや外部サービス(GitHub、Salesforce、Slackなど)に安全にアクセスできる。
- アクセス権限も細かくコントロールできるし、OAuth2やAPIキーの管理もバッチリ!
AgentCore Gateway
- 既存のAPIやAWS Lambda関数をエージェント用のツールに変換して、いろんなサービスとつなげやすくしてくれる。
- 認証や認可、リクエスト変換とかも全部おまかせ!
AgentCore Browser
- エージェントがウェブを自動で操作できるようになる。
- APIがないサービスでも、ウェブ画面を自動でナビゲートできる!
AgentCore Code Interpreter
- エージェントが自分でコードを実行できる環境も用意されてる。
- 計算とかデータ整形も自動でやってくれる!
使い方の流れ(カスタマーサポートAIの例)
- ステップ 1 – AgentCore Runtime を使用してクラウドにデプロイする 
- AIエージェントを安全なサーバーレス環境にデプロイして、お客さんからの問い合わせメールを受け取れるようにする。
- セッションごとに分離されてるから、他のお客さんのデータと混ざる心配もナシ!
- ステップ 2 – コンテキストのメモリを有効にする 
- お客さんとのやりとり(「どんな質問が来たか」「どんな返事をしたか」)をAgentCore Memoryで短期・長期的に記憶。
-「前回もスマホのことで質問してたな」みたいに、過去のやりとりを覚えて、次の対応に活かせる!- ステップ 3 – ID およびアクセスコントロールを追加する 
- エージェントが社内システムや外部サービス(CRM、注文管理、Slackなど)にアクセスする時、AgentCore Identityで「誰がどの情報にアクセスできるか」をしっかりコントロール。
- たとえば、エージェントがユーザーごとに違う権限で社内ツールにアクセスしたり、外部サービスと連携する時に安全に認証したりできる!
- ステップ 4 – AgentCore Gateway を使用してエージェント機能を拡張する 
- AgentCore Gatewayを使って、エージェントが社内のCRMや注文管理システム、ナレッジベースなどにAPI経由でアクセス。
-「この人は本当にお客さん?」「何を買ったの?」「FAQの答えは?」みたいな情報を自動で取得!- ステップ 5 – AgentCore Code Interpreter および Browser ツールを使用して機能を追加する 
- お客さんの質問に答えるために、
• 計算が必要な場合はCode Interpreterで自動計算
• ウェブ上の管理画面から情報を取ってくる必要がある場合はBrowserで自動操作
みたいに、さらに便利な機能を追加できる!- ステップ 6 – オブザーバビリティを使用して可視性を得る 
- エージェントがどんな流れで対応したか、どこでエラーが起きたか、全部ダッシュボードで見える化!
- 人間の担当者が「この返事はどうやって作られた?」って確認したり、問題があればすぐに気づける。
どこで使えるの?
- 今はアメリカ東部・西部、オーストラリア(シドニー)、ドイツ(フランクフルト)でプレビュー中。
- 2025年9月16日までは無料で試せる。それ以降は有料になる予定。
まとめ
AgentCoreを使えば、AIエージェントの開発・運用がめっちゃ楽になるし、セキュリティやスケーラビリティもバッチリ!
本番運用も怖くないし、いろんなサービスと連携できるから、開発チームの負担が激減して、マジでテンション上がるサービスだよ!
どこから始めるのがいいかなぁと思ったけど、どうやらStrands Agentsのドキュメントにデプロイについて書かれている中に、AgentCore Runtimeへのデプロイについても書かれているものがあるので、とりあえずこれに従うのが良さそう。
まず、デプロイについては2つのアプローチがあると書かれている
| A: AgentCore Runtime SDKインテグレーション | B: カスタム実装 | |
|---|---|---|
| ユースケース | 既存エージェントをすぐ動かしたい時 | エージェントの HTTP インタフェースの細かい制御が必要な時 |
| マッチする用途例 | シンプルなエージェント、 プロトタイピング、 最小セットアップ |
複雑なエージェント、 カスタムミドルウェア、 本番システム |
| メリット | 自動HTTPサーバセットアップ、 自動デプロイツールがビルトイン |
FastAPIの完全制御、 カスタムなルーティング より進んだ機能 |
| デメリット | 細かいサーバー設定はできない | セットアップが手間、 サーバの手動設定が必要 |
それぞれを確認してみる。
2025/07/27追記
よくよく見るとAWSの公式ドキュメントと書いてあることはほぼ同じように思えるので、こちらで良さそう。
2025/07/27追記
公式ドキュメントだけだといろいろわからないことが多くて、以下を参考にさせていただいた。
A. SDKインテグレーション
AgentCore Runtime Python SDKを使う。
uvでPython仮想環境を作成
uv init -p 3.12 agentcore-runtime-work && cd $_
AgentCore Runtime Python SDKをインストール。Strands Agentsもあわせて。
uv add bedrock-agentcore strands-agents strands-agents-tools
(snip)
 + bedrock-agentcore==0.1.1
(snip)
 + strands-agents==1.1.0
 + strands-agents-tools==0.2.2
(snip)
Strandsでまずはシンプルなエージェントを作る。この時のスクリプト名がエントリーポイントとなり、かつ、どうやらエージェント名にもなるように思えるので、適切な名前にしておくのが良さそう?
多分main.pyが出来ていると思うので、これをリネームして、エージェントの処理を書く。
mv main.py strands_agent_sample.py
from strands import Agent
from strands.models import BedrockModel
from strands_tools import calculator

bedrock_model = BedrockModel(
    model_id="us.anthropic.claude-sonnet-4-20250514-v1:0",
    region_name="us-east-1",
    temperature=0.3
)

agent = Agent(
    model=bedrock_model,
    tools=[calculator],
    system_prompt="あなたは親切な日本語のアシスタントで計算が得意です。",
)

agent("3111696 / 74088 は?")
テスト
uv run strands_agent_sample.py
3111696 ÷ 74088 を計算しますね。
Tool #1: calculator
3111696 ÷ 74088 = **42** です。

この計算は割り切れる除算で、答えはちょうど42になります。
ではこれをAgentCore Runtime向けに書き換える。ストリーミングもできるけど、とりあえず。
from strands import Agent
from strands.models import BedrockModel
from strands_tools import calculator
# AgentCore Runtime SDKをインポート
from bedrock_agentcore.runtime import BedrockAgentCoreApp

bedrock_model = BedrockModel(
    model_id="us.anthropic.claude-sonnet-4-20250514-v1:0",
    region_name="us-east-1",
    temperature=0.3
)

agent = Agent(
    model=bedrock_model,
    tools=[calculator],
    system_prompt="あなたは親切な日本語のアシスタントで計算が得意です。",
)

# AgentCore アプリケーションを作成
app = BedrockAgentCoreApp()

# エージェントを呼び出すエントリポイント関数を指定
@app.entrypoint
def invoke(payload):
    # ユーザの入力を取得
    user_message = payload.get("prompt", "こんにちは!")
    # エージェントを呼び出し、結果を取得
    result = agent(user_message)
    # 結果を返す
    return {"result": result.message}

if __name__ == "__main__":
    app.run()
ローカルで実行
uv run strands_agent_sample.py
INFO:     Started server process [82162]
INFO:     Waiting for application startup.
INFO:     Application startup complete.
INFO:     Uvicorn running on http://127.0.0.1:8080 (Press CTRL+C to quit)
curlでアクセスしてみる。
curl -X POST http://localhost:8080/invocations \
    -H "Content-Type: application/json" \
    -d '{"prompt": "3111696 / 74088 は?"}' | jq -r .
{
  "result": {
    "role": "assistant",
    "content": [
      {
        "text": "3111696 ÷ 74088 = **42** です。\n\nこの計算結果は正確に42となり、割り切れる数値でした。"
      }
    ]
  }
}
終わったら止めておく。
これをデプロイしようと思う。デプロイの方法は2つ。
- bedrock-agentcore-starter-toolkitで自動デプロイ
- boto3でマニュアルデプロイ
今回は1つめのbedrock-agentcore-starter-toolkitを使うパターンで。パッケージを追加する。
uv add bedrock-agentcore-starter-toolkit
(snip)
 + bedrock-agentcore-starter-toolkit==0.1.2
(snip)
requirements.txtを作成
デプロイする前に、ECRのレポジトリとIAMロールを事前に作成しておく必要がある。
まずECRのレポジトリを作成。
aws ecr create-repository \
    --repository-name strands_agent_sample \
    --region us-east-1
出力されたECRのレポジトリのURIを控えておく。
{
    "repository": {
        "repositoryArn": "arn:aws:ecr:us-east-1:XXXXXXXXXXXX:repository/strands_agent_sample",
        "registryId": "XXXXXXXXXXXX",
        "repositoryName": "strands_agent_sample",
        "repositoryUri": "XXXXXXXXXXXX.dkr.ecr.us-east-1.amazonaws.com/strands_agent_sample",
        "createdAt": "2025-07-27T03:01:08.137000+09:00",
        "imageTagMutability": "MUTABLE",
        "imageScanningConfiguration": {
            "scanOnPush": false
        },
        "encryptionConfiguration": {
            "encryptionType": "AES256"
        }
    }
}
次にIAMロール。IAMロールについては以下を参考に作成。
REGION="us-east-1"
ACCOUNT_ID="XXXXXXXXXXXX"
AGENT_NAME="strands_agent_sample"
cat > trust-policy.json << EOF
{
  "Version": "2012-10-17",
  "Statement": [
    {
      "Sid": "AssumeRolePolicy",
      "Effect": "Allow",
      "Principal": {
        "Service": "bedrock-agentcore.amazonaws.com"
      },
      "Action": "sts:AssumeRole",
      "Condition": {
            "StringEquals": {
                "aws:SourceAccount": "${ACCOUNT_ID}"
            },
            "ArnLike": {
                "aws:SourceArn": "arn:aws:bedrock-agentcore:${REGION}:${ACCOUNT_ID}:*"
            }
       }
    }
  ]
}
EOF
cat > execution-policy.json << EOF
{
    "Version": "2012-10-17",
    "Statement": [
        {
            "Sid": "ECRImageAccess",
            "Effect": "Allow",
            "Action": [
                "ecr:BatchGetImage",
                "ecr:GetDownloadUrlForLayer"
            ],
            "Resource": [
                "arn:aws:ecr:${REGION}:${ACCOUNT_ID}:repository/*"
            ]
        },
        {
            "Effect": "Allow",
            "Action": [
                "logs:DescribeLogStreams",
                "logs:CreateLogGroup"
            ],
            "Resource": [
                "arn:aws:logs:${REGION}:${ACCOUNT_ID}:log-group:/aws/bedrock-agentcore/runtimes/*"
            ]
        },
        {
            "Effect": "Allow",
            "Action": [
                "logs:DescribeLogGroups"
            ],
            "Resource": [
                "arn:aws:logs:${REGION}:${ACCOUNT_ID}:log-group:*"
            ]
        },
        {
            "Effect": "Allow",
            "Action": [
                "logs:CreateLogStream",
                "logs:PutLogEvents"
            ],
            "Resource": [
                "arn:aws:logs:${REGION}:${ACCOUNT_ID}:log-group:/aws/bedrock-agentcore/runtimes/*:log-stream:*"
            ]
        },
        {
            "Sid": "ECRTokenAccess",
            "Effect": "Allow",
            "Action": [
                "ecr:GetAuthorizationToken"
            ],
            "Resource": "*"
        },
        {
        "Effect": "Allow",
        "Action": [
            "xray:PutTraceSegments",
            "xray:PutTelemetryRecords",
            "xray:GetSamplingRules",
            "xray:GetSamplingTargets"
            ],
         "Resource": [ "*" ]
         },
         {
            "Effect": "Allow",
            "Resource": "*",
            "Action": "cloudwatch:PutMetricData",
            "Condition": {
                "StringEquals": {
                    "cloudwatch:namespace": "bedrock-agentcore"
                }
            }
        },
        {
            "Sid": "GetAgentAccessToken",
            "Effect": "Allow",
            "Action": [
                "bedrock-agentcore:GetWorkloadAccessToken",
                "bedrock-agentcore:GetWorkloadAccessTokenForJWT",
                "bedrock-agentcore:GetWorkloadAccessTokenForUserId"
            ],
            "Resource": [
              "arn:aws:bedrock-agentcore:${REGION}:${ACCOUNT_ID}:workload-identity-directory/default",
              "arn:aws:bedrock-agentcore:${REGION}:${ACCOUNT_ID}:workload-identity-directory/default/workload-identity/${AGENT_NAME}-*"
            ]
        },
         {"Sid": "BedrockModelInvocation",
         "Effect": "Allow",
         "Action": [
                "bedrock:InvokeModel",
                "bedrock:InvokeModelWithResponseStream"
              ],
        "Resource": [
            "arn:aws:bedrock:*::foundation-model/*",
            "arn:aws:bedrock:${REGION}:${ACCOUNT_ID}:*"
        ]
        }
    ]
}
EOF
aws iam create-role \
    --role-name strands_agent_sample_role \
    --assume-role-policy-document file://trust-policy.json \
    --region us-east-1
aws iam put-role-policy \
    --role-name strands_agent_sample_role \
    --policy-name strands_agent_sample_policy \
    --policy-document file://execution-policy.json \
    --region us-east-1
作成したIAMロールのARNを確認しておく。
aws iam get-role \
    --role-name strands_agent_sample_role \
    --query 'Role.Arn' \
    --output text
arn:aws:iam::XXXXXXXXXXXX:role/strands_agent_sample_role
requirements.txt を作成
strands-agents
strands-agents-tools
bedrock-agentcore
__init__.py を作成
touch __init__.py
ではエージェントの設定を行う。agentcore configureを実行。引数は、エージェントを実装したファイルと先ほど作成したIAMロールを指定する。
uv run agentcore configure \
    --entrypoint strands_agent_sample.py \
    -er arn:aws:iam::XXXXXXXXXXXX:role/strands_agent_sample_role
ここからは対話形式で色々聞かれるので適宜設定していく。
Configuring Bedrock AgentCore...
Entrypoint parsed: file=/Users/kun432/work/agentcore-runtime-work/strands_agent_sample.py, bedrock_agentcore_name=strands_agent_sample
Agent name: strands_agent_sample
まずECRのレポジトリURIを入力
🏗️  ECR Repository
Press Enter to auto-create ECR repository, or provide ECR Repository URI to use existing
ECR Repository URI (or press Enter to auto-create): XXXXXXXXXXXX.dkr.ecr.us-east-1.amazonaws.com/strands_agent_sample
✓ Using existing ECR repository: XXXXXXXXXXXX.dkr.ecr.us-east-1.amazonaws.com/strands_agent_sample
依存パッケージのファイルが自動で検出される。これを使うのでそのままEneter。
🔍 Detected dependency file: requirements.txt
Press Enter to use this file, or type a different path (use Tab for autocomplete):
Path or Press Enter to use detected dependency file:
✓ Using detected file: requirements.txt
認証について聞かれるが、今回は使用しないのでnoで。
✓ Using detected file: requirements.txt
🔐 Authorization Configuration
By default, Bedrock AgentCore uses IAM authorization.
Configure OAuth authorizer instead? (yes/no) [no]:
こんな感じで完了。
✓ Using default IAM authorization
Configuring BedrockAgentCore agent: strands_agent_sample
Generated .dockerignore
Generated Dockerfile: /Users/kun432/work/agentcore-runtime-work/Dockerfile
Generated .dockerignore: /Users/kun432/work/agentcore-runtime-work/.dockerignore
Setting 'strands_agent_sample' as default agent
╭────────────────────────────────── Bedrock AgentCore Configured ──────────────────────────────────╮
│ Configuration Summary                                                                            │
│                                                                                                  │
│ Name: strands_agent_sample                                                                       │
│ Runtime: Docker                                                                                  │
│ Region: ap-northeast-1                                                                           │
│ Account: XXXXXXXXXXXX                                                                            │
│ Execution Role: arn:aws:iam::XXXXXXXXXXXX:role/strands_agent_sample_role                         │
│ ECR: XXXXXXXXXXXX.dkr.ecr.us-east-1.amazonaws.com/strands_agent_sample                           │
│ Authorization: IAM (default)                                                                     │
│                                                                                                  │
│ Configuration saved to: /Users/kun432/work/agentcore-runtime-work/.bedrock_agentcore.yaml        │
╰──────────────────────────────────────────────────────────────────────────────────────────────────╯
以下のファイルが作成されていた。
FROM public.ecr.aws/docker/library/python:3.12-slim
WORKDIR /app


COPY requirements.txt requirements.txt
# Install from requirements file
RUN pip install -r requirements.txt


RUN pip install aws-opentelemetry-distro>=0.10.0


# Set AWS region environment variable

ENV AWS_REGION=ap-northeast-1
ENV AWS_DEFAULT_REGION=ap-northeast-1


# Signal that this is running in Docker for host binding logic
ENV DOCKER_CONTAINER=1

# Create non-root user
RUN useradd -m -u 1000 bedrock_agentcore
USER bedrock_agentcore

EXPOSE 8080
EXPOSE 8000

# Copy entire project (respecting .dockerignore)
COPY . .

# Use the full module path

CMD ["opentelemetry-instrument", "python", "-m", "strands_agent_sample"]
default_agent: strands_agent_sample
agents:
  strands_agent_sample:
    name: strands_agent_sample
    entrypoint: strands_agent_sample.py
    platform: linux/arm64
    container_runtime: docker
    aws:
      execution_role: arn:aws:iam::XXXXXXXXXXXX:role/strands_agent_sample_role
      execution_role_auto_create: true
      account: 'XXXXXXXXXXXX'
      region: ap-northeast-1
      ecr_repository: XXXXXXXXXXXX.dkr.ecr.us-east-1.amazonaws.com/strands_agent_sample
      ecr_auto_create: false
      network_configuration:
        network_mode: PUBLIC
      protocol_configuration:
        server_protocol: HTTP
      observability:
        enabled: true
    bedrock_agentcore:
      agent_id: null
      agent_arn: null
      agent_session_id: null
    codebuild:
      project_name: null
      execution_role: null
      source_bucket: null
    authorizer_configuration: null
    oauth_configuration: null
.dockerignore
# Build artifacts
build/
dist/
*.egg-info/
*.egg

# Python cache
__pycache__/
__pycache__*
*.py[cod]
*$py.class
*.so
.Python

# Virtual environments
.venv/
.env
venv/
env/
ENV/

# Testing
.pytest_cache/
.coverage
.coverage*
htmlcov/
.tox/
*.cover
.hypothesis/
.mypy_cache/
.ruff_cache/

# Development
*.log
*.bak
*.swp
*.swo
*~
.DS_Store

# IDEs
.vscode/
.idea/

# Version control
.git/
.gitignore
.gitattributes

# Documentation
docs/
*.md
!README.md

# CI/CD
.github/
.gitlab-ci.yml
.travis.yml

# Project specific
tests/

# Bedrock AgentCore specific - keep config but exclude runtime files
.bedrock_agentcore.yaml
.dockerignore

# Keep wheelhouse for offline installations
# wheelhouse/
この中で気になったのはリージョン。自分のAWS CLIの設定のデフォルトが東京リージョンになっているせいか、 ap-northeast-1 が散見される。AgentCoreはまだ東京リージョンには来ておらず、今回は us-east-1 で統一してるので、適宜変更が必要と思われる。
ではまずローカルで起動してみる。 agentcore launch -l でDockerイメージが作成され、コンテナが起動してローカルでアクセスできるようになる。
uv run agentcore launch -l
なんかちょろっとエラーが見えるが起動した模様。
Launching Bedrock AgentCore (local mode)...

Launching Bedrock AgentCore agent 'strands_agent_sample' locally
⠧ Launching Bedrock AgentCore...Build: #8 18.84 Successfully installed annotated-types-0.7.0 anyio-4.9.0 attrs-25.3.0 aws-requests-auth-0.4.3 beautifulsoup4-4.13.4 bedrock-agentcore-0.1.1 boto3-1.39.14 botocore-1.39.14 certifi-2025.7.14 charset_normalizer-3.4.2 click-8.2.1 dill-0.4.0 docstring-parser-0.17.0 h11-0.16.0 html5lib-1.1 httpcore-1.0.9 httpx-0.28.1 httpx-sse-0.4.1 idna-3.10 importlib-metadata-8.7.0 jmespath-1.0.1 jsonschema-4.25.0 jsonschema-specifications-2025.4.1 lxml-6.0.0 markdown-it-py-3.0.0 markdownify-1.1.0 mcp-1.12.2 mdurl-0.1.2 mpmath-1.3.0 opentelemetry-api-1.35.0 opentelemetry-instrumentation-0.56b0 opentelemetry-instrumentation-threading-0.56b0 opentelemetry-sdk-1.35.0 opentelemetry-semantic-conventions-0.56b0 packaging-25.0 pillow-11.3.0 prompt-toolkit-3.0.51 pydantic-2.11.7 pydantic-core-2.33.2 pydantic-settings-2.10.1 pygments-2.19.2 pyjwt-2.10.1 python-dateutil-2.9.0.post0 python-dotenv-1.1.1 python-multipart-0.0.20 readabilipy-0.3.0 referencing-0.36.2 regex-2024.11.6 requests-2.32.4 rich-14.1.0 rpds-py-0.26.0 s3transfer-0.13.1 six-1.17.0 slack-bolt-1.23.0 slack_sdk-3.36.0 sniffio-1.3.1 soupsieve-2.7 sse-starlette-3.0.0 starlette-0.47.2 strands-agents-1.1.0 strands-agents-tools-0.2.2 sympy-1.14.0 tenacity-9.1.2 typing-extensions-4.14.1 typing-inspection-0.4.1 urllib3-2.5.0 uvicorn-0.35.0 watchdog-6.0.0 wcwidth-0.2.13 webencodings-0.5.1 wrapt-1.17.2 zipp-3.23.0
⠙ Launching Bedrock AgentCore...Build: #9 12.44 ERROR: pip's dependency resolver does not currently take into account all the packages that are installed. This behaviour is the source of the following dependency conflicts.
⠼ Launching Bedrock AgentCore...Docker image built: bedrock_agentcore-strands_agent_sample:latest
✓ Docker image built: bedrock_agentcore-strands_agent_sample:latest
✓ Ready to run locally
Starting server at http://localhost:8080
Press Ctrl+C to stop

Configuration of aws_configurator not loaded, configurator already loaded
Attempting to instrument while already instrumented
INFO:     Started server process [1]
INFO:     Waiting for application startup.
INFO:     Application startup complete.
INFO:     Uvicorn running on http://0.0.0.0:8080 (Press CTRL+C to quit)
⠏ Launching Bedrock AgentCore...
curlでアクセスしてみる。
curl -X POST http://localhost:8080/invocations \
    -H "Content-Type: application/json" \
    -d '{"prompt": "3111696 / 74088 は?"}' | jq -r .
{
  "result": {
    "role": "assistant",
    "content": [
      {
        "text": "**3111696 ÷ 74088 = 42** です。\n\nこの割り算は、3111696が74088で割り切れて、答えがちょうど42になります。"
      }
    ]
  }
}
ただなぁ・・・死ぬほど遅いし、結構コケる・・・どうもこれデフォルトでOpenTelemetryが有効になっているが、ローカル環境にはそれを受けるものがないので、そこで遅くなっているように思える。コンソールには以下が延々と出続けてる。
Transient error StatusCode.UNAVAILABLE encountered while exporting traces to localhost:4317, retrying in 1s.
Transient error StatusCode.UNAVAILABLE encountered while exporting traces to localhost:4317, retrying in 2s.
Transient error StatusCode.UNAVAILABLE encountered while exporting traces to localhost:4317, retrying in 4s.
Dockerfileの以下を一時的に書き換えた。
(snip)
#CMD ["opentelemetry-instrument", "python", "-m", "strands_agent_sample"]
CMD ["python", "-m", "strands_agent_sample"]
再度ローカルで起動。
uv run agentcore launch -l
curl -X POST http://localhost:8080/invocations \
    -H "Content-Type: application/json" \
    -d '{"prompt": "3111696 / 74088 は?"}' | jq -r .
明らかにレスポンスが早い。
{
  "result": {
    "role": "assistant",
    "content": [
      {
        "text": "3111696 ÷ 74088 = **42** です。\n\nこの計算結果は整数になっており、3111696は74088の42倍ということになります。"
      }
    ]
  }
}
んー、これはどうすべきなのかな?調べてみた感じだと、OpenTelemetryを有効にするとおそらくCloudWatchで細かいメトリクスを取れるようになるようなので、無効化しないほうがいいとは思う。
調べてみると、一応agentcore configureでそれを無効化するオプションや
環境変数で有効無効の設定ができる様子なんだけど、
前者はそれを踏まえて.bedrock_agentcore.yamlやDockerfileに設定しちゃうのだろうと思うし、後者は AGENT_OBSERVABILITY_ENABLED=false を渡して実行してみたけど効かなかった(uv run agentcore launch -l --env AGENT_OBSERVABILITY_ENABLED=false )。いっそOpenTelemetryをローカルで建てたほうが良いのか???OpenTelemetryぜんぜんわかってないけども。
とりあえず一旦ここはおいておく、いうことで先ほど修正した箇所は元に戻す。
(snip)
CMD ["opentelemetry-instrument", "python", "-m", "strands_agent_sample"]
#CMD ["python", "-m", "strands_agent_sample"]
ではこれをAWS上にデプロイする。
uv run agentcore launch
Launching Bedrock AgentCore (cloud mode)...

Launching Bedrock AgentCore agent 'strands_agent_sample' to cloud
⠋ Launching Bedrock AgentCore...Docker image built: bedrock_agentcore-strands_agent_sample:latest
Using execution role from config: arn:aws:iam::XXXXXXXXXXXX:role/strands_agent_sample_role
⠙ Launching Bedrock AgentCore...✅ Execution role validation passed: arn:aws:iam::XXXXXXXXXXXX:role/strands_agent_sample_role
Uploading to ECR...
Using ECR repository from config: XXXXXXXXXXXX.dkr.ecr.us-east-1.amazonaws.com/strands_agent_sample
⠴ Launching Bedrock AgentCore...Authenticating with registry...
⠧ Launching Bedrock AgentCore...Registry authentication successful
Tagging image: bedrock_agentcore-strands_agent_sample:latest -> XXXXXXXXXXXX.dkr.ecr.us-east-1.amazonaws.com/strands_agent_sample:latest
Pushing image to registry...
⠇ Launching Bedrock AgentCore...The push refers to repository [XXXXXXXXXXXX.dkr.ecr.us-east-1.amazonaws.com/strands_agent_sample]
61d48bb1664e: Layer already exists
3d9940b37746: Pushed
b3407f3b5b5b: Pushed
94fa42b5194c: Layer already exists
a131134159e5: Pushed
27b1542b9257: Layer already exists
bd5545aa89b7: Layer already exists
b3cb0f802d2a: Pushed
046e0ba021a5: Pushed
90bdf2e17d39: Layer already exists
e08447d7efa8: Pushed
⠏ Launching Bedrock AgentCore...latest: digest: sha256:aee5bd4d55d5e298766f6fe95b568192e9bcf32d75a0203ee4a24593c9e74d34 size: 856
Image pushed successfully
Image uploaded to ECR: XXXXXXXXXXXX.dkr.ecr.us-east-1.amazonaws.com/strands_agent_sample
Deploying to Bedrock AgentCore...
⠇ Launching Bedrock AgentCore...✅ Agent created/updated: arn:aws:bedrock-agentcore:us-east-1:XXXXXXXXXXXX:runtime/strands_agent_sample-XXXXXXXXXX
Polling for endpoint to be ready...
⠼ Launching Bedrock AgentCore...Agent endpoint: arn:aws:bedrock-agentcore:us-east-1:XXXXXXXXXXXX:runtime/strands_agent_sample-XXXXXXXXXX/runtime-endpoint/DEFAULT
✓ Image pushed to ECR: XXXXXXXXXXXX.dkr.ecr.us-east-1.amazonaws.com/strands_agent_sample:latest
╭─────────────────────────────────── Bedrock AgentCore Deployed ───────────────────────────────────╮
│ Deployment Successful!                                                                           │
│                                                                                                  │
│ Agent Name: strands_agent_sample                                                                 │
│ Agent ARN:                                                                                       │
│ arn:aws:bedrock-agentcore:us-east-1:XXXXXXXXXXXX:runtime/strands_agent_sample-XXXXXXXXXX         │
│ ECR URI: XXXXXXXXXXXX.dkr.ecr.us-east-1.amazonaws.com/strands_agent_sample                       │
│                                                                                                  │
│ You can now check the status of your Bedrock AgentCore endpoint with:                            │
│ agentcore status                                                                                 │
│                                                                                                  │
│ You can now invoke your Bedrock AgentCore endpoint with:                                         │
│ agentcore invoke '{"prompt": "Hello"}'                                                           │
│                                                                                                  │
│ 📋 Agent logs available at:                                                                      │
│    /aws/bedrock-agentcore/runtimes/strands_agent_sample-XXXXXXXXXX-DEFAULT                       │
│    /aws/bedrock-agentcore/runtimes/strands_agent_sample-XXXXXXXXXX-DEFAULT/runtime-logs          │
│                                                                                                  │
│ 💡 Tail logs with:                                                                               │
│    aws logs tail /aws/bedrock-agentcore/runtimes/strands_agent_sample-XXXXXXXXXX-DEFAULT         │
│ --follow                                                                                         │
│    aws logs tail /aws/bedrock-agentcore/runtimes/strands_agent_sample-XXXXXXXXXX-DEFAULT --since │
│ 1h                                                                                               │
╰──────────────────────────────────────────────────────────────────────────────────────────────────╯
デプロイできたみたい。マネージメントコンソールからも確認できる。

ではテスト。 agentcore invokeを使える。ちなみにこちらはローカルでも使える(-l)。
uv run agentcore invoke '{"prompt": "3111696 / 74088 は?"}'
結果(一部抜粋)。一応出来てはいるみたいなんだけども、日本語は出力が・・・・
Payload:
{
  "prompt": "3111696 / 74088 \u306f\uff1f"
}
Invoking BedrockAgentCore agent 'strands_agent_sample' via cloud endpoint
Session ID: 2a8c3e15-13f6-44d9-b2f4-28ebf72017af

Response:
{
(snip)
  "contentType": "application/json",
  "statusCode": 200,
  "response": [
    "b'{\"result\": {\"role\": \"assistant\", \"content\": [{\"text\": \"3111696 \\xc3\\xb7 74088
\\xe3\\x81\\xae\\xe8\\xa8\\x88\\xe7\\xae\\x97\\xe7\\xb5\\x90\\xe6\\x9e\\x9c\\xe3\\x81\\xaf **42**
\\xe3\\x81\\xa7\\xe3\\x81\\x99\\xe3\\x80\\x82\\\\n\\\\n\\xe5\\x85\\x88\\xe3\\x81\\xbb\\xe3\\x81\\xa9
\\xe3\\x81\\xa8\\xe5\\x90\\x8c\\xe3\\x81\\x98\\xe8\\xa8\\x88\\xe7\\xae\\x97\\xe3\\x81\\xa7\\xe3\\x81
\\x99\\xe3\\x81\\xae\\xe3\\x81\\xa7\\xe3\\x80\\x81\\xe7\\xad\\x94\\xe3\\x81\\x88\\xe3\\x81\\xaf\\xe5
\\xa4\\x89\\xe3\\x82\\x8f\\xe3\\x82\\x8a\\xe3\\x81\\xbe\\xe3\\x81\\x9b\\xe3\\x82\\x93\\xe3\\x80\\x82
\\xe4\\xbd\\x95\\xe5\\xba\\xa6\\xe8\\x81\\x9e\\xe3\\x81\\x84\\xe3\\x81\\xa6\\xe3\\x81\\x84\\xe3\\x81
\\x9f\\xe3\\x81\\xa0\\xe3\\x81\\x84\\xe3\\x81\\xa6\\xe3\\x82\\x82\\xe3\\x80\\x813111696 \\xc3\\xb7
74088 = 42
\\xe3\\x81\\xa7\\xe3\\x81\\x99\\xe3\\x80\\x82\\\\n\\\\n\\xe4\\xbb\\x96\\xe3\\x81\\xab\\xe4\\xbd\\x95
\\xe3\\x81\\x8b\\xe8\\xa8\\x88\\xe7\\xae\\x97\\xe3\\x81\\xae\\xe3\\x81\\x8a\\xe6\\x89\\x8b\\xe4\\xbc
\\x9d\\xe3\\x81\\x84\\xe3\\x81\\x8c\\xe5\\xbf\\x85\\xe8\\xa6\\x81\\xe3\\x81\\xa7\\xe3\\x81\\x97\\xe3
\\x81\\x9f\\xe3\\x82\\x89\\xe3\\x80\\x81\\xe3\\x81\\x8a\\xe6\\xb0\\x97\\xe8\\xbb\\xbd\\xe3\\x81\\xab
\\xe3\\x81\\xa9\\xe3\\x81\\x86\\xe3\\x81\\x9e\\xef\\xbc\\x81\"}]}}'"
  ]
}
あとちょいちょいこういうのも起きる。
Payload:
{
  "prompt": "3111696 / 74088 \u306f\uff1f"
}
Invoking BedrockAgentCore agent 'strands_agent_sample' via cloud endpoint
❌ Invocation failed: An error occurred (RuntimeClientError) when calling the InvokeAgentRuntime
operation: Received error (500) from runtime. Please check your CloudWatch logs for more
information.
CloudWatch Logsを見ると、んー、ツールの結果を上手く処理できていない、とかなのかな?
aws logs tail /aws/bedrock-agentcore/runtimes/strands_agent_sample-XXXXXXXXXX-DEFAULT --region us-east-1
2025-07-27T08:48:53.717000+00:00 2025/07/27/[runtime-logs]dac142bd-fe55-4bd8-aa10-0eb8c1d19073 TypeError: can only concatenate str (not "int") to str
あとこういうのもちょいちょい出てる(長いのでメッセージだけ)
Failed to export batch code: 400, reason: \u0012�\u0002The OTLP API is supported with CloudWatch Logs as a Trace Segment Destination. Please enable the CloudWatch Logs destination for your traces using the UpdateTraceSegmentDestination API (https://docs.aws.amazon.com/xray/latest/api/API_UpdateTraceSegmentDestination.html)
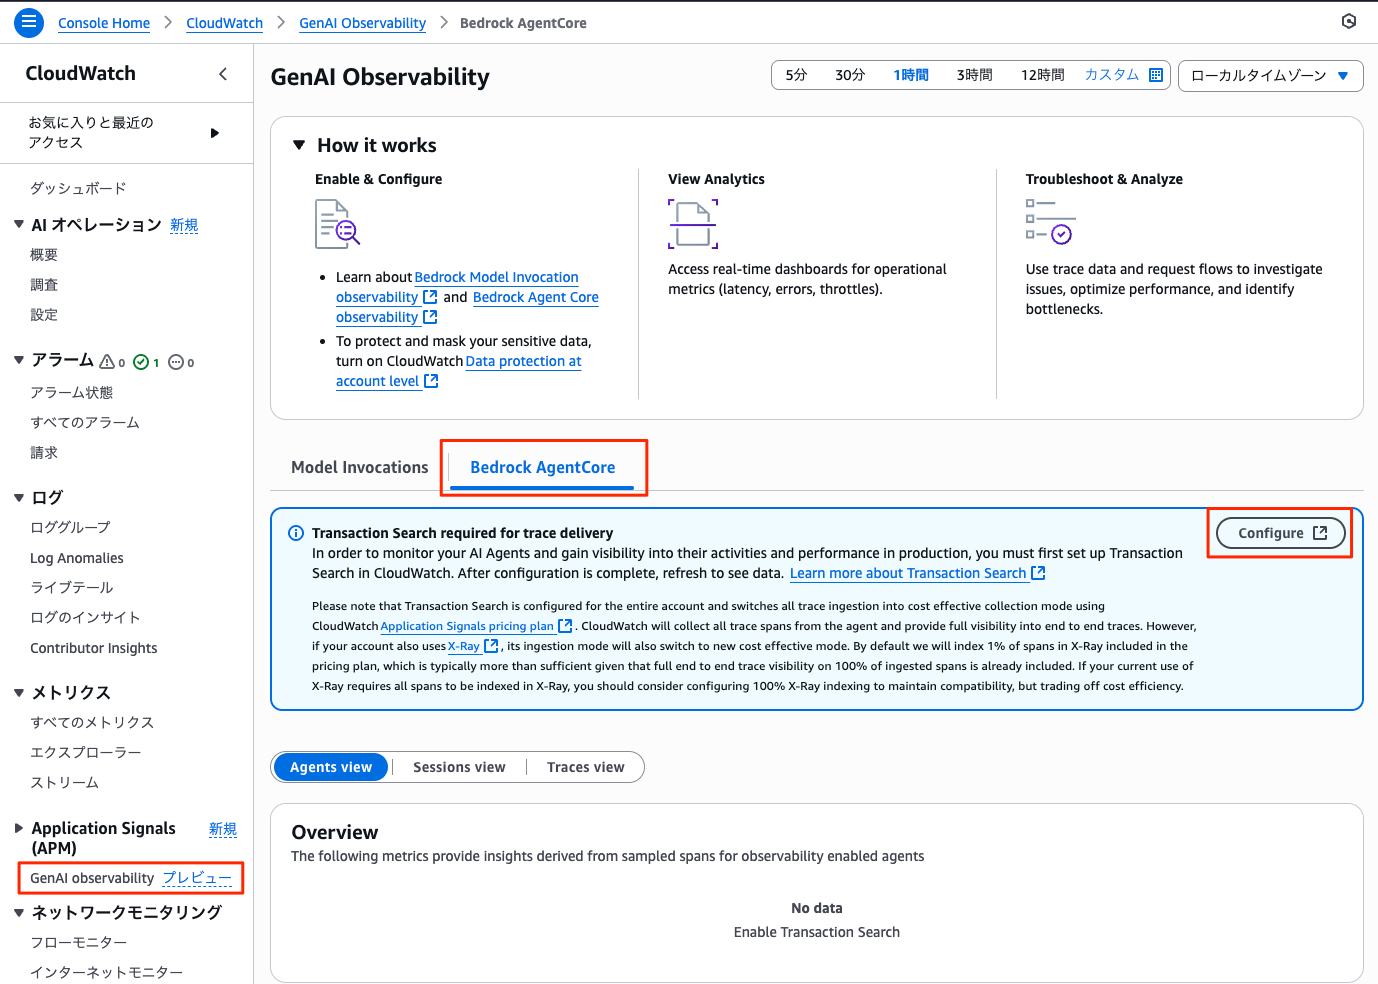
どうやれこれ。
なおOTLPのエンドポイントを利用するにはTransaction Searchを有効化する必要があります。最初Transaction Searchを有効化していないリージョンで検証していたのですが、OTLPのエンドポイントにリクエストを送ると以下のようなエラーが発生しました。
request to https://xray.ap-northeast-1.amazonaws.com/v1/traces responded with HTTP Status Code 400, Message=The OTLP API is supported with CloudWatch Logs as a Trace Segment Destination. Please enable the CloudWatch Logs destination for your traces using the UpdateTraceSegmentDestination API (https://docs.aws.amazon.com/xray/latest/api/API_UpdateTraceSegmentDestination.html)この辺りの注意事項はドキュメントにも記載されているので事前にご一読ください。
詳細を把握していないので今回は特に設定しないけども以下あたりで有効にできそう。
とりあえず日本語でちゃんと動いているのを確認したいので雑にPythonで。
import boto3
import json


agent_core_client = boto3.client('bedrock-agentcore', region_name="us-east-1")

prompt = "3111696 / 74088 は?"
agent_arn = "arn:aws:bedrock-agentcore:us-east-1:XXXXXXXXXXXX:runtime/strands_agent_sample-XXXXXXXXXX"

payload = json.dumps({"prompt": prompt}).encode()

response = agent_core_client.invoke_agent_runtime(
    agentRuntimeArn=agent_arn,
    payload=payload
)

content = []
for chunk in response["response"]:
    decoded_chunk = chunk.decode('utf-8')
    content.append(decoded_chunk)

full_content = json.loads(''.join(content))
print(full_content["result"]["content"][0]["text"])
3111696 ÷ 74088 = **42** です。

この計算結果は正確に42となり、割り切れる計算でした。
まとめ
なんとかRuntime完走。やってることはそれほど難しいものではないと思うし、とても簡単にできるようになってるとは思うのだけども、詰まったところはいろいろ前提の部分だと思う。その意味では、公式のドキュメントはもうちょっと丁寧に作ってあるといいなーと思う。完走できたのはほんと参考記事のおかげです、ありがとうございます。
とりあえずやっと入口って感じなので、このあともまだまだ続く。
(個人的に色々なものをお試しているけども、Get startedが詰まることがないように慎重に作ってあるものは、それだけでプロダクトやプロジェクトに対する印象が大きく変わるので、是非そうあってほしい。)
なお、CLIからは削除みたいなものは見当たらない。
uv run agentcore --help
 Usage: agentcore [OPTIONS] COMMAND [ARGS]...

 BedrockAgentCore CLI


╭─ Options ────────────────────────────────────────────────────────────────────────────────────────╮
│ --help          Show this message and exit.                                                      │
╰──────────────────────────────────────────────────────────────────────────────────────────────────╯
╭─ Commands ───────────────────────────────────────────────────────────────────────────────────────╮
│ invoke                      Invoke Bedrock AgentCore endpoint.                                   │
│ status                      Get Bedrock AgentCore status including config and runtime details.   │
│ launch                      Launch Bedrock AgentCore locally or to cloud.                        │
│ create_mcp_gateway          Creates an MCP Gateway.                                              │
│ create_mcp_gateway_target   Creates an MCP Gateway Target.                                       │
│ configure                   Configuration management                                             │
│ gateway                     Manage Bedrock AgentCore Gateways                                    │
╰──────────────────────────────────────────────────────────────────────────────────────────────────╯
削除したい場合は、マネージメントコンソールからAgent Runtimeを削除すればいいのかな?
こちらも参考になる
とりあえずTransaction Search、色々調べてみたけど、無料枠あるし個人の検証レベルだと問題な誘うに思うので、us-east-1で有効化した。

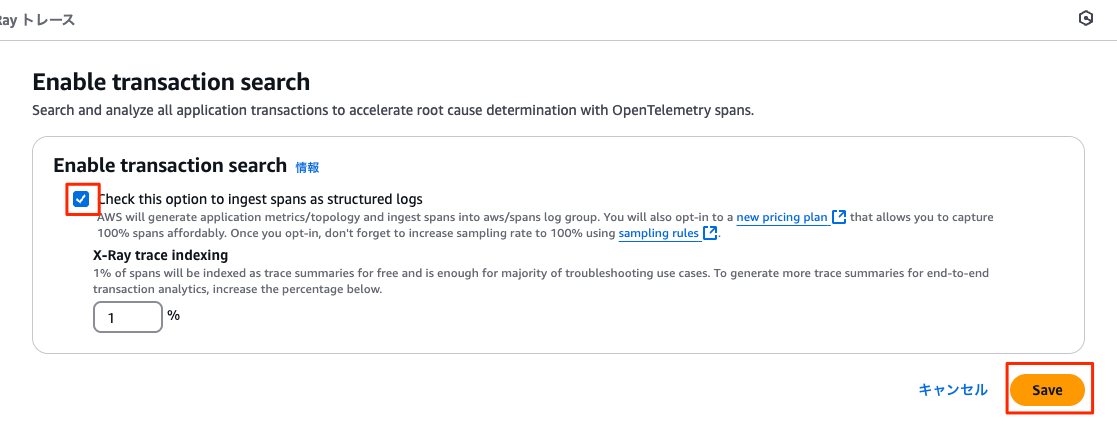
有効になるにはちょっと時間がかかったけど、これで有効化。

エージェントにリクエストを送ってみると、こんな感じで取れるようになった。
