マルチモーダルEmbeddingモデル「E5-V」を試す
ここで知った。
以下が気になるところ
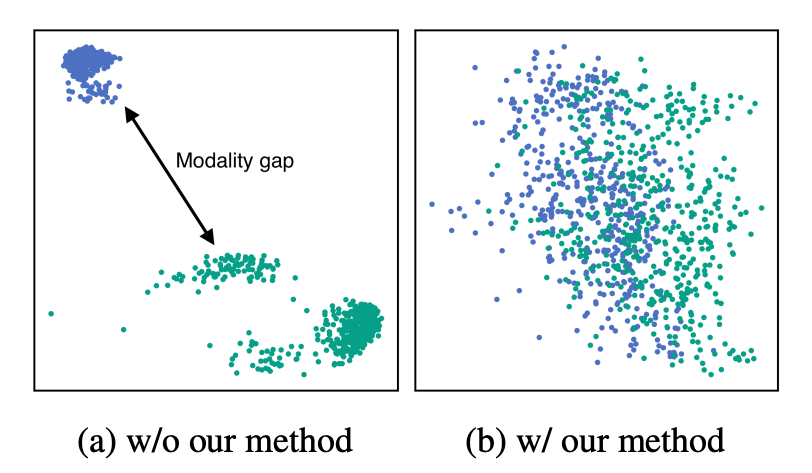
画像と文字列とでモダリティギャップがない、つまりは、似た意味なら画像だろうと文字列だろうと近いベクトルになる、という主張のようです。右側がE5-Vのイメージ
前にVertex AIのマルチモーダルEmbeddingsを試した際、なんとなく自分の理解にモヤモヤっとしたものと感じていて、「同じセマンティック空間」ってまさにこれではなかろうかという気がした。
ライセンス的にはちょっと厳しそうではあるけども、気になったので自分でもE5-V試してみる。
論文
どのような研究か?
この研究は、マルチモーダル大規模言語モデル (MLLM)を活用して、普遍的なマルチモーダル埋め込みを実現するE5-Vという新しいフレームワークを提案しています。E5-Vは、テキストと画像の両方を含む複合的な入力を効果的に表現することができます。
新規性 (従来研究と比べて何がすごいのか)?
- MLLMを直接活用して普遍的なマルチモーダル埋め込みを実現している点。
- プロンプトベースの表現手法により、モダリティ間のギャップを解消している点。
- テキストデータのみを用いた単一モダリティ学習で、マルチモーダルタスクにおいて高いパフォーマンスを達成している点。
技術や手法のキモはどこか?
- プロンプトベースの表現手法:「Summary above sentence/image in one word:」というプロンプトを使用して、テキストと画像の埋め込みを同じ空間に統一します。
- 単一モダリティ学習:マルチモーダルデータを使用せず、テキストペアのみを用いて対照学習を行います。これにより、高価なマルチモーダルデータセットの収集が不要になります。
- ゼロショット命令追従能力:学習時に見ていないプロンプトでも、タスクに応じた適切な表現を生成できます。
どういう結果を示したか?
- テキスト-画像検索タスク(Flickr30KとCOCO)で、既存の強力なベースラインと同等以上の性能を達成。
- 合成画像検索タスク(FashionIQとCIRR)で、最先端の手法を大幅に上回る性能を示した。
- 画像-画像検索タスク(I2I-Flickr30KとI2I-COCO)で、テキストを画像として入力した場合でも高い性能を維持。
- 文章埋め込みタスク(STS)でも最高性能を達成。
議論はあるか?
- 表現手法の効果:「in one word:」を含むプロンプトが、モダリティギャップの解消に重要な役割を果たしていることを示しています。
- 単一モダリティ学習の優位性:マルチモーダル学習と比較して、単一モダリティ学習がより優れた性能を示し、かつ学習時間を大幅に短縮できることを実証しています。
- ゼロショット命令追従能力:学習時に見ていないプロンプトでも、タスクに応じた適切な表現を生成できる能力について議論しています。
次に読むべき論文は?
この論文の内容をさらに深く理解するために、以下の論文を読むことをおすすめします:
- CLIP (Radford et al., 2021): マルチモーダル埋め込みの基礎となる研究です。
- LLaVA (Liu et al., 2023): マルチモーダル大規模言語モデルの代表的な研究の一つです。
- E5 (Wang et al., 2023): テキスト埋め込みにおける大規模言語モデルの活用に関する研究です。
GitHubレポジトリ
E5-V: マルチモーダル大規模言語モデルによるユニバーサル埋め込み
マルチモーダル埋め込みを実現するために、E5-Vと呼ばれるフレームワークを提案する。E5-Vは、異なるタイプの入力間のモダリティギャップを効果的に埋め、微調整なしでもマルチモーダル埋め込みにおいて高い性能を示す。また、E5-Vの単一モダリティ学習アプローチを提案し、テキストペアのみでモデルを学習することで、マルチモーダル学習よりも優れた性能を示す。
referred from https://github.com/kongds/E5-V
モデル
ほぼほぼ松noteさんの記事の写経をColaboratoryで。L4GPUでギリギリ。
Colaboratoryだとある程度パッケージは入っているので、足りないものだけを追加
!pip install deepspeed peft bitsandbytes datasets
モデルをロードして、テキストと画像のEmbeddingsを作成する。READMEにある画像・テキストに加えて以下の画像(とテキスト)を追加した。


import torch
import torch.nn.functional as F
import requests
from PIL import Image
from io import BytesIO
from transformers import AutoTokenizer
from transformers import LlavaNextProcessor, LlavaNextForConditionalGeneration
import matplotlib.pyplot as plt
from sklearn.manifold import TSNE
import numpy as np
import seaborn as sns

def download_and_resize_image(url, max_size=512):
    try:
        headers = {
            'User-Agent': "urllib3/2.0.7 (XXXX@XXXX) urllib3/2.0.7"
        }
        response = requests.get(url, headers=headers, timeout=10)
        response.raise_for_status()
        img = Image.open(BytesIO(response.content))
        img.thumbnail((max_size, max_size))
        return img
    except Exception as e:
        print(f"Error downloading or resizing image from {url}: {e}")
        return None

llama3_template = '<|start_header_id|>user<|end_header_id|>\n\n{}<|eot_id|><|start_header_id|>assistant<|end_header_id|>\n\n \n'

processor = LlavaNextProcessor.from_pretrained('royokong/e5-v')
model = LlavaNextForConditionalGeneration.from_pretrained('royokong/e5-v', torch_dtype=torch.float16).cuda()

img_prompt = llama3_template.format('<image>\nSummary above image in one word: ')
text_prompt = llama3_template.format('<sent>\nSummary above sentence in one word: ')

urls = [
    'https://upload.wikimedia.org/wikipedia/commons/thumb/4/47/American_Eskimo_Dog.jpg/360px-American_Eskimo_Dog.jpg',
    'https://upload.wikimedia.org/wikipedia/commons/thumb/b/b6/Felis_catus-cat_on_snow.jpg/179px-Felis_catus-cat_on_snow.jpg',
    'https://upload.wikimedia.org/wikipedia/commons/8/8d/Symboli_rudolf.jpg',
    'https://upload.wikimedia.org/wikipedia/commons/7/74/Narita_Brian_19960309R1.jpg',
]

# 画像をダウンロードしリサイズ
images = [download_and_resize_image(url, max_size=400) for url in urls]
images = [img for img in images if img is not None]

if not images:
    print("Failed to download and resize any images. Please check your internet connection or the image URLs.")
    exit()

texts = [
    "草むらに座っている犬",
    "雪の中に佇む猫",
    "競馬場で立っている競走馬",
    "競馬場で走っている競走馬"
]

text_inputs = processor([text_prompt.replace('<sent>', text) for text in texts], return_tensors="pt", padding=True).to('cuda')
img_inputs = processor([img_prompt]*len(images), images, return_tensors="pt", padding=True).to('cuda')

with torch.no_grad():
    text_embs = model(**text_inputs, output_hidden_states=True, return_dict=True).hidden_states[-1][:, -1, :]
    img_embs = model(**img_inputs, output_hidden_states=True, return_dict=True).hidden_states[-1][:, -1, :]

    text_embs = F.normalize(text_embs, dim=-1)
    img_embs = F.normalize(img_embs, dim=-1)

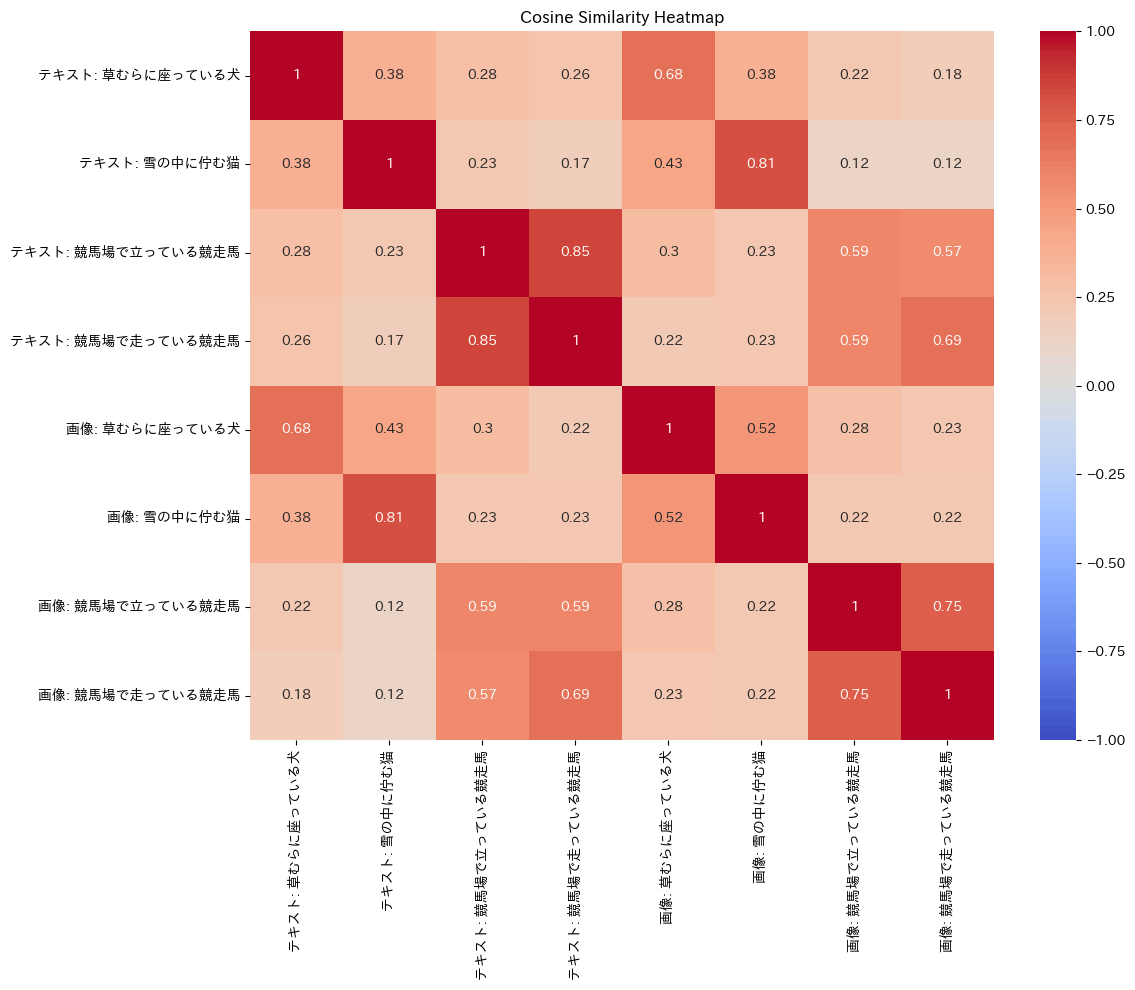
print(text_embs @ img_embs.t())
tensor([[0.6841, 0.3811, 0.2212, 0.1836],
        [0.4304, 0.8105, 0.1227, 0.1204],
        [0.3022, 0.2278, 0.5923, 0.5679],
        [0.2175, 0.2284, 0.5942, 0.6855]], device='cuda:0',
       dtype=torch.float16)
コサイン類似度のマトリクスをヒートマップで作成
!pip install japanize-matplotlib
import matplotlib.pyplot as plt
import japanize_matplotlib
from sklearn.manifold import TSNE
import numpy as np
import seaborn as sns

# ラベルの作成
text_labels = [f"テキスト: {text}" for text in texts]
img_labels = [f"画像: {text}" for text in texts]
all_labels = text_labels + img_labels

# コサイン類似度のマトリックス
cosine_sim_matrix = torch.cat([text_embs, img_embs]) @ torch.cat([text_embs, img_embs]).t()
cosine_sim_matrix = cosine_sim_matrix.cpu().numpy()

# コサイン類似度のヒートマップ
plt.figure(figsize=(12, 10))
sns.heatmap(cosine_sim_matrix, annot=True, cmap='coolwarm', vmin=-1, vmax=1, xticklabels=all_labels,yticklabels=all_labels)
plt.title('Cosine Similarity Heatmap')
plt.tight_layout()
plt.show()

概ね犬・猫・馬という感じで類似性が見えるのがわかる。
おまけ
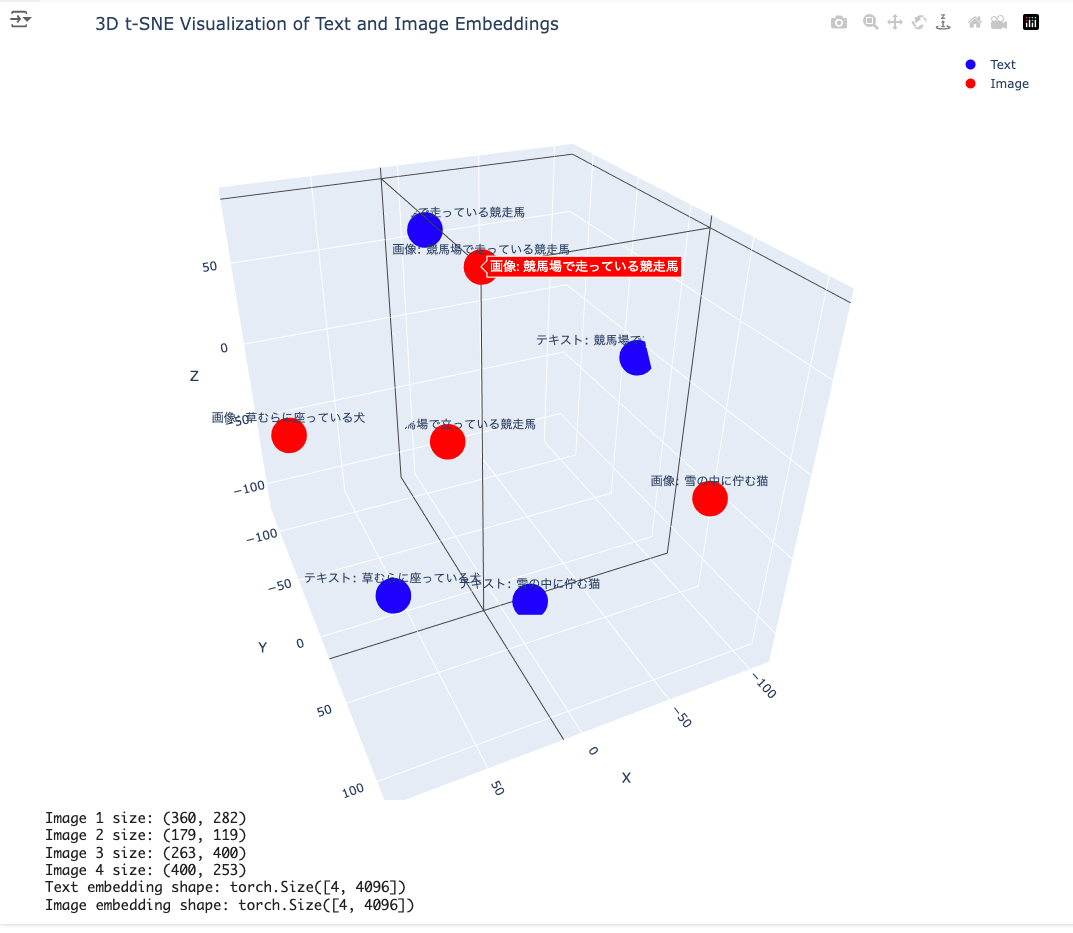
t-sneで3次元に削減して3D散布図にしてみた。
!pip install plotly
import plotly.graph_objs as go
from plotly.subplots import make_subplots

# 3D t-SNE可視化
all_embs = torch.cat([text_embs, img_embs]).cpu().numpy()
n_samples = all_embs.shape[0]

# perplexityをサンプル数に応じて調整
perplexity = min(30, n_samples - 1)  # デフォルトは30、但しサンプル数より小さくする

try:
    tsne = TSNE(n_components=3, random_state=42, perplexity=perplexity)
    embs_3d = tsne.fit_transform(all_embs)

    # Plotlyを使用して3Dプロットを作成
    fig = make_subplots(rows=1, cols=1, specs=[[{'type': 'scatter3d'}]])

    # テキストのプロット
    fig.add_trace(go.Scatter3d(
        x=embs_3d[:len(texts), 0],
        y=embs_3d[:len(texts), 1],
        z=embs_3d[:len(texts), 2],
        mode='markers+text',
        marker=dict(size=10, color='blue'),
        text=text_labels,
        hoverinfo='text',
        name='Text'
    ))

    # 画像のプロット
    fig.add_trace(go.Scatter3d(
        x=embs_3d[len(texts):, 0],
        y=embs_3d[len(texts):, 1],
        z=embs_3d[len(texts):, 2],
        mode='markers+text',
        marker=dict(size=10, color='red'),
        text=img_labels,
        hoverinfo='text',
        name='Image'
    ))

    fig.update_layout(
        title='3D t-SNE Visualization of Text and Image Embeddings',
        scene=dict(
            xaxis_title='X',
            yaxis_title='Y',
            zaxis_title='Z'
        ),
        width=1000,
        height=800,
        margin=dict(r=20, b=10, l=10, t=40)
    )

    fig.show()

except Exception as e:
    print(f"Error during t-SNE visualization: {e}")
    print("Skipping t-SNE visualization.")

# リサイズされた画像のサイズを表示
for i, img in enumerate(images):
    print(f"Image {i+1} size: {img.size}")

# エンベディングの次元を表示
print(f"Text embedding shape: {text_embs.shape}")
print(f"Image embedding shape: {img_embs.shape}")

多少恣意的に見てるところはあるけど、それっぽい?
プロンプトベースの表現手法:「Summary above sentence/image in one word:」というプロンプトを使用して、テキストと画像の埋め込みを同じ空間に統一します。
厳密には、画像とテキストを「そのまま」同じセマンティック空間に入れているということではなくて、LLMで変換することで同じ空間に入れている、ってことだよね。

