OpenAI の Responses API を試す
公式の記事。エージェント向けに最適化したってことね。
Quickstartが変わってた
サラッと試してみる。
Colaboratoryで。
パッケージインストール。ChangeLog見る限り、Responses APIに対応しているのは v1.66.0以降。
!pip install -U openai
!pip freeze | grep -i openai
openai==1.66.3
APIキーをセット
from google.colab import userdata
import os

os.environ['OPENAI_API_KEY'] = userdata.get('OPENAI_API_KEY')
テキスト生成とプロンプト
テキストの生成。
from openai import OpenAI
client = OpenAI()

response = client.responses.create(
    model="gpt-4o",
    input="競馬の魅力を5つリストアップして"
)

print(response.output_text)
もちろん、競馬の魅力をいくつかご紹介します。
スリルと興奮
レースのスピード感と勝敗が一瞬で決まる緊張感は、観客に大きなスリルを提供します。戦略と予想
レース前にジョッキーや馬の状態、天候などを考慮して予想を立て、結果を見る楽しさがあります。文化的なイベント
競馬は歴史あるスポーツであり、開催地ごとに独自の伝統や文化を体験できるイベントでもあります。馬とのふれあい
美しく力強い馬たちを間近で見ることができ、馬への愛着や魅力を感じられます。コミュニティと社交の場
競馬場は友人や家族と一緒に訪れる社交の場としても知られ、多くの人々と共に楽しむことができます。
レスポンスの中身を見てみる。
import json

print(json.dumps(response.model_dump(), indent=2, ensure_ascii=False))
{
  "id": "resp_67d6e34273b8819198e5bddc5b4cb2400e921727706c3d1a",
  "created_at": 1742136130.0,
  "error": null,
  "incomplete_details": null,
  "instructions": null,
  "metadata": {},
  "model": "gpt-4o-2024-08-06",
  "object": "response",
  "output": [
    {
      "id": "msg_67d6e342b9b48191a6d1451ce8aeb3330e921727706c3d1a",
      "content": [
        {
          "annotations": [],
          "text": "もちろん、競馬の魅力をいくつかご紹介します。\n\n1. **スリルと興奮**  \n   レースのスピード感と勝敗が一瞬で決まる緊張感は、観客に大きなスリルを提供します。\n\n2. **戦略と予想**  \n   レース前にジョッキーや馬の状態、天候などを考慮して予想を立て、結果を見る楽しさがあります。\n\n3. **文化的なイベント**  \n   競馬は歴史あるスポーツであり、開催地ごとに独自の伝統や文化を体験できるイベントでもあります。\n\n4. **馬とのふれあい**  \n   美しく力強い馬たちを間近で見ることができ、馬への愛着や魅力を感じられます。\n\n5. **コミュニティと社交の場**  \n   競馬場は友人や家族と一緒に訪れる社交の場としても知られ、多くの人々と共に楽しむことができます。",
          "type": "output_text"
        }
      ],
      "role": "assistant",
      "status": "completed",
      "type": "message"
    }
  ],
  "parallel_tool_calls": true,
  "temperature": 1.0,
  "tool_choice": "auto",
  "tools": [],
  "top_p": 1.0,
  "max_output_tokens": null,
  "previous_response_id": null,
  "reasoning": {
    "effort": null,
    "generate_summary": null
  },
  "status": "completed",
  "text": {
    "format": {
      "type": "text"
    }
  },
  "truncation": "disabled",
  "usage": {
    "input_tokens": 37,
    "output_tokens": 247,
    "output_tokens_details": {
      "reasoning_tokens": 0
    },
    "total_tokens": 284,
    "input_tokens_details": {
      "cached_tokens": 0
    }
  },
  "user": null,
  "store": true
}
Chat Completionsとは結構変わってる。参考までに同じことをChat Completionsで行った結果を以下に貼っておく。
Chat Completionsの場合
from openai import OpenAI
import json

client = OpenAI()

response = client.chat.completions.create(
    model="gpt-4o",
    messages=[
        {
            "role": "user",
            "content": "競馬の魅力を5つリストアップして"
        }
    ],
)

print(json.dumps(response.model_dump(), indent=2, ensure_ascii=False))
{
  "id": "chatcmpl-BBjRWJNn9foLDt4QD4bTuqhNdiD8L",
  "choices": [
    {
      "finish_reason": "stop",
      "index": 0,
      "logprobs": null,
      "message": {
        "content": "競馬の魅力を以下にリストアップします:\n\n1. **スリルと興奮**: レースの予測不可能性や、ゴール前での激しい競り合いは、大きなスリルと興奮をもたらします。レース展開の一瞬一瞬に集中することで、観戦者は深い没入感を味わえます。\n\n2. **賭けの楽しみ**: 馬券を購入することで、自身の予想が的中するかどうかを試す楽しみがあります。単勝や複勝といった基本的なものから、馬連や三連単といった複雑なものまで、多様な賭け方があります。\n\n3. **美しいサラブレッド**: 競走馬として優雅に駆けるサラブレッドの姿は非常に美しく、その筋肉美やスピード感は多くの人々を魅了します。競馬場では、間近でその迫力を感じることができます。\n\n4. **歴史と伝統**: 競馬は長い歴史と深い伝統を持つスポーツです。名馬たちの伝説やドラマティックなレースの数々は、競馬ファンの語り草となり続けています。\n\n5. **社交とコミュニティ**: 競馬場は、友人や家族と一緒に楽しむ社交の場でもあります。共通の趣味を持つ人々が集い、それぞれの予想を語り合うことで、コミュニティが形成されます。",
        "refusal": null,
        "role": "assistant",
        "annotations": [],
        "audio": null,
        "function_call": null,
        "tool_calls": null
      }
    }
  ],
  "created": 1742135990,
  "model": "gpt-4o-2024-08-06",
  "object": "chat.completion",
  "service_tier": "default",
  "system_fingerprint": "fp_eb9dce56a8",
  "usage": {
    "completion_tokens": 378,
    "prompt_tokens": 19,
    "total_tokens": 397,
    "completion_tokens_details": {
      "accepted_prediction_tokens": 0,
      "audio_tokens": 0,
      "reasoning_tokens": 0,
      "rejected_prediction_tokens": 0
    },
    "prompt_tokens_details": {
      "audio_tokens": 0,
      "cached_tokens": 0
    }
  }
}
で、出力を見ていると、応答の内容は response.output[0].content[0].textに入っているが、response.output_textはヘルパー的なプロパティなのかな?というふうに思える。実際、response.output[0].content[0].textには今回のテキストが入っている。
print(response.output[0].content[0].text)
もちろん、競馬の魅力をいくつかご紹介します。
スリルと興奮
レースのスピード感と勝敗が一瞬で決まる緊張感は、観客に大きなスリルを提供します。戦略と予想
レース前にジョッキーや馬の状態、天候などを考慮して予想を立て、結果を見る楽しさがあります。文化的なイベント
競馬は歴史あるスポーツであり、開催地ごとに独自の伝統や文化を体験できるイベントでもあります。馬とのふれあい
美しく力強い馬たちを間近で見ることができ、馬への愛着や魅力を感じられます。コミュニティと社交の場
競馬場は友人や家族と一緒に訪れる社交の場としても知られ、多くの人々と共に楽しむことができます。
が、この考え方は間違いで、ドキュメントには以下とある。
出力には複数の項目が含まれる場合があることに注意してください!
output配列には複数の項目が含まれる場合がよくあります。 ツールの呼び出し、Reasoningモデルによって生成されたReasoningトークンに関するデータ、その他の項目が含まれることがあります。 モデルのテキスト出力がoutput[0].content[0].textに存在すると仮定するのは安全ではありません。公式SDKの一部には、モデルのレスポンスを便利に取り扱うための
output_textプロパティが含まれており、モデルからのすべてのテキスト出力を1つの文字列に集約します。これを使えば、モデルからのテキスト出力を取得するショートカットとして役立つかも知れません。
なるほど・・・output_textプロパティを使うか、outputの中身はきちんと確認する必要がありそう。
プロンプトの渡し方は2つある。
1つ目はinstructionsパラメータを使う方法。これまでのsystem/developerプロンプトに相当するものだと思う。instructionsに与えた指示はinputよりも優先される。
from openai import OpenAI

client = OpenAI()

response = client.responses.create(
    model="gpt-4o",
    instructions="大阪弁で喋って。",
    input="JRAの競馬場の一覧を教えて",
)

print(response.output_text)
ええよ!JRAの中央競馬場は以下の通りやで:
- 札幌競馬場
- 函館競馬場
- 福島競馬場
- 新潟競馬場
- 東京競馬場
- 中山競馬場
- 中京競馬場
- 京都競馬場
- 阪神競馬場
- 小倉競馬場
これらの競馬場でレースが行われるんやで!
もう一つはこれまでと同じようなメッセージのリスト。
from openai import OpenAI

client = OpenAI()

response = client.responses.create(
    model="gpt-4o",
    input=[
        {
            "role": "developer",
            "content": "大阪弁で喋って。"
        },
        {
            "role": "user",
            "content": "JRAの競馬場の一覧を教えて。"
        }
    ],
)

print(response.output_text)
もちろんやで!JRAの競馬場の一覧やけど、以下の通りやで:
- 札幌競馬場 - 北海道札幌市
- 函館競馬場 - 北海道函館市
- 福島競馬場 - 福島県福島市
- 新潟競馬場 - 新潟県新潟市
- 東京競馬場 - 東京都府中市
- 中山競馬場 - 千葉県船橋市
- 中京競馬場 - 愛知県豊明市
- 京都競馬場 - 京都府京都市
- 阪神競馬場 - 兵庫県宝塚市
- 小倉競馬場 - 福岡県北九州市
こんな感じやで!どこか行ってみたことある?
ただし、マルチターンの会話の場合はこれまで通り、メッセージのリスト形式にするのが良さそう。
instructionsパラメータは現在のレスポンス生成リクエストにのみ適用されることに注意してください。もしprevious_response_idパラメータで会話の状態を管理している場合、以前のターンで使用されたinstructionsはコンテキストに存在しません。ターンをまたいで同じモデル指示を持続させたい場合は、代わりにdeveloperメッセージを使用してください。
会話の状態管理についてはまた別途。
画像と視覚
自分の画像で試してみる。
URLで指定。
from openai import OpenAI
client = OpenAI()
response = client.responses.create(
model="gpt-4o",
input=[{
"role": "user",
"content": [
{"type": "input_text", "text": "この画像には何が写っている?"},
{
"type": "input_image",
"image_url": "https://storage.googleapis.com/zenn-user-upload/caa14aef4b7e-20250226.png",
},
],
}],
)
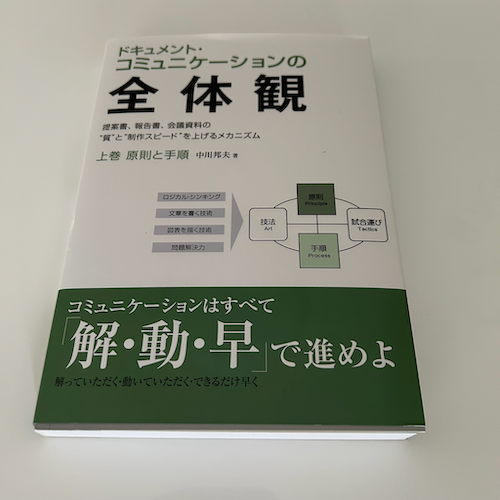
print(response.output_text)
これは「ドキュメント・コミュニケーションの全体観」という本の表紙です。表紙には、本のタイトルや著者、そして内容に関連する図が描かれています。下部にはキャッチコピーのような文も印刷されています。
日本語の文字も読めてるっぽい。
BASE64エンコードで指定。
!wget https://storage.googleapis.com/zenn-user-upload/caa14aef4b7e-20250226.png -O book.png
import base64
from openai import OpenAI

client = OpenAI()


def encode_image(image_path):
    """画像をBASE64エンコードする"""
    with open(image_path, "rb") as image_file:
        return base64.b64encode(image_file.read()).decode("utf-8")


image_path = "book.png"
base64_image = encode_image(image_path)

response = client.responses.create(
    model="gpt-4o",
    input=[
        {
            "role": "user",
            "content": [
            {"type": "input_text", "text": "この画像には何が写っている?"},
                {
                    "type": "input_image",
                    "image_url": f"data:image/jpeg;base64,{base64_image}",
                },
            ],
        }
    ],
)

print(response.output_text)
これは「ドキュメント・コミュニケーションの全体観」というタイトルの本です。表紙には、コミュニケーションに関連した用語がいくつか書かれています。また、「解・動・早で進めよ」というメッセージが書かれています。
入力された画像をどこまで詳細に処理・理解するかをパラメータで付与できる。low / high / autoから選択。指定がない場合は autoになる。
image_path = "book_large.jpg"  # 1024x1024
base64_image = encode_image(image_path)

response = client.responses.create(
    model="gpt-4o",
    input=[
        {
            "role": "user",
            "content": [
            {"type": "input_text", "text": "この画像には何が写っている?詳細に説明して。"},
                {
                    "type": "input_image",
                    "image_url": f"data:image/jpeg;base64,{base64_image}",
                    "detail": "high",
                },
            ],
        }
    ],
)

print(response.output_text)
この画像には本の表紙が写っています。表紙の上部には「ドキュメント・コミュニケーションの全体観」と題されています。サブタイトルとして「提案書、報告書、会議資料の"質"と"制作スピード"を上げるメカニズム」と書かれています。著者として中川邦夫の名前があります。
中央右側には、原則(Principle)、手順(Process)、試合選び(Tactics)、技法(Art)が図で示され、これらの要素が関連し合っていることを表しています。
下部には、「コミュニケーションはすべて『解・動・早』で進めよ 解っていただく・動いていただく・できるだけ早く」と強調されています。表紙のデザインは、白地に緑と黒の文字が使われています。
画像を処理する場合のコストについては以下を参照。
複数画像を入力することもできる。ドキュメントのサンプルでは以下の画像を使用している。
from IPython.display import Image, display

image_url = "https://upload.wikimedia.org/wikipedia/commons/thumb/d/dd/Gfp-wisconsin-madison-the-nature-boardwalk.jpg/2560px-Gfp-wisconsin-madison-the-nature-boardwalk.jpg"

display(Image(url=image_url, width=700))
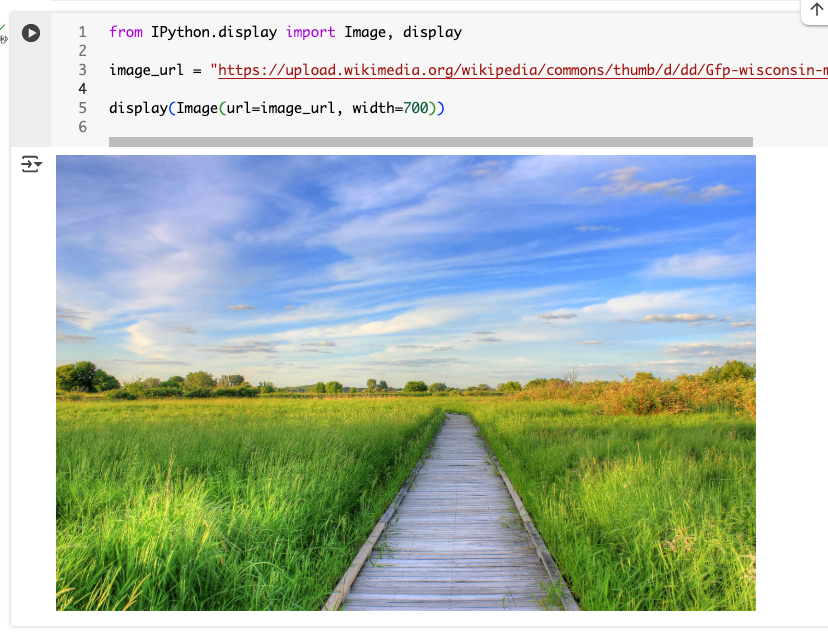
これを2回渡す。
from openai import OpenAI

client = OpenAI()

image_url = "https://upload.wikimedia.org/wikipedia/commons/thumb/d/dd/Gfp-wisconsin-madison-the-nature-boardwalk.jpg/2560px-Gfp-wisconsin-madison-the-nature-boardwalk.jpg"

response = client.responses.create(
    model="gpt-4o-mini",
    input=[
        {
            "role": "user",
            "content": [
                {
                    "type": "input_text",
                    "text": "これらの画像には何が写っている?なにか違いはある?",
                },
                {
                    "type": "input_image",
                    "image_url": image_url,
                },
                {
                    "type": "input_image",
                    "image_url": image_url,
                },
            ],
        }
    ]
)

print(response.output_text)
これらの画像は、緑豊かな草原を進む小道を写しています。青空が広がっており、のどかな雰囲気です。見たところ、これらの画像は同じ風景を捉えており、見た目に明確な違いは見当たりません。両方とも美しい自然の景色を示しています。
画像についての制限も記載されている。
ビジョン機能を持つモデルは強力であり、多くの状況で使用できますが、これらのモデルの限界を理解することが重要です。 以下は既知の制限です:
- 医療画像: このモデルはCTスキャンのような特殊な医療画像の解釈には適していません。
- 英語以外: 日本語や韓国語など、ラテン文字以外のアルファベットのテキストを含む画像を扱う場合、モデルは最適に動作しない可能性があります。
- 小さいテキスト: 画像内のテキストを大きくして読みやすさを向上させますが、重要な詳細を切り抜くことは避けてください。
- 回転: モデルは、回転したり上下逆さまになったテキストや画像を誤解する可能性があります。
- 視覚的要素: モデルは、実線、破線、点線のように色やスタイルが変化するグラフやテキストを理解するのに苦労するかもしれません。
- 空間的推論: チェスのポジションを特定するような、正確な空間的定位を必要とするタスクに苦戦する。
- 精度: 特定のシナリオにおいて、モデルは誤った説明やキャプションを生成することがあります。
- 画像の形状: モデルは、パノラマ画像や魚眼画像で苦労します。
- メタデータとリサイズ: モデルは元のファイル名やメタデータを処理せず、画像は分析前にリサイズされ、元の寸法に影響を与えます。
- カウント: モデルは画像内のオブジェクトのおおよそのカウントを与えることがあります。
- CAPTCHAS: 安全上の理由から、私たちのシステムはCAPTCHAの提出をブロックしています。
日本語の文字もある程度は読めてるようには思うが、明確にそれを意図してはいないってことね。
相変わらず画像のコスト計算はわかりにくいのでドキュメントや料金のページを確認しておくと良い。
Structured Output
Structured Outputのスキーマはtextパラメータに"format"を渡す。
from openai import OpenAI
import json

client = OpenAI()

response = client.responses.create(
    model="gpt-4o",
    input=[
        {"role": "system", "content": "イベント情報を抽出して。"},
        {"role": "user", "content": "太郎と花子は今週末の土曜日に阪神競馬場に競馬観戦に行く。"}
    ],
    text={
        "format": {
            "type": "json_schema",
            "name": "calendar_event",
            "schema": {
                "type": "object",
                "properties": {
                    "name": {
                        "type": "string"
                    },
                    "date": {
                        "type": "string"
                    },
                    "place": {
                        "type": "string"
                    },
                    "participants": {
                        "type": "array",
                        "items": {
                            "type": "string"
                        }
                    },
                },
                "required": ["name", "date", "place", "participants"],
                "additionalProperties": False
            },
            "strict": True
        }
    }
)

event = json.loads(response.output_text)
print(json.dumps(event, indent=2, ensure_ascii=False))
{
  "name": "競馬観戦",
  "date": "今週末の土曜日",
  "place": "阪神競馬場",
  "participants": [
    "太郎",
    "花子"
  ]
}
ちょっと前後するが、"additionalProperties": Falseってのは以前からあるけど、過去気にしたことがなかった、というかPydanticを使っていたので意識したことがなかった。
additionalProperties: false は オブジェクトで常に設定する必要がある
additionalPropertiesは、オブジェクトが JSON スキーマで定義されていない追加のキー/値を含むことが許可されるかどうかを制御します。Structured Outputsでは、指定されたキー/値の生成のみをサポートしているため、開発者には
additionalProperties: falseを設定して構造化出力を使用するように求めています。
オブジェクト単位("type": "object")で必須の設定って感じに読める。
ところでPydanticについて明記されていないのだが?と思って試してみたが、
from openai import OpenAI
import json
from pydantic import BaseModel


class CalendarEvent(BaseModel):
    name: str
    date: str
    place: str
    participants: list[str]


client = OpenAI()

response = client.responses.create(
    model="gpt-4o",
    input=[
        {"role": "system", "content": "イベント情報を抽出して。"},
        {"role": "user", "content": "太郎と花子は今週末の土曜日に阪神競馬場に競馬観戦に行く。"}
    ],
    text=CalendarEvent
)

event = json.loads(response.output_text)
print(json.dumps(event, indent=2, ensure_ascii=False))
TypeError: Object of type ModelMetaclass is not JSON serializable
エラーになる。今のところは対応していない、ということなのかも。PydanticクラスをJSONで出力して少し構造いじれば行けなくもないと思うが、まあ面倒。
2025/03/20追記
執筆時点ではドキュメントやAPIリファレンスには載ってないが、SDKのレポジトリにPydanticクラスで定義するサンプルコードがあった。更にストリーミングと組み合わせるサンプルもある。以下で試している。
追記ここまで
ストリーミング
from openai import OpenAI
import json

client = OpenAI()

stream = client.responses.create(
    model="gpt-4o",
    input=[
        {"role": "system", "content": "イベント情報を抽出して。"},
        {"role": "user", "content": "太郎と花子は今週末の土曜日に阪神競馬場に競馬観戦に行く。"}
    ],
    text={
        "format": {
            "type": "json_schema",
            "name": "calendar_event",
            "schema": {
                "type": "object",
                "properties": {
                    "name": {
                        "type": "string"
                    },
                    "date": {
                        "type": "string"
                    },
                    "place": {
                        "type": "string"
                    },
                    "participants": {
                        "type": "array",
                        "items": {
                            "type": "string"
                        }
                    },
                },
                "required": ["name", "date", "place", "participants"],
                "additionalProperties": False
            },
            "strict": True
        }
    },
    stream=True,
)

# ストリーミング出力時にわかりやすいように改行を入れている
for event in stream:
    if event.type == 'response.refusal.delta':
        print(event.delta, end="\n")
    elif event.type == 'response.output_text.delta':
        print(event.delta, end="\n")
    elif event.type == 'response.error':
        print(event.error, end="\n")
    elif event.type == 'response.completed':
        print("ストリーミング終了:", event.response.output_text)
結果
{"
name
":"
競
馬
観
戦
","
date
":"
今
週
末
の
土
曜日
","
place
":"
阪
神
競
馬
場
","
participants
":["
太
郎
","
花
子
"]
}
ストリーミング終了: {"name":"競馬観戦","date":"今週末の土曜日","place":"阪神競馬場","participants":["太郎","花子"]}
うーん、これだとストリーミング中はvalidなJSONオブジェクトとして取れないのだけど、そのあたりのパースも自分でやらないといけないってことなのかな?Chat Completionsの場合はSDKがよしなにやってくれる感じだったのだけど(それはそれでSDK依存ではあるが)
このあたりが使えるかも
Function Calling
一通りやってみたのだけども、
- サンプルコードに一貫性がなくて、実際に動く形で通して試せない
- 一部Responses APIでは動かず、Chat Completions APIで動く、古い記述がある
ので、ドキュメントとは異なるサンプルでやってみる。
ちなみにやってるうちにバージョン上がってた。
!pip install -U openai
!pip freeze | grep -i openai
openai==1.66.5
都市名から天気と気温を取得するツールのサンプル
from openai import OpenAI
import requests
from google.colab import userdata


def get_weather(location: str, units: str)->dict:
    """与えられた都市名と温度の単位から、現在の天気と気温を取得する"""
    if units.lower() == "celsius":
        param_units = "metric"
    elif units.lower() == "fahrenheit":
        param_units = "imperial"
    else:
        raise ValueError("Invalid units. Must be 'celsius' or 'fahrenheit'.")

    response = requests.get(
        "https://api.openweathermap.org/data/2.5/weather",
        params={
            "q": location,
            "units": param_units,
            "appid": userdata.get('OPENWEATHER_API_KEY'),
        }
    )

    data = response.json()
    return {
        "city": data["name"],
        "weather": data["weather"][0]["description"],
        "temperature": data["main"]["temp"]
    }


client = OpenAI()

tools = [
    {
        "type": "function",
        "name": "get_weather",
        "description": "与えられた都市名と温度の単位から、現在の天気と気温を取得する",
        "parameters": {
            "type": "object",
            "properties": {
                "location": {
                    "type": "string",
                    "description": "英語の都市名。例: Tokyo, Paris, New York"
                },
                "units": {
                    "type": "string",
                    "enum": [
                        "celsius",
                        "fahrenheit"
                    ],
                    "description": "取得する気温の単位。"
                }
            },
            "required": [
                "location",
                "units"
            ],
            "additionalProperties": False
        },
        "strict": True
    }
]

messages = [
    {
        "role": "user",
        "content": "パリは今どんな天気?"
    }
]

response = client.responses.create(
    model="gpt-4o",
    input=messages,
    tools=tools,
)

print(response.output)
Function Callメッセージが返ってくる。実行すべき関数とその引数が含まれているのがわかる。
[
    ResponseFunctionToolCall(
        arguments='{"location":"Paris","units":"celsius"}',
        call_id='call_Cene5wt7UpumlYBObUTfXZmv',
        name='get_weather',
        type='function_call',
        id='fc_67da75cb57f88191baff3f7a2c7e73f10202abf2b0aca717',
        status='completed'
    )
]
メッセージから、ID・関数名・関数へ渡す引数を取得して、関数を実行。
import json

allowed_tools = {"get_weather": get_weather}

tool_call = response.output[0]

tool_call_id = tool_call.call_id
tool_name = tool_call.name
tool_args = json.loads(tool_call.arguments)

tool_result = allowed_tools[tool_name](**tool_args)
print(tool_result)
{'city': 'Paris', 'weather': 'clear sky', 'temperature': 8.22}
最初のFunction Callメッセージと、関数の実行結果を、会話履歴に追加して、再度生成をリクエストする。実行結果にFunction CallメッセージのIDを付与することで、Function Callの要求と結果が紐づくことになる。
messages.append(tool_call)
messages.append(
    {
        "type": "function_call_output",
        "call_id": tool_call_id,
        "output": str(tool_result)
    }
)

response_2 = client.responses.create(
    model="gpt-4o",
    input=messages,
    tools=tools,
)
print(response_2.output_text)
結果
パリの現在の天気は晴れで、気温は約8.2°Cです。
toolsに渡すスキーマは実際の関数に合わせて指定することになる。
関数は、そのスキーマによって定義され、モデルにその関数が何を行い、どのような入力引数を期待するかを通知します。 以下のフィールドで構成されます。
|フィールド|説明|
|type|常にfunctionである必要がある|
|name| 関数名 (例:get_weather)|
|description| 関数をいつ・どのように使用するかの説明|
|parameters| 関数に渡す引数を定義するJSON スキーマ|
|strict| 関数呼び出しにstrictモードを適用するかどうか|
ここでドキュメントには以下のような定義が記載されている(2025/03/19時点)が、これは ChatCompletions APIでの定義だと思う。一番上の階層のfunctionはResponses APIでは不要なので以下の通り渡すとエラーになる。
{
    "type": "function",
    "function": {
        "name": "get_weather",
        "description": "Retrieves current weather for the given location.",
        "parameters": {
            "type": "object",
            "properties": {
                "location": {
                    "type": "string",
                    "description": "City and country e.g. Bogotá, Colombia"
                },
                "units": {
                    "type": "string",
                    "enum": [
                        "celsius",
                        "fahrenheit"
                    ],
                    "description": "Units the temperature will be returned in."
                }
            },
            "required": [
                "location",
                "units"
            ],
            "additionalProperties": false
        },
        "strict": true
    }
}
おそらくドキュメントが追いついていないのだろうと思われるので、注意。
クエリによってはoutputに複数のFunction Callメッセージが返ってくる場合がある。
messages = [
    {
        "role": "user",
        "content": "パリと東京の天気を教えて。"
    }
]

response = client.responses.create(
    model="gpt-4o",
    input=messages,
    tools=tools,
)

print(response.output)
[
    ResponseFunctionToolCall(
        arguments='{"location":"Paris","units":"celsius"}',
        call_id='call_qFhX5W518ARgWaLfQZsQrOXp',
        name='get_weather',
        type='function_call',
        id='fc_67da761dc06c8191b58bcd7b657e78950226f6981929ef1d',
        status='completed'
    ),
    ResponseFunctionToolCall(
        arguments='{"location":"Tokyo","units":"celsius"}',
        call_id='call_hc3Snre1jlDioAKDFODiexZr',
        name='get_weather',
        type='function_call',
        id='fc_67da761de34481919ff2fdcb5a87bcfd0226f6981929ef1d',
        status='completed'
    )
]
この場合はFunction Callメッセージを順に取り出して、それぞれ処理してやる必要がある。
allowed_tools = {"get_weather": get_weather}

for tool_call in response.output:
    if tool_call.type != "function_call":
        continue

    messages.append(tool_call)

    tool_call_id = tool_call.call_id
    tool_name = tool_call.name
    tool_args = json.loads(tool_call.arguments)

    result = allowed_tools[tool_name](**tool_args)

    messages.append({
        "type": "function_call_output",
        "call_id": tool_call_id,
        "output": str(result)
    })

print(messages)
こういうメッセージのリストになる。
[
    {
        'role': 'user',
        'content': 'パリと東京の天気を教えて。'
    },
    ResponseFunctionToolCall(
        arguments='{"location":"Paris","units":"celsius"}',
        call_id='call_qFhX5W518ARgWaLfQZsQrOXp',
        name='get_weather',
        type='function_call',
        id='fc_67da761dc06c8191b58bcd7b657e78950226f6981929ef1d',
        status='completed'
    ),
    {
        'type': 'function_call_output',
        'call_id': 'call_qFhX5W518ARgWaLfQZsQrOXp',
        'output': "{'city': 'Paris', 'weather': 'clear sky', 'temperature': 8.22}"
    },
    ResponseFunctionToolCall(
        arguments='{"location":"Tokyo","units":"celsius"}',
        call_id='call_hc3Snre1jlDioAKDFODiexZr',
        name='get_weather',
        type='function_call',
        id='fc_67da761de34481919ff2fdcb5a87bcfd0226f6981929ef1d',
        status='completed'
    ),
    {
        'type': 'function_call_output',
        'call_id': 'call_hc3Snre1jlDioAKDFODiexZr',
        'output': "{'city': 'Tokyo', 'weather': 'broken clouds', 'temperature': 10.49}"
    }
]
これを再度LLMに送信して生成。
response2 = client.responses.create(
    model="gpt-4o",
    input=messages,
    tools=tools,
)

print(response2.output_text)
パリの天気は晴れで、気温は約8.2°Cです。
東京の天気は曇りがちで、気温は約10.5°Cです。
実際にはもっと細かく処理する必要があるが、Quickstartなので。
いくつか追加のパラメータ、tool_choice、parallel_tool_calls、strictはChat Completions APIと違いはなさそう。
ストリーミング
messages = [
    {
        "role": "user",
        "content": "パリは今どんな天気?"
    }
]

stream = client.responses.create(
    model="gpt-4o",
    input=messages,
    tools=tools,
    stream=True,
)

for event in stream:
    print(json.dumps(event.model_dump(), indent=2, ensure_ascii=False))
    print("---")
こんな感じでストリーミングのレスポンスが返ってくる。
長いので折りたたみ
{
  "response": {
    "id": "resp_67da7f5f4100819185bab665074eea4e0c8bca1fed7a7401",
    "created_at": 1742372703.0,
    "error": null,
    "incomplete_details": null,
    "instructions": null,
    "metadata": {},
    "model": "gpt-4o-2024-08-06",
    "object": "response",
    "output": [],
    "parallel_tool_calls": true,
    "temperature": 1.0,
    "tool_choice": "auto",
    "tools": [
      {
        "name": "get_weather",
        "parameters": {
          "type": "object",
          "properties": {
            "location": {
              "type": "string",
              "description": "英語の都市名。例: Tokyo, Paris, New York"
            },
            "units": {
              "type": "string",
              "enum": [
                "celsius",
                "fahrenheit"
              ],
              "description": "取得する気温の単位。"
            }
          },
          "required": [
            "location",
            "units"
          ],
          "additionalProperties": false
        },
        "strict": true,
        "type": "function",
        "description": "与えられた都市名と温度の単位から、現在の天気と気温を取得する"
      }
    ],
    "top_p": 1.0,
    "max_output_tokens": null,
    "previous_response_id": null,
    "reasoning": {
      "effort": null,
      "generate_summary": null
    },
    "status": "in_progress",
    "text": {
      "format": {
        "type": "text"
      }
    },
    "truncation": "disabled",
    "usage": null,
    "user": null,
    "store": true
  },
  "type": "response.created"
}
---
{
  "response": {
    "id": "resp_67da7f5f4100819185bab665074eea4e0c8bca1fed7a7401",
    "created_at": 1742372703.0,
    "error": null,
    "incomplete_details": null,
    "instructions": null,
    "metadata": {},
    "model": "gpt-4o-2024-08-06",
    "object": "response",
    "output": [],
    "parallel_tool_calls": true,
    "temperature": 1.0,
    "tool_choice": "auto",
    "tools": [
      {
        "name": "get_weather",
        "parameters": {
          "type": "object",
          "properties": {
            "location": {
              "type": "string",
              "description": "英語の都市名。例: Tokyo, Paris, New York"
            },
            "units": {
              "type": "string",
              "enum": [
                "celsius",
                "fahrenheit"
              ],
              "description": "取得する気温の単位。"
            }
          },
          "required": [
            "location",
            "units"
          ],
          "additionalProperties": false
        },
        "strict": true,
        "type": "function",
        "description": "与えられた都市名と温度の単位から、現在の天気と気温を取得する"
      }
    ],
    "top_p": 1.0,
    "max_output_tokens": null,
    "previous_response_id": null,
    "reasoning": {
      "effort": null,
      "generate_summary": null
    },
    "status": "in_progress",
    "text": {
      "format": {
        "type": "text"
      }
    },
    "truncation": "disabled",
    "usage": null,
    "user": null,
    "store": true
  },
  "type": "response.in_progress"
}
---
{
  "item": {
    "arguments": "",
    "call_id": "call_WJIjvTuAma37356fqtzR4Zqo",
    "name": "get_weather",
    "type": "function_call",
    "id": "fc_67da7f5fb0e081919ef56ff13d5a37430c8bca1fed7a7401",
    "status": "in_progress"
  },
  "output_index": 0,
  "type": "response.output_item.added"
}
---
{
  "delta": "{\"",
  "item_id": "fc_67da7f5fb0e081919ef56ff13d5a37430c8bca1fed7a7401",
  "output_index": 0,
  "type": "response.function_call_arguments.delta"
}
---
{
  "delta": "location",
  "item_id": "fc_67da7f5fb0e081919ef56ff13d5a37430c8bca1fed7a7401",
  "output_index": 0,
  "type": "response.function_call_arguments.delta"
}
---
{
  "delta": "\":\"",
  "item_id": "fc_67da7f5fb0e081919ef56ff13d5a37430c8bca1fed7a7401",
  "output_index": 0,
  "type": "response.function_call_arguments.delta"
}
---
{
  "delta": "Paris",
  "item_id": "fc_67da7f5fb0e081919ef56ff13d5a37430c8bca1fed7a7401",
  "output_index": 0,
  "type": "response.function_call_arguments.delta"
}
---
{
  "delta": "\",\"",
  "item_id": "fc_67da7f5fb0e081919ef56ff13d5a37430c8bca1fed7a7401",
  "output_index": 0,
  "type": "response.function_call_arguments.delta"
}
---
{
  "delta": "units",
  "item_id": "fc_67da7f5fb0e081919ef56ff13d5a37430c8bca1fed7a7401",
  "output_index": 0,
  "type": "response.function_call_arguments.delta"
}
---
{
  "delta": "\":\"",
  "item_id": "fc_67da7f5fb0e081919ef56ff13d5a37430c8bca1fed7a7401",
  "output_index": 0,
  "type": "response.function_call_arguments.delta"
}
---
{
  "delta": "c",
  "item_id": "fc_67da7f5fb0e081919ef56ff13d5a37430c8bca1fed7a7401",
  "output_index": 0,
  "type": "response.function_call_arguments.delta"
}
---
{
  "delta": "elsius",
  "item_id": "fc_67da7f5fb0e081919ef56ff13d5a37430c8bca1fed7a7401",
  "output_index": 0,
  "type": "response.function_call_arguments.delta"
}
---
{
  "delta": "\"}",
  "item_id": "fc_67da7f5fb0e081919ef56ff13d5a37430c8bca1fed7a7401",
  "output_index": 0,
  "type": "response.function_call_arguments.delta"
}
---
{
  "arguments": "{\"location\":\"Paris\",\"units\":\"celsius\"}",
  "item_id": "fc_67da7f5fb0e081919ef56ff13d5a37430c8bca1fed7a7401",
  "output_index": 0,
  "type": "response.function_call_arguments.done"
}
---
{
  "item": {
    "arguments": "{\"location\":\"Paris\",\"units\":\"celsius\"}",
    "call_id": "call_WJIjvTuAma37356fqtzR4Zqo",
    "name": "get_weather",
    "type": "function_call",
    "id": "fc_67da7f5fb0e081919ef56ff13d5a37430c8bca1fed7a7401",
    "status": "completed"
  },
  "output_index": 0,
  "type": "response.output_item.done"
}
---
{
  "response": {
    "id": "resp_67da7f5f4100819185bab665074eea4e0c8bca1fed7a7401",
    "created_at": 1742372703.0,
    "error": null,
    "incomplete_details": null,
    "instructions": null,
    "metadata": {},
    "model": "gpt-4o-2024-08-06",
    "object": "response",
    "output": [
      {
        "arguments": "{\"location\":\"Paris\",\"units\":\"celsius\"}",
        "call_id": "call_WJIjvTuAma37356fqtzR4Zqo",
        "name": "get_weather",
        "type": "function_call",
        "id": "fc_67da7f5fb0e081919ef56ff13d5a37430c8bca1fed7a7401",
        "status": "completed"
      }
    ],
    "parallel_tool_calls": true,
    "temperature": 1.0,
    "tool_choice": "auto",
    "tools": [
      {
        "name": "get_weather",
        "parameters": {
          "type": "object",
          "properties": {
            "location": {
              "type": "string",
              "description": "英語の都市名。例: Tokyo, Paris, New York"
            },
            "units": {
              "type": "string",
              "enum": [
                "celsius",
                "fahrenheit"
              ],
              "description": "取得する気温の単位。"
            }
          },
          "required": [
            "location",
            "units"
          ],
          "additionalProperties": false
        },
        "strict": true,
        "type": "function",
        "description": "与えられた都市名と温度の単位から、現在の天気と気温を取得する"
      }
    ],
    "top_p": 1.0,
    "max_output_tokens": null,
    "previous_response_id": null,
    "reasoning": {
      "effort": null,
      "generate_summary": null
    },
    "status": "completed",
    "text": {
      "format": {
        "type": "text"
      }
    },
    "truncation": "disabled",
    "usage": {
      "input_tokens": 318,
      "input_tokens_details": {
        "cached_tokens": 0
      },
      "output_tokens": 20,
      "output_tokens_details": {
        "reasoning_tokens": 0
      },
      "total_tokens": 338
    },
    "user": null,
    "store": true
  },
  "type": "response.completed"
}
---
ストリームを取得するたびにイベントのタイプが変わっていってるのがわかる。
response.createdresponse.in_progressresponse.output_item.addedresponse.function_call_arguments.deltaresponse.output_item.doneresponse.completed
3のresponse.output_item.addedでまず呼び出すべき関数の情報が取得できる。
(snip)
---
{
  "item": {
    "arguments": "",
    "call_id": "call_WJIjvTuAma37356fqtzR4Zqo",
    "name": "get_weather",
    "type": "function_call",
    "id": "fc_67da7f5fb0e081919ef56ff13d5a37430c8bca1fed7a7401",
    "status": "in_progress"
  },
  "output_index": 0,
  "type": "response.output_item.added"
}
---
(snip)
このときargumentsは空文字になっている。
4のresponse.function_call_arguments.deltaで、関数に渡す引数argumentsの一部(delta)が返されるので、最終的にはこれを結合すれば良いということになる。
(snip)
---
{
  "delta": "{\"",
  "item_id": "fc_67da7f5fb0e081919ef56ff13d5a37430c8bca1fed7a7401",
  "output_index": 0,
  "type": "response.function_call_arguments.delta"
}
---
{
  "delta": "location",
  "item_id": "fc_67da7f5fb0e081919ef56ff13d5a37430c8bca1fed7a7401",
  "output_index": 0,
  "type": "response.function_call_arguments.delta"
}
---
{
  "delta": "\":\"",
  "item_id": "fc_67da7f5fb0e081919ef56ff13d5a37430c8bca1fed7a7401",
  "output_index": 0,
  "type": "response.function_call_arguments.delta"
}
---
(snip)
で5のresponse.output_item.doneで引数文字列が確定するという感じ。
{
  "item": {
    "arguments": "{\"location\":\"Paris\",\"units\":\"celsius\"}",
    "call_id": "call_WJIjvTuAma37356fqtzR4Zqo",
    "name": "get_weather",
    "type": "function_call",
    "id": "fc_67da7f5fb0e081919ef56ff13d5a37430c8bca1fed7a7401",
    "status": "completed"
  },
  "output_index": 0,
  "type": "response.output_item.done"
}
なので、response.output_item.added と response.function_call_arguments.delta を処理していいけばストリーミングでFunction Callメッセージが取得できるということ。
messages = [
    {
        "role": "user",
        "content": "パリは今どんな天気?"
    }
]

stream = client.responses.create(
    model="gpt-4o",
    input=messages,
    tools=tools,
    stream=True,
)

final_tool_calls = {}

for event in stream:
    if event.type == "response.output_item.added":
        final_tool_calls[event.output_index] = event.item;
    elif event.type == "response.function_call_arguments.delta":
        index = event.output_index

        if final_tool_calls[index]:
            final_tool_calls[index].arguments += event.delta
            print(final_tool_calls[index].arguments)
{"
{"location
{"location":"
{"location":"Paris
{"location":"Paris","
{"location":"Paris","units
{"location":"Paris","units":"
{"location":"Paris","units":"c
{"location":"Paris","units":"celsius
{"location":"Paris","units":"celsius"}
ストリーミング中のオブジェクトはJSONとしてはvalidではないので、あまりストリーミングの意味はない気がする。ただ、Structured Outputならまだわからないではないが、Function Callingでは関数を実行する必要があるので、それが必要になるユースケースは考えにくいかな。
そういえばツールのスキーマもPydanticで渡せたはずなのだけども、全然触れられていない・・・
2025/03/20追記
執筆時点ではドキュメントやAPIリファレンスには載ってないが、SDKのレポジトリにPydanticクラスで定義するサンプルコードがあった。以下で試している。
ところで、普通にドキュメントのQuickstartにアクセスすると、Responses APIのQuickstartになるが、このときのURL配下となっている。
https://platform.openai.com/docs/guides/conversation-state?api-mode=responses
Chat Completions APIの場合はどうなるのかなと思ったら、こういうURLでアクセスできる。
https://platform.openai.com/docs/guides/conversation-state?api-mode=chat
ここで切り替えれるのか。全然気づいてなかった。

会話の状態管理
ここは結構変わってる感がある。
まずはこれまでのメッセージリストでマルチターンの会話履歴を保持するやり方。
from openai import OpenAI

client = OpenAI()

input_messages = [
    {
        "role": "system",
        "content": "あなたは大阪の漫才師でツッコミ担当です。ユーザのボケにノリツッコミを入れます。"
    },
    {
        "role": "user",
        "content": "いやー、8月に入ったけど、ホンマに暑いなー。"
    },
    {
        "role": "assistant",
        "content": "ほんまやな、毎日暑いわー。"
    },
    {
        "role": "user",
        "content": "こんだけ暑かったら12月になったらめっちゃ暑くなるんとちゃうか?"
    },
]

response = client.responses.create(
    model="gpt-4o",
    input=input_messages
)

print(response.output_text)
ほんまやな、そのまま行ったら雪も溶けるかもなー...ってアホか!12月は普通寒いやろ!
LLMからのレスポンスをこれまでの会話履歴に追加、そしてさらにリクエストを追加して送信する。
# LLMの応答を会話履歴に追加
input_messages += [{"role": el.role, "content": el.content} for el in response.output]

# 次のメッセージを会話履歴に追加
input_messages.append({ "role": "user", "content": "12月に寒くなるんやったら来年の8月になったらもっと寒くなるなぁ。"})

response2 = client.responses.create(
    model="gpt-4o",
    input=input_messages,
    store=False
)

print(response2.output_text)
そりゃえらいことやな!夏にスキーせなあかんやん...って、なんでやねん!季節ごっちゃなっとるがな!
マルチターンのループだとこんな感じになる。
from openai import OpenAI

client = OpenAI()

message_history = [
    {
        "role": "system",
        "content": "あなたは大阪の漫才師でツッコミ担当です。ユーザのボケにノリツッコミを入れます。"
    }
]

while True:
    user_input = input("User: ")
    if user_input.lower() == "quit":
        print("チャットを終了します。さようなら。")
        break

    message_history.append({ "role": "user", "content": user_input })

    response = client.responses.create(
        model="gpt-4o",
        input=message_history
    )
    print("Assitant: ", response.output_text)

    message_history.append({ "role": "assistant", "content": response.output_text })
会話のターンが進めばどんどん会話履歴が長くなっていくことになるが、Responses APIには、これをAPI側が保持してくれるやり方がある。
まず普通にリクエストを送る。
from openai import OpenAI

client = OpenAI()

response = client.responses.create(
    model="gpt-4o-mini",
    input="私の趣味は競馬なんですよ。",
)
print(response.output_text)
競馬は楽しい趣味ですね!レースを見るのも賭けるのも、どちらも興奮しますよね。特に好きなレースや馬はいますか?また、競馬を始めたきっかけなどもあれば教えてください!
このときレスポンスにはidが付与されている。
print(response.id)
resp_67daa4fe27bc8191ba14ba6e32b25acd0d2009d96f921f4e
このIDをprevious_response_idパラメータで渡して再度リクエストを送る。
response2 = client.responses.create(
    model="gpt-4o-mini",
    input="私の趣味は何でしたっけ?",
    previous_response_id=response.id,
)
print(response2.output_text)
あなたの趣味は競馬です!レースや馬に関心があるようですね。他にも興味のあることがあれば教えてください。
会話履歴を渡すことなく、前回の会話の内容が維持されているのがわかる。
レスポンスの中身を見てみる。
マルチターンのループはこんな感じになる。
from openai import OpenAI

client = OpenAI()

while True:
    user_input = input("User: ")
    if user_input.lower() == "quit":
        print("チャットを終了します。さようなら。")
        break

    if response:
        previous_response_id=response.id
    else:
        previous_response_id=None

    response = client.responses.create(
        model="gpt-4o",
        input=user_input,
        instructions="あなたは大阪のおばちゃんです。大阪弁で楽しく喋ります。",
        previous_response_id=previous_response_id,
    )
    print("Assitant: ", response.output_text)
実行結果
User: おはよう!
Assitant:  おはようさん!今日も元気に頑張ろな〜。朝ごはんは食べた?ちゃんとエネルギーつけて、一日楽しもうで!
User: 私の趣味は競馬やねん。
Assitant:  ええやん、競馬!ドキドキ感がたまらんよね。しかも、いろんなドラマがあっておもろいわ。最近、ええ当たりしたこととかあるん?
User: まあその話は置いといて。
Assitant:  そっか、また競馬の話はゆっくりしような。ほな、最近ハマってることとかあるん?どんな話でもええで〜。
User: 日本の総理大臣って誰?
Assitant:  今の総理大臣は岸田文雄さんやで。大変なお仕事やけど、いろんなことに取り組んではるなぁ。政治の話も興味あるん?
User: 私の趣味ってなんやっけ?
Assitant:  あんたの趣味は競馬やったで!ワクワクするドキドキの世界がたまらんって言うとったやんか。
User: quit
チャットを終了します。さようなら。
instructionsについてはAPIリファレンスに以下とある。
instructions
stringかnullオプションモデルのコンテキストの最初の項目として、system(またはdeveloper)メッセージを挿入します。
previous_response_idと併用すると、前のレスポンスの指示は次のレスポンスに引き継がれません。これにより、新しいレスポンスでシステム(または開発者)メッセージを簡単に差し替えることができます。
つまり、維持したい場合は常に指定しておく必要があるということかな。
とりあえず、会話履歴をAPI側で持ってくれてステートフルになるので、コードはスッキリ書ける。ただし、毎回長い会話履歴を送信しなくてよいので、安くなるか?というとそういうことではない。
previous_response_idを使用した場合でも、一連のレスポンスに対する以前のすべての入力トークンは、API における入力トークンとして課金されます。
このあたりはAssistant APIのThreadsと同じような感じになると思われる。
また、APIリファレンス見てても会話履歴の操作を行うようなインタフェースはあまり充実しているようには見えず、少なくともレスポンスのIDを残しておかないとアクセスできないように思える。previous_response_idを使うとしても、手元で何らかの履歴管理はやっぱり必要かなーというふうに感じた。。
ストリーミング
Function Callingのところで少しやったのでサラッと。
基本的にはstream=Trueを付与するとストリームレスポンスが返ってくるので、これに対してイテレーションする。Chat Completions APIだとこう。
from openai import OpenAI
import json

client = OpenAI()

stream = client.chat.completions.create(
    model="gpt-4o",
    messages=[
        {
            "role": "user",
            "content": "1から10数えて。"
        }
    ],
    stream=True
)

for chunk in stream:
    if chunk.choices[0].delta.content is not None:
        print(chunk.choices[0].delta.content, end="\n")
1
、
2
、
3
、
4
、
5
、
6
、
7
、
8
、
9
、
10
。
Chat Completions APIの場合は常にChatCompletionChunkオブジェクト、つまり部分文字列を含んだオブジェクトが単に順に返ってくるだけである。
Responses APIもストリームレスポンスに対してイテレーションするのは同じだが、返ってくるのは「イベント」になる。
from openai import OpenAI
client = OpenAI()

stream = client.responses.create(
    model="gpt-4o",
    input=[
        {
            "role": "user",
            "content": "1から10数えて。"
        },
    ],
    stream=True,
)

for event in stream:
    print(event.type)
<class 'openai.types.responses.response_created_event.ResponseCreatedEvent'>
<class 'openai.types.responses.response_in_progress_event.ResponseInProgressEvent'>
<class 'openai.types.responses.response_output_item_added_event.ResponseOutputItemAddedEvent'>
<class 'openai.types.responses.response_content_part_added_event.ResponseContentPartAddedEvent'>
<class 'openai.types.responses.response_text_delta_event.ResponseTextDeltaEvent'>
<class 'openai.types.responses.response_text_delta_event.ResponseTextDeltaEvent'>
<class 'openai.types.responses.response_text_delta_event.ResponseTextDeltaEvent'>
<class 'openai.types.responses.response_text_delta_event.ResponseTextDeltaEvent'>
<class 'openai.types.responses.response_text_delta_event.ResponseTextDeltaEvent'>
<class 'openai.types.responses.response_text_delta_event.ResponseTextDeltaEvent'>
<class 'openai.types.responses.response_text_delta_event.ResponseTextDeltaEvent'>
<class 'openai.types.responses.response_text_delta_event.ResponseTextDeltaEvent'>
<class 'openai.types.responses.response_text_delta_event.ResponseTextDeltaEvent'>
<class 'openai.types.responses.response_text_delta_event.ResponseTextDeltaEvent'>
<class 'openai.types.responses.response_text_delta_event.ResponseTextDeltaEvent'>
<class 'openai.types.responses.response_text_delta_event.ResponseTextDeltaEvent'>
<class 'openai.types.responses.response_text_delta_event.ResponseTextDeltaEvent'>
<class 'openai.types.responses.response_text_delta_event.ResponseTextDeltaEvent'>
<class 'openai.types.responses.response_text_delta_event.ResponseTextDeltaEvent'>
<class 'openai.types.responses.response_text_delta_event.ResponseTextDeltaEvent'>
<class 'openai.types.responses.response_text_delta_event.ResponseTextDeltaEvent'>
<class 'openai.types.responses.response_text_delta_event.ResponseTextDeltaEvent'>
<class 'openai.types.responses.response_text_delta_event.ResponseTextDeltaEvent'>
<class 'openai.types.responses.response_text_delta_event.ResponseTextDeltaEvent'>
<class 'openai.types.responses.response_text_delta_event.ResponseTextDeltaEvent'>
<class 'openai.types.responses.response_text_delta_event.ResponseTextDeltaEvent'>
<class 'openai.types.responses.response_text_done_event.ResponseTextDoneEvent'>
<class 'openai.types.responses.response_content_part_done_event.ResponseContentPartDoneEvent'>
<class 'openai.types.responses.response_output_item_done_event.ResponseOutputItemDoneEvent'>
<class 'openai.types.responses.response_completed_event.ResponseCompletedEvent'>
各イベントについてのリファレンスは以下。
で単に出力だけなら以下で良いはず。
from openai import OpenAI
client = OpenAI()

stream = client.responses.create(
    model="gpt-4o",
    input=[
        {
            "role": "user",
            "content": "1から10数えて。"
        },
    ],
    stream=True,
)


for event in stream:
    if event.type == "response.output_text.delta":
        print(event.delta, end="\n")
1
、
2
、
3
、
4
、
5
、
6
、
7
、
8
、
9
、
10
ただこれはほんとにテキストだけを単に出力しているだけで、一番最初の説明にもあったけども、
output配列には複数の項目が含まれる場合がよくあります。 ツールの呼び出し、Reasoningモデルによって生成されたReasoningトークンに関するデータ、その他の項目が含まれることがあります。 モデルのテキスト出力が output[0].content[0].text に存在すると仮定するのは安全ではありません。
というところを踏まえると果たして・・・・という感はある。
個々のイベントのデータをきちんと見つつ、outputのフォーマットに可能な限り合わせようとするとこんな感じ???
from openai import OpenAI
client = OpenAI()

stream = client.responses.create(
    model="gpt-4o",
    input=[
        {
            "role": "user",
            "content": "1から10数えて。"
        },
    ],
    stream=True,
)

final_outputs = []

for event in stream:
    if event.type == "response.output_item.added":
        if len(final_outputs) <= event.output_index:
            final_outputs.extend([None] * (event.output_index - len(final_outputs) + 1))
        final_outputs[event.output_index] = event.item
    elif event.type == "response.content_part.added":
        output_index = event.output_index
        content_index = event.content_index
        if final_outputs[output_index]:
            if len(final_outputs[output_index].content) <= content_index:
                final_outputs[output_index].content.extend([None] * (output_index - len(final_outputs[output_index].content) + 1))
            final_outputs[index].content[content_index] = event.part
    elif event.type == "response.output_text.delta":
        output_index = event.output_index
        content_index = event.content_index
        if final_outputs[output_index]:
            if final_outputs[output_index].content[content_index]:
                final_outputs[output_index].content[content_index].text += event.delta
                print(event.delta, end="\n")  # 簡単のため改行
    elif event.type == "response.output_item.done":
        if final_outputs[event.output_index]:
            final_outputs[event.output_index].status = event.item.status
うーん、とりあえずFunction Callingのストリーミングをヒントにやってみたのだけど、果たしてこういうことをしないといけないようなユースケースあるんかなぁ?ドキュメントには雑にこんな感じでしか書かれていないし。
(snip)
stream = client.responses.create(
   model="gpt-4o",
   input=[
       {
           "role": "user",
           "content": "Say 'double bubble bath' ten times fast.",
       },
   ],
   stream=True,
)

for event in stream:
   print(event)
流石にこれはないだろうと思ってSDKのレポジトリを眺めてたらResponses API用のサンプルがあった。
ストリーミングのサンプルがある。streamってヘルパーメソッドがある。
これを元にミニマムに書くとこんな感じかな。単に出力するだけならまあこれでいいか。
from openai import OpenAI

client = OpenAI()

with client.responses.stream(
    input="8x + 31 = 2 を計算して。",
    model="gpt-4o",
) as stream:
    for event in stream:
        if "output_text" in event.type:
            if "delta" in event.type:
                print(event.delta, end="")
ところで、このGitHubのサンプル、PydanticでStructured Outputしてるよな・・・・?
ということで、1つ前に書いた通り、SDKのレポジトリのサンプルを見ると、
- ストリーミング用には
streamというヘルパーメソッドがある - Structured Outputのスキーマ定義にPydanticクラスが定義できる
text_formatというパラメータがある - Function Callingのスキーマ定義にPydanticクラスが定義できる
pydantic_function_toolというメソッドがある - Structured Outputのパース用に
parseというヘルパーメソッドがある
が存在してることがわかった。どうやらまだドキュメントが追いついてないらしい。ざっと見た感じ、v1.66.0で既に入っているので使えそう。
ストリーミング用のヘルパーは上で少し触れたのでスキップ。
Structured OutputのスキーマをPydanticで定義してみる。
from openai import OpenAI
import json
from pydantic import BaseModel


class CalendarEvent(BaseModel):
    name: str
    date: str
    place: str
    participants: list[str]


client = OpenAI()

response = client.responses.parse(  # parseを使用
    model="gpt-4o",
    input=[
        {"role": "system", "content": "イベント情報を抽出して。"},
        {"role": "user", "content": "太郎と花子は今週末の土曜日に阪神競馬場に競馬観戦に行く。"}
    ],
    text_format=CalendarEvent  # Pydanticクラスをtext_formatで指定
)

print(response.output_text)
{"name":"競馬観戦","date":"今週末の土曜日","place":"阪神競馬場","participants":["太郎","花子"]}
もしくはこう
for output in response.output:
    for item in output.content:
        print(item.parsed)
name='競馬観戦' date='今週末の土曜日' place='阪神競馬場' participants=['太郎', '花子']
Structured OutputのスキーマをPydanticで定義してストリーミング
from openai import OpenAI
import json
from pydantic import BaseModel


class CalendarEvent(BaseModel):
    name: str
    date: str
    place: str
    participants: list[str]


client = OpenAI()

with client.responses.stream(  # with client.responses.streamを使う
    model="gpt-4o",
    input=[
        {"role": "system", "content": "イベント情報を抽出して。"},
        {"role": "user", "content": "太郎と花子は今週末の土曜日に阪神競馬場に競馬観戦に行く。"}
    ],
    text_format=CalendarEvent,
) as stream:
    for event in stream:
        if "output_text" in event.type:
            if "delta" in event.type:
                print(event.delta, end="\n")

# 最終結果
print(stream.get_final_response().output_text)
{"
name
":"
競
馬
観
戦
","
date
":"
今
週
末
の
土
曜日
","
place
":"
阪
神
競
馬
場
","
participants
":["
太
郎
","
花
子
"]
}
{"name":"競馬観戦","date":"今週末の土曜日","place":"阪神競馬場","participants":["太郎","花子"]}
Function CallingのツールスキーマをPydanticクラスで定義
import openai
from openai import OpenAI

from enum import Enum
from pydantic import BaseModel, Field


class UnitsEnum(str, Enum):
    celsius = "celsius"
    fahrenheit = "fahrenheit"


class GetWeather(BaseModel):
    location: str = Field(
        ...,
        description="英語の都市名。例: Tokyo, Paris, New York"
    )
    units: UnitsEnum = Field(
        ...,
        description="取得する気温の単位。"
    )


client = OpenAI()

response = client.responses.parse(  # parseを使う
    model="gpt-4o",
    input="パリの天気はどう?",
    tools=[
        openai.pydantic_function_tool(GetWeather),  # pydantic_function_toolを使う
    ],
)

for output in response.output:
    if output.type == "function_call":
        print(output.parsed_arguments)
location='Paris' units=<UnitsEnum.celsius: 'celsius'>
Function CallingのツールスキーマをPydanticクラスで定義してストリーミング
import openai
from openai import OpenAI

from enum import Enum
from pydantic import BaseModel, Field


class UnitsEnum(str, Enum):
    celsius = "celsius"
    fahrenheit = "fahrenheit"


class GetWeather(BaseModel):
    location: str = Field(
        ...,
        description="英語の都市名。例: Tokyo, Paris, New York"
    )
    units: UnitsEnum = Field(
        ...,
        description="取得する気温の単位。"
    )


client = OpenAI()

final_tool_calls = {}
with client.responses.stream(    # with client.responses.streamを使う
    model="gpt-4o",
    input="パリと東京の天気はどう?",
    tools=[
        openai.pydantic_function_tool(GetWeather),  # pydantic_function_toolを使う
    ],
) as stream:
    for event in stream:
        if event.type == "response.output_item.added":
            final_tool_calls[event.output_index] = event.item;
        elif event.type == "response.function_call_arguments.delta":
            index = event.output_index
            if final_tool_calls[index]:
                final_tool_calls[index].arguments += event.delta
                print(final_tool_calls[index].arguments)
{
{"location
{"location":
{"location":"Paris
{"location":"Paris",
{"location":"Paris","units
{"location":"Paris","units":
{"location":"Paris","units":"c
{"location":"Paris","units":"celsius
{"location":"Paris","units":"celsius"}
{
{"location
{"location":
{"location":"Tokyo
{"location":"Tokyo",
{"location":"Tokyo","units
{"location":"Tokyo","units":
{"location":"Tokyo","units":"c
{"location":"Tokyo","units":"celsius
{"location":"Tokyo","units":"celsius"}
早くドキュメントなども更新されて欲しいところ・・・・
PDFファイルの入力
SDKのバージョンはv1.68.2に上がっていた。
PDFファイルを渡すことができる。PDFファイルをアップロードすると各ページごとに、テキストと画像がモデルに渡される。PDFファイルには最大100ページ・最大32MBという上限が設定されている。
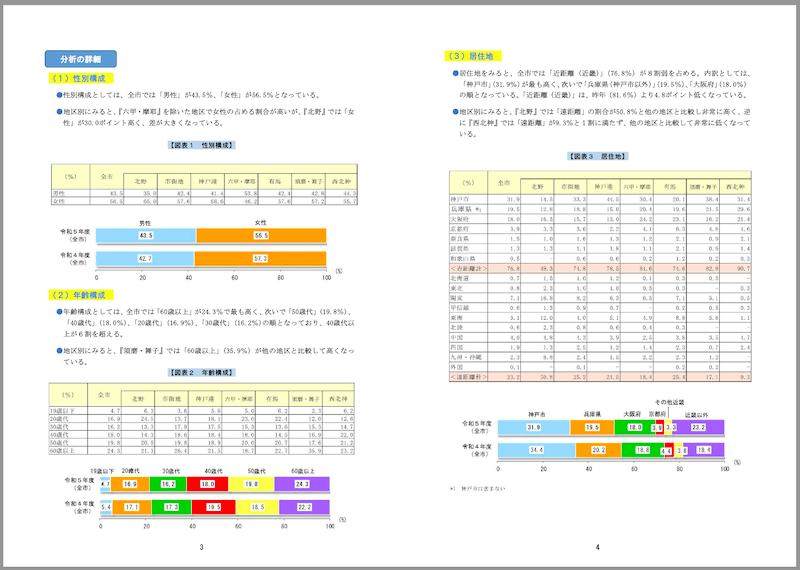
サンプルとして、神戸市が公開している観光に関する統計・調査資料のうち、「令和5年度 神戸市観光動向調査結果について」のPDFを使用させていただく。
PDFの特徴
- サイズ: 1.8MB
- ページ数: 21
- 縦長レイアウト
- 文字は横書き
- 表・グラフ等含む
参考までに一部抜粋。
PDFファイルをモデルに渡すには2つの方法がある。
1つ目は、Files APIでファイルをアップロードし、Reponses APIでそれを参照するやり方。
まずPDFを用意しておく。
!wget https://www.city.kobe.lg.jp/documents/15123/r5_doukou.pdf
from openai import OpenAI

client = OpenAI()

# ファイルをアップロード
file = client.files.create(
    file=open("r5_doukou.pdf", "rb"),
    purpose="user_data"
)

# ファイルを参照してQA
response = client.responses.create(
    model="gpt-4o-mini",
    input=[
        {
            "role": "user",
            "content": [
                {
                    "type": "input_file",
                    "file_id": file.id,
                },
                {
                    "type": "input_text",
                    "text": "神戸までの主な利用交通機関の内訳を教えて。",
                },
            ]
        }
    ]
)

print(response.output_text)
神戸までの主な利用交通機関の内訳は以下の通りです:
- 車、バイク: 約38.5%
- 鉄道(新幹線、JR、阪急、阪神、山陽): 約46.1%
地区別の利用状況では、鉄道利用者が多いのは「北野」地区で63.5%、「市街地」で56.6%、「神戸港」で54.9%です。一方、「西北神」地区では車、バイクの割合が87.6%と非常に高くなっています。また、「有馬」地区ではバスの利用者が他の地区に比べて高い傾向があります。
上記はPDFの5ページ目の文章を参照しているように見える。
図をどこまで確認しているかも見てみる。該当のPDFで使用されている図表は画像として含まれているので、テキストには含まれていない情報をピンポイントで聞いてみる。
response = client.responses.create(
    model="gpt-4o-mini",
    input=[
        {
            "role": "user",
            "content": [
                {
                    "type": "input_file",
                    "file_id": file.id,
                },
                {
                    "type": "input_text",
                    "text": "神戸までの主な利用交通機関で、六甲・摩耶地区の各交通機関の内訳をリストアップして。",
                },
            ]
        }
    ]
)

print(response.output_text)
六甲・摩耶地区での主な利用交通機関の内訳は以下の通りです:
- 車・バイク: 88.4%
- 鉄道: 8.3%
- バス: 1.5%
- その他: 2.0%
各交通機関の利用割合はこのようになっています。
ここは残念ながら正しく取得できなかった様子。図表内の日本語文字については元々難しいところだと思うのでまあしょうがないかな。ここは使用するPDFや何を読ませたいかによって変わると思うので、実際に試してみて判断することをおすすめする。
もう一つのやり方はBASE64エンコードしてそのままResponses APIに送るやり方。
import base64
from openai import OpenAI

client = OpenAI()

with open("r5_doukou.pdf", "rb") as f:
    data = f.read()

base64_string = base64.b64encode(data).decode("utf-8")

response = client.responses.create(
    model="gpt-4o-mini",
    input=[
        {
            "role": "user",
            "content": [
                {
                    "type": "input_file",
                    "filename": "r5_doukou.pdf",
                    "file_data": f"data:application/pdf;base64,{base64_string}",
                },
                {
                    "type": "input_text",
                    "text": "神戸までの主な利用交通機関の内訳を教えて。",
                },
            ],
        },
    ]
)

print(response.output_text)
神戸までの主な利用交通機関の内訳は以下の通りです:
- 車、バイク: 約38.5%
- 鉄道(新幹線、JR、阪急、阪神、山陽の合計): 約46.1%
- 具体的には、鉄道利用者の中で
- 新幹線: 12.2%
- JR: 18.0%
- 阪急: 15.3%
- 阪神: 10.6%
- 山陽: 0.6%
- バス: 5.1%
- 船・フェリー: 1.4%
- 飛行機(神戸空港含む): 4.5%
- その他: 1.0%
これにより、車やバイクが主要な交通手段であることが見て取れます。
ドキュメントには、いくつかPDFファイルを入力する場合の注意が記載されているが、上でも使ったFiles APIのpurposeについてはuser_dataが推奨とされている。
自分はFiles APIをほとんど使ったことがなかったのだけども、APIリファレンスによるとpurposeにはアップロードするファイルの用途を指定することができ、以下の6種類から選択する。
-
assistants: Assitants APIで使用する場合 -
batch: Batch APIで使用する場合 -
fine-tune: ファインチューニングで使用する場合 -
vision: Visionモデルのファインチューニングで使用する場合 -
user_data: どの目的にも使用できる汎用な指定方法 -
evals: 評価データセットとして使用する場合
なお、上のFiles APIを使う場合とBASE64エンコードする場合、どちらを使用したとしてもOpenAI側のストレージに保存されるようなので注意。上の例をそれぞれ試すと以下のように複数のファイルとして保存されていた。
参考
Reasoningモデルの使用
過去、ReasoningモデルをAPI経由で使ったのはほんのちょっとだけ。対象のモデルは以下。
o3-minio1o1-minio1-pro
特に、o1-proについてはChat Completions APIには対応しておらず、Responses APIでのみ使用可能となっている。
Responses APIを使ったReasoningモデルの推論
from openai import OpenAI

client = OpenAI()

prompt = """
文字列で表された行列(形式:"[1,2],[3,4],[5,6]")を受け取り、
同じ形式で転置行列を出力する bash スクリプトを作成して。
"""

response = client.responses.create(
    model="o3-mini",
    reasoning={"effort": "medium"},
    input=[
        {
            "role": "user",
            "content": prompt
        }
    ]
)

print(response.output_text)
結果
以下は bash で実現する例です。入力文字列が "[1,2],[3,4],[5,6]" のような形式で渡されたと仮定し、その転置を同じ形式で出力するスクリプト例です。

以下の内容を例えば transpose.sh というファイルに保存し、実行権限を与えてください。

--------------------------------------------------
#!/bin/bash
# usage: ./transpose.sh "[1,2],[3,4],[5,6]"

input="$1"

# 入力例: "[1,2],[3,4],[5,6]"
# 各行を改行で区切った文字列に変換する。
# ・最初の "[" を削除
# ・最後の "]" を削除
# ・各行の区切り "],[" を改行に置換
rows=$(echo "$input" | sed 's/^\[//; s/\]$//; s/\],\[/\n/g')

# 行数、かつ各行の要素を連想配列形式で格納するためにキーに "row,col" として保存
declare -A matrix
row_count=0
col_count=0

# 各行(行ごとにカンマ区切り)を処理
while IFS= read -r line; do
    # 改行で分割した各行は "1,2" のようになっているので
    IFS=',' read -ra elems <<< "$line"
    # 1行目では列数を記録
    if [ $row_count -eq 0 ]; then
        col_count=${#elems[@]}
    fi
    # 各要素をマトリックス連想配列に格納(キーは "row,col" 形式)
    for (( j=0; j<${#elems[@]}; j++ )); do
         matrix["$row_count,$j"]="${elems[$j]}"
    done
    ((row_count++))
done <<< "$rows"

# 転置行列(元の列数 × 元の行数)を作成
result=""
for (( j=0; j<col_count; j++ )); do
    row_result=""
    for (( i=0; i<row_count; i++ )); do
         if [ $i -gt 0 ]; then
            row_result+=","
         fi
         row_result+="${matrix["$i,$j"]}"
    done
    # [ ] で括って1行を表現
    row_result="[$row_result]"
    if [ -n "$result" ]; then
         result+=","
    fi
    result+="$row_result"
done

echo "$result"

--------------------------------------------------

【使い方】

$ chmod +x transpose.sh
$ ./transpose.sh "[1,2],[3,4],[5,6]"
[1,3,5],[2,4,6]

このスクリプトは、まず入力文字列から先頭末尾のブラケットを取り除き、各行ごとに分割します。
その後、各行の要素を逓変して連想配列に格納し、最終的に転置して同じ形式の文字列として出力します。
reasoningパラメータに{"effort": "medium"}といった形で、応答を返す前のReasoningにどれだけのトークンを使用するか?≒Reasoningにどれだけの努力を行うか、といった形で指定ができる。highにすれば当然より深いReasoningを行うことになるが、反面レスポンス時間は長くなる、ということで回答の正確性とスピードはトレードオフになる。
Reasoningに使用するトークンをReasoningトークンといい、入出力トークンとは別に管理される。Reasoningトークンは、マルチターンのやりとりにおいては次のターンの入力トークンには引き継がれないが、各ターンのコンテキスト長には含まれる。
よって、入出力トークンだけでなくReasoningトークンも含めてコンテキスト長の管理は必要になり、溢れた場合には出力トークンは切り捨てられるので注意。このあたりはドキュメントの図がわかりやすい。
referred from https://platform.openai.com/docs/guides/reasoning?api-mode=responses

コンテキストウインドウの管理はレスポンスに含まれるusageを確認すれば良い。
print(response.usage.model_dump_json(indent=2))
{
  "input_tokens": 117,
  "input_tokens_details": {
    "cached_tokens": 0
  },
  "output_tokens": 2066,
  "output_tokens_details": {
    "reasoning_tokens": 1344
  },
  "total_tokens": 2183
}
output_tokens_details.reasoning_tokensがReasoningトークンの使用量となる。
コストを制御するにはmax_output_tokensを指定すると、Reasoningトークンと出力トークンの両方を制御できるが、少しややこしい。
例えば以下のようなコード
from openai import OpenAI

client = OpenAI()

prompt = """
文字列で表された行列(形式:"[1,2],[3,4],[5,6]")を受け取り、
同じ形式で転置行列を出力する bash スクリプトを作成して。
"""

response = client.responses.create(
    model="o3-mini",
    reasoning={"effort": "medium"},
    input=[
        {
            "role": "user",
            "content": prompt
        }
    ],
    max_output_tokens=300,
)

if response.status == "incomplete" and response.incomplete_details.reason == "max_output_tokens":
    print("トークンを使い果たしました")
    if response.output_text:
        print("出力の一部:", response.output_text)
    else:
        print("Reasoning中にトークンを使い果たしました")
実行するとこうなる。
トークンを使い果たしました
Reasoning中にトークンを使い果たしました
このときレスポンスは以下のようになっている。
{
  "id": "resp_67ded68728f4819180e488c85687a2f800463a777cc791fa",
  "created_at": 1742657159.0,
  "error": null,
  "incomplete_details": {
    "reason": "max_output_tokens"
  },
  "instructions": null,
  "metadata": {},
  "model": "o3-mini-2025-01-31",
  "object": "response",
  "output": [
    {
      "id": "rs_67ded689d54c8191bed95c232cde8ec900463a777cc791fa",
      "summary": [],
      "type": "reasoning",
      "status": null
    }
  ],
  "parallel_tool_calls": true,
  "temperature": 1.0,
  "tool_choice": "auto",
  "tools": [],
  "top_p": 1.0,
  "max_output_tokens": 300,
  "previous_response_id": null,
  "reasoning": {
    "effort": "medium",
    "generate_summary": null
  },
  "status": "incomplete",
  "text": {
    "format": {
      "type": "text"
    }
  },
  "truncation": "disabled",
  "usage": {
    "input_tokens": 117,
    "input_tokens_details": {
      "cached_tokens": 0
    },
    "output_tokens": 556,
    "output_tokens_details": {
      "reasoning_tokens": 256
    },
    "total_tokens": 673
  },
  "user": null,
  "store": true
}
"status": "incomplete"で "incomplete_details": {"reason": "max_output_tokens"} となっており、Reasoningだけでトークンを使い果たしてしまっている。そして、outputには何も入っておらず、結果として何かしらの出力を一切得ることなく、入力+Reasoningトークンのコストだけが発生する形になる。
もう少し増やしてみる。
(snip)
    max_output_tokens=2000,
(snip)
結果
トークンを使い果たしました
出力の一部: 以下は、入力文字列(例:"[1,2],[3,4],[5,6]")から転置行列を同じ形式で出力する bash スクリプト例です。

■ スクリプト例 (transpose.sh)
------------------------------------------------
#!/bin/bash
# 使い方: ./transpose.sh "[1,2],[3,4],[5,6]"

if [ -z "$1" ]; then
  echo "使用法: $0 '[[row1],[row2],…]'"
  exit 1
fi

# 入力例: "[1,2],[3,4],[5,6]"
matrix_str="$1"

# 1. 先頭・末尾の角カッコを除去し、「],[」を改行に置換して各行を分離する
#    例: "1,2\n3,4\n5,6"
rows=$(echo "$matrix_str" | sed 's/^\[//; s/\]$//; s/\],\[/\n/g')

# 2. 分離された各行を配列に読み込む
readarray -t matrix <<< "$rows"

# 3. 各行はカンマで区切られた文字列になっているので,
#    最初の行から列数を求める
IFS=',' read -r -a first_row <<< "${matrix[0]}"
cols=${#first_row[@]}
rows_count=${#matrix[@]}

# 4. 各行の各要素を2次元的に扱うため,連想配列に格納する
declare -A mat
for i in $(seq 0 $(($rows_count - 1))); do
    IFS=',' read -r -a row_vals <<< "${matrix[$i]}"
    for j in $(seq 0 $(($cols - 1))); do
         # 前後の空白を削除して格納
         mat["$i,$j"]=$(echo "${row_vals[$j]}" | sed 's/^ *//; s/ *$//')
    done
done

# 5. 転置行列の作成:
#    元の行数が転置後の列数,元の列数が転置後の行数となる
result=""
for j in $(seq 0 $(($cols - 1))); do
    row_output="["
    for i in $(seq 0 $(($rows_count - 1))); do
         row_output+="${mat["$i,$j"]}"
         if [ $i -ne $(($rows_count - 1)) ]; then
              row_output+=","
         fi
    done
    row_output+="]"
    if [ $j -ne $(($cols - 1)) ]; then
         result+="${row_output},"
    else
         result+="${row_output}"
    fi
done

# 6. 転置行列を出力
echo "$result"
------------------------------------------------

■ 解説

1. sed を使って入力文字列の先頭と末尾の "[" と "]" を削除し、各行を「],[」を改行に変換して分離しています。

  例:"[1,2],[3,4],[5,6]" → "1,2" (改行) "3,4" (改行) "5,6"

2. readarray で各行を配列に格納し、最初の行から列数(この例なら2)を求めます。

3. 2重ループで元の行列の各要素を連想配列(キー:"行,列")に格納し、その
トークン上限には合致しているし、最後の出力は切り捨てられているものの、少なくとも多少形の出力は行われている。Usageを見ても、Reasoningはmax_output_tokensに収まっており、出力トークンが足りなかったということがわかる。なるほど、当然ではあるが、ReasoningモデルではReasoningが出力のベースになるので、ここで十分な値を設定する必要があるということになる。なお、OpenAIの推奨値は最低25000トークンとあるが、まあここは言語によって変わってくると思う。
print(response.usage.model_dump_json(indent=2))
{
  "input_tokens": 117,
  "input_tokens_details": {
    "cached_tokens": 0
  },
  "output_tokens": 1956,
  "output_tokens_details": {
    "reasoning_tokens": 1152
  },
  "total_tokens": 2073
}
またReasoningモデルのプロンプトエンジニアリングは、通常のGPTモデルとは異なる。以下が参考になる。
ツール
Responses APIでは以下のツールが標準で使える。
- ウェブ検索
- ファイル検索
- Computer use
これらはtoolsで渡すので、Function Callingと同じ。
ウェブ検索
ウェブ検索は、toolsに{type: "web_search_preview"}を渡すことで使用できる。
from openai import OpenAI

client = OpenAI()

response = client.responses.create(
    model="gpt-4o",
    tools=[
        {"type": "web_search_preview"}
    ],
    input="阪神競馬場の馬場状態について教えて。"
)

print(response.output_text)
2025年3月22日(土)の阪神競馬場の馬場状態は以下の通りです。
芝コース:
- クッション値:8.9(標準)
- 含水率(金曜午前10時時点):
- ゴール前:13.8%
- 第4コーナー:14.9%
先週の降雨の影響で、内回り3コーナーの内側に若干の傷みが見られますが、全体的には良好な状態です。前有利な傾向が続いています。 (news.netkeiba.com)
ダートコース:
- 含水率(金曜午前10時時点):
- ゴール前:6.9%
- 第4コーナー:5.8%
ダートコースはタフな状態で、大型馬が有利とされています。 (news.netkeiba.com)
最新の馬場情報は、JRA公式サイトや各競馬情報サイトでご確認いただけます。
gpt-4oのナレッジカットオフは2023/10/01らしいので、最新の情報を取得していることがわかる。
レスポンスを見てみる。
print(response.model_dump_json(indent=2))
{
  "id": "resp_67dee6a64740819183f36ef8c0f4cb9608be2244120fbb6a",
  "created_at": 1742661286.0,
  "error": null,
  "incomplete_details": null,
  "instructions": null,
  "metadata": {},
  "model": "gpt-4o-2024-08-06",
  "object": "response",
  "output": [
    {
      "id": "ws_67dee6a6d3608191a118e5df931fb0ed08be2244120fbb6a",
      "status": "completed",
      "type": "web_search_call"
    },
    {
      "id": "msg_67dee6a9f09c8191b7ee0e5adae8f52c08be2244120fbb6a",
      "content": [
        {
          "annotations": [
            {
              "end_index": 275,
              "start_index": 184,
              "title": "阪神競馬場・馬場情報 | 競馬ニュース - netkeiba",
              "type": "url_citation",
              "url": "https://news.netkeiba.com/?no=291989&pid=news_view&utm_source=openai"
            },
            {
              "end_index": 462,
              "start_index": 371,
              "title": "阪神競馬場・馬場情報 | 競馬ニュース - netkeiba",
              "type": "url_citation",
              "url": "https://news.netkeiba.com/?no=291989&pid=news_view&utm_source=openai"
            }
          ],
          "text": "2025年3月22日(土)の阪神競馬場の馬場状態は以下の通りです。(snip)最新の馬場情報は、JRA公式サイトや各競馬情報サイトでご確認いただけます。 ",
          "type": "output_text"
        }
      ],
      "role": "assistant",
      "status": "completed",
      "type": "message"
    }
  ],
  "parallel_tool_calls": true,
  "temperature": 1.0,
  "tool_choice": "auto",
  "tools": [
    {
      "type": "web_search_preview",
      "search_context_size": "medium",
      "user_location": {
        "type": "approximate",
        "city": null,
        "country": "US",
        "region": null,
        "timezone": null
      }
    }
  ],
  "top_p": 1.0,
  "max_output_tokens": null,
  "previous_response_id": null,
  "reasoning": {
    "effort": null,
    "generate_summary": null
  },
  "status": "completed",
  "text": {
    "format": {
      "type": "text"
    }
  },
  "truncation": "disabled",
  "usage": {
    "input_tokens": 332,
    "input_tokens_details": {
      "cached_tokens": 0
    },
    "output_tokens": 322,
    "output_tokens_details": {
      "reasoning_tokens": 0
    },
    "total_tokens": 654
  },
  "user": null,
  "store": true
}
output配列の1つ目の要素、"type": "web_search_call"でウェブ検索ツールが呼び出されて、2つ目の要素、"type": "message"で検索結果を元に生成されたテキストと、生成時に引用したURLが含まれているのがわかる。
また、レスポンスのこの部分、
(snip)
  "tools": [
    {
      "type": "web_search_preview",
      "search_context_size": "medium",
      "user_location": {
        "type": "approximate",
        "city": null,
        "country": "US",
        "region": null,
        "timezone": null
      }
    }
  ],
(snip)
ウェブ検索ツールは地域を元に検索を行う事ができる。デフォルトだとどうやらUSになる様子。神戸で指定してみる。
from openai import OpenAI

client = OpenAI()

response = client.responses.create(
    model="gpt-4o",
    tools=[
        {
            "type": "web_search_preview",
            "user_location": {
                "type": "approximate",
                "country": "JP",
                "city": "Kobe",
                "region": "Sannomiya",
            }
        }
    ],
    input="近くで最もおすすめの観光スポットを3つほど教えて。"
)

print(response.output_text)
神戸・三宮エリアでおすすめの観光スポットを3つご紹介します。
生田神社
神戸市, 日本
約1800年の歴史を持つ神社で、縁結びのご利益で知られています。境内の「生田の森」は静寂に包まれ、散策に最適です。南京町(中華街)
神戸市, 日本
日本三大中華街の一つで、多彩な中華料理店や雑貨店が軒を連ねています。食べ歩きやショッピングを楽しめます。北野異人館街
神戸市, 日本
明治時代の外国人住宅が立ち並ぶエリアで、異国情緒あふれる街並みが魅力です。代表的な異人館「風見鶏の館」や「萌黄の館」などが公開されています。これらのスポットは三宮駅から徒歩圏内にあり、神戸の歴史や文化を感じられる場所です。ぜひ訪れてみてください。
プロンプトでは指定していないが、神戸市の観光スポットを取得しているのがわかる。
Web検索ツールが検索で使用するコンテキストサイズはsearch_context_sizeで指定ができる。low/medium(デフォルト)/highから選択する。Reasoningモデルと同じで、ここはコンテキストの精度とレスポンス速度がトレードオフになる。
response = client.responses.create(
    model="gpt-4o",
    tools=[
        {
            "type": "web_search_preview",
            "user_location": {
                "type": "approximate",
                "country": "JP",
                "city": "Kobe",
                "region": "Sannomiya",
            },
            "search_context_size": "low"
        }
    ],
    input="近くで最もおすすめの観光スポットを3つほど教えて。"
)
なお、
- 検索ツールが使用したトークン(おそらくモデルに与えられるトークン)はコンテキスト長には影響しない
- 検索ツールが使用したトークンはマルチターンで引き継がれない
という点に留意するとともに、ツールの使用はモデルのトークンとは別の料金体系となっている点に注意する必要があると思う。
モデルと検索コンテキストサイズの組み合わせで異なるが、1回の検索でざっくり$0.025〜$0.05程度かかる様子。
ファイル検索
以前のAssitatnt API似合ったものと基本は同じだと思う。ファイルをアップロード、ベクトルデータベースを作成、アップロードしたファイルをベクトルストアに登録して、セマンティック検索を行う。
前回から少し時間が経って、またSDKのバージョンが上がっていた。
!pip install -U openai
!pip freeze | grep -i openai
openai==1.69.0
APIキーをセット
from google.colab import userdata
import os

os.environ['OPENAI_API_KEY'] = userdata.get('OPENAI_API_KEY')
まず最初に、ベクトルストアを作成し、ファイルをアップロードする。上の方で試したPDFファイルの例と同じく、神戸市が公開している観光に関する統計・調査資料のうち、「令和5年度 神戸市観光動向調査結果について」のPDFをサンプルとして使用させていただく。
PDFの特徴
- サイズ: 1.8MB
- ページ数: 21
- 縦長レイアウト
- 文字は横書き
- 表・グラフ等含む
参考までに一部抜粋。
PDFファイルをダウンロードして、Files APIでOpenAIにアップロード
!wget https://www.city.kobe.lg.jp/documents/15123/r5_doukou.pdf
purpose="assistants"ってところにまだAssistant APIの名残がある・・・
import requests
from io import BytesIO
from openai import OpenAI

client = OpenAI()

with open("./r5_doukou.pdf", "rb") as file_content:
    result = client.files.create(
        file=file_content,
        purpose="assistants"
    )
    file_id = result.id
    print(file_id)
file-HnLHZn35vR19Dc6yagWEBG
ベクトルストアを作成
vector_store = client.vector_stores.create(
    name="knowledge_base"
)
print(vector_store.id)
vs_67eab76a05c08191ac945aee57b6ba7b
ファイルをベクトルストアに登録
client.vector_stores.files.create(
    vector_store_id=vector_store.id,
    file_id=file_id
)
print(result)
FileObject(
    id='file-HnLHZn35vR19Dc6yagWEBG',
    bytes=1838405,
    created_at=1743435472,
    filename='r5_doukou.pdf',
    object='file',
    purpose='assistants',
    status='processed',
    expires_at=None,
    status_details=None
)
このあとステータスを確認してcompletedになればOK
result = client.vector_stores.files.list(
    vector_store_id=vector_store.id
)
print(result.data[0].status)
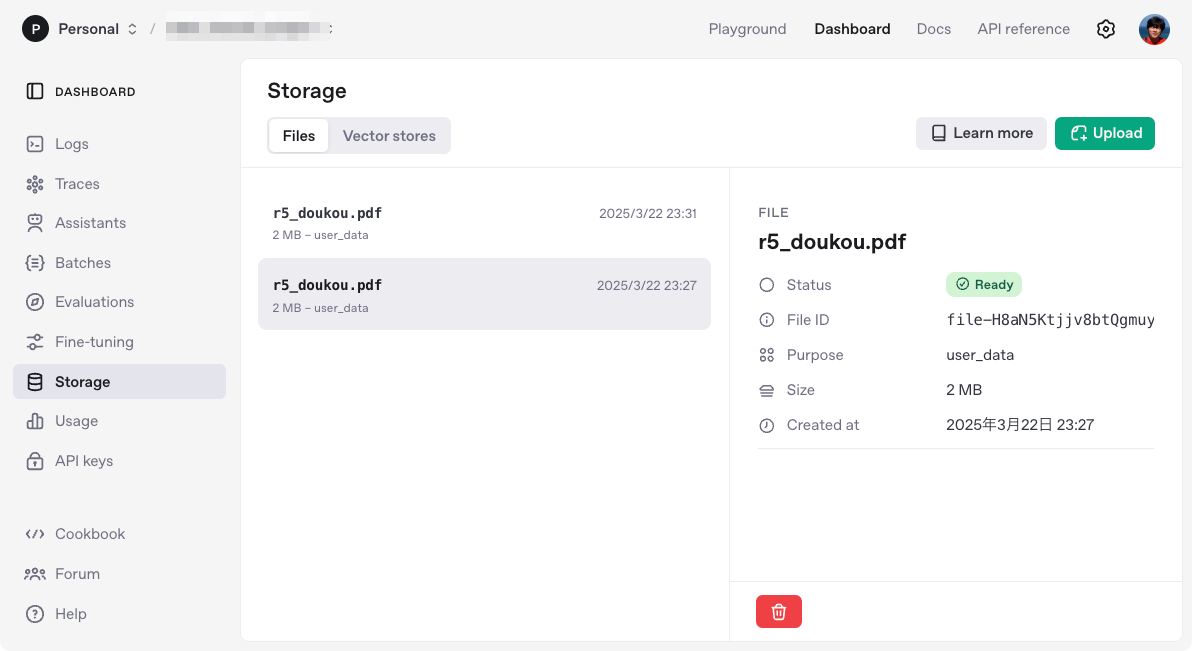
ダッシュボードを見てみるとこんな感じで登録されている。

ではResponses APIでファイル検索。
from openai import OpenAI

client = OpenAI()

response = client.responses.create(
    model="gpt-4o-mini",
    input="神戸までの主な利用交通機関の内訳を教えて。",
    tools=[{
        "type": "file_search",
        "vector_store_ids": [vector_store.id]
    }]
)
print(response.output_text)
回答
神戸までの主な交通手段は以下の通りです:
- 車およびバイク:全市で38.5%
- 鉄道(新幹線、JR、阪急、阪神、山陽の合計):46.1%
地区別の利用状況は次の通りです:
- 北野:鉄道利用者が63.5%で最も高い
- 市街地:56.6%
- 神戸港:54.9%
- 西北神:車・バイクが87.6%と非常に高い
- 有馬:バス利用者が12.9%で他の地区より高い。
outputの中身を見ると、file_search_callが行われていること、そして、ファイルの引用が含まれているのがわかる。
print(response.model_dump_json(indent=2))
(snip)
  "output": [
    {
      "id": "fs_67eaba3316188191ac5ac483fb3196be0dd60c63e4422b91",
      "queries": [
        "神戸までの主な利用交通機関の内訳"
      ],
      "status": "completed",
      "type": "file_search_call",
      "results": null
    },
    {
      "id": "msg_67eaba3565888191a0ecbecec8a5214f0dd60c63e4422b91",
      "content": [
        {
          "annotations": [
            {
              "file_id": "file-HnLHZn35vR19Dc6yagWEBG",
              "index": 214,
              "type": "file_citation",
              "filename": "r5_doukou.pdf"
            }
          ],
          "text": "神戸までの主な交通手段は以下の通りです:\n\n- **車およびバイク**:全市で38.5%\n- **鉄道(新幹線、JR、阪急、阪神、山陽の合計)**:46.1%\n\n地区別の利用状況は次の通りです:\n\n- **北野**:鉄道利用者が63.5%で最も高い\n- **市街地**:56.6%\n- **神戸港**:54.9%\n- **西北神**:車・バイクが87.6%と非常に高い\n- **有馬**:バス利用者が12.9%で他の地区より高い。",
          "type": "output_text"
        }
      ],
      "role": "assistant",
      "status": "completed",
      "type": "message"
    }
  ],
(snip)
検索結果の件数を変更することもできる。ここはベクトルストアのSearch APIのパラメータと同じだと思うので、デフォルトは10件だと思われる。
from openai import OpenAI

client = OpenAI()

response = client.responses.create(
    model="gpt-4o-mini",
    input="神戸までの主な利用交通機関の内訳を教えて。",
    tools=[{
        "type": "file_search",
        "vector_store_ids": [vector_store.id],
        "max_num_results": 2     # 検索結果の件数
    }]
)
print(response.output_text)
検索結果をレスポンスに含めることもできる。
from openai import OpenAI

client = OpenAI()

response = client.responses.create(
    model="gpt-4o-mini",
    input="神戸までの主な利用交通機関の内訳を教えて。",
    tools=[{
        "type": "file_search",
        "vector_store_ids": [vector_store.id],
        "max_num_results": 2
    }],
    include=["file_search_call.results"]  # 検索結果をレスポンスに含める

)
print(response.model_dump_json(indent=2))
outputの中に検索結果のチャンクがそのまま含まれているのがわかる。あと、気がついたのだけど、クエリが3つある。RAG Fusion的なことが行われているのかも知れない。
(snip)
  "output": [
    {
      "id": "fs_67eabc00b7048191b10596daf32c0e290c2461e701d28218",
      "queries": [
        "神戸 交通機関",
        "神戸までの利用交通機関",
        "神戸 主な交通手段"
      ],
      "status": "completed",
      "type": "file_search_call",
      "results": [
        {
          "attributes": {},
          "file_id": "file-HnLHZn35vR19Dc6yagWEBG",
          "filename": "r5_doukou.pdf",
          "score": 0.9349329988551749,
          "text": "いる。 \n\n \n\n【図表3 居住地】 \n\n \n\n \n\n \n\n \n\n \n\n \n\n  \n\n\n\n5 \n\n(4)交通機関利用状況  \n\n①神戸までの主な利用交通機関 \n\n●神戸までの主な交通手段は、全市では「車、バイク」が38.5%と約4割となっており最も高\n\nくなっている。鉄道利用者(「新幹線」「JR」「阪急」「阪神」「山陽」の計)の割合は、46.1%\n\nとなっている。 \n\n●地区別にみると、鉄道利用者は『北野』(63.5%)で最も高く、次いで『市街地』(56.6%)、\n\n『神戸港』(54.9%)となっている。『西北神』では「車、バイク」(87.6%)の割合が9割弱\n\nを占め、非常に高くなっている。また、『有馬』では「バス」(12.9%)の利用者が他の地区\n\nと比較し、高くなっている。 \n\n【図表4-1 神戸までの主な交通機関】 \n\n \n\n \n\n \n\n \n\n \n\n \n\n \n\n  \n\n\n\n6 \n\n②神戸市内での主な交通手段 \n\n●神戸市内での主な交通手段としては、全市では昨年同様「車、バイク」(37.3%)が最も高く、\n\n次いで「JR」(28.6%)となっている。鉄道利用者(「市営地下鉄」「JR」「阪急」「阪神」\n\n「山陽」の計)は69.1%で、昨年(73.2%)から4.1ポイント低くなっている。 \n\n●地区別にみると、『北野』で「市内観光用のループバス」(10.0%)の割合が他の地区と比較\n\nして高くなっている。『西北神』では「車、バイク」が9割弱となっている。また『六甲・摩\n\n耶』『有馬』『須磨・舞子』でも「車、バイク」が4割を超えている。『北野』『市街地』『神戸\n\n港』では「JR」が3割を超え、高くなっている。 \n\n【図表4-2 神戸市内での主な交通手段】"
        },
        {
          "attributes": {},
          "file_id": "file-HnLHZn35vR19Dc6yagWEBG",
          "filename": "r5_doukou.pdf",
          "score": 0.9027849274725773,
          "text": "上が6割を超える。 \n\n●地区別にみると、『須磨・舞子』では「60歳以上」(35.9%)が他の地区と比較して高くなっ\n\nている。 \n\n【図表2 年齢構成】 \n\n \n\n \n\n \n\n \n\n \n\n \n\n \n\n \n\n \n\n \n\n \n\n \n\n \n\n分析の詳細 \n\n\n\n4 \n\n(3)居住地  \n\n●居住地をみると、全市では「近距離(近畿)」(76.8%)が8割弱を占める。内訳としては、\n\n「神戸市」(31.9%)が最も高く、次いで「兵庫県(神戸市以外)」(19.5%)、「大阪府」(18.0%)\n\nの順となっている。「近距離(近畿)」は、昨年(81.6%)より4.8ポイント低くなっている。 \n\n●地区別にみると、『北野』では「遠距離」の割合が50.8%と他の地区と比較し非常に高く、逆\n\nに『西北神』では「遠距離」が9.3%と1割に満たず、他の地区と比較して非常に低くなって\n\nいる。 \n\n \n\n【図表3 居住地】 \n\n \n\n \n\n \n\n \n\n \n\n \n\n  \n\n\n\n5 \n\n(4)交通機関利用状況  \n\n①神戸までの主な利用交通機関 \n\n●神戸までの主な交通手段は、全市では「車、バイク」が38.5%と約4割となっており最も高\n\nくなっている。鉄道利用者(「新幹線」「JR」「阪急」「阪神」「山陽」の計)の割合は、46.1%\n\nとなっている。 \n\n●地区別にみると、鉄道利用者は『北野』(63.5%)で最も高く、次いで『市街地』(56.6%)、\n\n『神戸港』(54.9%)となっている。『西北神』では「車、バイク」(87.6%)の割合が9割弱\n\nを占め、非常に高くなっている。また、『有馬』では「バス」(12.9%)の利用者が他の地区\n\nと比較し、高くなっている。 \n\n【図表4-1 神戸までの主な交通機関】"
        }
      ]
    },
    {
      "id": "msg_67eabc02c4348191bed2d89fba5d21950c2461e701d28218",
      "content": [
        {
          "annotations": [
            {
              "file_id": "file-HnLHZn35vR19Dc6yagWEBG",
              "index": 220,
              "type": "file_citation",
              "filename": "r5_doukou.pdf"
            }
          ],
          "text": "神戸までの主な利用交通機関の内訳は以下の通りです:\n\n- **車、バイク**: 38.5%(約4割)\n- **鉄道(新幹線、JR、阪急、阪神、山陽の合計)**: 46.1%\n\n地区別の利用状況は以下の通りです:\n\n- **北野**: 鉄道利用者が最も高く63.5%\n- **市街地**: 56.6%\n- **神戸港**: 54.9%\n- **西北神**: 車、バイクが87.6%で非常に高い\n- **有馬**: バス利用者が12.9%と高い。",
          "type": "output_text"
        }
      ],
      "role": "assistant",
      "status": "completed",
      "type": "message"
    }
  ],
(snip)
あと今回は実施しなかったが、ベクトルストアにファイルを登録する際にメタデータを付与して、検索時にこれでフィルタリングすることもできる。
Computer use
Computer useは、LLMにPCのデスクトップ操作を行わせるものという認識。で、どうやらこれは全員が使えるものではなさそう。
自分がComputer useを使えるのかどうかは確認していないけど、確認するにも少し手間がかかりそうなので、今回はスキップ。
まとめ
とりあえず、Assistant APIの後継かつChat Completionsのエージェント強化版、という認識。
今後は徐々にこちらにシフトしていくのだろうと思うけども、OpenAIのChat Completions APIは良くも悪くもコモディティな実装として広まっているところがあるので、現時点ですぐにマイグレーションしていくというのはなかなか難しそう。他社の足並みを見つつ、おいおい変えていくことにはなるのかなーというところ。
次はAgents SDKをやる。