Closed3
AudioSRでオーディオの超解像化を試す
colaboratoryでやる。RAM/VRAM両方そこそこ食うので、T4・ハイメモリで。オーディオファイル次第で更に必要になるので、適宜環境を設定のこと。
サンプルとしてYouTubeにある自分の勉強会動画をwav化したものを使用した。
- 内容は音声インタフェース・会話フローに関する勉強会
- 日本語と英語が混在
- 1時間8分
yt-dlpを使ってYouTube動画から音声ファイルを生成する。
!pip install yt-dlp
!yt-dlp -x --audio-format wav -o sample.wav https://www.youtube.com/watch?v=Yl2kR6zLRY8
オーディオファイルの時間が長かったりサイズが大きかったりすると、AudioSRはCUDA ouf of memoryになる(元のオーディオファイルは790MBでそのままだとVRAMは50GBぐらい必要っぽかった)ので、無音部分をカットして30秒だけ切り出すこととする。この辺のコードはChatGPTに全部書いてもらった。
AudioSRとpydubをインストール
!pip install audiosr==0.0.6 pydub
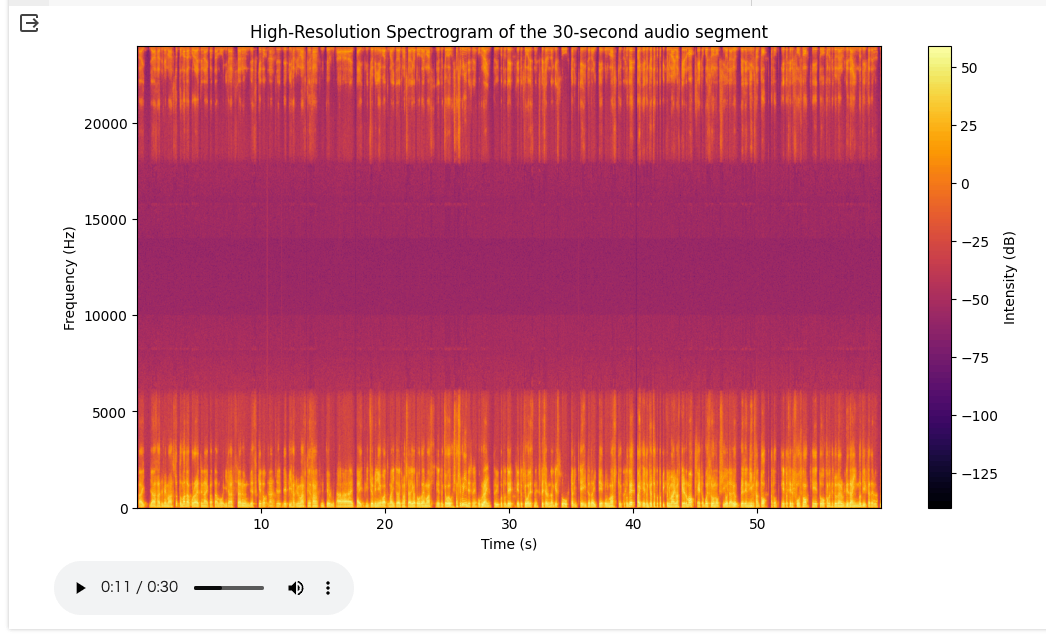
wavファイルから30秒切り出してスペクトログラムとオーディオコントロールを表示
import matplotlib.pyplot as plt
from pydub import AudioSegment
from pydub.silence import split_on_silence
import numpy as np
from IPython.display import Audio

# wavファイルを読み込む
wav_audio = AudioSegment.from_file("sample.wav", format="wav")

# 無音部分を検出し、カットする
chunks = split_on_silence(wav_audio, min_silence_len=500, silence_thresh=-40)
non_silent_audio = sum(chunks)

# 最初の30秒間を切り出す
thirty_seconds = 30 * 1000  # pydubはミリ秒単位を使用する
audio_segment = non_silent_audio[:thirty_seconds]

# 切り出したオーディオセグメントをwavファイルとして保存
output_path = "sample_30secs.wav"
audio_segment.export(output_path, format="wav")

# 高解像度のスペクトログラムをプロットするコード
samples = np.array(audio_segment.get_array_of_samples())
frame_rate = audio_segment.frame_rate

# スペクトログラムの解像度を高くするためのパラメータ
NFFT = 2048  # FFTウィンドウのサイズ
noverlap = 1024  # ウィンドウのオーバーラップ

plt.figure(figsize=(12, 6))
plt.specgram(samples, Fs=frame_rate, NFFT=NFFT, noverlap=noverlap, cmap='inferno')
plt.title('High-Resolution Spectrogram of the 30-second audio segment')
plt.ylabel('Frequency (Hz)')
plt.xlabel('Time (s)')
plt.colorbar(label='Intensity (dB)')
plt.show()

# 再生
Audio(output_path)
AudioSRで超解像化
!audiosr -i sample_30secs.wav
(…).co/roberta-base/resolve/main/vocab.json: 100% 899k/899k [00:00<00:00, 2.36MB/s]
(…).co/roberta-base/resolve/main/merges.txt: 100% 456k/456k [00:00<00:00, 2.40MB/s]
(…)co/roberta-base/resolve/main/config.json: 100% 481/481 [00:00<00:00, 2.58MB/s]
Loading AudioSR: basic
Loading model on cuda:0
basic.pth: 100% 6.18G/6.18G [03:05<00:00, 33.2MB/s]
/usr/local/lib/python3.10/dist-packages/torch/functional.py:504: UserWarning: torch.meshgrid: in an upcoming release, it will be required to pass the indexing argument. (Triggered internally at ../aten/src/ATen/native/TensorShape.cpp:3526.)
  return _VF.meshgrid(tensors, **kwargs)  # type: ignore[attr-defined]
/usr/local/lib/python3.10/dist-packages/torchaudio/transforms/_transforms.py:580: UserWarning: Argument 'onesided' has been deprecated and has no influence on the behavior of this module.
  warnings.warn(
DiffusionWrapper has 258.20 M params.
/usr/local/lib/python3.10/dist-packages/torch/nn/utils/weight_norm.py:30: UserWarning: torch.nn.utils.weight_norm is deprecated in favor of torch.nn.utils.parametrizations.weight_norm.
  warnings.warn("torch.nn.utils.weight_norm is deprecated in favor of torch.nn.utils.parametrizations.weight_norm.")
 Warning: audio is longer than 10.24 seconds, may degrade the model performance. It's recommand to truncate your audio to 5.12 seconds before input to AudioSR to get the best performance.
Running DDIM Sampling with 50 timesteps
DDIM Sampler: 100% 50/50 [00:35<00:00,  1.42it/s]
 Don't forget to try different seeds by setting --seed <int> so that AudioSR can have optimal performance on your hardware.
Save audio to ./output/09_11_2023_12_20_05/sample_30secs_AudioSR_Processed_48K.wav.
ffmpeg version 4.4.2-0ubuntu0.22.04.1 Copyright (c) 2000-2021 the FFmpeg developers
  built with gcc 11 (Ubuntu 11.2.0-19ubuntu1)
  configuration: --prefix=/usr --extra-version=0ubuntu0.22.04.1 --toolchain=hardened --libdir=/usr/lib/x86_64-linux-gnu --incdir=/usr/include/x86_64-linux-gnu --arch=amd64 --enable-gpl --disable-stripping --enable-gnutls --enable-ladspa --enable-libaom --enable-libass --enable-libbluray --enable-libbs2b --enable-libcaca --enable-libcdio --enable-libcodec2 --enable-libdav1d --enable-libflite --enable-libfontconfig --enable-libfreetype --enable-libfribidi --enable-libgme --enable-libgsm --enable-libjack --enable-libmp3lame --enable-libmysofa --enable-libopenjpeg --enable-libopenmpt --enable-libopus --enable-libpulse --enable-librabbitmq --enable-librubberband --enable-libshine --enable-libsnappy --enable-libsoxr --enable-libspeex --enable-libsrt --enable-libssh --enable-libtheora --enable-libtwolame --enable-libvidstab --enable-libvorbis --enable-libvpx --enable-libwebp --enable-libx265 --enable-libxml2 --enable-libxvid --enable-libzimg --enable-libzmq --enable-libzvbi --enable-lv2 --enable-omx --enable-openal --enable-opencl --enable-opengl --enable-sdl2 --enable-pocketsphinx --enable-librsvg --enable-libmfx --enable-libdc1394 --enable-libdrm --enable-libiec61883 --enable-chromaprint --enable-frei0r --enable-libx264 --enable-shared
  libavutil      56. 70.100 / 56. 70.100
  libavcodec     58.134.100 / 58.134.100
  libavformat    58. 76.100 / 58. 76.100
  libavdevice    58. 13.100 / 58. 13.100
  libavfilter     7.110.100 /  7.110.100
  libswscale      5.  9.100 /  5.  9.100
  libswresample   3.  9.100 /  3.  9.100
  libpostproc    55.  9.100 / 55.  9.100
Guessed Channel Layout for Input Stream #0.0 : mono
Input #0, wav, from '/tmp/sample_30secs_AudioSR_Processed_48K.wav':
  Duration: 00:00:30.72, bitrate: 768 kb/s
  Stream #0:0: Audio: pcm_s16le ([1][0][0][0] / 0x0001), 48000 Hz, mono, s16, 768 kb/s
Output #0, wav, to './output/09_11_2023_12_20_05/sample_30secs_AudioSR_Processed_48K.wav':
  Metadata:
    ISFT            : Lavf58.76.100
  Stream #0:0: Audio: pcm_s16le ([1][0][0][0] / 0x0001), 48000 Hz, mono, s16, 768 kb/s
Stream mapping:
  Stream #0:0 -> #0:0 (copy)
Press [q] to stop, [?] for help
size=    2816kB time=00:00:29.99 bitrate= 769.1kbits/s speed=4.04e+03x
video:0kB audio:2816kB subtitle:0kB other streams:0kB global headers:0kB muxing overhead: 0.002705%
デフォルトだとoutput/DD_MM_YYYY_HH_mm_ssディレクトリの下に超解像化されたオーディオファイルが生成される。
!apt-get install tree
!tree output
output
└── 09_11_2023_12_20_05
    └── sample_30secs_AudioSR_Processed_48K.wav

1 directory, 1 file
このファイルを読み込んで、最初と同じようにスペクトログラムとオーディオコントロールを表示
import os
import glob
from IPython.display import Audio

# wavファイルを読み込む
files = glob.glob("./output/*/*.wav")
wav30secs_audio = AudioSegment.from_file(files[0], format="wav")

# ここからは高解像度のスペクトログラムをプロットするコード
samples = np.array(wav30secs_audio.get_array_of_samples())
frame_rate = wav30secs_audio.frame_rate

# スペクトログラムの解像度を高くするためのパラメータ
NFFT = 2048  # FFTウィンドウのサイズ
noverlap = 1024  # ウィンドウのオーバーラップ

plt.figure(figsize=(12, 6))
plt.specgram(samples, Fs=frame_rate, NFFT=NFFT, noverlap=noverlap, cmap='inferno')
plt.title('High-Resolution Spectrogram of the 30-second audio segment')
plt.ylabel('Frequency (Hz)')
plt.xlabel('Time (s)')
plt.colorbar(label='Intensity (dB)')
plt.show()

Audio(files[0])
スペクトログラムをみる限りは変更されているように思える

実際に聞いてみると、大きな変化は自分の耳では感じられないけども、気持ちだけクリアになったかな?というところ。他のオーディオでも試してみたい。
参考
超解像化前
超解像化後
これをやりたかったのはWhisperでSTTする際に認識率が上がらないかなという期待から。そのうち試すつもり。
このスクラップは2023/11/09にクローズされました