TiptapのTable extensionにバブルメニューを足そう
はじめに
TiptapでTable extensionを使うとき、列の追加や削除に使えるウィジェットが欲しくなると思います。
今回は、バブルメニューを使ってそれを実現しようと思います。
実装が主なのでTiptap自体の詳細な仕組みについてはほとんど触れません。
テーブルを用意する
最小構成のテーブルを用意しましょう。今回はReactで実装します。
import "./App.css";
import { EditorContent, useEditor } from "@tiptap/react";
import Table from "@tiptap/extension-table";
import TableRow from "@tiptap/extension-table-row";
import TableHeader from "@tiptap/extension-table-header";
import TableCell from "@tiptap/extension-table-cell";
import Document from "@tiptap/extension-document";
import Text from "@tiptap/extension-text";
import Paragraph from "@tiptap/extension-paragraph";

function App() {
  const editor = useEditor({
    extensions: [
      Document,
      Text,
      Paragraph,
      Table,
      TableRow,
      TableHeader,
      TableCell,
    ],
    content: `
    <caption>list of countries</caption>
    <table>
      <tbody>
        <tr>
          <th>country</th>
          <th colspan="2">good places to visit</th>
        </tr>
        <tr>
          <td>Japan</td>
          <td>houses</td>
          <td>woods</td>
        </tr>
        <tr>
          <td>France</td>
          <td>parks</td>
          <td>towers</td>
        </tr>
      </tbody>
    </table>
  `,
  });
  return (
    <main className="main">
      <EditorContent editor={editor} />
    </main>
  );
}

export default App;

テーブルの初期状態。適宜スタイルをつけています
バブルメニューを追加する
バブルメニューの拡張をインストールし、BubbleMenuコンポーネントを使ってバブルメニューを追加します。
npm install @tiptap/extension-bubble-menu
  return (
    <main className="main">
      <EditorContent editor={editor} />
      {editor && (
        <BubbleMenu editor={editor}>
          <div className="bubble-menu-wrapper">
            <button
              onClick={() => editor.chain().focus().addColumnAfter().run()}
            >
              add column
            </button>
            <button onClick={() => editor.chain().focus().addRowAfter().run()}>
              add row
            </button>
            <button onClick={() => editor.chain().focus().mergeOrSplit().run()}>
              merge or split
            </button>
          </div>
        </BubbleMenu>
      )}
    </main>
  );
テーブルが利用できるコマンドの一覧については、公式ドキュメントを参照してください。ここでは行と列の追加とテーブル結合のみに対応しています。
トリガーを設定する
テーブルの任意の箇所にカーソルが合っていたらバブルメニューが表示されるようにしたいです。
バブルメニューのデフォルトの挙動はテキストが範囲選択されているときに表示される形なので、これを上書きする形になります。
<BubbleMenu
    editor={editor}
    shouldShow={({ editor }) => {
        return (
            editor.isActive("table") ||
            editor.isActive("tableRow") ||
            editor.isActive("tableCell")
        );
    }}
>
shouldShowがバブルメニューの表示を制御するpropsです。
isActiveを利用することで現在のカーソルが特定のノード上にあることを確認しています。これでテーブル上にバブルメニューが表示されるようになりました。

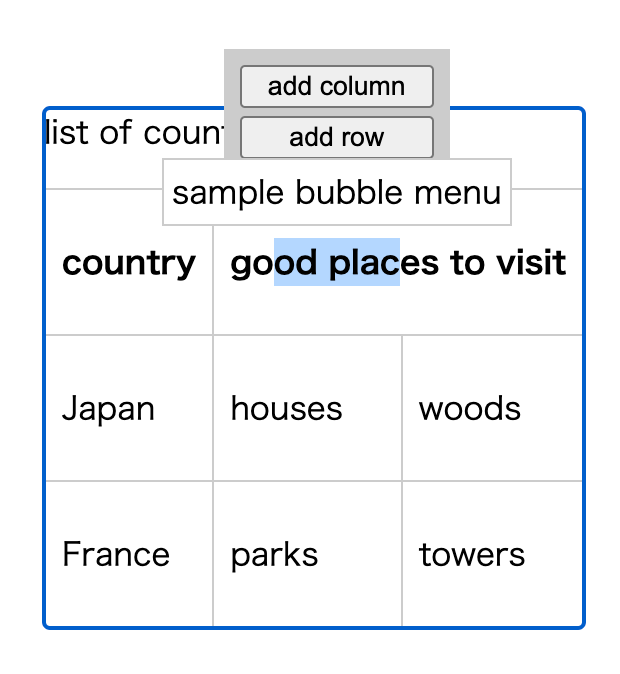
バブルメニュー同士の競合を解消する
範囲を指定して利用する通常のバブルメニューも利用している場合、先ほど追加したものと競合します。これを解消しましょう。

範囲選択すると2つのバブルメニューが重なっている
1. 範囲選択されている場合は表示しない
まず、範囲選択されている場合はテーブルのバブルメニューを表示しないようにしましょう。
<BubbleMenu
  editor={editor}
  shouldShow={({ editor, state }) => {
    return (
      state.selection.empty &&
      editor.isActive("table") ||
      editor.isActive("tableRow") ||
      editor.isActive("tableCell")
    );
  }}
>
state.selectionは現在選択しているコンテンツの情報を返すAPIです。state.selection.emptyがtrueのときにカーソルの選択範囲が存在しない状態になっているため、範囲選択しているときバブルメニューを表示しない挙動が実現できました。
2. セルが範囲選択されているときは表示する
まだ問題があります。テーブルのバブルメニューには複数セルのマージという範囲選択を要求するアクションがあるため、文字列ではなくセルが選択されている場合はこれを表示しなければいけません。
セル間で選択をした場合にTiptapはこれを検知していて、stateにstate.selection.$headCell / state.selection.$anchorCellというプロパティを追加します。
これらが存在する場合は、バブルメニューを表示する形にしましょう。
<BubbleMenu
  editor={editor}
  shouldShow={({ editor, state }) => {
    const isEmptyCursorInTable =
      state.selection.empty &&
      (editor.isActive("table") ||
        editor.isActive("tableRow") ||
        editor.isActive("tableCell"));
    const isCellSelection =
      state.selection.$headCell && state.selection.$anchorCell;
    return isCellSelection || isEmptyCursorInTable;
  }}
>
3. 通常のバブルメニューの制御
最後に、セル間を選択しているときは通常のバブルメニューを表示しないようにします。
<BubbleMenu
  className="sample-bubble-menu"
  editor={editor}
  shouldShow={({ state }) => {
    const isCellSelection =
      state.selection.$headCell && state.selection.$anchorCell;
    return !state.selection.empty && !isCellSelection;
  }}
>
完成
これで完成です。テーブルを操作するためのウィジェットを用意できたので、ここに適宜列の追加や削除などのアクションを追加していく形になります。
コード全体を見る
import "./App.css";
import { BubbleMenu, EditorContent, useEditor } from "@tiptap/react";
import Table from "@tiptap/extension-table";
import TableRow from "@tiptap/extension-table-row";
import TableHeader from "@tiptap/extension-table-header";
import TableCell from "@tiptap/extension-table-cell";
import Document from "@tiptap/extension-document";
import Text from "@tiptap/extension-text";
import Paragraph from "@tiptap/extension-paragraph";

function App() {
  const editor = useEditor({
    extensions: [
      Document,
      Text,
      Paragraph,
      Table,
      TableRow,
      TableHeader,
      TableCell,
    ],
    content: `
    <caption>list of countries</caption>
    <table>
      <tbody>
        <tr>
          <th>country</th>
          <th colspan="2">good places to visit</th>
        </tr>
        <tr>
          <td>Japan</td>
          <td>houses</td>
          <td>woods</td>
        </tr>
        <tr>
          <td>France</td>
          <td>parks</td>
          <td>towers</td>
        </tr>
      </tbody>
    </table>
  `,
  });

  return (
    <main className="main">
      <EditorContent editor={editor} />

      {editor && (
        <BubbleMenu
          editor={editor}
          shouldShow={({ editor, state }) => {
            const isEmptyCursorInTable =
              state.selection.empty &&
              (editor.isActive("table") ||
                editor.isActive("tableRow") ||
                editor.isActive("tableCell"));
            const isCellSelection =
              state.selection.$headCell && state.selection.$anchorCell;
            return isCellSelection || isEmptyCursorInTable;
          }}
        >
          <div className="bubble-menu-wrapper">
            <button
              onClick={() => editor.chain().focus().addColumnAfter().run()}
            >
              add column
            </button>
            <button onClick={() => editor.chain().focus().addRowAfter().run()}>
              add row
            </button>
            <button onClick={() => editor.chain().focus().mergeOrSplit().run()}>
              merge or split
            </button>
          </div>
        </BubbleMenu>
      )}
      {editor && (
        <BubbleMenu
          className="sample-bubble-menu"
          editor={editor}
          shouldShow={({ state }) => {
            const isCellSelection =
              state.selection.$headCell && state.selection.$anchorCell;
            return !state.selection.empty && !isCellSelection;
          }}
        >
          sample bubble menu
        </BubbleMenu>
      )}
    </main>
  );
}

export default App;
おわりに
今回はかなり簡単な例ですが、リッチテキストエディタ系のライブラリはブラックボックス感が強く簡単そうに思えることを実現するだけでもかなりの労力が必要なことが多いです。いい感じのカスタマイズを実現できたらまた記事にまとめようと思います。
ありがとうございました。
使用したコード: https://github.com/koyo221/tiptap-table-bubblemenu-sample


Discussion