WindowsでMCPのQuickStartをやってみた
1. はじめに
MCPの公式サイトには実際にシンプルな構成のMCP天気予報サーバー(National Weather Service API を使用)を構築し、Claude for DesktopからMCP天気予報サーバーを使用するといった流れのQuickStartが記載されています。本稿はMCP QuickStartの内容に補足を加えながら、MCP天気予報サーバーの構築からClaude for Desktopとの接続に至るまでの一連の手順と補足を備忘録として記録したものです。なお使用マシンはWindowsです。
2. MCPとは
MCPとはModel Context Protoclの略で、Claudeを開発しているAnthropic社が提唱した、アプリケーションがLLMにコンテキストを提供する方法を標準化したオープンプロトコルです。
(ピンとこない方は、LLMに外部のツール等を連携するための繋ぎ役、と認識していただければ、、、)
(それでもピンとこない方は、LLMをつよつよにするもの、という認識で今は大丈夫です。)
概念の詳細な解説は公式サイトに載っているのでそちらを確認していただくほうが最善かと思われます。
https://docs.anthropic.com/ja/docs/agents-and-tools/mcp
3. システム要件
- Python 3.10 以降
- Python MCP SDK 1.2.0 以降
4. 環境構築
4.1. uvのインストール
MCP QuickStartでは、パッケージの管理に「uv」を使用しているのでインストールしましょう。
コマンドプロンプトを開いて、以下のコマンドを実行することでインストールが実行されます。
powershell -ExecutionPolicy ByPass -c "irm https://astral.sh/uv/install.ps1 | iex
インストール完了後、以下のコマンドを実行し、「uv」のバージョンが表示されたらOKです。
uv --version
バージョン表示

エラーが起きた場合はターミナルの再起動&PCの再起動を行ってください。
4.2. プロジェクトの作成
以下のコマンドを順番に実行して、プロジェクトの作成を行います。
# Create a new directory for our project
uv init weather
cd weather

# Create virtual environment and activate it
uv venv
.venv\Scripts\activate

# Install dependencies
uv add mcp[cli] httpx

# Create our server file
new-item weather.py
以下、各コマンドの解説です。
解説が不要な方は 5. MCPサーバーの構築 まで飛ばしていただいて構いません。
4.2.1. Create a new directory for our project
# Create a new directory for our project --①
uv init weather
cd weather
uv init weather
uvを使用して、新規のPythonプロジェクトを作成します。このコマンドでは
- 新規にweatherというディレクトリを作成し、
- その中に以下を含む初期プロジェクト構成を作成します。
-
venv/(仮想環境) -
pyproject.toml(依存情報) -
uv.lock(ロックファイル) -
.gitignoreなど
-
cd weather
uv initで作成したディレクトリへ移動します。
4.2.2. Create virtual environment and activate it
# Create virtual environment and activate it
uv venv
.venv\Scripts\activate
uv venv
.venv/ディレクトリ内にPythonの仮想環境一式が格納されます。
(python -m venv .venv のuv版)
.venv\Scripts\activate
仮想環境の有効化を行います。
4.2.3. Install dependencies
# Install dependencies
uv add mcp[cli] httpx
uvでPythonプロジェクトに依存パッケージを追加します。今回はmcpパッケージのcliオプション付き依存をインストールしています。
(挙動はpip installに近いですが、uvを使用した方が高速です。)
4.2.4. Create our server file
# Create our server file
new-item weather.py
new-item weather.py
Powershellのコマンドで weather.py を新規作成しています。
5. MCPサーバーの構築
5.1. パッケージのインポートとインスタンスの設定
weather.pyに以下のコードを追加します。
from typing import Any
import httpx
from mcp.server.fastmcp import FastMCP

# Initialize FastMCP server
mcp = FastMCP("weather")

# Constants
NWS_API_BASE = "https://api.weather.gov"
USER_AGENT = "weather-app/1.0"
以下コードの解説です。
解説が不要な方は 5.2 ヘルパー関数の実装 まで飛ばしていただいて構いません。
from typing import Any
import httpx
from mcp.server.fastmcp import FastMCP
-
httpx: HTTP通信(非同期)ライブラリ APIを叩くのに使用 -
FastMCP: MCPサーバのベース
FastMCPとは?
FastMCPとはFastAPIベースで構築されたMCP対応のAPIサーバーを簡単に立ち上げるためのクラスです。Python関数をデコレーターで登録するだけで、ClaudeやLLMから呼び出せるHTTP APIを構築することができます。ざっくり言うと、Pythonで作成した関数を、LLMが呼び出せるように公開するためのサーバー構築キットといったところです。
# Initialize FastMCP server
mcp = FastMCP("weather")
MCP対応のAPIサーバーの初期化を行います。
ここでは以下の処理が行われます。
-
FastMCPクラスを使用して、新しいMCPサーバーインスタンスを生成します。 -
"weather"はこのサーバーの識別名で、ClaudeなどのLLMインスタンスからアクセスする際に使用されます。 - 以降、この
mcpインスタンスに対して関数を登録することで、LLMから呼び出せるAPIを定義することができます。
# Constants
NWS_API_BASE = "https://api.weather.gov"
USER_AGENT = "weather-app/1.0"
天気情報を取得するために使用する外部API(National Weather Service API)との通信設定としてAPIのURLとUSER_AGENTを定義します。
5.2. ヘルパー関数の実装
National Weather Service APIからのデータを取得し、フォーマットするためのヘルパー関数を実装します。weather.pyに以下のコードを追記してください。
async def make_nws_request(url: str) -> dict[str, Any] | None:
    """Make a request to the NWS API with proper error handling."""
    headers = {
        "User-Agent": USER_AGENT,
        "Accept": "application/geo+json"
    }
    async with httpx.AsyncClient() as client:
        try:
            response = await client.get(url, headers=headers, timeout=30.0)
            response.raise_for_status()
            return response.json()
        except Exception:
            return None

def format_alert(feature: dict) -> str:
    """Format an alert feature into a readable string."""
    props = feature["properties"]
    return f"""
Event: {props.get('event', 'Unknown')}
Area: {props.get('areaDesc', 'Unknown')}
Severity: {props.get('severity', 'Unknown')}
Description: {props.get('description', 'No description available')}
Instructions: {props.get('instruction', 'No specific instructions provided')}
"""
以下コードの解説です。
解説が不要な方は 5.3 ツール実行ハンドラーの実装 まで飛ばしていただいて構いません。
async def make_nws_request(...)
- 引数
urlで指定されたエンドポイントにHTTP GETリクエストを送信します。 -
httpx.AsycClient()を使用して非同期で通信を行います。 - レスポンスが正常であればJSONを返し、失敗した場合はNoneを返します。
def format_alert(...)
- National Weather Service APIのレスポンス(GeoJSON形式)に含まれる1件のアラートを受け取り、その
propertiesを使用して、整形済みの文字列を返します。
National Weather Service APIのレスポンス例
{
  "type": "FeatureCollection",
  "features": [
    {
      "id": "https://api.weather.gov/alerts/abc123",
      "type": "Feature",
      "properties": {
        "id": "abc123",
        "areaDesc": "New York County",
        "event": "Flood Warning",
        "severity": "Moderate",
        "certainty": "Likely",
        "urgency": "Expected",
        "eventStatus": "Actual",
        "headline": "Flood Warning issued for New York County",
        "description": "Heavy rain is expected in the area...",
        "instruction": "Avoid low-lying areas and stay indoors.",
        "sent": "2024-01-01T12:00:00-05:00",
        "effective": "2024-01-01T13:00:00-05:00",
        "expires": "2024-01-01T18:00:00-05:00",
        "ends": "2024-01-01T17:00:00-05:00",
        ...
      },
      "geometry": {
        "type": "Polygon",
        "coordinates": [
          [
            [-74.0059, 40.7128],
            [-74.0060, 40.7138],
            ...
          ]
        ]
      }
    },
    ...
  ],
  "title": "Current Alerts for the United States",
  "updated": "2024-01-01T12:30:00-05:00"
}
5.3. ツール実行ハンドラーの実装
以下のコードをweather.pyに追記します。
@mcp.tool()
async def get_alerts(state: str) -> str:
    """Get weather alerts for a US state.

    Args:
        state: Two-letter US state code (e.g. CA, NY)
    """
    url = f"{NWS_API_BASE}/alerts/active/area/{state}"
    data = await make_nws_request(url)

    if not data or "features" not in data:
        return "Unable to fetch alerts or no alerts found."

    if not data["features"]:
        return "No active alerts for this state."

    alerts = [format_alert(feature) for feature in data["features"]]
    return "\n---\n".join(alerts)

@mcp.tool()
async def get_forecast(latitude: float, longitude: float) -> str:
    """Get weather forecast for a location.

    Args:
        latitude: Latitude of the location
        longitude: Longitude of the location
    """
    # First get the forecast grid endpoint
    points_url = f"{NWS_API_BASE}/points/{latitude},{longitude}"
    points_data = await make_nws_request(points_url)

    if not points_data:
        return "Unable to fetch forecast data for this location."

    # Get the forecast URL from the points response
    forecast_url = points_data["properties"]["forecast"]
    forecast_data = await make_nws_request(forecast_url)

    if not forecast_data:
        return "Unable to fetch detailed forecast."

    # Format the periods into a readable forecast
    periods = forecast_data["properties"]["periods"]
    forecasts = []
    for period in periods[:5]:  # Only show next 5 periods
        forecast = f"""
{period['name']}:
Temperature: {period['temperature']}°{period['temperatureUnit']}
Wind: {period['windSpeed']} {period['windDirection']}
Forecast: {period['detailedForecast']}
"""
        forecasts.append(forecast)

    return "\n---\n".join(forecasts)
2つの関数 get_alerts() get_forecast()はNational Weather Service APIを利用して天気警報と予報を取得するツールで、MCPサーバーに関数として公開されます。これによりClaudeなどのLLMクライアントから呼び出せるAPI関数となります。
get_alerts(state: str) 米国州別の天気予報を取得
- 引数に2文字の州コードを指定
-
https://api.weather.gov/alerts/area/{state}にリクエストし、該当エリアの発令中の天気予報一覧を取得 - 取得した各警報を
format_alert()関数で整形して、LLMに返しやすい形式に変換
get_forecast(latitude: float, longitude: float) 緯度経度から天気予報を取得
1. 指定した緯度経度に対し、NWS API の /points/{lat},{lon} にアクセス。
2.取得したレスポンスから forecast エンドポイントURLを抽出。
3.さらにそこへリクエストし、**今後の天気予報(最大5件)**を取得。
4.\各予報を整形して文字列でまとめ、Claudeなどで見やすい形式に変換。
@mcp.tool()の役割
- MCPサーバーにこの関数を「ツール」として登録
- Claudeなどがツール呼び出し時に
"function": get_alertsのように使えるようになる - 型ヒントとdocstringに基づいて自動的に引数の仕様と説明がLLMに渡される
→ClaudeなどのLLMはこの型ヒントとdocstringの記載を参照して、ツールを使用するか判断する!
5.4. サーバーの実行
以下のコードを追記し、
if __name__ == "__main__":
    # Initialize and run the server
    mcp.run(transport='stdio')
次のコマンドでサーバーを実行します。
uv run weather.py
6. Claude for Desktopでサーバーをテストする
6.1. Claude for Desktopをインストールする
公式サイトよりClaude for Desktopをダウンロードして、インストールする。
6.2. cloud_desktop_config.jsonを編集する
作成したMCPサーバーをClaude for Desktopから呼び出せるように設定ファイルを編集します。
「Cloude for Desktop」を起動→左上のアイコンをクリック→「ファイル」→「設定」→「開発者」→「構成を編集」をクリックするとエクスプローラーが表示されるので「claude_desktop_config.json」を選択します。
※「claude_desktop_cofig.json」が存在しない場合は新規に作成してください。

「claude_desktop_config.json」に以下を追記してください。
{
    "mcpServers": {
        "weather": {
            "command": "C:\\Users\\(your user name)\\.local/bin/uv.exe",
            "args": [
                "--directory",
                "C:\\abusolute\\path\\to\\weather",
                "run",
                "weather.py"
            ]
        }
    }
}
commandにはuv.exeの絶対パス、argsの第二引数にweather.pyの絶対パスをそれぞれ指定してください。
「claude_desktop_config.json」の編集後、claude for Desktopを再起動してください。
6.3. Claude for Desktopのプロンプトの確認
設定が正常に完了すると、プロンプトの下部に「金槌アイコン」が表示されます。

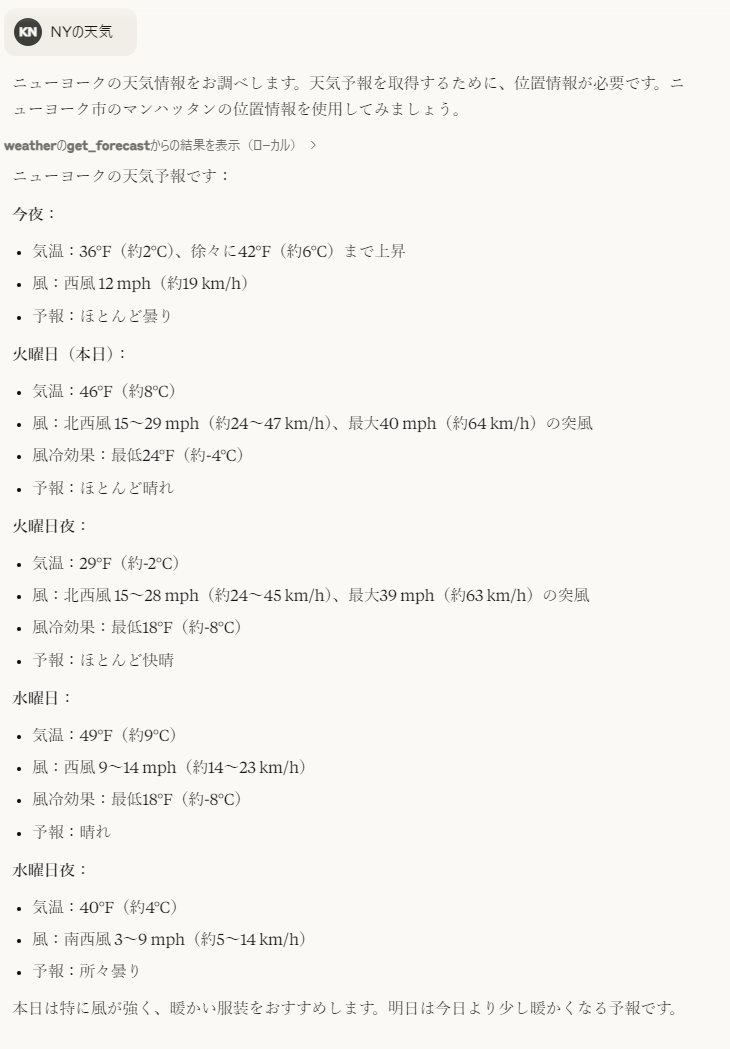
実際に「NYの天気」などをプロンプトに打ち込んで送信してみましょう。
(↓こんな感じでMCPサーバーに実装したツールが使用されているのを確認できます。)
ちなみにツールなしで「NYの天気」とプロンプトに打ち込むとこのような返信が返ってきます。

7. 終わりに
以上で、シンプルなMCPサーバーを実装し、Claude for DesktopからMCPサーバーのツールを使用する一連の流れは終了です。わかりづらい表現も多々あったと思いますが最後まで読んでいただき誠にありがとうございます。誤っている箇所等ありましたらご指摘いただければ幸いです。
Discussion