GitHub Actions で OIDC を使用して AWS 認証を行う
毎回ググってるので備忘録。
Google Cloud はこっち。
概要
GitHub Actions では OpenID Connect (OIDC) がサポートされています。
OIDC を使用することにより長期間有効なアクセスキーなどを用意することなく AWS 認証を行うことができます。
詳細については下記ページをご参照ください。
この記事では GitHub Actions で OIDC を使用して AWS 認証を行うまでの手順をまとめます。
リポジトリ
この記事内で使用しているサンプルコードは下記リポジトリで管理しています。
手順
1. ID プロバイダを作成する
まず OIDC に使用する ID プロバイダを AWS で作成します。
Terraform で作成する場合のサンプルコード
data "http" "github_actions_openid_configuration" {
  url = "https://token.actions.githubusercontent.com/.well-known/openid-configuration"
}

data "tls_certificate" "github_actions" {
  url = jsondecode(data.http.github_actions_openid_configuration.response_body).jwks_uri
}

resource "aws_iam_openid_connect_provider" "github_actions" {
  url             = "https://token.actions.githubusercontent.com"
  client_id_list  = ["sts.amazonaws.com"]
  thumbprint_list = data.tls_certificate.github_actions.certificates[*].sha1_fingerprint
}
IAM コンソールから ID プロバイダ → プロバイダを追加 の順にクリックします。

各項目を次のように入力します。
| 項目 | 値 |
|---|---|
プロバイダのタイプ |
OpenID Connect |
プロバイダの URL |
https://token.actions.githubusercontent.com( 入力後、 サムプリントを取得 をクリックします。 ) |
対象者 |
sts.amazonaws.com |

各項目を入力して プロバイダの URL の サムプリントを取得 をクリックした後、 プロバイダを追加 をクリックします。
これで GitHub Actions 用の ID プロバイダが作成されます。

2. IAM ロールを作成する
GitHub Actions で使用する IAM ロールを作成します。
Terraform で作成する場合のサンプルコード
data "aws_iam_policy_document" "example_assume_role_policy" {
  statement {
    effect  = "Allow"
    actions = ["sts:AssumeRoleWithWebIdentity"]
    principals {
      type        = "Federated"
      identifiers = ["arn:aws:iam::<AWSアカウントID>:oidc-provider/token.actions.githubusercontent.com"] # ID プロバイダの ARN
    }
    condition {
      test     = "StringEquals"
      variable = "token.actions.githubusercontent.com:aud"
      values   = ["sts.amazonaws.com"]
    }

    # 特定のリポジトリの特定のブランチからのみ認証を許可する
    condition {
      test     = "StringEquals"
      variable = "token.actions.githubusercontent.com:sub"
      values   = ["repo:<GitHubユーザー名>/<GitHubリポジトリ名>:ref:refs/heads/<ブランチ名>"]
    }
    # 特定のリポジトリの全てのワークフローから認証を許可する場合はこっち
    # condition {
    #   test     = "StringLike"
    #   variable = "token.actions.githubusercontent.com:sub"
    #   values   = ["repo:<GitHubユーザー名>/<GitHubリポジトリ名>:*"]
    # }
  }
}

resource "aws_iam_role" "example" {
  name               = "oidc-example-role"
  assume_role_policy = data.aws_iam_policy_document.example_assume_role_policy.json
}

# 任意のポリシーをアタッチする
# AmazonS3ReadOnlyAccess をアタッチする例
resource "aws_iam_role_policy_attachment" "example_s3_readonly" {
  role       = aws_iam_role.example.name
  policy_arn = "arn:aws:iam::aws:policy/AmazonS3ReadOnlyAccess"
}
IAM コンソールから ロール → ロールを作成 の順にクリックします。

信頼ポリシーを設定
信頼されたエンティティタイプ に カスタム信頼ポリシー を選択し、 カスタム信頼ポリシー を入力します。

カスタム信頼ポリシー には次のような JSON を入力します。
{
    "Version": "2012-10-17",
    "Statement": [
        {
            "Sid": "",
            "Effect": "Allow",
            "Principal": {
                "Federated": "arn:aws:iam::<AWSアカウントID>:oidc-provider/token.actions.githubusercontent.com"
            },
            "Action": "sts:AssumeRoleWithWebIdentity",
            "Condition": {
                "StringEquals": {
                    "token.actions.githubusercontent.com:aud": "sts.amazonaws.com",
                    "token.actions.githubusercontent.com:sub": "repo:<GitHubユーザー名>/<GitHubリポジトリ名>:ref:refs/heads/<ブランチ名>"
                }
            }
        }
    ]
}
この中で特に重要なのは Condition です。
"Condition": {
    "StringEquals": {
        "token.actions.githubusercontent.com:aud": "sts.amazonaws.com",
        // 特定のリポジトリの特定のブランチからのみ認証を許可する
        "token.actions.githubusercontent.com:sub": "repo:<GitHubユーザー名>/<GitHubリポジトリ名>:ref:refs/heads/<ブランチ名>"
    }
}
このようにすることで特定のリポジトリの特定のブランチからのみ認証を許可することができます。
Condition を設定しないと全ての GitHub リポジトリから認証できるようになってしまうため、必ず設定してください。
もしもブランチを制限せず、特定のリポジトリの全てのワークフローから認証を許可したい場合は Condition を次のように修正します。
  {
      // ...省略
              "Condition": {
                  "StringEquals": {
                      "token.actions.githubusercontent.com:aud": "sts.amazonaws.com"
-                     "token.actions.githubusercontent.com:sub": "repo:<GitHubユーザー名>/<GitHubリポジトリ名>:ref:refs/heads/<ブランチ名>"
                  },
+                 "StringLike": {
+                     "token.actions.githubusercontent.com:sub": "repo:<GitHubユーザー名>/<GitHubリポジトリ名>:*"
+                 }
              }
      // ...省略
  }
カスタム信頼ポリシー を入力したら 次へ をクリックします。
IAM ロールにポリシーをアタッチ
任意のポリシーをアタッチします。
今回は AmazonS3ReadOnlyAccess ポリシーをアタッチしておきます。
アタッチするポリシーを選択した後、 次へ をクリックします。

ロール名を設定して作成
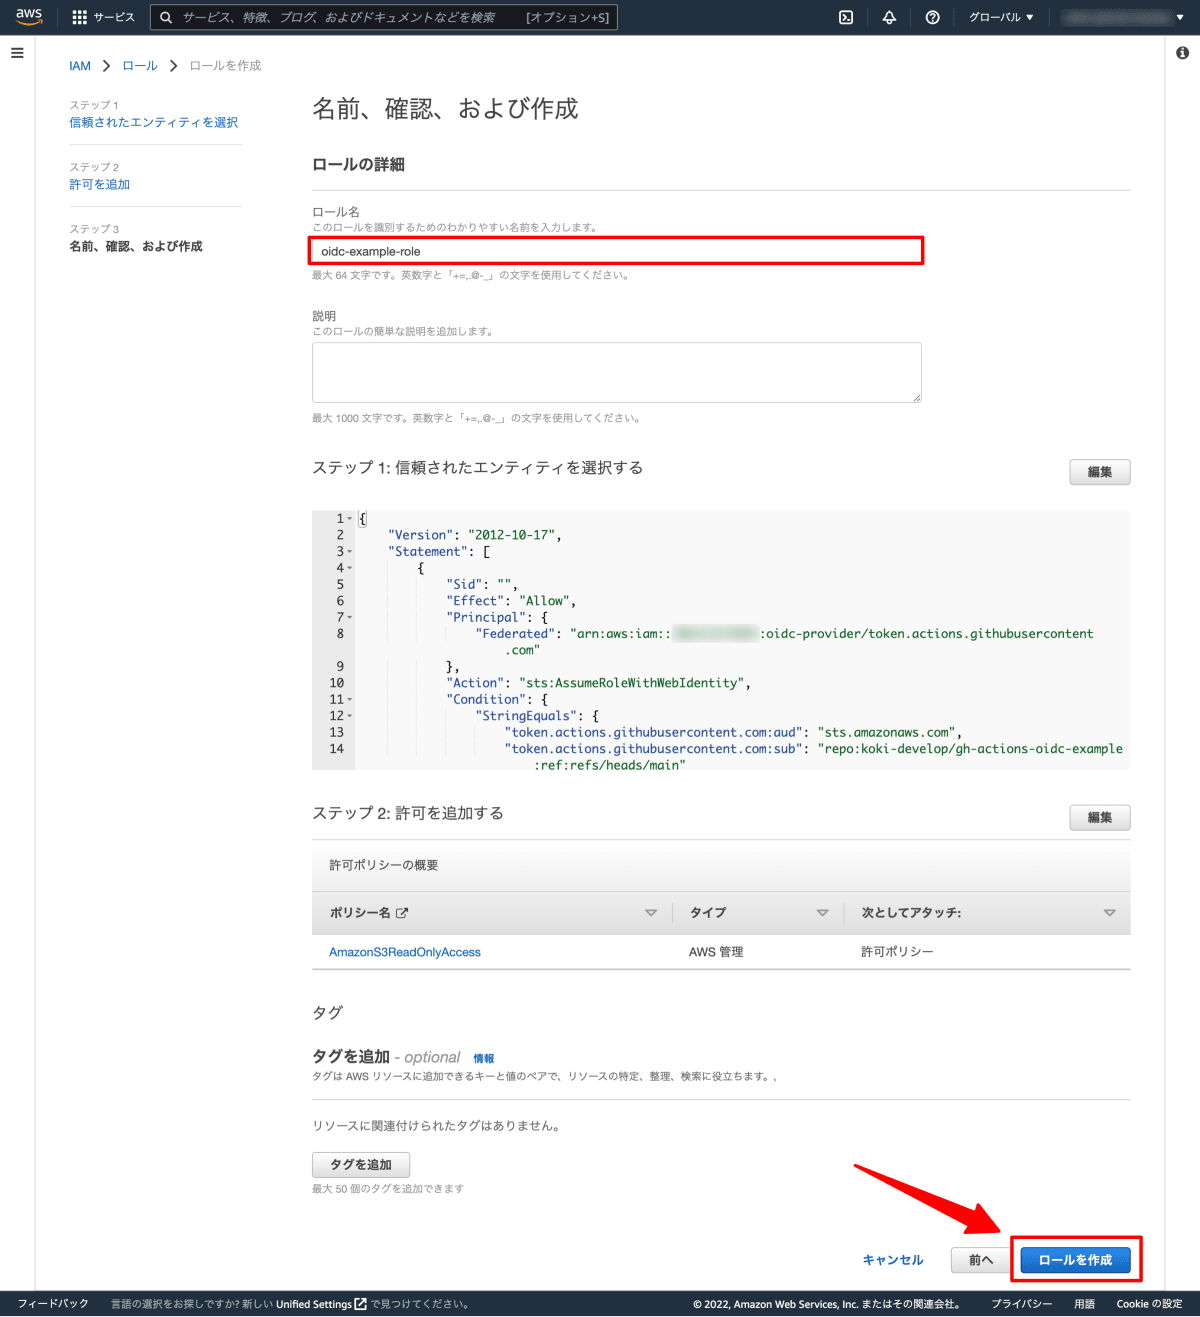
ロール名 に任意のロール名を入力して ロールを作成 をクリックします。
これで IAM ロールが作成されます。
3. GitHub Actions で OIDC を使用して AWS 認証を行う
ここまでやってようやくワークフローを作成します。
AWS 認証には aws-actions/configure-aws-credentials アクションを使用します。
role-to-assume に IAM ロールの ARN を指定するだけで OIDC を使用した AWS 認証を行ってくれます。便利。
下記は AWS 認証を行った後にプライベートな S3 バケットのオブジェクト一覧を取得するワークフローのサンプルです。
permissions に id-token: write を設定しないと OIDC を使えないので注意です。
name: example

on:
  push:

jobs:
  s3ls:
    runs-on: ubuntu-latest
    permissions:
      id-token: write
      contents: read
    steps:
      - uses: aws-actions/configure-aws-credentials@v1
        with:
          aws-region: 'us-east-1' # リージョンを指定
          role-to-assume: 'arn:aws:iam::<AWSアカウントID>:role/<IAMロール名>' # 作成した IAM ロールの ARN

      # プライベートな S3 バケットを読み取ってみる
      - run: aws s3 ls s3://oidc-example
AWS リソースにアクセスできています。わーい。

参考
Discussion