【Flutter】iOS 内蔵カメラ風なカメラを実装してみた(フォーカスと露出機能付き)
私はエヌ次元でモバイルアプリ開発エンジニアをやっています。
目的
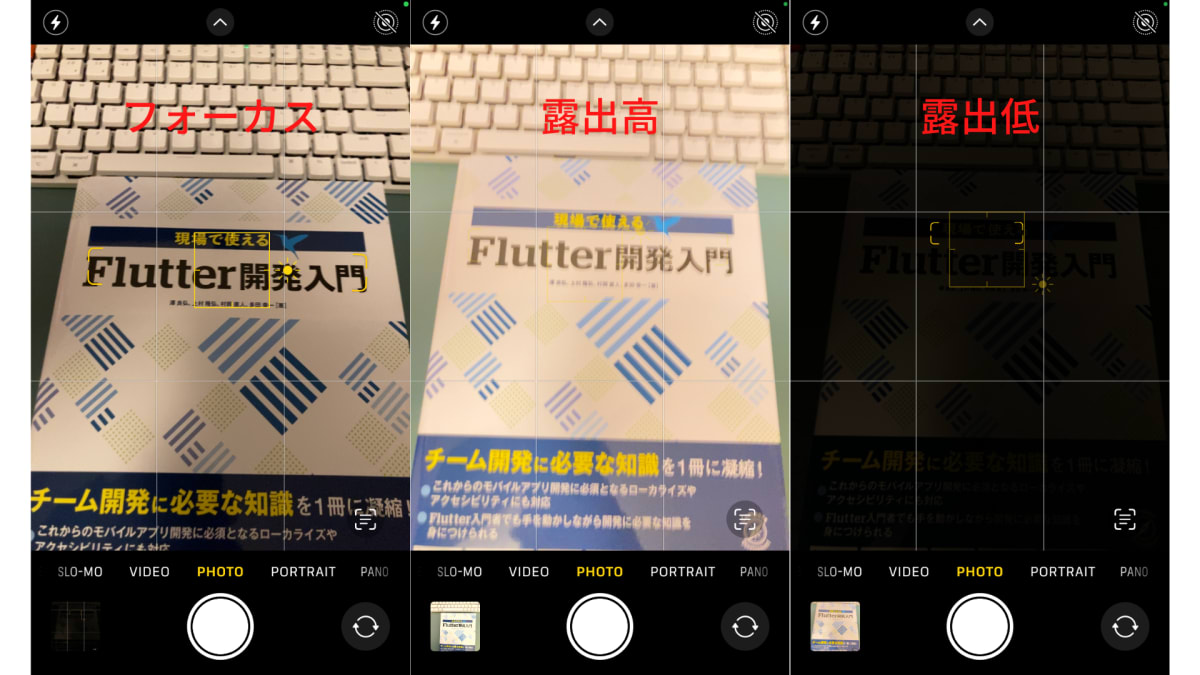
プラットフォーム Flutter で iOS 内蔵カメラ風なカメラを実装します。
機能としては、フォーカス機能と露出機能を実装します。
- 使用端末: iPhone SE 第 2 世代
- バージョン: iOS 16.1
作ったもの
最終的に作ったものは、以下のようになります。
- 使用端末: Pixel 3
- バージョン: Android 10
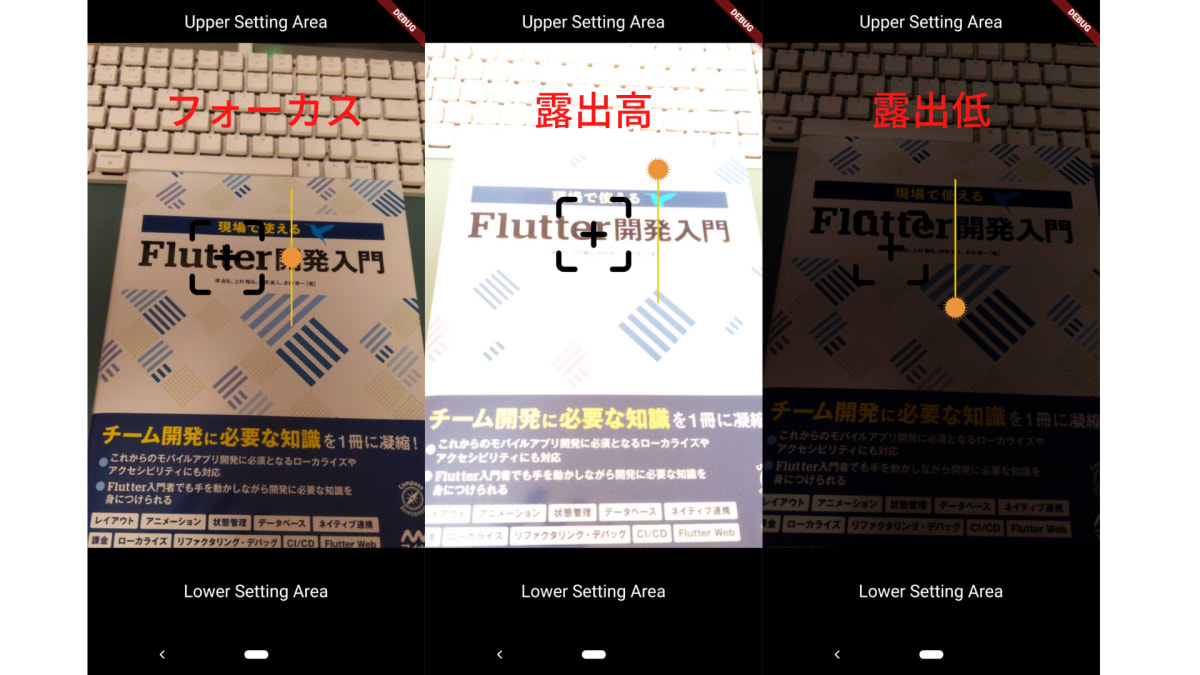
※無料アイコン画像を使用しているため、iOS 内蔵カメラとのアイコンデザインには程遠いことには目を瞑ってください
背景
業務プロジェクトでカメラ周りに触れることがあり、Flutter で iPhone 内蔵カメラのような機能を作ってみたいと思いました。
開発環境
$ fvm flutter --version
Flutter 3.3.6 • channel stable • https://github.com/flutter/flutter.git
Framework • revision 6928314d50 (6 weeks ago) • 2022-10-25 16:34:41 -0400
Engine • revision 3ad69d7be3
Tools • Dart 2.18.2 • DevTools 2.15.0
使用ライブラリ
カメラ
A Flutter plugin for iOS, Android and Web allowing access to the device cameras.
その他ライブラリ
状態管理で riverpod を使用しました。
flutter_riverpod: ^2.1.1
freezed: ^2.2.1
freezed_annotation: ^2.2.0
UI 部分の実装
表示部分の導入部分
スタック構造で、カメラ部分と上下の設定部分を絶対配置しています。
Stack(
  children: const [
    _CameraPreview(),
    Align(
      alignment: Alignment.topCenter,
      child: _UpperSettingArea(),
    ),
    Align(
      alignment: Alignment.bottomCenter,
      child: _LowerSettingArea(),
    )
  ],
)
カメラ部分
カメラ部分もスタック構造でカメラ描写部にフォーカスが表示されるように設置しました。
フォーカスの表示される位置は、状態で監視している計算された XY 座標に応じて更新されます。
class _CameraPreview extends ConsumerWidget {
const _CameraPreview({
Key? key,
}) : super(key: key);
Widget build(BuildContext context, WidgetRef ref) {
final provider = ref.watch(cameraPreviewProvider);
final focusPositionTop =
provider.focusModel.coordinateY - focusWidgetSize / 2;
final focusPositionLeft =
provider.focusModel.coordinateX - focusWidgetSize / 2;
return GestureDetector(
/// ここでは省略します
child: Stack(
children: [
AspectRatio(
aspectRatio: 9 / 16,
child: CameraPreview(
ref.read(cameraPreviewProvider.notifier).cameraController,
),
),
Positioned(
top: focusPositionTop,
left: focusPositionLeft,
child: const FocusWidget(),
),
],
),
);
}
}
フォーカス部分
このフォーカスウィジェットでは、フォーカスと露出調整部をスタック構造で表示しています。
露出調整部の箇所は、フォーカスされた X 座標に応じて、フォーカス部の左右に分けて表示するため、Visibility ウィジェットで表示分けしています。
class FocusWidget extends ConsumerWidget {
const FocusWidget({
Key? key,
}) : super(key: key);
Widget build(BuildContext context, WidgetRef ref) {
final provider = ref.watch(cameraPreviewProvider);
return Visibility(
visible: provider.focusModel.isVisible,
child: SizedBox(
height: focusWidgetSize,
width: focusWidgetSize,
child: Stack(
children: [
Visibility(
visible: provider.exposureModel.position == Position.left,
child: const Align(
alignment: Alignment.centerLeft,
child: _ExposureCoordinator(),
),
),
Align(
alignment: Alignment.center,
child: SizedBox(
width: focusIconSize,
height: focusIconSize,
child: Image.asset(
'assets/focus.png',
),
),
),
Visibility(
visible: provider.exposureModel.position == Position.right,
child: const Align(
alignment: Alignment.centerRight,
child: _ExposureCoordinator(),
),
),
],
),
),
);
}
}
ロジックの実装
カメラ描写部分のタッチイベントを検知する
GestureDetector ウィジェットで、複数の種類のタッチイベントを検知して、それに応じた対応をします。
iPhone 内蔵カメラを触ってみると、以下のようなことが分かりました。
- シングルタップ
- シングルタップして、スクリーンから指が離れた時: タッチ部分にフォーカスが当たる
- ロングプレス
- ロングプレスして1~2秒経過した時: タッチ部分にフォーカスが当たる
- 垂直方向のドラッグ移動イベント(フォーカスが当たっている場合)
- 垂直方向にドラッグする: 露出調整部分の Y 座標が変動する
class _CameraPreview extends ConsumerWidget {
const _CameraPreview({
Key? key,
}) : super(key: key);
Widget build(BuildContext context, WidgetRef ref) {
/// 省略します
return GestureDetector(
onTapDown: ref.read(cameraPreviewProvider.notifier).onTapDown,
onTapUp: (TapUpDetails details) {
ref.read(cameraPreviewProvider.notifier).onTapUp(details, context);
},
onVerticalDragUpdate:
ref.read(cameraPreviewProvider.notifier).onVerticalDragUpdate,
onLongPressStart: (LongPressStartDetails details) {
ref
.read(cameraPreviewProvider.notifier)
.onLongPressStart(details, context);
},
child: Stack(
children: [
/// 省略します
],
),
);
}
}
onTapDown イベント
このイベントを検知した際に、フォーカスや露出値に関連する状態を初期状態に戻します。
/// スクリーン上でタップされた時のイベントに呼ばれるコールバック関数
/// 状態を初期化する
Future<void> onTapDown(TapDownDetails details) async {
  debugPrint('【onTapDown】');

  state = state.copyWith(
    exposureModel: state.exposureModel.copyWith(
      isUpdated: false,
    ),
  );

  final error = await _tryOrSetExposureOffsetOnDevice(0);
  if (error != null) {
    debugPrint(error.toString());
    return;
  }
  state = state.copyWith(
    exposureModel: state.exposureModel.copyWith(
      currentValue: 0,
    ),
  );
}
onTapUp と onLongPress イベント
どちらのイベントもフォーカスを当てる仕事が類似しています。
/// タップされたスクリーンとの接地が終了したイベントに呼ばれるコールバック関数
/// ネイティブで管理するフォーカス地点と Flutter 上で描写されるフォーカス位置の設定をする
Future<void> onTapUp(TapUpDetails details, BuildContext context) async {
  debugPrint(
      '【onTapUp】positionX: ${details.globalPosition.dx}, positionY: ${details.globalPosition.dy}');
  await _setFocus(
    distanceX: details.globalPosition.dx,
    distanceY: details.globalPosition.dy,
    context: context,
  );

  _hideFocusAfterSeconds();
}
/// ロングプレス押下イベントに呼ばれるコールバック関数
/// フォーカス地点のネイティブと描写される位置の設定をする
Future<void> onLongPressStart(
  LongPressStartDetails details,
  BuildContext context,
) async {
  debugPrint(
      '【onLongPressStart】positionX: ${details.globalPosition.dx}, positionY: ${details.globalPosition.dy}');

  await _setFocus(
    distanceX: details.globalPosition.dx,
    distanceY: details.globalPosition.dy,
    context: context,
  );

  _hideFocusAfterSeconds();
}
両イベントで呼ぶネイティブへの指示とフォーカスの XY 座標を設定するタスクを、メソッド _setFocus に集約しました。
Future<void> _setFocus({
  required double distanceX,
  required double distanceY,
  required BuildContext context,
}) async {
  final error = await _tryOrSetFocusPointOnDevice(
    distanceX: distanceX,
    distanceY: distanceY,
    context: context,
  );
  if (error != null) {
    debugPrint(error.toString());
    return;
  }

  _updateFocusCoordinates(
    newCoordinateX: distanceX,
    newCoordinateY: distanceY,
  );
}
まず、ネイティブへフォーカス位置の命令を出します。
このメソッドでは、ネイティブへの命令で例外が発生した場合には error を返すようにしています。
この tryOr~ メソッドの内容は、最近よく書いている Go 言語から影響を受けて書いてみました。
処理でエラーが発生したらエラーを返却し、エラーがなかった場合には null を返すという具合です。
メソッドを呼ぶ側では、error が null かどうかを判定し、それに応じた処理を行います。
Future<CameraException?> _tryOrSetFocusPointOnDevice({
  required double distanceX,
  required double distanceY,
  required BuildContext context,
}) async {
  final size = MediaQuery.of(context).size;
  try {
    await _cameraController.setFocusPoint(
      Offset(
        distanceX / size.width,
        distanceY / size.height,
      ),
    );
  } on CameraException catch (error) {
    return error;
  }
  return null;
}
ネイティブへフォーカス位置の命令に成功したら、フォーカスを描写する XY 座標を更新します。
_isTappedRightFourthScreen メソッドでは、スクリーン右側部をタッチされたかどうかを判定します。
スクリーン右側部をタッチされていた場合、露出調整バーをフォーカス左側に表示するなどの仕組みのためです。
void _updateFocusCoordinates({
  required double newCoordinateX,
  required double newCoordinateY,
}) {
  if (state.exposureModel.isUpdated) {
    _hideFocusAfterSeconds();
    return;
  }

  final isTappedRightFourthScreen =
      _isTappedRightFourthScreen(newCoordinateX);

  state = state.copyWith(
    focusModel: state.focusModel.copyWith(
      isVisible: true,
      coordinateX: newCoordinateX,
      coordinateY: newCoordinateY,
    ),
    exposureModel: state.exposureModel.copyWith(
      /// 露出調整アイコンを初期位置に戻す
      coordinateY: exposureCoordinatorBarHeight / 2,

      /// スクリーン上でタップされた場所によって、露出調整バーの表示する左右の側を決める
      /// 左側をタップされた場合: 露出調整バーをフォーカス右側に表示する
      /// 右側をタップされた場合: 露出調整バーをフォーカス左側に表示する
      position: isTappedRightFourthScreen ? Position.left : Position.right,
    ),
  );
}
onVerticalDragUpdate イベント
垂直方向のドラッグイベントを検知した場合に、ネイティブへ露出値を変更する命令をし、露出調整部の Y 座標の更新を行います。
movingDistanceY はドラッグイベントで検出する距離に重み _movementWeight を付けることで、露出調整部が極端に動くことを抑制しました。
/// 垂直方向のドラッグ移動イベントに呼ばれるコールバック関数
/// ネイティブで管理する露出値と Flutter 上で描写される露出座標位置の設定をする
Future<void> onVerticalDragUpdate(DragUpdateDetails details) async {
  /// フォーカスが表示されていない場合は、露出変更はできない
  if (!state.focusModel.isVisible) {
    return;
  }

  /// タイマーが起動していた場合には、キャンセルする
  if (_focusAutoHidingTimer != null) {
    _focusAutoHidingTimer?.cancel();
  }
  debugPrint(
      '【onPointerMove】positionX: ${details.globalPosition.dx}, positionY: ${details.globalPosition.dy}');

  /// 重み付きの移動距離
  /// Delta:
  /// The amount the pointer has moved in the coordinate space of the event
  /// receiver since the previous update.
  final movingDistanceY = details.delta.dy / _movementWeight;

  final error = await _tryOrSetExposureOffsetOnDevice(movingDistanceY);
  if (error != null) {
    debugPrint(error.toString());
  } else {
    _updateExposureCoordinates(movingDistanceY);
  }
  _hideFocusAfterSeconds();
}
まず、ネイティブへ露出値を変更する命令をします。
露出調整バーの中央から端までの距離と許容できる露出値を使用して、相対的な重みを計算します。
重み付きで計算された movingDistanceY にこの相対的な重みを付けることで、ネイティブに命令する露出値を計算します。
Future<CameraException?> _tryOrSetExposureOffsetOnDevice(
  double movingDistanceY,
) async {
  double relativeWeight = 0;

  /// 露出アイコンが上部に移動する場合、movingDistanceY は負数になる
  final isMovingUp = movingDistanceY <= 0.0;
  const distanceToEdge = exposureCoordinatorBarHeight / 2;
  if (isMovingUp) {
    relativeWeight = distanceToEdge / (state.exposureModel.maxValue).abs();
  } else {
    relativeWeight = distanceToEdge / (state.exposureModel.minValue).abs();
  }

  final movingExposureValue = -movingDistanceY / relativeWeight;
  final newExposureValue =
      state.exposureModel.currentValue + movingExposureValue;

  final isNewExposureValueWithinAvailableRange =
      (state.exposureModel.minValue <= newExposureValue) &&
          (newExposureValue <= state.exposureModel.maxValue);
  if (!isNewExposureValueWithinAvailableRange) {
    return CameraException(
      'setExposurePointFailed',
      'Given value could cause overflow.',
    );
  }

  try {
    await _cameraController.setExposureOffset(newExposureValue);
  } on CameraException catch (error) {
    return error;
  }

  state = state.copyWith(
    exposureModel: state.exposureModel.copyWith(
      currentValue: newExposureValue,
    ),
  );
  return null;
}
計算された露出値がネイティブ側で許容できるか分からないために、チェック機構 isNewExposureValueWithinAvailableRange を用意しています。
こちらで使用する maxValue と minValue は初期化時に取得して、状態で保持するようにしました。
/// 露出の最大許容値と最低許容値を取得する
final minValue = await _cameraController.getMinExposureOffset();
final maxValue = await _cameraController.getMaxExposureOffset();
state = state.copyWith(
  isCameraReady: true,
  exposureModel: state.exposureModel.copyWith(
    minValue: minValue,
    maxValue: maxValue,
  ),
);
ネイティブへ露出値を変更する命令に成功したら、露出調整部の Y 座標の更新を行います。
void _updateExposureCoordinates(double movingDistanceY) {
  final currentExposureCoordinateY = state.exposureModel.coordinateY;
  final newCoordinateY = currentExposureCoordinateY + movingDistanceY;
  if (newCoordinateY < 0 || exposureCoordinatorBarHeight < newCoordinateY) {
    return;
  }

  state = state.copyWith(
    exposureModel: state.exposureModel.copyWith(
      isUpdated: true,
      coordinateY: newCoordinateY,
    ),
  );
}
サンプルプロジェクトリポジトリ
全ての実装コードは以下のリポジトリから確認できます。
camera_with_focus_and_exposure
終わりに
プライベートで久しぶりに Flutter を使って、アプリっぽいものを作ってみました。
カメラ周りの実装に興味が出てきたので、今後は Android ネイティブ側のカメラ部分にも触れていけたらと思っています。
Discussion