📺
ラズパイを使って、OLED表示デバイスに文字列や画像を表示するよ
💡やること
SSD1306表示デバイスを使って、いろいろ表示させます。
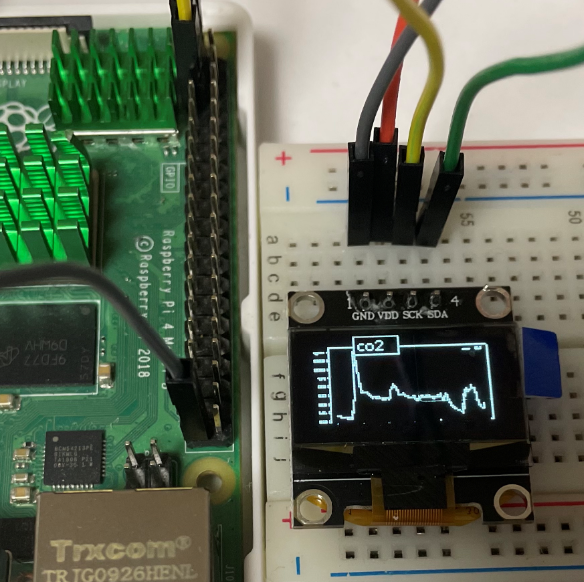
🏁デモ
🔧パーツ一覧
| no | 部品名 | 個数 | 備考 |
|---|---|---|---|
| 1 | ラズベリーパイ | 1 | 今回は4Bで確認 |
| 2 | 128x64ドット有機ELディスプレイ | 1 | 秋月電子 |
| 3 | ジャンパー線 | 適量 | - |
| 4 | ブレッドボード | 1 | - |
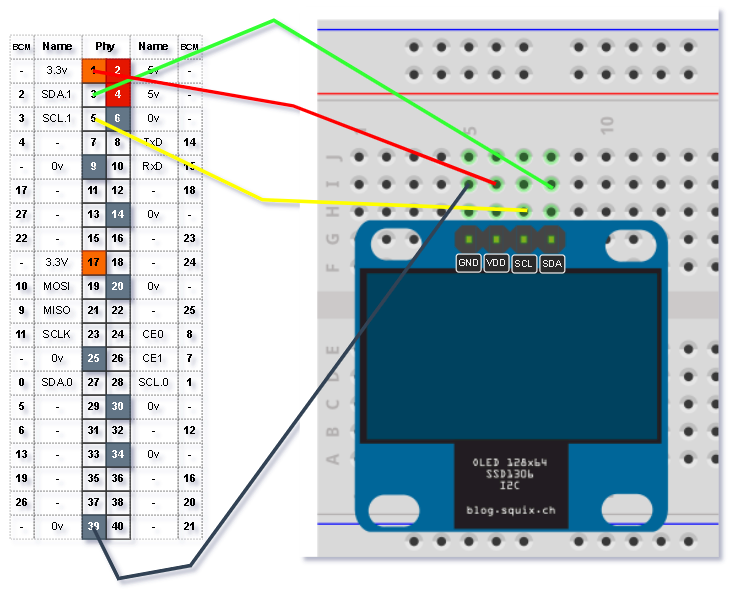
接続図
💻環境
開発環境
- ラズベリーパイ
- Linux rpi 5.10.17-v7l+ #1403 SMP Mon Feb 22 11:33:35 GMT 2021 armv7l GNU/Linux
- Python
- Python 3.7.3 (default, Jan 22 2021, 20:04:44)
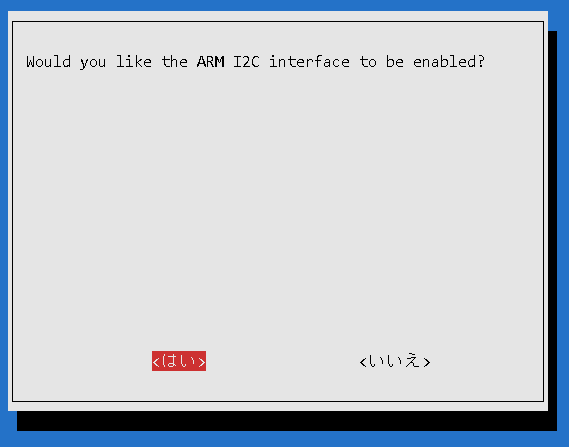
ラズベリーパイの設定
本デバイスは、I2C通信を使って制御します。
I2C通信を使用できるように設定する必要があります。
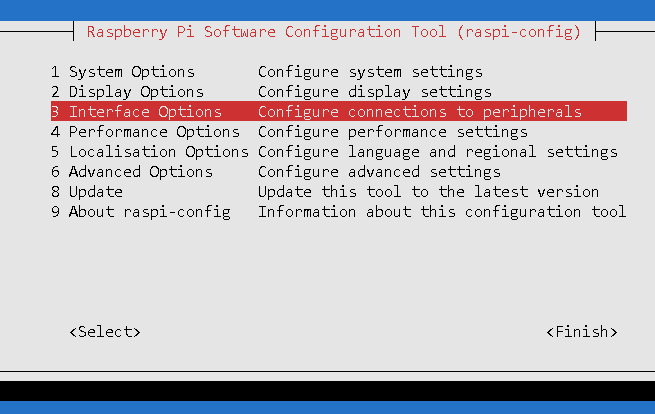
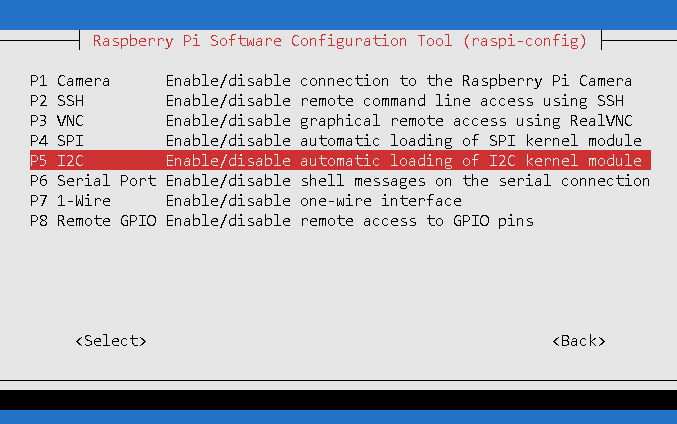
I2Cの有効化は、以下のコマンドから実施できます。
$ sudo raspi-config
- Interface Optionsを選択
- I2Cを選択
- "はい"(or "Yes")を選択
- これで有効化されます(1回行えばOKです)
モジュールのインストール
apt
日本語を表示するためにフォントをインストールします。
$ sudo apt-get install fonts-ipafont
pip
Pythonに関するモジュールをインストールします。
$ python3 -m venv env
$ source env/bin/activate
(env) $ pip install adafruit-circuitpython-ssd1306
(env) $ pip install smbus2
(env) $ pip install pillow
📝手順
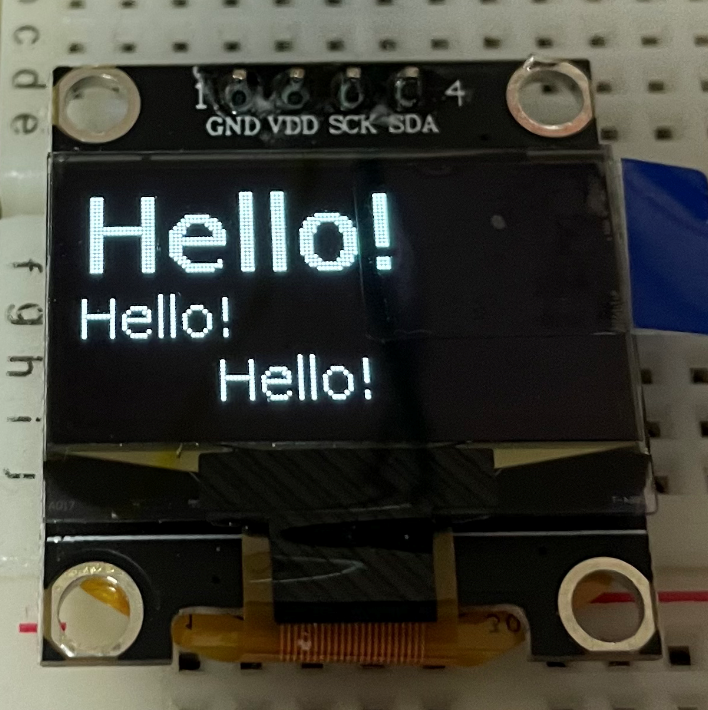
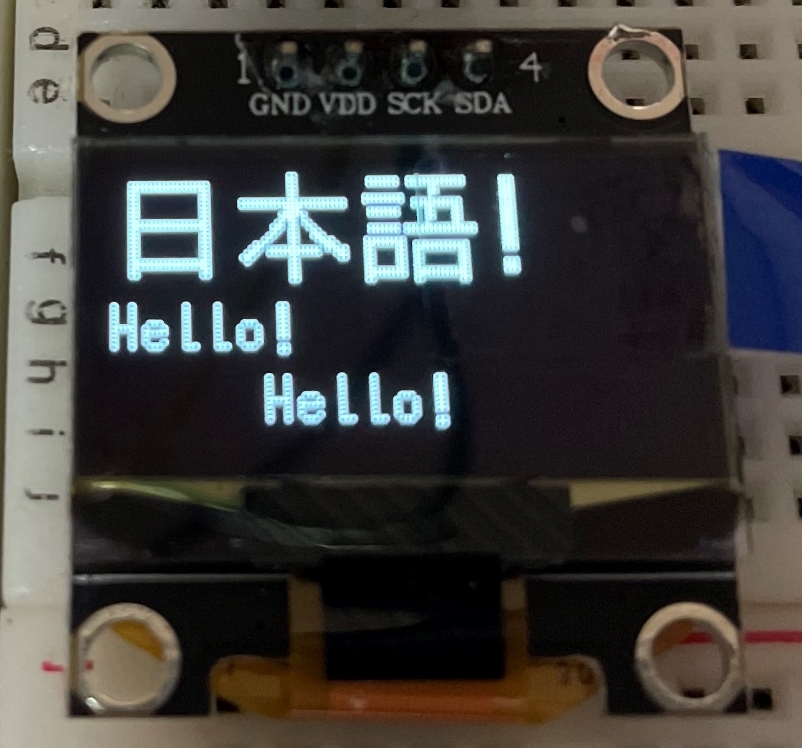
下記を表示します。
- コード1 : "Hello World"を表示
- コード2 : "日本語"を表示
- コード3 : 画像を表示
- 使用する画像は、
 となります
となります
- 使用する画像は、
接続されているかを確認
i2cdetectコマンドを使って、表示デバイスが接続されている確認します。
(env) $ i2cdetect -y 1
     0  1  2  3  4  5  6  7  8  9  a  b  c  d  e  f
00:          -- -- -- -- -- -- -- -- -- -- -- -- --
10: -- -- -- -- -- -- -- -- -- -- -- -- -- -- -- --
20: -- -- -- -- -- -- -- -- -- -- -- -- -- -- -- --
30: -- -- -- -- -- -- -- -- -- -- -- -- 3c -- -- --
40: -- -- -- -- -- -- -- -- -- -- -- -- -- -- -- --
50: -- -- -- -- -- -- -- -- -- -- -- -- -- -- -- --
60: -- -- -- -- -- -- -- -- -- -- -- -- -- -- -- --
70: -- -- -- -- -- -- -- --
"3c"が、表示デバイスのデバイスアドレスとなります。
コード - 1 : "Hello World"を表示
ssd1306_text.py
import board
import digitalio
from PIL import Image, ImageDraw, ImageFont
import adafruit_ssd1306
from time import sleep

# SSD1306のピン設定
DEVICE_ADR = 0x3C
DISP_WIDTH = 128
DISP_HEIGHT = 64

def main():

    # Setting some variables for our reset pin etc.
    RESET_PIN = digitalio.DigitalInOut(board.D4)

    # Very important... This lets py-gaugette 'know' what pins to use in order to reset the display
    i2c = board.I2C()
    oled = adafruit_ssd1306.SSD1306_I2C(DISP_WIDTH, DISP_HEIGHT, i2c, addr=DEVICE_ADR, reset=RESET_PIN)

    # Clear display.
    oled.fill(0)
    oled.show()

    # Create blank image for drawing.
    image = Image.new("1", (oled.width, oled.height))
    draw = ImageDraw.Draw(image)

    # Load a font in 2 different sizes.
    font = ImageFont.truetype("/usr/share/fonts/truetype/dejavu/DejaVuSans.ttf", 28)
    font2 = ImageFont.truetype("/usr/share/fonts/truetype/dejavu/DejaVuSans.ttf", 14)

    # Draw the text
    draw.text((0, 0), "Hello!", font=font, fill=255)
    draw.text((0, 30), "Hello!", font=font2, fill=255)
    draw.text((34, 46), "Hello!", font=font2, fill=255)

    # Display image
    oled.image(image)
    oled.show()

    sleep(5)

    # Clear display.
    oled.fill(0)
    oled.show()

    return

if __name__ == "__main__":
    main()
実行手順 - 1
(env) $ python ssd1306_text.py
コード - 2 : "日本語"を表示
ssd1306_nihongo.py
import board
import digitalio
from PIL import Image, ImageDraw, ImageFont
import adafruit_ssd1306
from time import sleep

# SSD1306のピン設定
DEVICE_ADR = 0x3C
DISP_WIDTH = 128
DISP_HEIGHT = 64

def main():

    # Setting some variables for our reset pin etc.
    RESET_PIN = digitalio.DigitalInOut(board.D4)

    # Very important... This lets py-gaugette 'know' what pins to use in order to reset the display
    i2c = board.I2C()
    oled = adafruit_ssd1306.SSD1306_I2C(DISP_WIDTH, DISP_HEIGHT, i2c, addr=DEVICE_ADR, reset=RESET_PIN)

    # Clear display.
    oled.fill(0)
    oled.show()

    # Create blank image for drawing.
    image = Image.new("1", (oled.width, oled.height))
    draw = ImageDraw.Draw(image)

    # Load a font in 2 different sizes.
    font = ImageFont.truetype("/usr/share/fonts/truetype/fonts-japanese-gothic.ttf", 28)
    font2 = ImageFont.truetype("/usr/share/fonts/truetype/fonts-japanese-gothic.ttf", 14)

    # Draw the text
    draw.text((0, 0), "日本語!", font=font, fill=255)
    draw.text((0, 30), "Hello!", font=font2, fill=255)
    draw.text((34, 46), "Hello!", font=font2, fill=255)

    # Display image
    oled.image(image)
    oled.show()

    sleep(5)

    # Clear display.
    oled.fill(0)
    oled.show()

    return

if __name__ == "__main__":
    main()
実行手順 - 2
(env) $ python ssd1306_nihongo.py
コード3 : 画像を表示
ssd1306_img.py
import board
import digitalio
from PIL import Image, ImageDraw, ImageFont
import adafruit_ssd1306
from time import sleep

# SSD1306のピン設定
DEVICE_ADR = 0x3C
DISP_WIDTH = 128
DISP_HEIGHT = 64

def main():

    # Setting some variables for our reset pin etc.
    RESET_PIN = digitalio.DigitalInOut(board.D4)

    # Very important... This lets py-gaugette 'know' what pins to use in order to reset the display
    i2c = board.I2C()
    oled = adafruit_ssd1306.SSD1306_I2C(DISP_WIDTH, DISP_HEIGHT, i2c, addr=DEVICE_ADR, reset=RESET_PIN)

    # Clear display.
    oled.fill(0)
    oled.show()

    # Create blank image for drawing.
    image = Image.open("graph.png")
    draw = ImageDraw.Draw(image)

    # Display image
    oled.image(image)
    oled.show()

    sleep(5)

    # Clear display.
    oled.fill(0)
    oled.show()
    return

if __name__ == "__main__":
    main()
実行手順 - 3
(env) $ python ssd1306_img.py
デモの結果になります。
🔎ポイント
画像を作成して描画
コード上で使用しているPillowモジュールはサードパーティ製の画像処理モジュールです。
今回のコードでは、文字列であっても一旦画像にしています(Pillowを使用)。
oled.image()へ128x64 のモノクロ画像を渡しています。
さいごに
この記事も含め、ラズパイの活用方法を
としてまとめ中です。
Discussion