【Flutter】geocoding で現在位置の住所を取得する
初めに
今回は geocoding パッケージ を使って現在位置を取得する実装を行いたいと思います。
記事の対象者
- Flutter 学習者
- ユーザーの位置情報を取得したい方
- 位置情報を扱う実装が必要な方
目的
今回は上記の通り geocoding パッケージ を使って位置情報を取得する実装を行うことを目的とします。
最終的には以下の動画のようにユーザーの現在位置を取得して表示できるような実装を行います。
geocoding(ジオコーディング) とは
そもそもの意味の ジオコーディング とは、Google Map Platform によると、「住所を地理座標に変換する処理のこと」を指します。
具体的には、東京駅の住所である「東京都千代田区丸の内1丁目」を、緯度経度で表される地理座標である (35.6812362,139.7671248) に変換する処理のことと言えます。
また、逆に、地理座標を人が読める住所に変換するプロセスを「リバースジオコーディング」と言います。
geocoding パッケージは Flutter において上記のジオコーディングとリバースジオコーディングの両方が行えるパッケージです。
geolocator パッケージ
また、今回は geocoding パッケージとともに geolocator パッケージ も使用します。
geolocator パッケージは「Flutterで各プラットフォームの位置情報サービスに簡単にアクセスするためのパッケージ」とされています。
具体的には、iOS では CLLocationManager、Android では LocationManager にアクセスすることでユーザーの現在位置の取得などが可能です。
導入
以下のパッケージの最新バージョンを pubspec.yamlに記述
dependencies:
  flutter:
    sdk: flutter
  geocoding: ^2.1.1
  geolocator: ^10.1.1
または
以下をターミナルで実行
flutter pub add geocoding geolocator
実装
- 住所のデータ構造の定義
- データを管理する Provider の作成
- 現在位置から住所を取得
- 任意の座標から住所を取得
1. 住所のデータ構造の定義
まずは住所のデータ構造を Address として address.dart に定義して扱いやすい形で位置情報を取得できるようにします。
コードは以下の通りです。
class Address {
  final String country;
  final String prefecture;
  final String city;
  final String street;

  Address({
    required this.country,
    required this.prefecture,
    required this.city,
    required this.street,
  });
}
今回はデータベースへの格納などは行わないため、Freezedなどは使わずに単純なクラスとして定義しておきます。
Address で以下の項目を保持できるようにしています。
- 国
- 都道府県
- 市区町村
- 市区町村以下の住所
2. データを管理する Provider の作成
次に位置情報を管理するための Provider として geocoding_provider.dart に GeocodingController を作成します。
コードは以下の通りです。
import 'dart:developer';
import 'package:geolocator/geolocator.dart';
import 'package:geocoding/geocoding.dart';
import 'package:riverpod_annotation/riverpod_annotation.dart';
part 'geocoding_provider.g.dart';
class GeocodingController extends _$GeocodingController {
late bool isServiceEnabled;
late LocationPermission permission;
Future<void> build() async {
isServiceEnabled = await Geolocator.isLocationServiceEnabled();
permission = await Geolocator.checkPermission();
if (!isServiceEnabled) {
return Future.error('Location services are disabled.');
}
if (permission == LocationPermission.denied) {
permission = await Geolocator.requestPermission();
if (permission == LocationPermission.denied) {
return Future.error('Location permissions are denied');
}
}
if (permission == LocationPermission.deniedForever) {
return Future.error(
'Location permissions are permanently denied, we cannot request permissions.');
}
}
Future<Position> getCurrentPosition() async {
return await Geolocator.getCurrentPosition();
}
Future<Placemark> getPlacemarkFromPosition(
{required double latitude, required double longitude}) async {
final placeMarks = await GeocodingPlatform.instance
.placemarkFromCoordinates(latitude, longitude);
final placeMark = placeMarks[0];
return placeMark;
}
Future<Address> getCurrentAddress() async {
final currentPosition = await getCurrentPosition();
final placeMark = await getPlacemarkFromPosition(
latitude: currentPosition.latitude,
longitude: currentPosition.longitude,
);
final address = Address(
country: placeMark.country ?? '',
prefecture: placeMark.administrativeArea ?? '',
city: placeMark.locality ?? '',
street: placeMark.street ?? '',
);
return address;
}
Future<Address> getAddressInfoFromPosition(
{required double latitude, required double longitude}) async {
final placeMark = await getPlacemarkFromPosition(
latitude: latitude, longitude: longitude);
final address = Address(
country: placeMark.country ?? '',
prefecture: placeMark.administrativeArea ?? '',
city: placeMark.locality ?? '',
street: placeMark.street ?? '',
);
return address;
}
}
それぞれ詳しくみていきます。
以下の部分では、 Geolocator が使用できるかどうかを表す isServiceEnabled と、位置情報を使用する権限があるかどうかを保持している LocationPermission を permission として定義して、遅延初期化を行なっています。
late bool isServiceEnabled;
late LocationPermission permission;
以下の部分では次の項目を確かめてます。
-
Geolocatorのサービスが使用できるかどうか -
Geolocatorで位置情報を使用する権限があるかどうか- 権限が「拒否」の場合は確認のダイアログを出して、それでも許可されなければエラーを出力
- 権限が「常に拒否」の場合はエラーを出力
これらを GeocodingController の build メソッド内で行うことで、位置情報を使用しようとしたタイミングで機能が使用可能かを確かめることができます。
isServiceEnabled = await Geolocator.isLocationServiceEnabled();
permission = await Geolocator.checkPermission();
if (!isServiceEnabled) {
  return Future.error('Location services are disabled.');
}

if (permission == LocationPermission.denied) {
  permission = await Geolocator.requestPermission();
    if (permission == LocationPermission.denied) {
        return Future.error('Location permissions are denied');
  }
}

if (permission == LocationPermission.deniedForever) {
  return Future.error('Location permissions are permanently denied, we cannot request permissions.');
}
以下ではユーザーの現在の位置情報を取得する関数を実装しています。
Geolocator の getCurrentPosition を非同期で実行することで返り値として Future<Position> を得ることができます。
Position には緯度経度の他に高度やスピードやそれぞれの指標に対する正確性なども含まれています。
Future<Position> getCurrentPosition() async {
  return await Geolocator.getCurrentPosition();
}
以下では、緯度経度から Placemark を取得する関数を実装しています。
Placemark は国や都道府県、市区町村などのより詳しい情報を保持しており、getPlacemarkFromPosition 関数では名前の通り、緯度経度の座標から Placemark を取得する関数であり、この引数に現在位置の緯度経度を渡すことで、現在位置の住所を取得することができます。
Future<Placemark> getPlacemarkFromPosition(
  {required double latitude, required double longitude}) async {
  final placeMarks = await GeocodingPlatform.instance.placemarkFromCoordinates(
    latitude,
    longitude
  );
  final placeMark = placeMarks[0];
  return placeMark;
}
以下ではユーザーの現在地の住所を取得する関数を実装しています。
この関数で実装していることは以下の三つです。
- 先ほど実装した、現在位置を取得する
getCurrentPosition関数の返り値をcurrentPositionとする -
currentPositionの緯度経度をもとにgetPlacemarkFromPositionを実行して、返り値をplaceMarkとする -
placeMarkの各プロパティをAddressに対応させて返却
Future<Address> getCurrentAddress() async {
  final currentPosition = await getCurrentPosition();
  final placeMark = await getPlacemarkFromPosition(
    latitude: currentPosition.latitude,
    longitude: currentPosition.longitude,
  );

  final address = Address(
    country: placeMark.country ?? '',
    prefecture: placeMark.administrativeArea ?? '',
    city: placeMark.locality ?? '',
    street: placeMark.street ?? '',
  );
  return address;
}
Placemark で取得できる内容
Placemark のプロパティは以下のようになっています。
Placemark({
  this.name,
  this.street,
  this.isoCountryCode,
  this.country,
  this.postalCode,
  this.administrativeArea,
  this.subAdministrativeArea,
  this.locality,
  this.subLocality,
  this.thoroughfare,
  this.subThoroughfare,
});
先ほどの getCurrentPosition に log を加え、現在地を東京駅にすると、それぞれのプロパティは以下のように出力されます。
[log] name: 丸の内1丁目9
[log] street: 丸の内1丁目9
[log] isoCountryCode: JP
[log] country: 日本
[log] postalCode: 100-0005
[log] administrativeArea: 東京都
[log] subAdministrativeArea:
[log] locality: 千代田区
[log] subLocality: 丸の内
[log] thoroughfare: 丸の内1丁目
[log] subThoroughfare: 9
以下では、緯度経度から Placemark を取得し、それを自作の型である Address に変換して返却する関数を実装しています。
この関数で、緯度経度さえあればその場所の住所を取得することができます。
Future<Address> getAddressInfoFromPosition(
  {required double latitude, required double longitude}) async {
  final placeMark = await getPlacemarkFromPosition(
    latitude: latitude, longitude: longitude
  );
  final address = Address(
    country: placeMark.country ?? '',
    prefecture: placeMark.administrativeArea ?? '',
    city: placeMark.locality ?? '',
    street: placeMark.street ?? '',
  );
  return address;
}
これで基本的なデータの操作は可能になります。
今回は Riverpod generator を使用しており、コード生成が必要であるため、以下をターミナルで実行しておきます
flutter pub run build_runner build --delete-conflicting-outputs
3. 現在位置から住所を取得
この章では以下の動画のように、アプリを開いた時点で現在地点の住所を取得して、TextFiled の初期値として入力する実装を行います。
コードは以下の通りです。
import 'package:flutter/material.dart';
import 'package:flutter_riverpod/flutter_riverpod.dart';
import 'package:gap/gap.dart';
import 'package:hooks_riverpod/hooks_riverpod.dart';
import 'package:sample_flutter/geocoding/providers/geocoding_provider.dart';
class GiocodingSample extends ConsumerWidget {
const GiocodingSample({super.key});
Widget build(BuildContext context, WidgetRef ref) {
return Scaffold(
appBar: AppBar(
title: const Text('現在位置'),
),
body: FutureBuilder(
future:
ref.read(geocodingControllerProvider.notifier).getCurrentAddress(),
builder: (BuildContext context, AsyncSnapshot<Address> snapshot) {
if (snapshot.connectionState != ConnectionState.done) {
return const Center(
child: CircularProgressIndicator(),
);
}
if (snapshot.hasError) {
return Center(
child: Column(
children: [
Text(
snapshot.error.toString(),
),
],
),
);
}
if (snapshot.hasData) {
final countryTextController =
TextEditingController(text: snapshot.data!.country);
final prefectureTextController =
TextEditingController(text: snapshot.data!.prefecture);
final cityTextController =
TextEditingController(text: snapshot.data!.city);
final streetTextController =
TextEditingController(text: snapshot.data!.street);
return Padding(
padding: const EdgeInsets.symmetric(horizontal: 20.0),
child: Column(
crossAxisAlignment: CrossAxisAlignment.start,
children: [
const Text('国'),
TextField(
controller: countryTextController,
decoration:
const InputDecoration(border: OutlineInputBorder()),
),
const Gap(20),
const Text('都道府県'),
TextField(
controller: prefectureTextController,
decoration:
const InputDecoration(border: OutlineInputBorder()),
),
const Gap(20),
const Text('市区町村'),
TextField(
controller: cityTextController,
decoration:
const InputDecoration(border: OutlineInputBorder()),
),
const Gap(20),
const Text('番地'),
TextField(
controller: streetTextController,
decoration:
const InputDecoration(border: OutlineInputBorder()),
),
const Gap(40),
Align(
alignment: Alignment.center,
child: ElevatedButton(
onPressed: () {},
child: const Padding(
padding: EdgeInsets.symmetric(horizontal: 80.0),
child: Text(
'登録',
),
),
),
),
],
),
);
} else {
return const Column(
children: [
Center(
child: Text('データが存在しません'),
),
],
);
}
},
),
);
}
}
それぞれ詳しくみていきます。
以下のコードでは先ほど実装した geocodingControllerProvider の getCurrentAddress を FutureBuilder で実行することでユーザーの現在位置の住所を非同期で取得し、その値を snapshot としています。
FutureBuilder(
  future: ref.read(geocodingControllerProvider.notifier).getCurrentAddress(),
  builder: (BuildContext context, AsyncSnapshot<Address> snapshot) {
以下のコードでは getCurrentAddress の返り値である snapshot がある場合の処理を記述しており、データがある場合は国、都道府県、市区町村、市区町村以下の住所の四つのテキストフィールドのコントローラーに初期値として値を代入しています。
このようにすることで、現在地点の住所が取得できたときにそれをテキストフィールドの初期値とすることができます。
if (snapshot.hasData) {
  final countryTextController = TextEditingController(text: snapshot.data!.country);
  final prefectureTextController = TextEditingController(text: snapshot.data!.prefecture);
  final cityTextController = TextEditingController(text: snapshot.data!.city);
  final streetTextController = TextEditingController(text: snapshot.data!.street);
以下では、先ほど現在地点の住所を初期値として代入した countryTextController をテキストフィールドの controller に代入しています。
その他の都道府県などのテキストフィールドも同様の実装です。
const Text('国'),
TextField(
  controller: countryTextController,
  decoration: const InputDecoration(border: OutlineInputBorder()),
),
これで実行すると、章の初めで提示した以下の動画のように初期値として現在地の住所が代入されているかと思います。
iOS Simulator の現在位置の変更
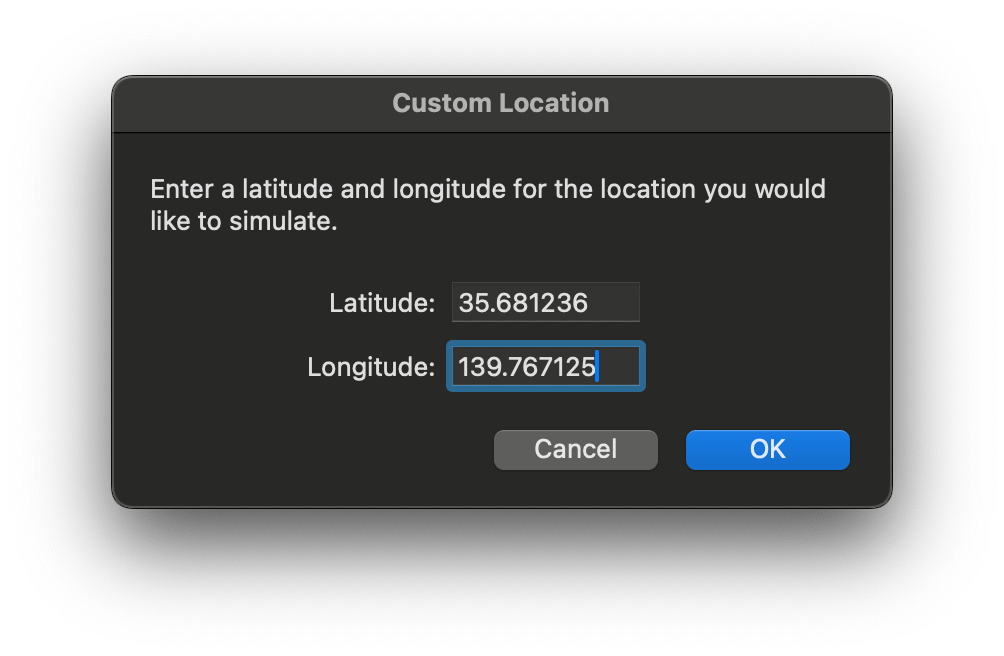
iOS Simulator の現在地を変更するためには、iOS Simulator を開いた状態で画面上部のタブの Features > Location > Custom Location で以下のようなダイアログが表示されるので、緯度と軽度を入力すれば現在位置を変更することができます。

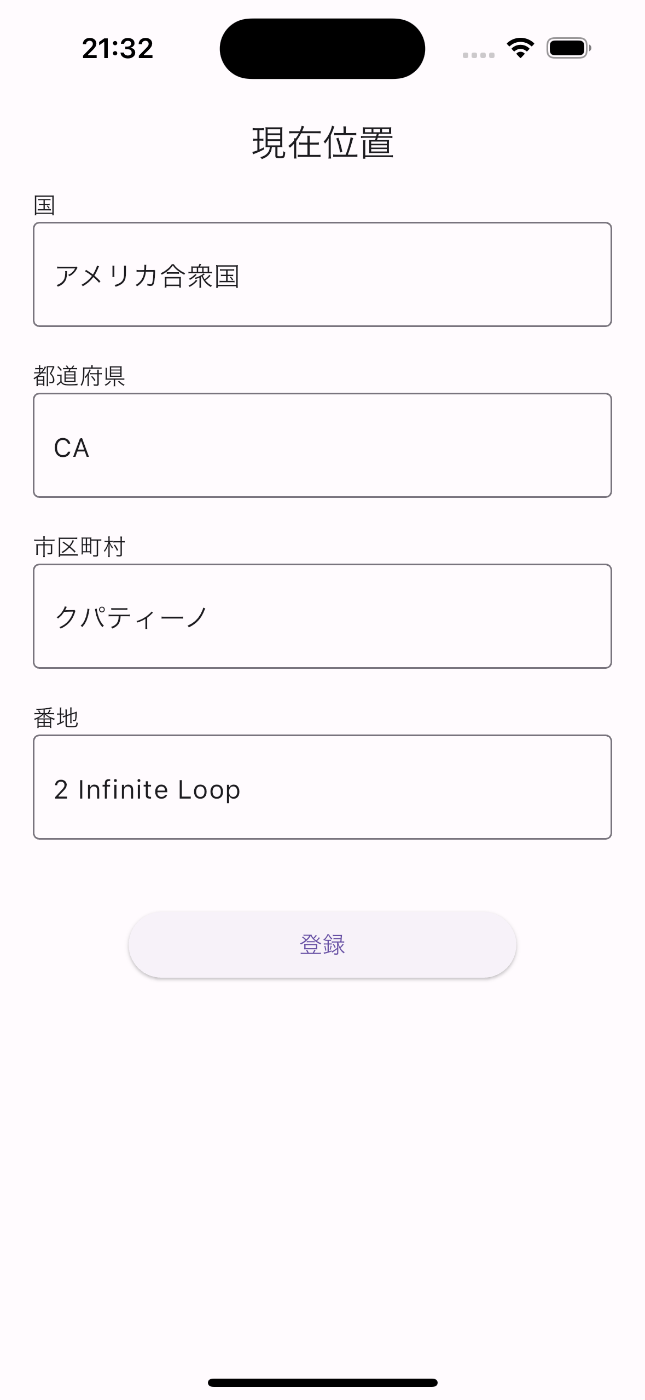
そのほかにも Location > Apple を選択すると以下のように Apple の本社と思われる位置を現在位置とすることもできます。

4. 任意の座標から住所を取得
最後にこの章では以下の動画のように任意の緯度経度を入力することでその場所の住所を取得する実装を行います。
コードは以下の通りです。
import 'package:flutter/material.dart';
import 'package:flutter_riverpod/flutter_riverpod.dart';
import 'package:gap/gap.dart';
import 'package:hooks_riverpod/hooks_riverpod.dart';
import 'package:sample_flutter/geocoding/providers/geocoding_provider.dart';
class GiocodingSample extends ConsumerWidget {
const GiocodingSample({super.key});
Widget build(BuildContext context, WidgetRef ref) {
return Scaffold(
appBar: AppBar(
title: const Text('現在位置'),
),
body: FutureBuilder(
future:
ref.read(geocodingControllerProvider.notifier).getCurrentAddress(),
builder: (BuildContext context, AsyncSnapshot<Address> snapshot) {
if (snapshot.connectionState != ConnectionState.done) {
return const Center(
child: CircularProgressIndicator(),
);
}
if (snapshot.hasError) {
return Center(
child: Column(
children: [
Text(
snapshot.error.toString(),
),
],
),
);
}
if (snapshot.hasData) {
final countryTextController =
TextEditingController(text: snapshot.data!.country);
final prefectureTextController =
TextEditingController(text: snapshot.data!.prefecture);
final cityTextController =
TextEditingController(text: snapshot.data!.city);
final streetTextController =
TextEditingController(text: snapshot.data!.street);
return Padding(
padding: const EdgeInsets.symmetric(horizontal: 20.0),
child: Column(
crossAxisAlignment: CrossAxisAlignment.start,
children: [
const Text('国'),
TextField(
controller: countryTextController,
decoration:
const InputDecoration(border: OutlineInputBorder()),
),
const Gap(20),
const Text('都道府県'),
TextField(
controller: prefectureTextController,
decoration:
const InputDecoration(border: OutlineInputBorder()),
),
const Gap(20),
const Text('市区町村'),
TextField(
controller: cityTextController,
decoration:
const InputDecoration(border: OutlineInputBorder()),
),
const Gap(20),
const Text('番地'),
TextField(
controller: streetTextController,
decoration:
const InputDecoration(border: OutlineInputBorder()),
),
const Gap(40),
Align(
alignment: Alignment.center,
child: ElevatedButton(
onPressed: () {},
child: const Padding(
padding: EdgeInsets.symmetric(horizontal: 80.0),
child: Text(
'登録',
),
),
),
),
const Gap(20),
Align(
  alignment: Alignment.center,
  child: TextButton(
    onPressed: () async {
      await showSearchFromPositionDialog(
        context: context,
        countryTextController: countryTextController,
        prefectureTextController: prefectureTextController,
        cityTextController: cityTextController,
        streetTextController: streetTextController,
        ref: ref,
      );
    },
    child: const Padding(
      padding: EdgeInsets.symmetric(horizontal: 80.0),
      child: Text(
        '座標から検索',
      ),
    ),
  ),
),
],
),
);
} else {
return const Column(
children: [
Center(
child: Text('データが存在しません'),
),
],
);
}
},
),
);
}
Future<void> showSearchFromPositionDialog({
  required BuildContext context,
  required TextEditingController countryTextController,
  required TextEditingController prefectureTextController,
  required TextEditingController cityTextController,
  required TextEditingController streetTextController,
  required WidgetRef ref,
}) async {
  final longitudeTextController = TextEditingController();
  final latitudeTextController = TextEditingController();
  showDialog(
    context: context,
    builder: (context) {
      return Dialog(
        child: Padding(
          padding: const EdgeInsets.all(20.0),
          child: Column(
            crossAxisAlignment: CrossAxisAlignment.start,
            mainAxisSize: MainAxisSize.min,
            children: [
              const Align(
                alignment: Alignment.center,
                child: Padding(
                  padding: EdgeInsets.all(8.0),
                  child: Text(
                    '座標から検索',
                    style: TextStyle(fontSize: 22),
                  ),
                ),
              ),
              const Gap(20),
              const Text('経度'),
              TextField(
                controller: latitudeTextController,
                decoration:
                    const InputDecoration(border: OutlineInputBorder()),
              ),
              const Gap(20),
              const Text('緯度'),
              TextField(
                controller: longitudeTextController,
                decoration:
                    const InputDecoration(border: OutlineInputBorder()),
              ),
              const Gap(20),
              const Align(
                alignment: Alignment.center,
                child: Text(
                  '例)大阪梅田駅: 34.7013302 , 135.4945564',
                  style: TextStyle(fontSize: 12),
                ),
              ),
              const Gap(20),
              Align(
                alignment: Alignment.center,
                child: Padding(
                  padding: const EdgeInsets.all(8.0),
                  child: ElevatedButton(
                    onPressed: () async {
                      final latitude =
                          double.parse(latitudeTextController.text);
                      final longitude =
                          double.parse(longitudeTextController.text);
                      await ref
                          .read(geocodingControllerProvider.notifier)
                          .getAddressInfoFromPosition(
                              latitude: latitude, longitude: longitude)
                          .then((address) {
                        countryTextController.text = address.country;
                        prefectureTextController.text = address.prefecture;
                        cityTextController.text = address.city;
                        streetTextController.text = address.street;
                      });
                      Navigator.pop(context);
                    },
                    child: const Padding(
                      padding: EdgeInsets.symmetric(horizontal: 20.0),
                      child: Text(
                        '検 索',
                      ),
                    ),
                  ),
                ),
              ),
            ],
          ),
        ),
      );
    },
  );
}
}
第3章のコードとの変更点は以下の二点です。
- 緯度経度を入力するダイアログを表示させるボタンの追加
- 緯度経度を入力するダイアログの実装
1. 緯度経度を入力するダイアログを表示させるボタンの追加
以下の部分で実装しています。
onPressed で後述の showSearchFromPositionDialog を実行しています。基本的なボタンの実装なので、詳細は省きます。
Align(
alignment: Alignment.center,
child: TextButton(
onPressed: () async {
await showSearchFromPositionDialog(
context: context,
countryTextController: countryTextController,
prefectureTextController: prefectureTextController,
cityTextController: cityTextController,
streetTextController: streetTextController,
ref: ref,
);
},
child: const Padding(
padding: EdgeInsets.symmetric(horizontal: 80.0),
child: Text(
'座標から検索',
),
),
),
),
2. 緯度経度を入力するダイアログの実装
コードは以下の通りです。
Future<void> showSearchFromPositionDialog({
required BuildContext context,
required TextEditingController countryTextController,
required TextEditingController prefectureTextController,
required TextEditingController cityTextController,
required TextEditingController streetTextController,
required WidgetRef ref,
}) async {
final longitudeTextController = TextEditingController();
final latitudeTextController = TextEditingController();
showDialog(
context: context,
builder: (context) {
return Dialog(
child: Padding(
padding: const EdgeInsets.all(20.0),
child: Column(
crossAxisAlignment: CrossAxisAlignment.start,
mainAxisSize: MainAxisSize.min,
children: [
const Align(
alignment: Alignment.center,
child: Padding(
padding: EdgeInsets.all(8.0),
child: Text(
'座標から検索',
style: TextStyle(fontSize: 22),
),
),
),
const Gap(20),
const Text('経度'),
TextField(
  controller: latitudeTextController,
  decoration: const InputDecoration(border: OutlineInputBorder()),
),
const Gap(20),
const Text('緯度'),
TextField(
controller: longitudeTextController,
decoration:
const InputDecoration(border: OutlineInputBorder()),
),
const Gap(20),
const Align(
alignment: Alignment.center,
child: Text(
'例)大阪梅田駅: 34.7013302 , 135.4945564',
style: TextStyle(fontSize: 12),
),
),
const Gap(20),
Align(
alignment: Alignment.center,
child: Padding(
padding: const EdgeInsets.all(8.0),
child: ElevatedButton(
onPressed: () async {
final latitude =
double.parse(latitudeTextController.text);
final longitude =
double.parse(longitudeTextController.text);
await ref
.read(geocodingControllerProvider.notifier)
.getAddressInfoFromPosition(
latitude: latitude, longitude: longitude)
.then((address) {
countryTextController.text = address.country;
prefectureTextController.text = address.prefecture;
cityTextController.text = address.city;
streetTextController.text = address.street;
});
Navigator.pop(context);
},
child: const Padding(
padding: EdgeInsets.symmetric(horizontal: 20.0),
child: Text(
'検 索',
),
),
),
),
),
],
),
),
);
},
);
}
詳しくみていきます。
以下では任意の緯度経度の入力を管理する TextEditingController を定義しています。
final longitudeTextController = TextEditingController();
final latitudeTextController = TextEditingController();
以下では定義した TextEditingController を TextField の controller に代入しています。これでユーザーの入力を保持できます。
const Text('経度'),
TextField(
controller: latitudeTextController,
decoration: const InputDecoration(border: OutlineInputBorder()),
),
以下では、ユーザーが緯度経度を入力して「検索」ボタンを押した際の処理を記述しています。
geocodingControllerProvider の getAddressInfoFromPosition を実行し、引数に浮動小数点型の緯度と経度を渡すことで、その場所の住所を取得できます。
取得したデータをそれぞれの TextEditingController の text に渡すことで、テキストフィールドの初期値を住所に変更することができます。
onPressed: () async {
  final latitude = double.parse(latitudeTextController.text);
  final longitude = double.parse(longitudeTextController.text);
  await ref.read(geocodingControllerProvider.notifier)
    .getAddressInfoFromPosition(
      latitude: latitude,
      longitude: longitude
    )
    .then((address) {
      countryTextController.text = address.country;
      prefectureTextController.text = address.prefecture;
      cityTextController.text = address.city;
      streetTextController.text = address.street;
  });
},
上記のコードを実行すると、章の初めで提示した以下の動画のような挙動になるかと思います。
まとめ
最後まで読んでいただいてありがとうございました。
今回は geocoding, geolocator を使って現在位置の住所を取得する実装を行いました。
geocoding に関しては、緯度と経度を入力するだけで日本語の住所に変換してくれるため、実装も簡単で便利だと感じました。
geolocator に関しては、単純に位置情報を取得するだけでなく、位置情報を取得するまでの権限の管理など、機能を実装する上で必要なものが揃っていてとても便利なパッケージであると感じました。
誤っている点やもっと良い書き方があればご指摘いただければ幸いです。
参考
Discussion