【Flutter】バイブレーションを実装する
初めに
今回は Flutter におけるバイブレーションについて、 実装方法や使い方を見ていきたいと思います。
最終的には、 Flutter で Swift のバイブレーションの実装を再現したり、バイブレーションをカスタムしたりできるようになることを目指します。
記事の対象者
- Flutter 学習者
- Flutter でバイブレーションを実装したい方
- Swift との違いを知りたい方
目的
今回は先述の通り、Flutter でのバイブレーションの実装を行うことを目的とします。
実装していく中でバイブレーションの使い方や使い所などを紹介できればと思います。
導入
まずは vibrationパッケージ の最新バージョンを pubspec.yamlに記述します。
dependencies:
  flutter:
    sdk: flutter
  vibration 2.0.0
または
以下をターミナルで実行
flutter pub add vibration
バイブレーションについて
まずは、 iOS 側でのバイブレーションの取り扱いについてみていきます。
バイブレーションに関して、 Apple のドキュメントでは「Haptic Feedback(触覚フィードバック)」として紹介されています。
Apple 公式の UIFeedbackGenerator の項目に以下のような記述があります。(原文を日本語訳)
-
UIImpactFeedbackGenerator
衝撃が発生したことを示すために衝撃フィードバックを使用します。例えば、ユーザーインターフェースオブジェクトが何かに衝突したり、所定の位置にはまり込んだりしたときに衝撃フィードバックをトリガーすることができます。 -
UISelectionFeedbackGenerator
選択の変更を示すために選択フィードバックを使用します。 -
UINotificationFeedbackGenerator
成功、失敗、警告を示すために通知フィードバックを使用します。 -
UICanvasFeedbackGenerator
描画イベントが発生したことを示すためにキャンバスフィードバックを使用します。例えば、オブジェクトがガイドや定規にスナップするような場合に使用します。
以上の記述から、 Haptic Feedback には4種類あり、各々で使用用途が異なるということがわかります。
今回は使用頻度を考えて、上記の中から上3つのフィードバックについて実装してみたいと思います。
- ImpactFeedback
- SelectionFeedback
- NotificationFeedback
使用上の注意
実装に入る前に、 Haptic Feedback の使用上の注意点を公式ドキュメントをもとに確認しておきたいと思います。 Playing haptics のドキュメントから引用します。
以下の点に注意しつつ実装を進めるようにします。
システムが提供する触覚パターンを使用しする
標準の触覚フィードバックは、標準コントロールを操作するときに常に提供されるため、ユーザはすでに認識しています。ドキュメントに記載されている使用パターンが、アプリやゲームにとって適切でない場合は、そのパターンに別の意味を持たせて使用するのは避けてください。代わりに、汎用的なパターンを使用するか、可能な場合は、独自のパターンを作成してください。ガイダンスは、カスタムの触覚フィードバックを参照してください。
一貫性のある触覚フィードバックを使用する
ユーザが特定の触覚パターンと特定の体験を結びつけることができるように、触覚フィードバックとそれを発生させるアクションには、明確な因果関係を持たせることが重要です。因果関係が明白でない触覚フィードバックは、ユーザを混乱させ、無駄なものと見なされる可能性があります。例えば、ゲームのキャラクタがミッションを達成できなかったときに特定の触覚パターンを提供する場合、ユーザはそのパターンから否定的な結果を連想します。あるレベルをクリアしたときなど、肯定的な結果に同じ触覚パターンを使用すると、ユーザは混乱してしまいます。
ほかのフィードバックを補完する形で使用する
物質世界で通常そうであるように、視覚、聴覚、触覚によるフィードバックが協調して動作することで、ユーザ体験は一貫性のある自然なものになります。例えば、通常は触覚フィードバックの強さや鮮明さを、一緒に表示するアニメーションの強さや鮮明さと合わせるようにしてください。
多用しすぎないようにする
触覚フィードバックは、たまに提供されると効果的ですが、頻繁に使うとしつこく感じられることがあります。ユーザテストを行うと、ユーザが最も心地よく感じるバランスを見つけるうえで役立ちます。多くの場合は、ユーザが意識しないくらいでありながら、無効にすると物足りなく感じられる程度が最適な体験です。
短い触覚フィードバックを使用する
ゲームプレイフローに伴って生じる長く続く触覚フィードバックで操作性を高めることはできますが、アプリでの長く続く触覚フィードバックは、フィードバックの意味を薄くさせ、タスクからユーザの気を逸らしてしまう可能性があります。Apple Pencil Proでは、例えば、連続する触覚フィードバックや長く続く触覚フィードバックで手書きや描画の操作が分かりやすくなる傾向はなく、Apple Pencilを持っているのが不快になる可能性すらあります。
触覚フィードバックはオプションにする
触覚フィードバックはオフにできるようにし、触覚フィードバックがなくてもアプリを使えるようにします。
触感フィードバックによって与える影響を考慮する
設計上、触覚フィードバックを行うと、ユーザに振動を感じさせるような力が発生します。発生した振動によって、カメラ、ジャイロスコープ、マイクなどのデバイスの機能に関わる操作性が損なわれないようにしてください
実装
それではバイブレーションの実装に入っていきます。
実装は以下の手順で進めていきます。
- ImpactFeedback
- SelectionFeedback
- NotificationFeedback
- カスタムのフィードバック
1. ImpactFeedback
まずは、 ImpactFeedback の実装を行います。
それぞれの実装は Manager と View に分けて行いたいと思います。
View に関しては、バイブレーションを試すことができる一覧のビューと、それぞれのバイブレーションの使い所を試すビューに分けて実装します。
FeedbackManager の編集
まずは FeedbackManager です。
コードは以下の通りです。
import 'package:flutter/services.dart';
import 'package:riverpod_annotation/riverpod_annotation.dart';
part 'feedback_manager.g.dart';
enum FeedbackType {
  impact,
  selection,
  notification,
}
class FeedbackManager extends _$FeedbackManager {
FeedbackType build() {
return FeedbackType.impact;
}
Future<void> triggerImpactFeedback({
ImpactFeedbackStyle style = ImpactFeedbackStyle.medium,
}) async {
state = FeedbackType.impact;
switch (style) {
case ImpactFeedbackStyle.light:
await HapticFeedback.lightImpact();
break;
case ImpactFeedbackStyle.medium:
await HapticFeedback.mediumImpact();
break;
case ImpactFeedbackStyle.heavy:
await HapticFeedback.heavyImpact();
break;
}
}
}
enum ImpactFeedbackStyle {
  light,
  medium,
  heavy,
}
それぞれ詳しくみていきます。
以下では、今回実装する ImpactFeedback, SelectionFeedback, NotificationFeedback の三つのフィードバックを切り替えるための enum を定義しています。
今後の実装でそれぞれ追加していきます。
enum FeedbackType {
impact,
selection,
notification,
}
以下では、 Riverpod Geneartor を用いて Feedback を管理するための FeedbackManager を定義しています。 build メソッドでは先程定義した FeedbackType を返却するようにしています。
part 'feedback_manager.g.dart';
class FeedbackManager extends _$FeedbackManager {
FeedbackType build() {
return FeedbackType.impact;
}
feedback_manager.dart の下部に定義している以下の enum では、 ImpactFeedback の強さを表しています。UIImpactFeedbackGenerator.FeedbackStyle のドキュメントによると、 FeedbackStyle は5種類あります。今回は3種類のみに絞って実装しています。
enum ImpactFeedbackStyle {
light,
medium,
heavy,
}
以下では triggerImpactFeedback として先程定義した ImpactFeedbackStyle を引数として受け取り、 HapticFeedback でバイブレーションを実行しています。
HapticFeedback は Flutter の package:flutter/src/services/haptic_feedback.dart に用意されており、メソッドを呼び出すだけで簡単にバイブレーションを実行することができます。
Future<void> triggerImpactFeedback({
  ImpactFeedbackStyle style = ImpactFeedbackStyle.medium,
}) async {
  state = FeedbackType.impact;
  switch (style) {
    case ImpactFeedbackStyle.light:
      await HapticFeedback.lightImpact();
      break;
    case ImpactFeedbackStyle.medium:
      await HapticFeedback.mediumImpact();
      break;
    case ImpactFeedbackStyle.heavy:
      await HapticFeedback.heavyImpact();
      break;
  }
}
FeedbackListSample の編集
次に FeedbackListSample を作成します。
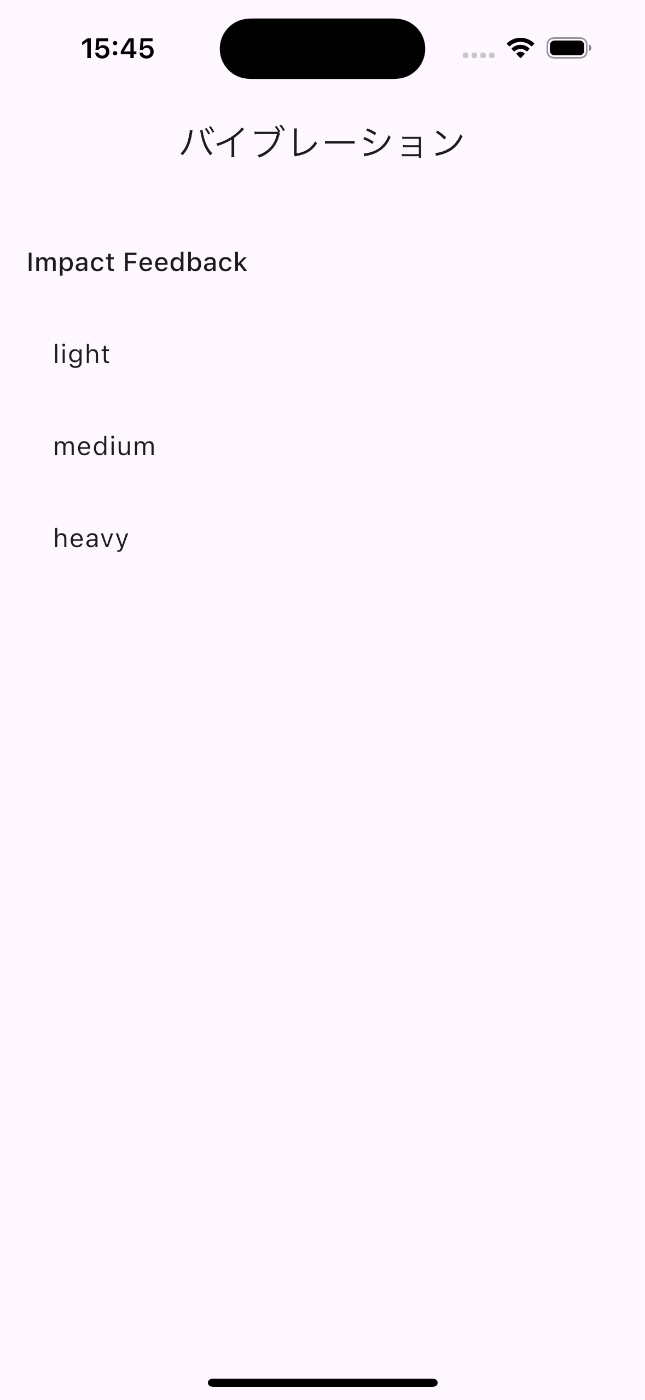
このページではそれぞれのバイブレーションの一覧を試すことができるようにしていきます。
コードは以下の通りです。
import 'package:flutter/material.dart';
import 'package:flutter_riverpod/flutter_riverpod.dart';
import 'package:gap/gap.dart';
import 'package:sample_flutter/vibration/feedback_manager.dart';
import 'package:sample_flutter/vibration/vibration_manager.dart';
class FeedbackListSample extends ConsumerWidget {
const FeedbackListSample({super.key});
Widget build(BuildContext context, WidgetRef ref) {
final feedBackController = ref.read(feedbackManagerProvider.notifier);
return Scaffold(
appBar: AppBar(
title: const Text(
'バイブレーション',
),
),
body: SingleChildScrollView(
child: Padding(
padding: const EdgeInsets.symmetric(
vertical: 32,
horizontal: 16,
),
child: Column(
crossAxisAlignment: CrossAxisAlignment.start,
children: [
Text(
'Impact Feedback',
style: Theme.of(context).textTheme.titleMedium,
),
const Gap(16),
...ImpactFeedbackStyle.values.map(
  (style) => ListTile(
    title: Text(style.name),
    onTap: () {
      feedBackController.triggerImpactFeedback(
        style: style,
      );
    },
  ),
),
],
),
),
),
);
}
}
以下では feedBackController として先程作成した feedbackManagerProvider を取得しています。
class FeedbackListSample extends ConsumerWidget {
const FeedbackListSample({super.key});
Widget build(BuildContext context, WidgetRef ref) {
final feedBackController = ref.read(feedbackManagerProvider.notifier);
以下では、 ImpactFeedbackStyle をもとに作成した ListTile に関して、タップされた際に先程取得した feedBackController の triggerImpactFeedback を実行しています。
これで ListTile をタップした際にそれぞれの強さのバイブレーションが実行されることがわかるかと思います。
...ImpactFeedbackStyle.values.map(
(style) => ListTile(
title: Text(style.name),
onTap: () {
feedBackController.triggerImpactFeedback(
style: style,
);
},
),
),
これで以下の画像のように、 ImpactFeedback を試すためのビューができるかと思います。

ImpactFeedback の使い所
以下では FeedbackListSample で一覧表示するだけでなく、 ImpactFeedback をどのような場面で使用できるかを考えていきます。
新たに impact_feedback_sample.dart というファイルを作成して以下のようなコードにしてみます。
class ImpactFeedbackSample extends HookConsumerWidget {
const ImpactFeedbackSample({super.key});
Widget build(BuildContext context, WidgetRef ref) {
final isNotificationToggleOn = useState(false);
final isVibrationToggleOn = useState(false);
final feedbackController = ref.read(feedbackManagerProvider.notifier);
return Scaffold(
appBar: AppBar(
title: const Text('Impact Feedback Sample'),
),
body: Column(
crossAxisAlignment: CrossAxisAlignment.start,
children: [
SwitchListTile(
  title: const Text('通知'),
  value: isNotificationToggleOn.value,
  onChanged: (value) {
    isNotificationToggleOn.value = value;
    feedbackController.triggerImpactFeedback();
  },
  secondary: const Icon(Icons.notifications),
),
SwitchListTile(
title: const Text('バイブレーション'),
value: isVibrationToggleOn.value,
onChanged: (value) {
isVibrationToggleOn.value = value;
feedbackController.triggerImpactFeedback();
},
secondary: const Icon(Icons.vibration),
),
],
),
);
}
}
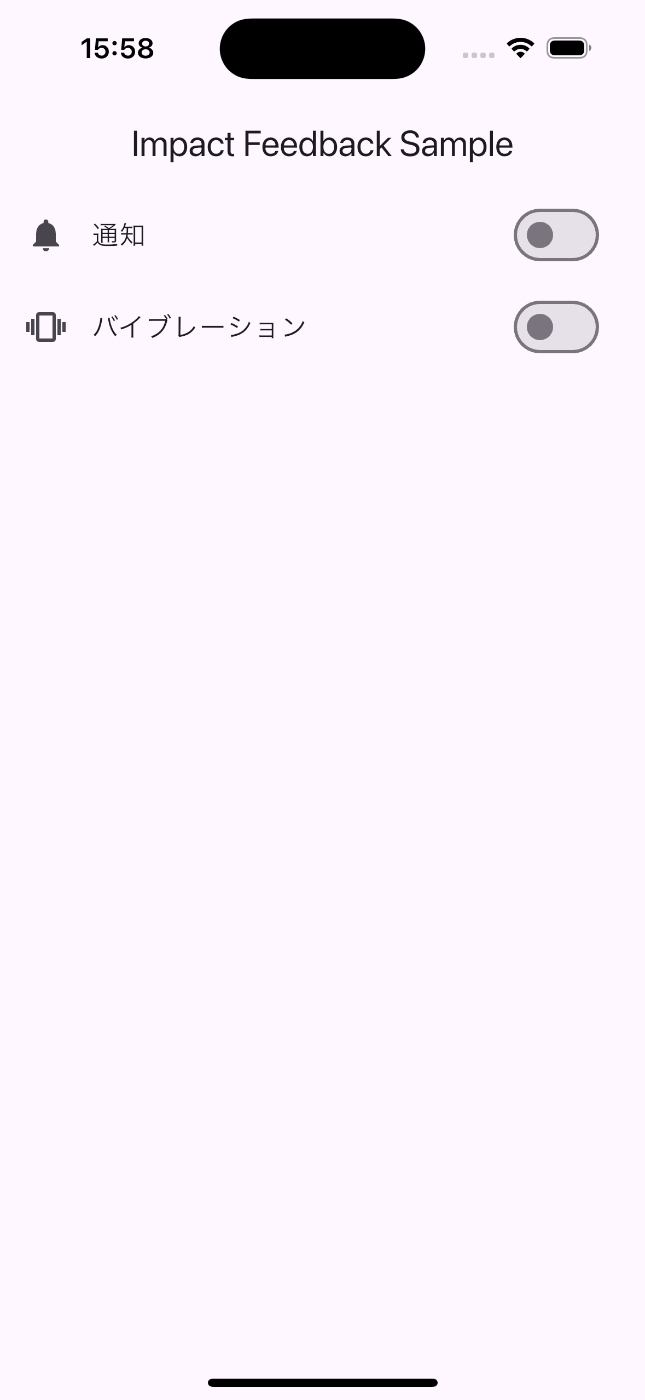
上記のコードで実行すると以下のようなUIになります。

ImpactFeedback の使い所として一つ考えられるのが Switch を切り替えた際のフィードバックです。
ユーザーは Switch が切り替わったかどうかを触感でも感知することができるようになります。
実際に iPhone のアラームアプリの以下の画面では Switch を切り替えた際のフィードバックが実装されています。

コードについてそれぞれ詳しくみていきます。
以下では、 useState を用いて各項目の Switch のON/OFFを保持しています。
また、先程作成した feedbackManagerProvider を読み取ることでバイブレーションに関する処理が実行できるようにしてます。
final isNotificationToggleOn = useState(false);
final isVibrationToggleOn = useState(false);
final feedbackController = ref.read(feedbackManagerProvider.notifier);
以下では、通知のON/OFFを設定するための SwitchListTile を作成しています。
onChanged の項目で isNotificationToggleOn の状態を書き換えると同時に triggerImpactFeedback を呼び出しています。
これで、ユーザーが SwitchListTile をタップした際にはバイブレーションが起こりよりわかりやすいフィードバックになっています。
SwitchListTile(
title: const Text('通知'),
value: isNotificationToggleOn.value,
onChanged: (value) {
isNotificationToggleOn.value = value;
feedbackController.triggerImpactFeedback();
},
secondary: const Icon(Icons.notifications),
),
2. SelectionFeedback
次に SelectionFeedback の実装を行います。
FeedbackManager の編集
まずは先程作成した FeedbackManager への追加実装から進めていきます。
コードは以下の通りです。
@riverpod
class FeedbackManager extends _$FeedbackManager {
FeedbackType build() {
return FeedbackType.impact;
}
// 既に実装した triggerImpactFeedback 関数
Future<void> triggerImpactFeedback({
ImpactFeedbackStyle style = ImpactFeedbackStyle.medium,
}) async {
// 省略
}
+ Future<void> triggerSelectionFeedback() async {
+ state = FeedbackType.selection;
+ await HapticFeedback.selectionClick();
+ }
SelectionFeedback は特に強さなどの指定はなく、selectionClick のみが用意されています。
したがって、 FeedbackManager における実装もかなりシンプルなものになっています。
FeedbackListSample の編集
次に、先程作成した FeedbackListSample への追加を行なっていきます。
コードは以下の通りです。
class FeedbackListSample extends ConsumerWidget {
const FeedbackListSample({super.key});
Widget build(BuildContext context, WidgetRef ref) {
final feedBackController = ref.read(feedbackManagerProvider.notifier);
return Scaffold(
appBar: AppBar(
title: const Text(
'バイブレーション',
),
),
body: SingleChildScrollView(
child: Padding(
padding: const EdgeInsets.symmetric(
vertical: 32,
horizontal: 16,
),
child: Column(
crossAxisAlignment: CrossAxisAlignment.start,
children: [
// Impact Feedback の実装(省略)
+ const Gap(32),
+ Text(
+ 'Selection Feedback',
+ style: Theme.of(context).textTheme.titleMedium,
+ ),
+ const Gap(16),
+ ListTile(
+ title: const Text('Selection Feedback'),
+ onTap: () {
+ feedBackController.triggerSelectionFeedback();
+ },
+ ),
],
),
),
),
);
}
}
先程の ImpactFeedback の実装と同様に、 feedBackController を読み取り、そこから先程定義した triggerSelectionFeedback を呼び出しています。
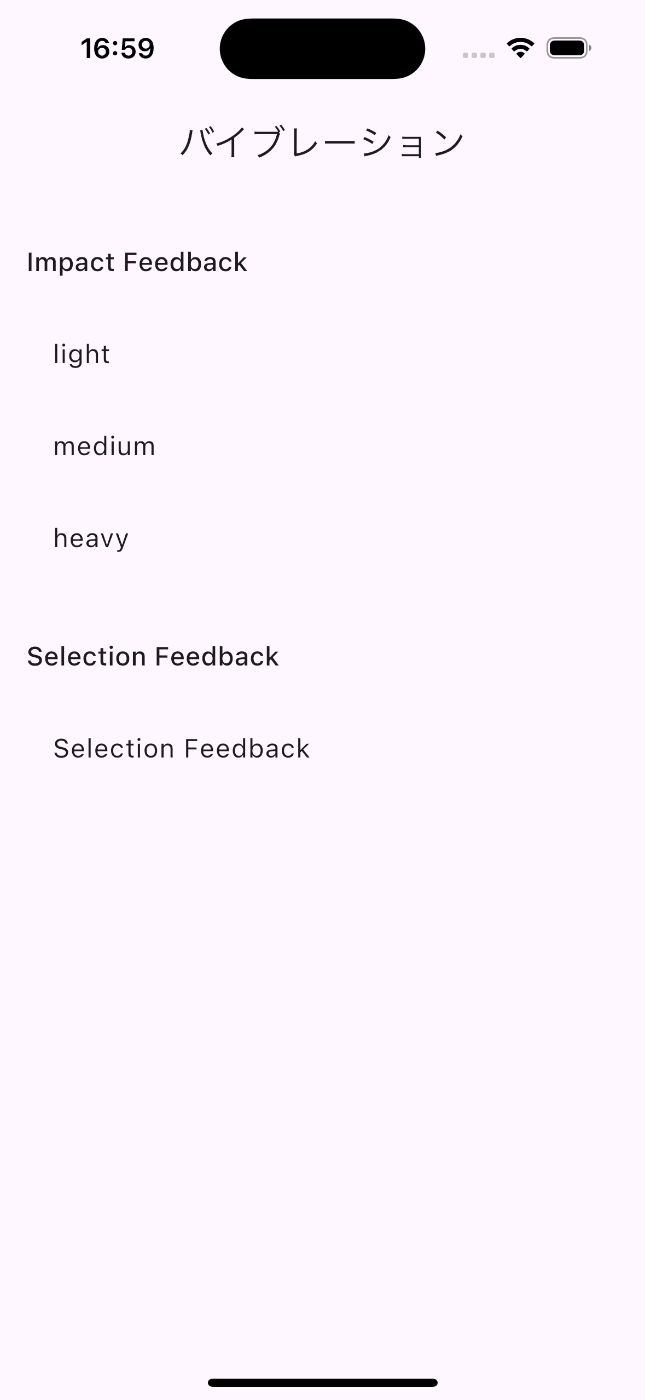
これで実行すると以下のようなUIになっており、タップすると SelectionFeedback が実行される ListTile が追加できたかと思います。

SelectionFeedback の使い所
次に SelectionFeedback の使い所についてみていきます。
新たに selection_feedback_sample.dart というファイルを作成して以下のようなコードにしてみます。
import 'package:flutter/cupertino.dart';
import 'package:flutter/material.dart';
import 'package:flutter_hooks/flutter_hooks.dart';
import 'package:hooks_riverpod/hooks_riverpod.dart';
import 'package:sample_flutter/vibration/feedback_manager.dart';
class SelectionFeedbackSample extends HookConsumerWidget {
const SelectionFeedbackSample({super.key});
static const _items = [
"item 1",
"item 2",
"item 3",
"item 4",
"item 5",
];
Widget build(BuildContext context, WidgetRef ref) {
final feedbackController = ref.read(feedbackManagerProvider.notifier);
final currentIndex = useState(0);
return Scaffold(
appBar: AppBar(
title: const Text('Selection Feedback Sample'),
),
body: Center(
child: TextButton(
child: const Text(
'アイテムを選択',
),
onPressed: () {
showModalBottomSheet(
context: context,
builder: (BuildContext context) {
return SizedBox(
height: MediaQuery.of(context).size.height / 3,
child: CupertinoPicker(
itemExtent: 40,
onSelectedItemChanged: (int index) {
currentIndex.value = index;
feedbackController.triggerSelectionFeedback();
},
children: _items.map((item) => Padding(
padding: const EdgeInsets.all(8.0),
child: Text(item),
)).toList(),
),
);
},
);
},
),
),
);
}
}
上記のコードで実行すると以下のようなUIになります。
item が並んだドラムロールをスクロールしてみると、先程のバイブレーションよりも少し小さいバイブレーションが実行されていることがわかるかと思います。

ドラムロールは連続する項目の選択に便利な一方でユーザー側からすると、選択されている項目が分かりにくい場合があります。そこで、 SelectionFeedback を実行することで、いつ選択しているアイテムが切り替わったかがより分かりやすくなります。
先程も例に出した iPhone のアラームアプリでは、時刻を選択するためのドラムロールにバイブレーションが実装されています。さらに、アラームアプリでは時刻が切り替わるたびにバイブレーションと同時に「カチッ」というサウンドも流れるようになっています。これでユーザーは視覚と触覚に加えて聴覚からもフィードバックが得られるため、誤って選択するケースをより減らすことができています。

3. NotificationFeedback
次は NotificationFeedback の実装を行います。
FeedbackManager の編集
まずは先程作成した FeedbackManager への追加実装から進めていきます。
コードは以下の通りです。
@riverpod
class FeedbackManager extends _$FeedbackManager {
FeedbackType build() {
return FeedbackType.impact;
}
// 既に実装した triggerImpactFeedback 関数
Future<void> triggerImpactFeedback({
ImpactFeedbackStyle style = ImpactFeedbackStyle.medium,
}) async {
// 省略
}
// 既に実装した triggerSelectionFeedback 関数
Future<void> triggerSelectionFeedback() async {
// 省略
}
+ Future<void> triggerNotificationFeedback({
+ NotificationFeedbackType type = NotificationFeedbackType.success,
+ }) async {
+ state = FeedbackType.notification;
+ switch (type) {
+ case NotificationFeedbackType.success:
+ await HapticFeedback.mediumImpact();
+ await Future.delayed(const Duration(milliseconds: 200));
+ await HapticFeedback.heavyImpact();
+ break;
+ case NotificationFeedbackType.warning:
+ await HapticFeedback.heavyImpact();
+ await Future.delayed(const Duration(milliseconds: 300));
+ await HapticFeedback.mediumImpact();
+ break;
+ case NotificationFeedbackType.error:
+ await HapticFeedback.mediumImpact();
+ await Future.delayed(const Duration(milliseconds: 100));
+ await HapticFeedback.mediumImpact();
+ await Future.delayed(const Duration(milliseconds: 100));
+ await HapticFeedback.heavyImpact();
+ await Future.delayed(const Duration(milliseconds: 100));
+ await HapticFeedback.heavyImpact();
+ break;
+ }
+ }
}
+ enum NotificationFeedbackType {
+ success,
+ warning,
+ error,
+ }
それぞれ詳しくみていきます。
以下では NotificationFeedback のタイプを指定するための enum を定義しています。
UINotificationFeedbackGenerator.FeedbackType のドキュメントからわかる通り、 NotificationFeedback には enum にも定義している3種類があるため、今回はそれをもとにタイプを作成しています。
enum NotificationFeedbackType {
  success,
  warning,
  error,
}
次に以下の部分です。
以下では、 NotificationFeedbackType を受け取って、そのタイプに応じた NotificationFeedback を実行する triggerNotificationFeedback を定義しています。
また、 NotificationFeedbackType.success の場合に実行するバイブレーションを実装しています。
今回、 NotificationFeedback を実装するにあたって、 success, warning, error の場合にあたるバイブレーションを Flutter 側で探したのですが、筆者は見つけられなかったため自作しました。
ImpactFeedback と Duration を組み合わせて自作しました。
warning, error の場合もやっていることは同じであるため、解説は割愛します。
Future<void> triggerNotificationFeedback({
  NotificationFeedbackType type = NotificationFeedbackType.success,
}) async {
  state = FeedbackType.notification;
  switch (type) {
    case NotificationFeedbackType.success:
      await HapticFeedback.mediumImpact();
      await Future.delayed(const Duration(milliseconds: 200));
      await HapticFeedback.heavyImpact();
      break;
なお、Apple公式ドキュメントに以下のような図があり、 success, warning, error の場合のバイブレーションの形がある程度わかったため、それを参考に自作しました。

FeedbackListSample の編集
次に FeedbackListSample を変更していきます。
コードは以下の通りです。
class FeedbackListSample extends ConsumerWidget {
const FeedbackListSample({super.key});
Widget build(BuildContext context, WidgetRef ref) {
final feedBackController = ref.read(feedbackManagerProvider.notifier);
return Scaffold(
appBar: AppBar(
title: const Text(
'バイブレーション',
),
),
body: SingleChildScrollView(
child: Padding(
padding: const EdgeInsets.symmetric(
vertical: 32,
horizontal: 16,
),
child: Column(
crossAxisAlignment: CrossAxisAlignment.start,
children: [
// Impact Feedback の実装(省略)
// Selection Feedback の実装(省略)
+ const Gap(32),
+ Text(
+ 'Notification Feedback',
+ style: Theme.of(context).textTheme.titleMedium,
+ ),
+ const Gap(16),
+ ...NotificationFeedbackType.values.map(
+ (type) => ListTile(
+ title: Text(type.name),
+ onTap: () {
+ feedBackController.triggerNotificationFeedback(type: type);
+ },
+ ),
+ ),
],
),
),
),
);
}
}
今までの実装と同様に、 feedBackController を読み取り、そこから先程定義した triggerNotificationFeedback を呼び出しています。
これで実行すると以下のようなUIになっており、タップすると `NotificationFeedback が実行される ListTile が追加できたかと思います。

NotificationFeedback の使い所
次に NotificationFeedback の使い所についてみていきます。
新たに notification_feedback_sample.dart というファイルを作成して以下のようなコードにしてみます。
class NotificationFeedbackSample extends HookConsumerWidget {
const NotificationFeedbackSample({super.key});
Widget build(BuildContext context, WidgetRef ref) {
final feedbackController = ref.read(feedbackManagerProvider.notifier);
final sendStatus = useState(SendStatus.notSent);
return Scaffold(
appBar: AppBar(
title: const Text('Notification Feedback Sample'),
),
body: Center(
child: TextButton.icon(
icon: sendStatus.value.icon,
label: Text(
sendStatus.value.label,
style: const TextStyle(color: Colors.white),
),
style: TextButton.styleFrom(
backgroundColor: sendStatus.value.backgroundColor,
),
onPressed: () {
final random = Random();
final nextStatus = [
SendStatus.success,
SendStatus.warning,
SendStatus.error,
][random.nextInt(3)];
sendStatus.value = nextStatus;
switch (nextStatus) {
case SendStatus.success:
feedbackController.triggerNotificationFeedback(
type: NotificationFeedbackType.success);
break;
case SendStatus.warning:
feedbackController.triggerNotificationFeedback(
type: NotificationFeedbackType.warning);
break;
case SendStatus.error:
feedbackController.triggerNotificationFeedback(
type: NotificationFeedbackType.error);
break;
default:
break;
}
},
),
),
);
}
}
enum SendStatus {
notSent(
label: '送信する',
icon: Icon(
Icons.send,
color: Colors.white,
),
backgroundColor: Colors.blue,
),
success(
label: '送信済み',
icon: Icon(
Icons.check,
color: Colors.white,
),
backgroundColor: Colors.green,
),
warning(
label: '画像が送信されていません',
icon: Icon(
Icons.warning,
color: Colors.white,
),
backgroundColor: Colors.orange,
),
error(
label: '送信できませんでした',
icon: Icon(
Icons.close,
color: Colors.white,
),
backgroundColor: Colors.red,
);
const SendStatus({
required this.label,
required this.icon,
required this.backgroundColor,
});
final String label;
final Icon icon;
final Color backgroundColor;
}
これで実行すると以下の動画のような挙動になるかと思います。
実機で実行してみると、「送信済み」 「画像が送信されていません」 「送信できませんでした」という三つの場合においてそれぞれ実行されるバイブレーションが異なることがわかります。
NotificationFeedback は先述の通り success, warning, error の三つの場合に分かれており、それぞれ異なるバイブレーションが実行されるためユーザーに与える印象が異なります。
これらを活用する例として、アプリで本来実行されるべき処理が正しく実行されたかどうかを伝えることが考えられます。
上記のコードの例では、以下のような三つの場合に実行するバイブレーションを切り替えることでユーザーにフィードバックを与えています。
-
送信済み(success)
本来実行されるべき「送信」という処理が正しく実行されていることを伝える -
画像が送信されていません(warning)
本来実行されるべき処理に一部問題、注意すべき点があることを伝える
場合によっては error に含まれることもあるため、問題の重要度に応じて使い分ける -
送信できませんでした(error)
本来実行されるべき「送信」という処理が実行されず、問題が発生したことを伝える
実際に活用されている例として、iPhone の FaceID 認証があります。
FaceID は認証に失敗した際にバイブレーションが実行されます。その時のバイブレーションはこの場合の error のバイブレーションと非常に似たものになっていることが確認できます。
NotificationFeedbackSample のコードを少し詳しくみていきます。
以下の部分では、送信の状態を表すための enum を定義しています。
送信の状態に応じて表示させるボタンのスタイルを変更するために、label や icon などを保持するようにしています。以下は notSent のみですが、他の場合に関しても同じような実装なので解説は割愛します。
enum SendStatus {
  notSent(
    label: '送信する',
    icon: Icon(
      Icons.send,
      color: Colors.white,
    ),
    backgroundColor: Colors.blue,
  ),

  // 省略

  const SendStatus({
    required this.label,
    required this.icon,
    required this.backgroundColor,
  });

  final String label;
  final Icon icon;
  final Color backgroundColor;
}
以下では他の実装と同じように feedbackManagerProvider を読み取っています。
また、 useState を用いて送信の状態を保持しています。
final feedbackController = ref.read(feedbackManagerProvider.notifier);
final sendStatus = useState(SendStatus.notSent);
以下では sendStatus の状態に応じて TextButton の表示を切り替えています。
それぞれ enum で定義したラベルやアイコンや背景色を用いて実装しています。
TextButton.icon(
  icon: sendStatus.value.icon,
  label: Text(
    sendStatus.value.label,
    style: const TextStyle(color: Colors.white),
  ),
  style: TextButton.styleFrom(
    backgroundColor: sendStatus.value.backgroundColor,
  ),
以下では、 TextButton.icon の onPressed を実装しています。
switch 文より前の処理では、 sendStatus の値をランダムに決定するための処理を記述しています。
本来のアプリケーションであればここで送信、保存の処理を行い、その結果をもとに状態を更新しますが、今回はサンプルなので、ランダムで実装しています。
switch 文では、ランダムに決定された送信の状態に応じて実行するバイブレーションを切り替えています。
onPressed: () {
  final random = Random();
  final nextStatus = [
    SendStatus.success,
    SendStatus.warning,
    SendStatus.error,
  ][random.nextInt(3)];

  sendStatus.value = nextStatus;

  switch (nextStatus) {
    case SendStatus.success:
      feedbackController.triggerNotificationFeedback(
          type: NotificationFeedbackType.success);
      break;
    case SendStatus.warning:
      feedbackController.triggerNotificationFeedback(
          type: NotificationFeedbackType.warning);
      break;
    case SendStatus.error:
      feedbackController.triggerNotificationFeedback(
          type: NotificationFeedbackType.error);
      break;
    default:
      break;
  }
},
4. カスタムのフィードバック
最後にバイブレーションを自由にカスタムしていきます。
今まで編集してきた FeedbackManager ではなく別のファイルでバイブレーションを実装していきます。
コードは以下の通りです。
import 'package:riverpod_annotation/riverpod_annotation.dart';
import 'package:vibration/vibration.dart';
part 'vibration_manager.g.dart';
class VibrationManager extends _$VibrationManager {
bool _hasVibrator = false;
bool _hasCustomVibrationsSupport = false;
Future<void> build() async {
_hasVibrator = await Vibration.hasVibrator() ?? false;
_hasCustomVibrationsSupport =
await Vibration.hasCustomVibrationsSupport() ?? false;
}
Future<void> triggerCustomFeedback({
CustomFeedbackType type = CustomFeedbackType.long,
}) async {
if (!_hasVibrator || !_hasCustomVibrationsSupport) return;
switch (type) {
case CustomFeedbackType.long:
Vibration.vibrate(
pattern: [0, 1000],
intensities: [0, 255],
);
break;
case CustomFeedbackType.threeTimes:
Vibration.vibrate(
pattern: [0, 500, 500, 500, 500, 500],
intensities: [0, 255, 0, 255, 0, 255],
);
break;
}
}
}
enum CustomFeedbackType {
  long,
  threeTimes,
}
それぞれ詳しくみていきます。
以下ではカスタムで作成するフィードバックのタイプを定義しています。
必要であれば作成したいフィードバックの数に応じて追加していきます。
enum CustomFeedbackType {
long,
threeTimes,
}
以下ではカスタムのフィードバックを管理する VibrationManager を Riverpod Generator で作成しています。カスタムのフィードバックを作成するためには以下の項目が両方とも true である必要があるため、 build メソッドでその確認を行なっています。
- Vibration.hasVibrator()
- Vibration.hasCustomVibrationsSupport()
class VibrationManager extends _$VibrationManager {
bool _hasVibrator = false;
bool _hasCustomVibrationsSupport = false;
Future<void> build() async {
_hasVibrator = await Vibration.hasVibrator() ?? false;
_hasCustomVibrationsSupport =
await Vibration.hasCustomVibrationsSupport() ?? false;
}
以下ではカスタムのフィードバックを作成しています。
この記事の冒頭で導入した vibration パッケージの Vibration.vibrate でバイブレーションを実行することができます。
バイブレーションは pattern, intensities をそれぞれカスタマイズすることができます。
Future<void> triggerCustomFeedback({
  CustomFeedbackType type = CustomFeedbackType.long,
}) async {
  if (!_hasVibrator || !_hasCustomVibrationsSupport) return;

  switch (type) {
    case CustomFeedbackType.long:
      Vibration.vibrate(
        pattern: [0, 1000],
        intensities: [0, 255],
      );
      break;
    case CustomFeedbackType.threeTimes:
      Vibration.vibrate(
        pattern: [0, 500, 500, 500, 500, 500],
        intensities: [0, 255, 0, 255, 0, 255],
      );
      break;
  }
}
pattern では [ 休止時間, バイブレーションの時間, 休止時間, バイブレーションの時間 ] のようにバイブレーションの実行時間をカスタマイズすることができます。具体的に、 CustomFeedbackType.long の場合は [0, 1000] となっているため、 0ms の休止時間の後に 1000ms のバイブレーションを実行するような設定になっています。
intensities ではバイブレーションの強さをカスタマイズすることができ、1~255の間で強さを指定できます。具体的に、CustomFeedbackType.long の場合は [0, 255] となっているため、 1000ms のバイブレーションの強さが 255 に設定されています。
以上を踏まえて、CustomFeedbackType.threeTimes を見てみると、 500ms のバイブレーションを 255 の強さで3回実行していることがわかるかと思います。
FeedbackListSample の編集
次に FeedbackListSample を変更していきます。
コードは以下の通りです。
class FeedbackListSample extends ConsumerWidget {
const FeedbackListSample({super.key});
Widget build(BuildContext context, WidgetRef ref) {
final feedBackController = ref.read(feedbackManagerProvider.notifier);
+ final vibrationController = ref.read(vibrationManagerProvider.notifier);
return Scaffold(
appBar: AppBar(
title: const Text(
'バイブレーション',
),
),
body: SingleChildScrollView(
child: Padding(
padding: const EdgeInsets.symmetric(
vertical: 32,
horizontal: 16,
),
child: Column(
crossAxisAlignment: CrossAxisAlignment.start,
children: [
// Impact Feedback の実装(省略)
// Selection Feedback の実装(省略)
// Notification Feedback の実装(省略)
+ const Gap(32),
+ Text(
+ 'Custom Feedback',
+ style: Theme.of(context).textTheme.titleMedium,
+ ),
+ const Gap(16),
+ ...CustomFeedbackType.values.map(
+ (type) => ListTile(
+ title: Text(type.name),
+ onTap: () {
+ vibrationController.triggerCustomFeedback(type: type);
+ },
+ ),
+ ),
],
),
),
),
);
}
}
上記のコードで実行すると以下のようなUIになり、それぞれタップするとカスタムしたバイブレーションが実行されることが確認できます。

Flutter における実装については以上です。
Swift で実装した場合
以下ではそれぞれの種類の Feedback を Swift で実装した場合のコードを載せておきます。
適宜参照していただければと思います。
import Foundation
import AudioToolbox
import UIKit
import SwiftUI

@MainActor
class VibrationViewModel: ObservableObject {
    static let shared = VibrationViewModel()

    // MARK: - Notification Feedback
    func notificationFeedback(_ type: UINotificationFeedbackGenerator.FeedbackType) {
            UINotificationFeedbackGenerator().notificationOccurred(type)
    }

    // MARK: - Impact Feedback
    func impactFeedback(_ style: UIImpactFeedbackGenerator.FeedbackStyle) {
            UIImpactFeedbackGenerator(style: style).impactOccurred()
    }

    // MARK: - Selection Feedback
    func selectionFeedback() {
            UISelectionFeedbackGenerator().selectionChanged()
    }

    // MARK: - Custom Feedback
    enum CustomFeedbackType {
        case long
        case sound(SystemSoundID)
        case threeTimes
        case noLimit
    }

    func customFeedback(_ type: CustomFeedbackType) {
        switch type {
        case .long:
            AudioServicesPlayAlertSoundWithCompletion(SystemSoundID(kSystemSoundID_Vibrate)) {}
        case .sound(let soundID):
            AudioServicesPlayAlertSoundWithCompletion(soundID) {}
        case .threeTimes:
            for _ in 0...2 {
                AudioServicesPlayAlertSoundWithCompletion(SystemSoundID(kSystemSoundID_Vibrate)) {}
                sleep(1)
            }
        case .noLimit:
            func makeVibrationNoLimit() {
                AudioServicesPlayAlertSoundWithCompletion(SystemSoundID(kSystemSoundID_Vibrate)) {
                    makeVibrationNoLimit()
                    sleep(1)
                }
            }
            makeVibrationNoLimit()
        }
    }
}

// MARK: - Usage Example
extension VibrationViewModel {
    func exampleUsage() {
        // Notification Feedback
        notificationFeedback(.success)
        notificationFeedback(.error)
        notificationFeedback(.warning)

        // Impact Feedback
        impactFeedback(.light)
        impactFeedback(.medium)
        impactFeedback(.heavy)

        // Selection Feedback
        selectionFeedback()

        // Custom Feedback
        customFeedback(.long)
        customFeedback(.sound(1102))  // firstSoundVibration
        customFeedback(.sound(1519))  // secondSoundVibration
        customFeedback(.sound(1520))  // thirdSoundVibration
        customFeedback(.sound(1521))  // fourthSoundVibration
        customFeedback(.threeTimes)
        customFeedback(.noLimit)
    }
}
import SwiftUI

struct VibrationView: View {
    @StateObject private var vibrationViewModel = VibrationViewModel.shared

    var body: some View {
        NavigationView {
            List {
                Section(header: Text("Notification Feedback")) {
                    createButton(title: "Success", action: { vibrationViewModel.notificationFeedback(.success) })
                    createButton(title: "Warning", action: { vibrationViewModel.notificationFeedback(.warning) })
                    createButton(title: "Error", action: { vibrationViewModel.notificationFeedback(.error) })
                }

                Section(header: Text("Impact Feedback")) {
                    createButton(title: "Light", action: { vibrationViewModel.impactFeedback(.light) })
                    createButton(title: "Medium", action: { vibrationViewModel.impactFeedback(.medium) })
                    createButton(title: "Heavy", action: { vibrationViewModel.impactFeedback(.heavy) })
                }

                Section(header: Text("Selection Feedback")) {
                    createButton(title: "Selection", action: vibrationViewModel.selectionFeedback)
                }

                Section(header: Text("Custom Feedback")) {
                    createButton(title: "Long", action: { vibrationViewModel.customFeedback(.long) })
                    createButton(title: "Sound 1", action: { vibrationViewModel.customFeedback(.sound(1102)) })
                    createButton(title: "Sound 2", action: { vibrationViewModel.customFeedback(.sound(1519)) })
                    createButton(title: "Sound 3", action: { vibrationViewModel.customFeedback(.sound(1520)) })
                    createButton(title: "Sound 4", action: { vibrationViewModel.customFeedback(.sound(1521)) })
                    createButton(title: "Three Times", action: { vibrationViewModel.customFeedback(.threeTimes) })
                    createButton(title: "No Limit", action: { vibrationViewModel.customFeedback(.noLimit) })
                }
            }
            .navigationTitle("Vibration Test")
        }
    }

    private func createButton(title: String, action: @escaping () -> Void) -> some View {
        Button(action: action) {
            Text(title)
                .frame(maxWidth: .infinity, alignment: .leading)
        }
    }
}
以上です。
2024/8/20 更新
pub.dev に haptic_feedback というパッケージが用意されており、READMEを見てみると、今回自作した NotificationFeedback の .success, .warning, .error が用意されていそうだったので、そちらを使うことでより簡単に実装できるかと思います。
まとめ
最後まで読んでいただいてありがとうございました。
なお、今回紹介できませんでしたが、公式ドキュメントから引用した注意点にもあった通り、バイブレーションはオプションにする必要があります。したがって、SharedPreferences などにバイブレーションを有効にするかどうかの bool を保持しておくなどの対応が望ましいかなと思います。
バイブレーションなどのフィードバックはユーザーが納得感を持ってアプリケーションを操作するための非常に強力なツールだと思うので、ぜひサービスに組み込みたいと思いました。
誤っている点やもっと良い書き方があればご指摘いただければ幸いです。
参考
Discussion