【Flutter】Isolate を使って並列処理を実装する
初めに
今回は Isolate を使って並列処理を実装していきます。
重たい処理をUIスレッドで行うと表示が固まって操作できなくなってしまうこともあるので、その対処法になるかと思います。
記事の対象者
- Flutter 学習者
- 並列処理を実装したい方
目的
先述の通り、今回は Isolate を使って並列処理を行うことを目的とします。
画像の処理などの重たい処理を実行する場合、UIが固まってしまい、ユーザーが操作できなくなってしまうことがあります。これらを解消するために Isolate を用います。
具体的には、以下の動画のように重たい処理を実行したために画面が硬直するような場合の解決法をまとめていきます。
Isolate とは
Isolate に関して、公式サイトの内容を引用します。
All Dart code runs in isolates, which are similar to threads, but differ in that isolates have their own isolated memory. They do not share state in any way, and can only communicate by messaging. By default, Flutter apps do all of their work on a single isolate – the main isolate. In most cases, this model allows for simpler programming and is fast enough that the application's UI doesn't become unresponsive.
Sometimes though, applications need to perform exceptionally large computations that can cause "UI jank" (jerky motion). If your app is experiencing jank for this reason, you can move these computations to a helper isolate. This allows the underlying runtime environment to run the computation concurrently with the main UI isolate's work and takes advantage of multi-core devices.
Each isolate has its own memory and its own event loop. The event loop processes events in the order that they're added to an event queue. On the main isolate, these events can be anything from handling a user tapping in the UI, to executing a function, to painting a frame on the screen.(日本語訳)
すべてのDartコードはisolateで実行されます。isolateはスレッドに似ていますが、独自の隔離されたメモリを持つ点が異なります。isolateは互いに状態を共有せず、メッセージングによってのみ通信できます。デフォルトでは、Flutterアプリケーションはすべての作業を単一のisolate(メインisolate)で行います。ほとんどの場合、このモデルでより簡単なプログラミングが可能となり、アプリケーションのUIが応答不能にならない程度に十分な速さを持っています。
しかし、時にはアプリケーションが非常に大規模な計算を実行する必要があり、これが「UIのがたつき」(ぎこちない動き)を引き起こすことがあります。もしアプリがこの理由でがたつきを経験しているなら、これらの計算をヘルパーisolateに移動させることができます。これにより、基盤となるランタイム環境がメインUIのisolateの作業と並行して計算を実行でき、マルチコアデバイスの利点を活かすことができます。
各isolateは独自のメモリと独自のイベントループを持っています。イベントループは、イベントキューに追加された順序でイベントを処理します。メインisolateでは、これらのイベントはユーザーがUIをタップした処理から関数の実行、画面上にフレームを描画することまで、あらゆることが含まれます。
まとめると以下のようなことが言えそうです。
- 全てのコードは isolate で実行される
- isolate は互いに状態を共有せず、メッセージによって通信する
- Flutter アプリケーションでは作業をメイン isolate で行い、基本的には十分な処理速度がある
- アプリケーションで大規模な計算を行う際にUIがガタつくことがあり、その解決に使用できる
compute とは
公式ドキュメントの compute 関数に関する記述から以下を引用します。
On native platforms await compute(fun, message) is equivalent to await Isolate.run(() => fun(message)).
(日本語訳)
ネイティブプラットフォームでは、await compute(fun, message)はawait Isolate.run(() => fun(message))と同等です。
つまり、ネイティブにおいて compute 関数は Isolate の別の形であり、内部的には同じ処理を行なっていることがわかります。
また、Parse JSON in the background では重い処理の一例として JSON 形式の変換が挙げられており、そこに以下のような記述があります。
By default, Dart apps do all of their work on a single thread. In many cases, this model simplifies coding and is fast enough that it does not result in poor app performance or stuttering animations, often called "jank."
However, you might need to perform an expensive computation, such as parsing a very large JSON document. If this work takes more than 16 milliseconds, your users experience jank.
To avoid jank, you need to perform expensive computations like this in the background. On Android, this means scheduling work on a different thread. In Flutter, you can use a separate Isolate.(日本語訳)
デフォルトでは、Dartアプリは全ての作業を単一のスレッドで行います。多くの場合、このモデルはコーディングを簡素化し、アプリのパフォーマンス低下やアニメーションのぎこちなさ(よく「ジャンク」と呼ばれます)を引き起こさない程度に十分速いです。
しかし、非常に大きなJSONドキュメントの解析など、計算コストの高い処理を行う必要がある場合があります。この作業が16ミリ秒以上かかると、ユーザーはジャンクを経験します。
ジャンクを避けるには、このような計算コストの高い処理をバックグラウンドで実行する必要があります。Androidでは、これは異なるスレッドで作業をスケジュールすることを意味します。Flutterでは、別のIsolateを使用できます。
ここまでは Isolate の説明と概ね同じかと思います。
If you run the fetchPhotos() function on a slower device, you might notice the app freezes for a brief moment as it parses and converts the JSON. This is jank, and you want to get rid of it.
You can remove the jank by moving the parsing and conversion to a background isolate using the compute() function provided by Flutter. The compute() function runs expensive functions in a background isolate and returns the result. In this case, run the parsePhotos() function in the background.(日本語訳)
遅いデバイスでfetchPhotos()関数を実行すると、JSONの解析と変換を行う際に、アプリが一瞬フリーズするのに気付くかもしれません。これがジャンクであり、これを取り除きたいのです。
Flutterが提供するcompute()関数を使用して、解析と変換をバックグラウンドisolateに移動することで、ジャンクを除去できます。compute()関数は、計算コストの高い関数をバックグラウンドisolateで実行し、結果を返します。この場合、parsePhotos()関数をバックグラウンドで実行します。
ここでは重たい処理として fetchPhotos という関数を挙げ、以下の点を説明しています。
-
fetchPhotosを実行するとアプリがフリーズする。これをジャンクという - compute 関数で重たい処理をバックグラウンドの isolate に移動することでジャンクを除去できる
- compute 関数では計算コストの高い関数をバックグラウンドで実行可能
なお、Isolate と Async を用いた非同期処理の違いについては以下の動画がわかりやすいかと思います。
実装
実装は以下のような手順で進めていきたいと思います。
- フィボナッチ数列での検証
- 画像の圧縮処理の検証
1. フィボナッチ数列での検証
ドキュメントでも「重たい処理」の例として紹介されていたフィボナッチ数列を使って、Isolate の効果を検証していきます。
コードは以下の通りです。
import 'package:flutter/foundation.dart';
import 'package:flutter/material.dart';
import 'package:flutter_hooks/flutter_hooks.dart';
class IsolatePerformanceDemo extends HookWidget {
const IsolatePerformanceDemo({super.key});
Widget build(BuildContext context) {
final useIsolate = useState(true);
final result = useState(0);
final isCalculating = useState(false);
final calculationTime = useState<int>(0);
Future<void> calculateFibonacci() async {
isCalculating.value = true;
result.value = 0;
calculationTime.value = 0;
const n = 45;
final startTime = DateTime.now();
if (useIsolate.value) {
  result.value = await compute(fibonacci, n);
} else {
  result.value = fibonacci(n);
}
final endTime = DateTime.now();
final duration = endTime.difference(startTime);
calculationTime.value = duration.inMilliseconds;
debugPrint(
'Calculation ${useIsolate.value ? "with" : "without"} Isolate took ${duration.inMilliseconds}ms');
isCalculating.value = false;
}
return Scaffold(
appBar: AppBar(title: const Text('Isolate Performance Demo')),
body: Center(
child: Column(
mainAxisAlignment: MainAxisAlignment.center,
children: [
Padding(
padding: const EdgeInsets.all(8),
child: Text('Use Isolate: ${useIsolate.value}'),
),
Padding(
padding: const EdgeInsets.all(8),
child: Switch(
  value: useIsolate.value,
  onChanged: (value) {
    useIsolate.value = value;
  },
),
),
Padding(
padding: const EdgeInsets.all(8),
child: ElevatedButton(
onPressed: isCalculating.value ? null : calculateFibonacci,
child: const Text('Calculate Fibonacci(45)'),
),
),
const SizedBox(height: 20),
if (isCalculating.value)
const CircularProgressIndicator()
else
Column(
children: [
Text('Result: ${result.value}'),
const SizedBox(height: 10),
Text('Calculation Time: ${calculationTime.value}ms'),
],
),
],
),
),
);
}
}
int fibonacci(int n) {
if (n <= 1) return n;
return fibonacci(n - 1) + fibonacci(n - 2);
}
必要な部分のみ詳しくみていきます。
以下では、useState でそれぞれ必要な変数を定義しています。
useIsolate では Isolate を使用するかどうかを保持しています。
この値で別の Isolate を使用するかを切り替えて、どのような違いがあるかを見ることができます。
result は計算結果、 isCalculating は現在計算中かどうかの値、 calculationTime は計算にかかった時間を保持しています。
final useIsolate = useState(true);
final result = useState(0);
final isCalculating = useState(false);
final calculationTime = useState<int>(0);
以下では、 useIsolate の値によって compute 関数を使用するか使用しないかを切り替えています。
compute を使用する場合は第一引数に実行したい関数、第二引数に実行したい関数の引数を渡します。これでバックグラウンドで Isolate を使って処理することができます。
if (useIsolate.value) {
result.value = await compute(fibonacci, n);
} else {
result.value = fibonacci(n);
}
以下では、Switch で useIsolate の値を切り替えるようにしています。
これで Isolate を用いた処理にするかどうかを切り替えられます。
child: Switch(
value: useIsolate.value,
onChanged: (value) {
useIsolate.value = value;
},
),
このコードで実行して、それぞれの場合を見てみます。
Isolate を使用しない場合
Isolate を使用する場合
Isolate を使用しない場合は、「Calculate Fibonacci」ボタンを押した段階でタップしたことを示すRippleエフェクトが止まっており、UIが固まっていることがわかります。
一方で、Isolate を使用する場合はボタンを押してもUIが固まることはなく、計算中のUIが表示されていることがわかります。
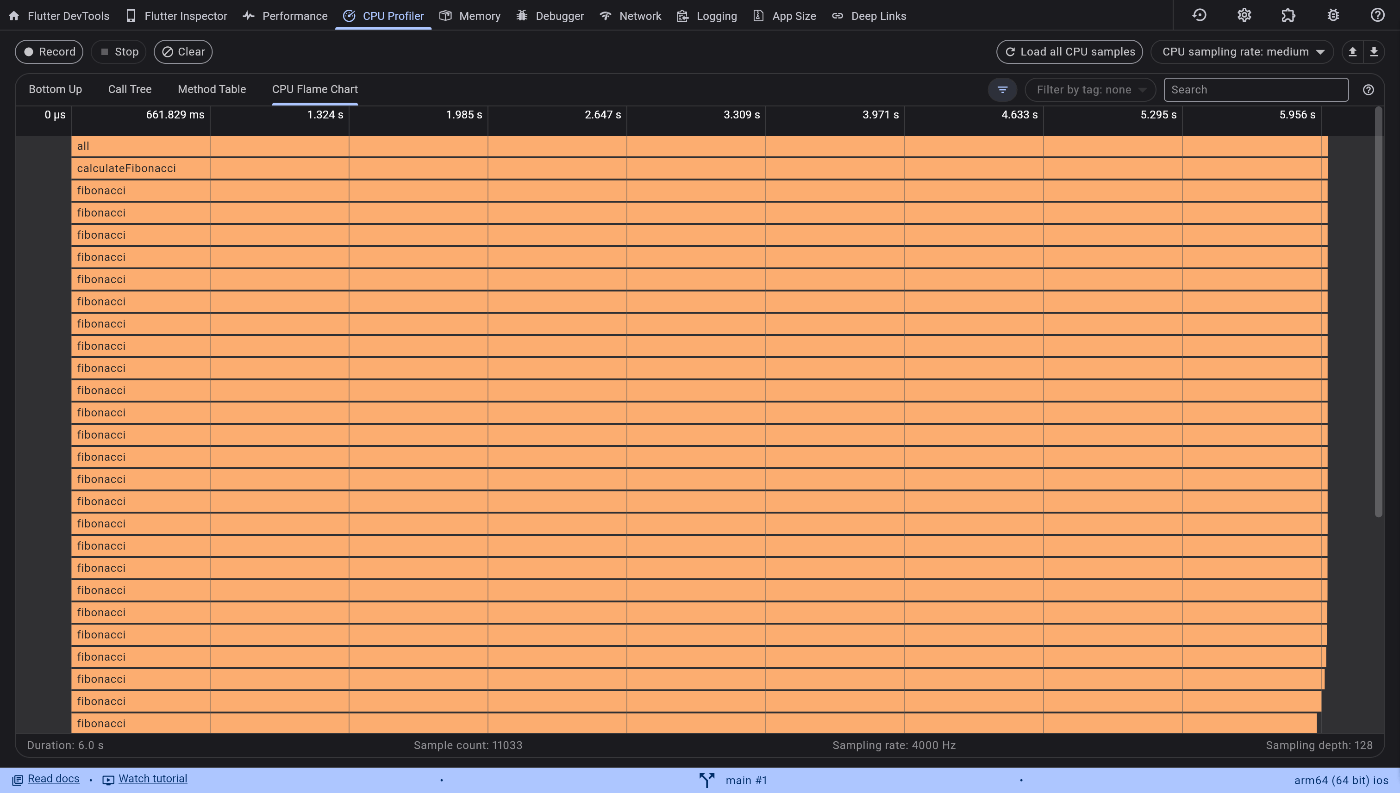
また、DevTool の CPU Flame Chart を見てみると以下のようになります。
Isolate を使用しない場合

Isolate を使用する場合

CPU Flame Chart では処理がどこで行われたかを確認することができます。
上記のグラフは、オレンジ色で表示されている「App Code」で実行された結果でかつフィボナッチ数列に関する処理のみをフィルタリングして表示したものです。
Isolate を使用していない場合はオレンジの fibonacci と書かれたバーが大量に並んでいることがわかります。この呼び出し件数が多いということはすなわちCPUの使用が多いということを表します。
一方で Isolate を使用した場合、 App Code として実行されているのは calculateFibonacci 関数のみであり、Isolate を使用しなかった場合にあった fibonacci の処理が表示されていないことがわかります。
以上のことからも、Isolate を使用する場合と使用しない場合ではパフォーマンスも実行されるコードの種類も異なることがわかります。
2. 画像の圧縮処理の検証
次に画像圧縮処理を例にとって Isolate の効果を見ていきたいと思います。
コードは以下の通りです。
import 'dart:io';
import 'package:flutter/foundation.dart';
import 'package:flutter/material.dart';
import 'package:flutter_hooks/flutter_hooks.dart';
import 'package:image_picker/image_picker.dart';
import 'package:image/image.dart' as img;
import 'package:path_provider/path_provider.dart';
import 'package:firebase_storage/firebase_storage.dart';
class ImageCompressionDemo extends HookWidget {
const ImageCompressionDemo({super.key});
Widget build(BuildContext context) {
final images = useState<List<ImageItem>>([]);
final isLoading = useState(false);
final useIsolate = useState(false);
Future<List<Uint8List>> compressMultipleImages(
List<Uint8List> imagesData) async {
return imagesData.map((imageData) {
final image = img.decodeImage(imageData);
if (image == null) throw Exception('Failed to decode image');
final compressedImage = img.copyResize(image, width: 800);
return Uint8List.fromList(img.encodeJpg(compressedImage, quality: 85));
}).toList();
}
Future<void> pickAndCompressImages() async {
final picker = ImagePicker();
final pickedFiles = await picker.pickMultiImage();
if (pickedFiles.isNotEmpty) {
isLoading.value = true;
final newImages = pickedFiles
.map((xFile) => ImageItem(
originalFile: File(xFile.path),
compressedFile: null,
isCompressed: false,
))
.toList();
images.value = [...images.value, ...newImages];
final tempDir = await getTemporaryDirectory();
final List<Uint8List> allImageBytes = await Future.wait(
newImages.map((img) => img.originalFile.readAsBytes()));
List<Uint8List> compressedImages;
if (useIsolate.value) {
compressedImages =
await compute(compressMultipleImages, allImageBytes);
} else {
compressedImages = await compressMultipleImages(allImageBytes);
}
for (int i = 0; i < compressedImages.length; i++) {
final tempFile = File(
'${tempDir.path}/compressed_${DateTime.now().millisecondsSinceEpoch}_$i.jpg');
await tempFile.writeAsBytes(compressedImages[i]);
images.value[images.value.length - newImages.length + i] = ImageItem(
originalFile: newImages[i].originalFile,
compressedFile: tempFile,
isCompressed: true,
);
final storageRef = FirebaseStorage.instance.ref().child(
'compress_images/${DateTime.now().millisecondsSinceEpoch}_$i.jpg');
await storageRef.putFile(tempFile);
}
images.value = [...images.value];
isLoading.value = false;
}
}
return Scaffold(
appBar: AppBar(title: const Text('Image Compression Demo')),
body: Column(
children: [
Row(
mainAxisAlignment: MainAxisAlignment.center,
children: [
const Text('Use Isolate'),
Switch(
value: useIsolate.value,
onChanged: (value) {
useIsolate.value = value;
},
),
],
),
ElevatedButton(
onPressed: pickAndCompressImages,
child: const Text('Select and Compress Images'),
),
if (isLoading.value) const CircularProgressIndicator(),
Expanded(
child: GridView.builder(
gridDelegate: const SliverGridDelegateWithFixedCrossAxisCount(
crossAxisCount: 3,
crossAxisSpacing: 4,
mainAxisSpacing: 4,
),
itemCount: images.value.length,
itemBuilder: (context, index) {
final image = images.value[index];
return Stack(
fit: StackFit.expand,
children: [
Image.file(
image.compressedFile ?? image.originalFile,
fit: BoxFit.cover,
),
if (!image.isCompressed)
const Center(child: CircularProgressIndicator()),
],
);
},
),
),
],
),
);
}
}
class ImageItem {
final File originalFile;
final File? compressedFile;
final bool isCompressed;
ImageItem({
required this.originalFile,
this.compressedFile,
required this.isCompressed,
});
}
必要な部分を詳しく見ていきます。
以下では必要な変数の定義を行なっています。
images は画像のファイルや圧縮後のファイル、圧縮中の状態などを持つ ImageItem をリストとして保持しています。
isLoading はロード中の状態を保持しています。
useIsolate は別の Isolate を使用するかどうかを保持しています。
final images = useState<List<ImageItem>>([]);
final isLoading = useState(false);
final useIsolate = useState(false);
以下では複数の画像を圧縮するときの処理を記述しています。
Uint8List のリストとして画像を受け取り、その画像を圧縮します。
それぞれの画像データに対して decodeImage, copyResize を実行して画像圧縮しています。
また、 compressedImage で quality を 85 にすることで少し品質を下げて返しています。
Future<List<Uint8List>> compressMultipleImages(List<Uint8List> imagesData) async {
  return imagesData.map((imageData) {
    final image = img.decodeImage(imageData);
    if (image == null) throw Exception('Failed to decode image');
    final compressedImage = img.copyResize(image, width: 800);
    return Uint8List.fromList(img.encodeJpg(compressedImage, quality: 85));
  }).toList();
}
以下では三つの手順を行っています。
行っている処理はコメントアウトした部分にある通りです。
なお、別の Isolate を使用する場合は compressMultipleImages 関数を compute に入れて実行しています。
- 画像の複数選択
- 画像の圧縮
- Cloud Storage へのアップロード
Future<void> pickAndCompressImages() async {
  final picker = ImagePicker();
  // 画像の複数枚選択
  final pickedFiles = await picker.pickMultiImage();

  if (pickedFiles.isNotEmpty) {
    isLoading.value = true;
    final newImages = pickedFiles
        .map((xFile) => ImageItem(
              originalFile: File(xFile.path),
              compressedFile: null,
              isCompressed: false,
            ))
        .toList();
    images.value = [...images.value, ...newImages];

    final tempDir = await getTemporaryDirectory();

    // 全ての画像データを一度に読み込む
    final List<Uint8List> allImageBytes = await Future.wait(
        newImages.map((img) => img.originalFile.readAsBytes()));

    List<Uint8List> compressedImages;
    if (useIsolate.value) {
      // Isolateを使用して全ての画像を一度に圧縮
      compressedImages =
          await compute(compressMultipleImages, allImageBytes);
    } else {
      // Isolateを使用せずに全ての画像を一度に圧縮
      compressedImages = await compressMultipleImages(allImageBytes);
    }

    // 圧縮された画像を保存し、状態を更新
    for (int i = 0; i < compressedImages.length; i++) {
      final tempFile = File(
          '${tempDir.path}/compressed_${DateTime.now().millisecondsSinceEpoch}_$i.jpg');
      await tempFile.writeAsBytes(compressedImages[i]);

      images.value[images.value.length - newImages.length + i] = ImageItem(
        originalFile: newImages[i].originalFile,
        compressedFile: tempFile,
        isCompressed: true,
      );

      // Cloud Storageへのアップロード
      final storageRef = FirebaseStorage.instance.ref().child(
          'compress_images/${DateTime.now().millisecondsSinceEpoch}_$i.jpg');
      await storageRef.putFile(tempFile);
    }

    images.value = [...images.value];
    isLoading.value = false;
  }
}
以下では先ほど定義した pickAndCompressImages を呼び出し、画像を選択して圧縮し、 Cloud Storage に保存するまでの一連の処理を行なっています。
ElevatedButton(
  onPressed: pickAndCompressImages,
  child: const Text('Select and Compress Images'),
),
このコードで実行して、それぞれの場合を見てみます。
Isolate を使用しない場合
Isolate を使用する場合
Isolate を使用しない場合は、「Select and Compress Images」ボタンを押して画像を選択すると、 CircularProgressIndicator が表示されますが、すぐに固まってしまいます。
このような表示だとユーザーは画像が表示されるまでどのような処理が行われているかがわからないため、困惑する原因になってしまいます。
一方で、Isolate を使用する場合は CircularProgressIndicator が正常に表示されるようになっています。これで画像の読み込み中であることがわかります。
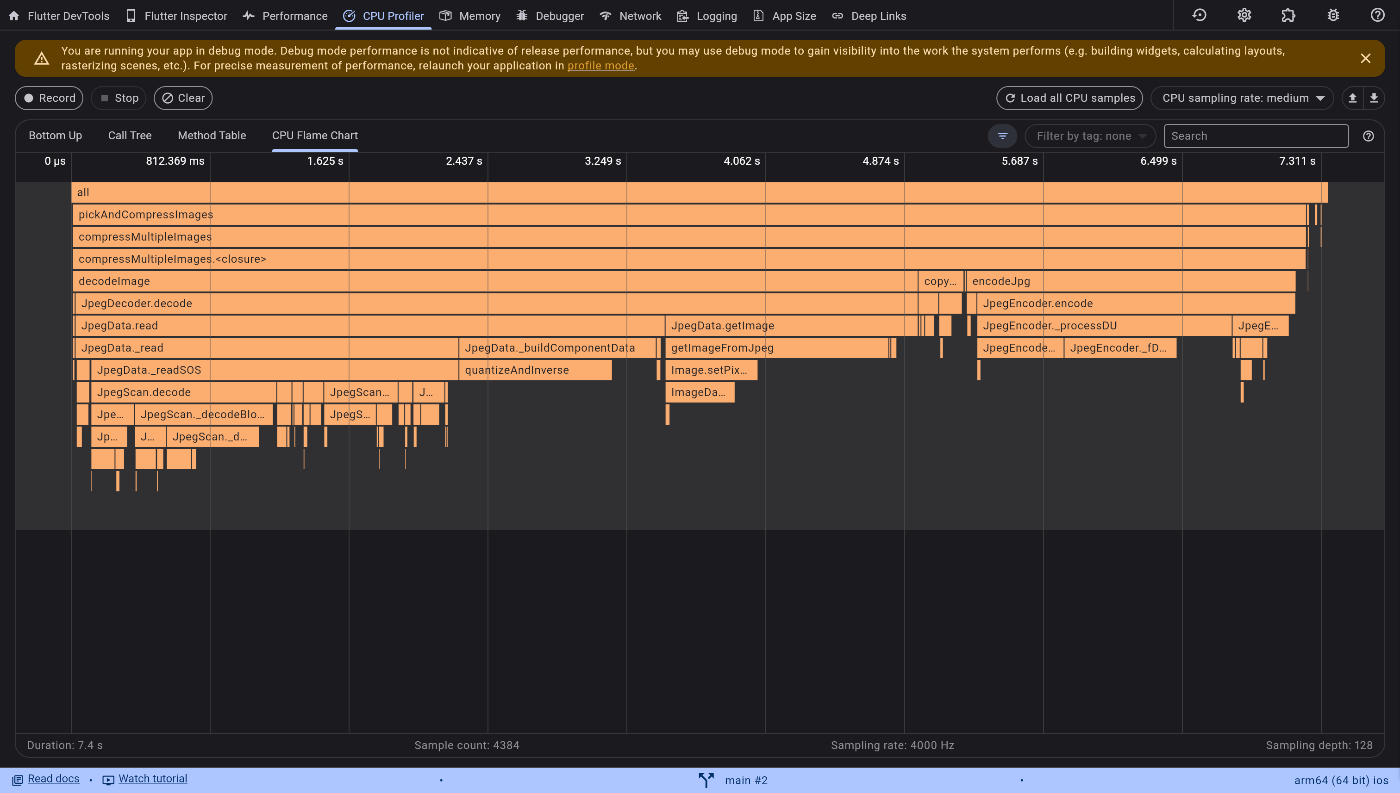
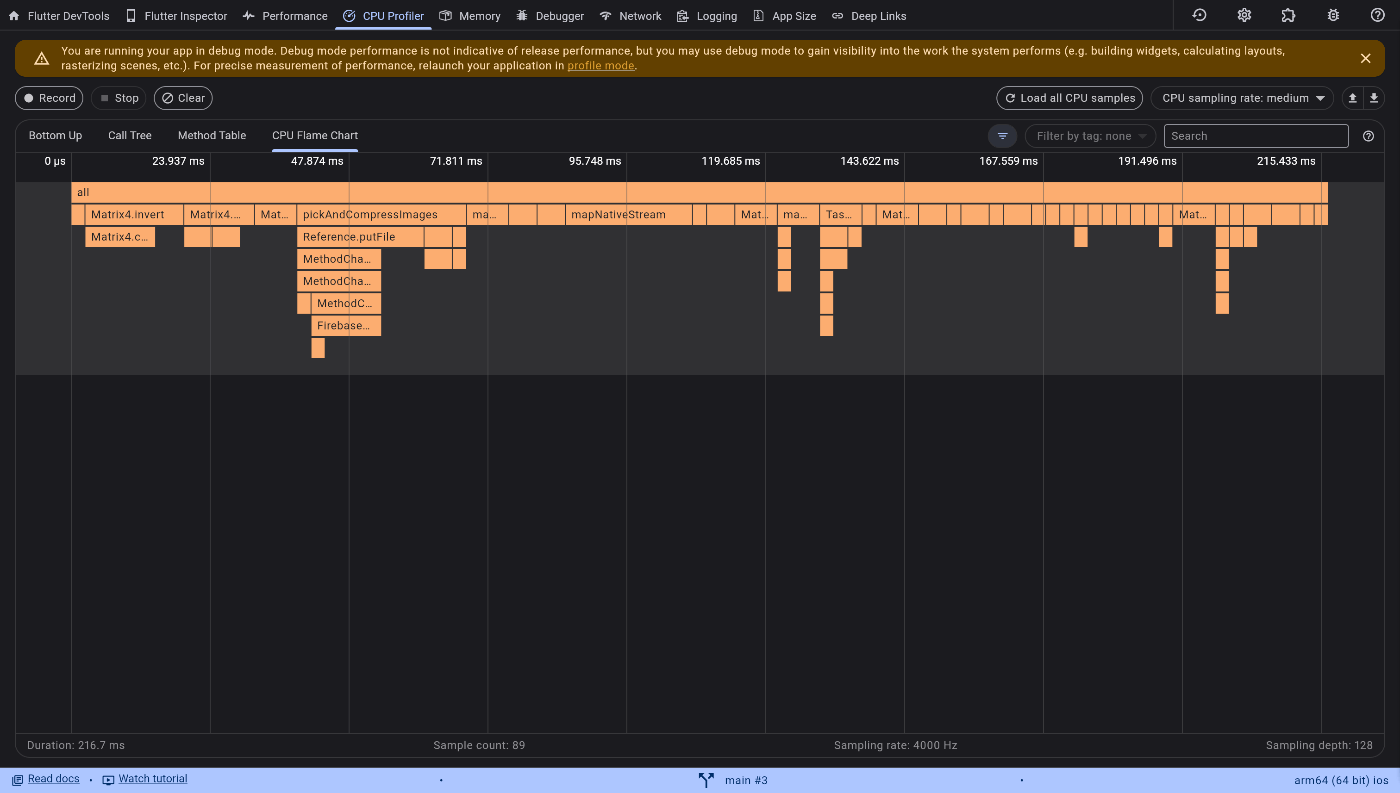
また、DevTool の CPU Flame Chart を見てみると以下のようになります。
Isolate を使用しない場合

Isolate を使用する場合

Isolate を使用していない場合、オレンジの App Code には compressMultiplelmages や decodeImage などが含まれていることがわかります。
一方で Isolate を使用した場合、 App Code として実行されているのは pickAndCompressImages 関数のみであり、 compute に入れた compressMultiplelmages 関数などが含まれていないことがわかります。
画像圧縮の場合でも Isolate を用いた場合は App Code で実行される処理が少ないことがわかります。
以上です。
まとめ
最後まで読んでいただいてありがとうございました。
今回は Isolate の扱いを簡単にまとめました。
基本的には compute 関数に処理を渡すのみで良いので手軽に使用できることがわかりました。
しかし、Flutter Web では こちらの Issue でもある通り compute が機能しない事例があり、 Worker などで代替する必要があるので、プラットフォームごとの考慮が必要になりそうです。
誤っている点やもっと良い書き方があればご指摘いただければ幸いです。
参考


Discussion