【Swift】iOS アプリに watchOS を追加する
初めに
今回は Swift で iOS と watchOS を連携して両方で動作するアプリを作ってみたいと思います。
最終的には SwiftData を使って簡単なTodoアプリを作ってみたいと思います。
記事の対象者
- Swift 学習者
- watchOS について知りたい方
- サービスに watchOS を導入したい方
目的
今回の目的は iOS と watchOS を連携してみることです。
初期の設定が多少難しい部分もあり、時間を取ってしまったので次に実装する際や他の方が実装する際の参考になればと思います。
なお、今回は Swift で実装していきます。 Flutter を用いる場合はまた別の対応が必要になるかと思うので、ご注意ください。
今回作成したアプリは以下のレポジトリで公開しています。
よろしければご参照ください。
iOS と watchOS の連携
まずは iOS と watchOS を連携してアプリを実行できるまで進めていきます。
連携は以下の手順で進めていきます。
- iOS アプリのプロジェクト作成
- watchOS のターゲット作成
- iOS アプリのプロジェクト設定
- watchOS アプリのプロジェクト設定
- Simulator の設定
1. iOS アプリのプロジェクト作成
まずは iOS アプリのプロジェクトを作成します。
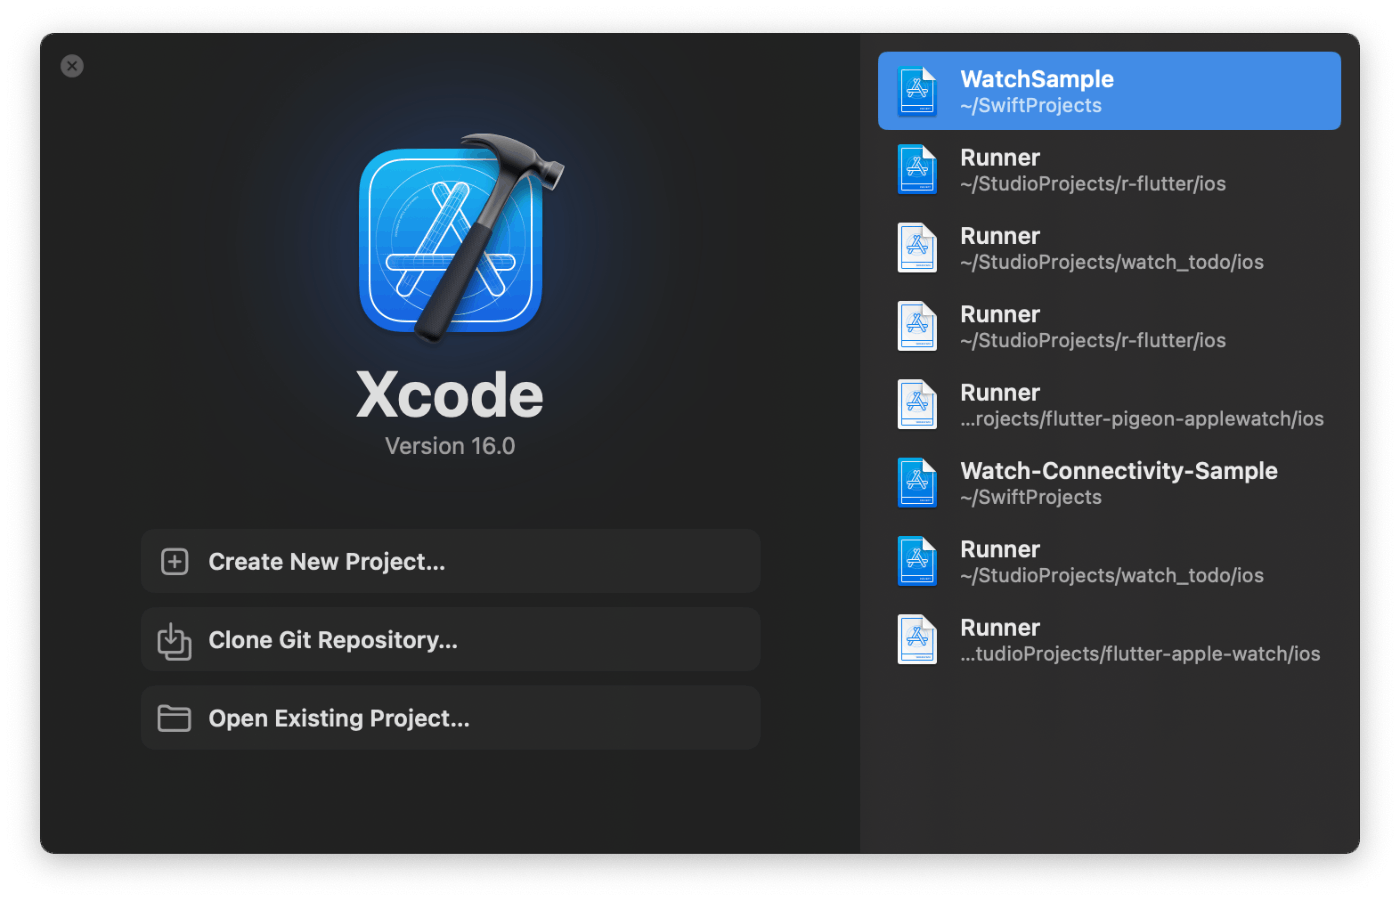
Xcode を開いて「Create New Project...」を選択します。
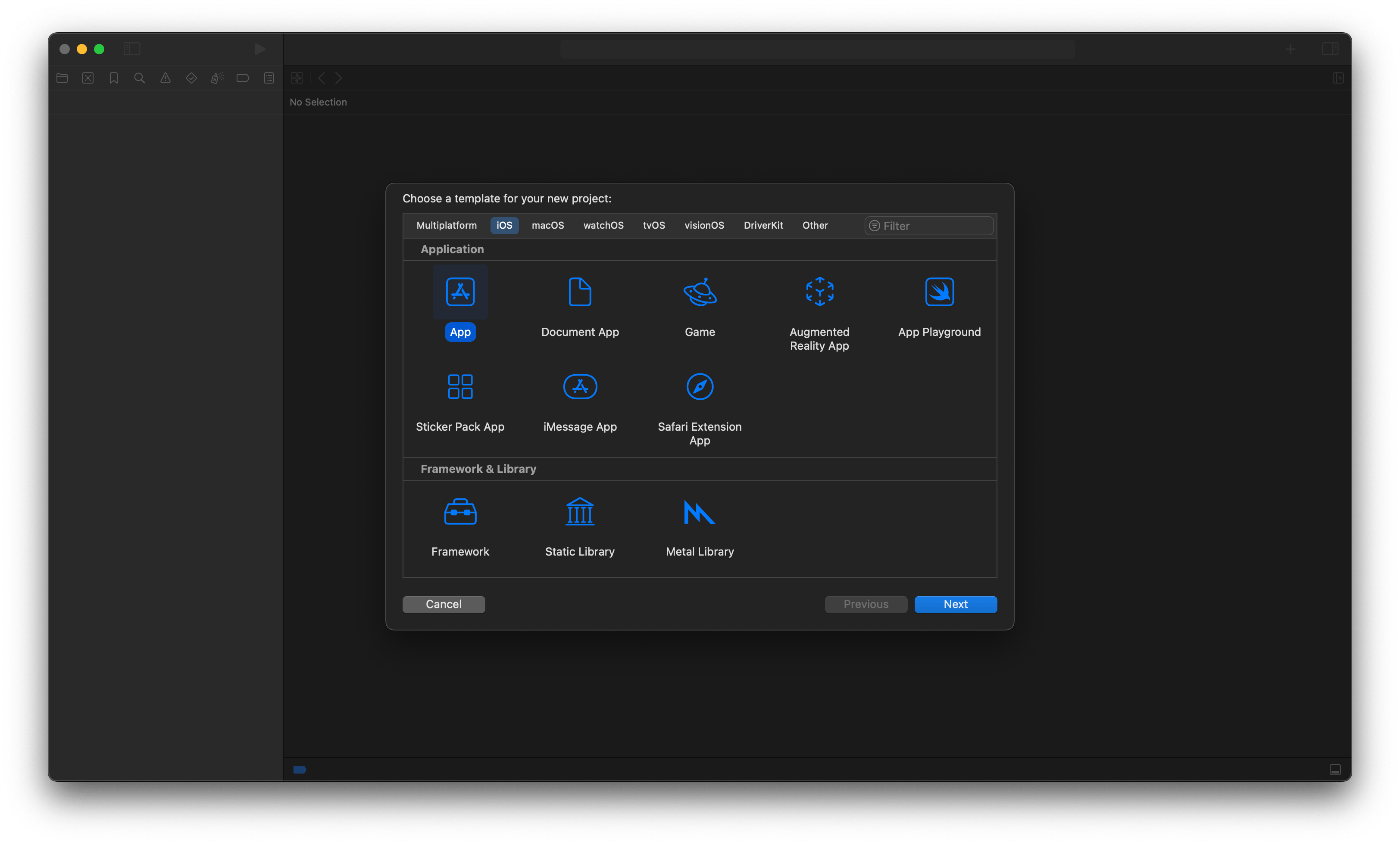
次に iOS の App を選択します。
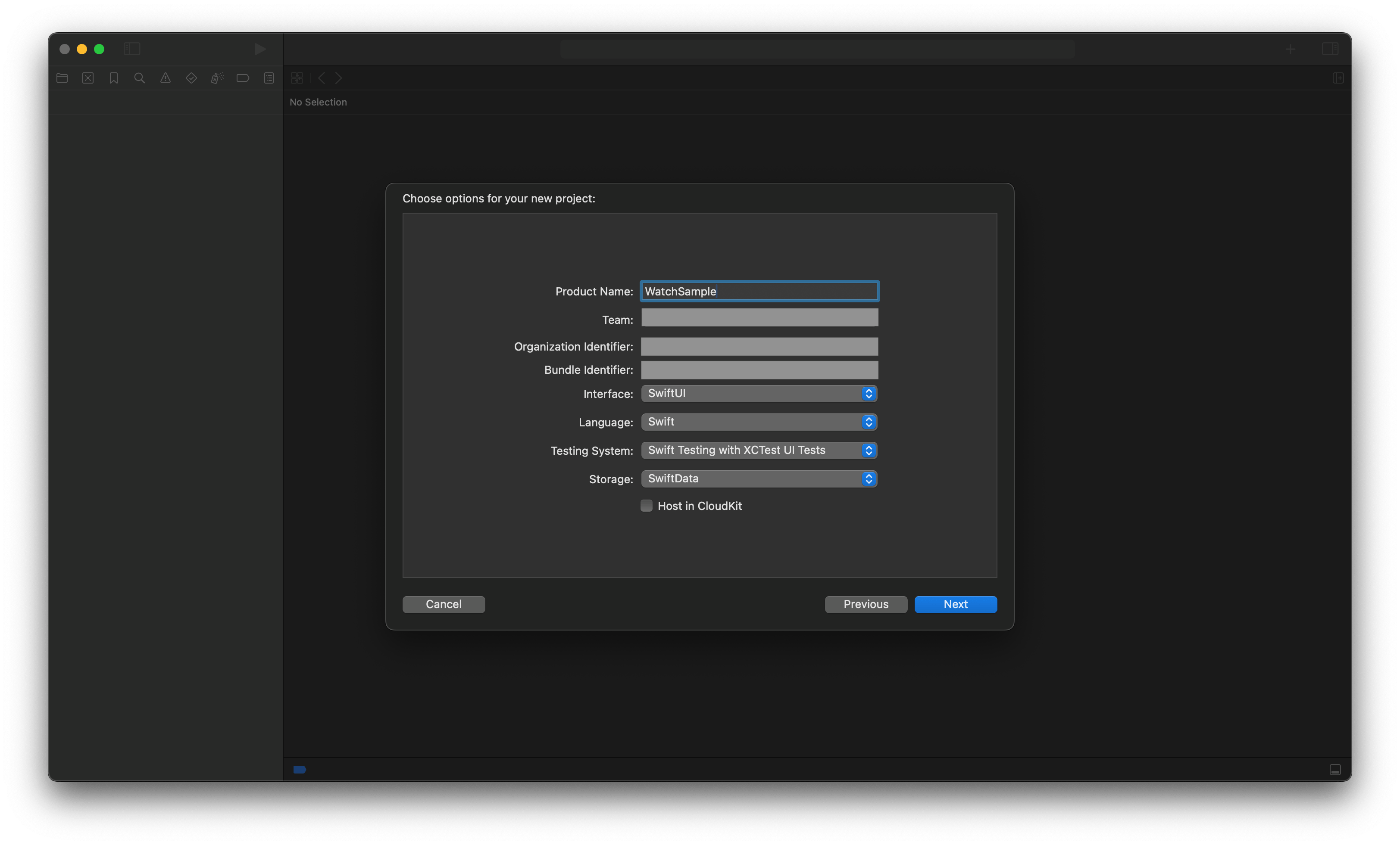
次にプロジェクト名を入力して「Next」を押します。
最後にプロジェクトを作成するディレクトリを選択して「Create」を押します。
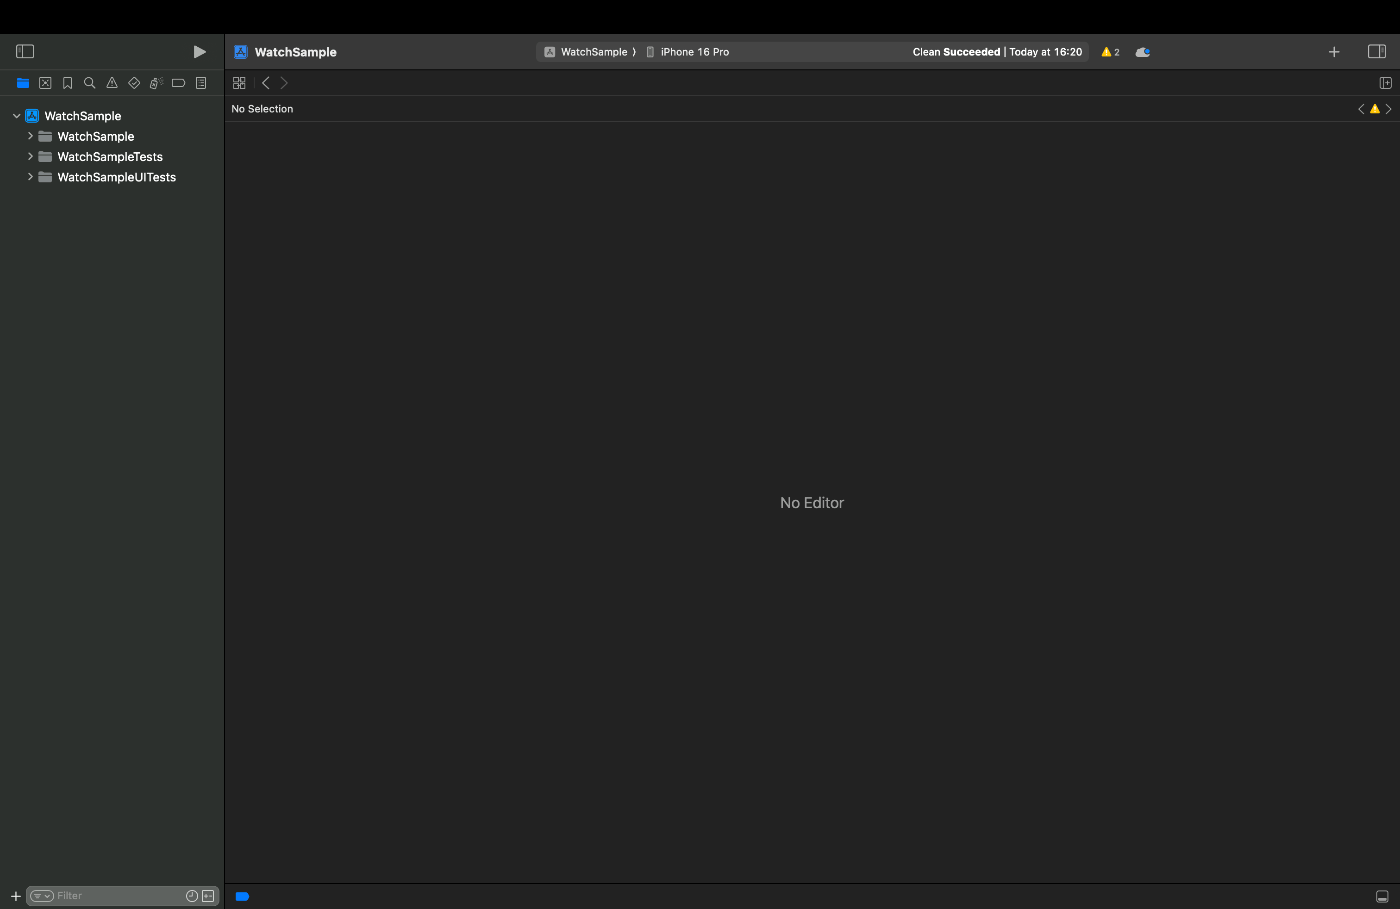
これで iOSアプリのプロジェクト作成は完了です。
2. watchOS のターゲット作成
次に watchOS のターゲットを作成していきます。
iOS アプリを作成した段階では以下の画像のようになっているかと思います。
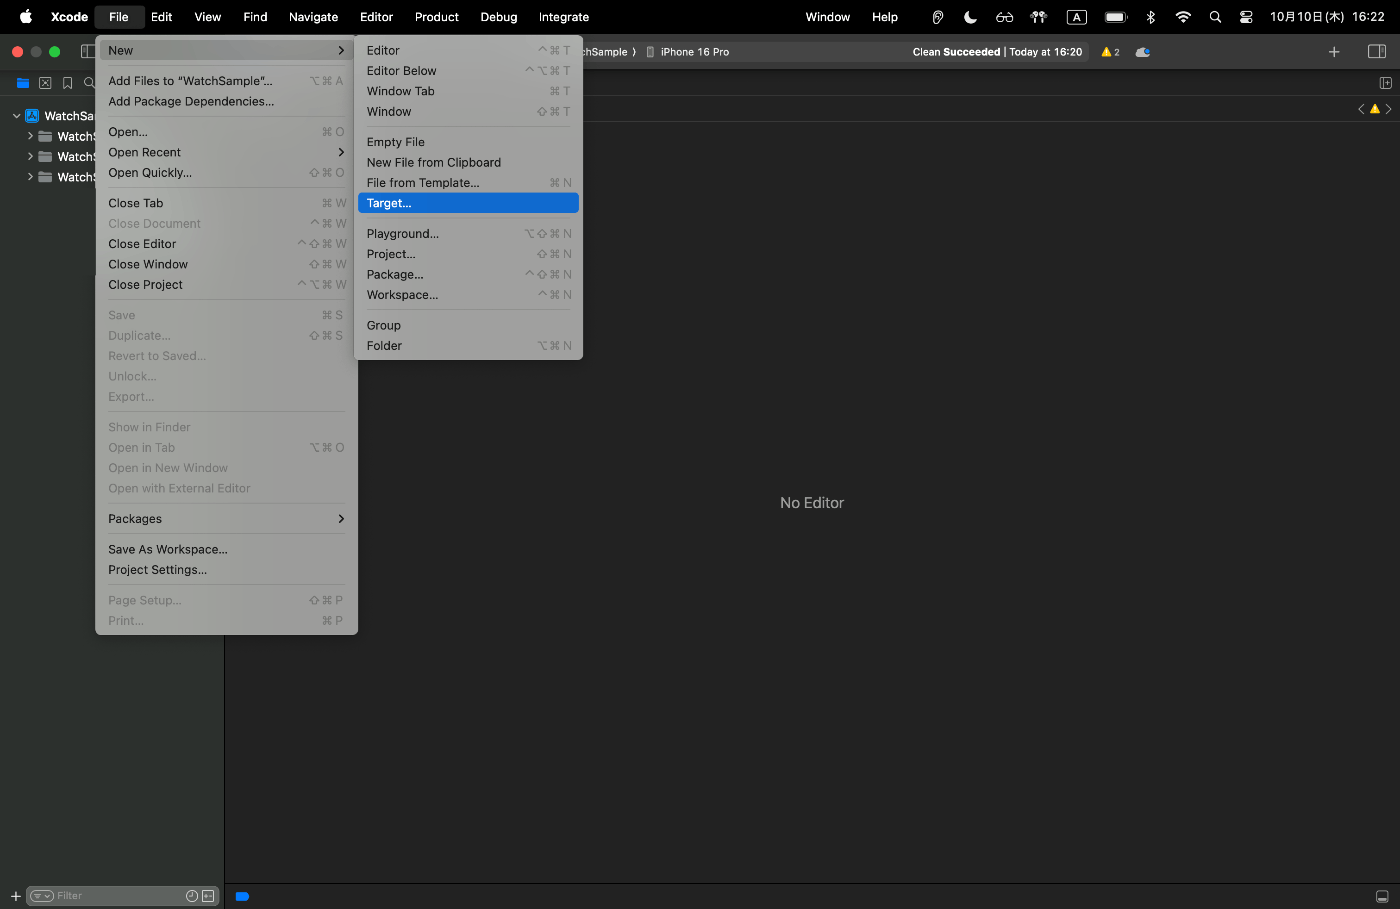
次に File > New > Target を選択します。
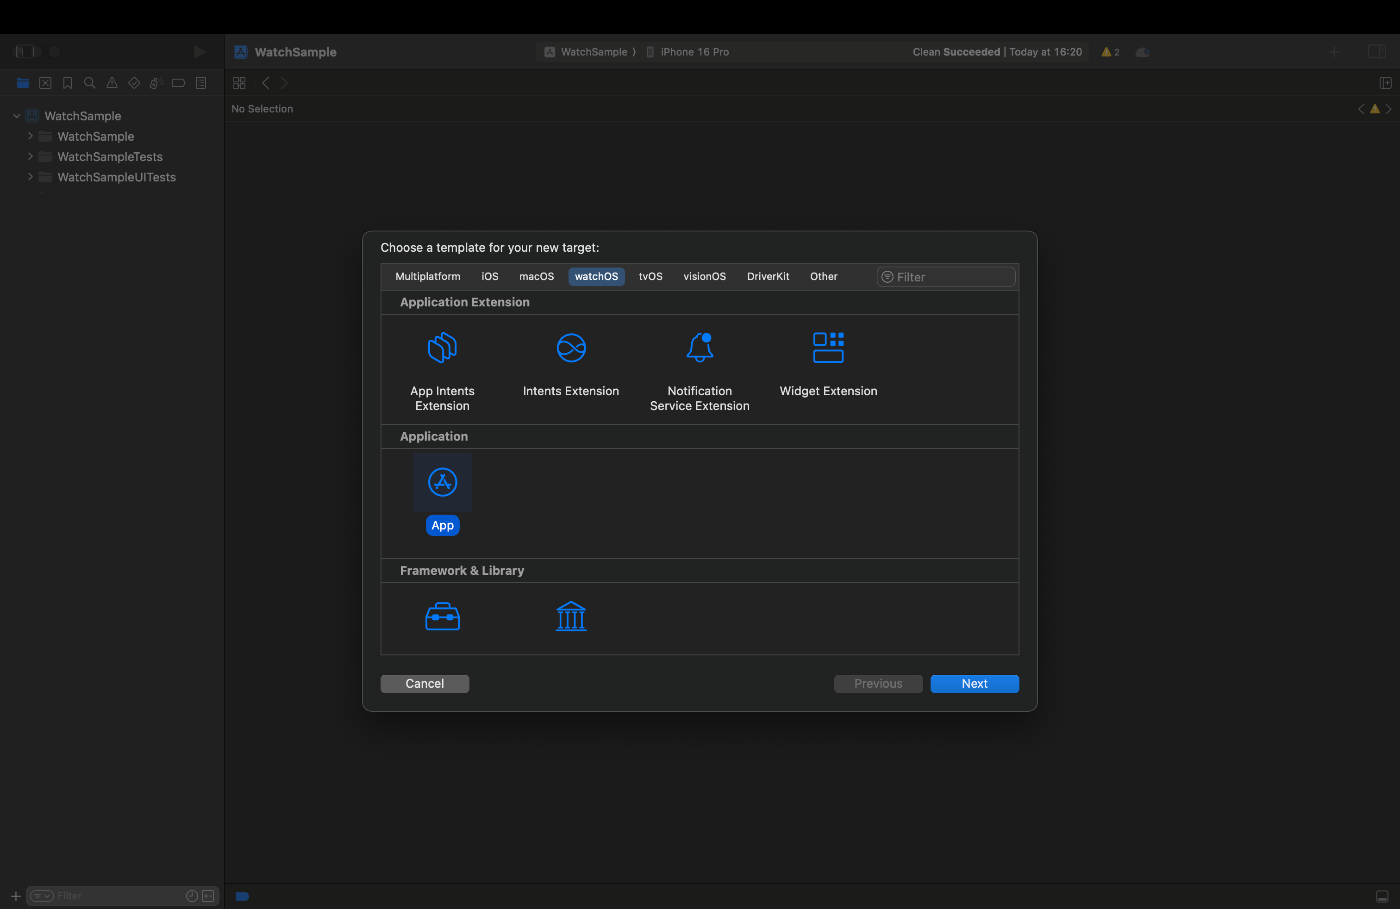
Target の中で watchOS > App を選択します。
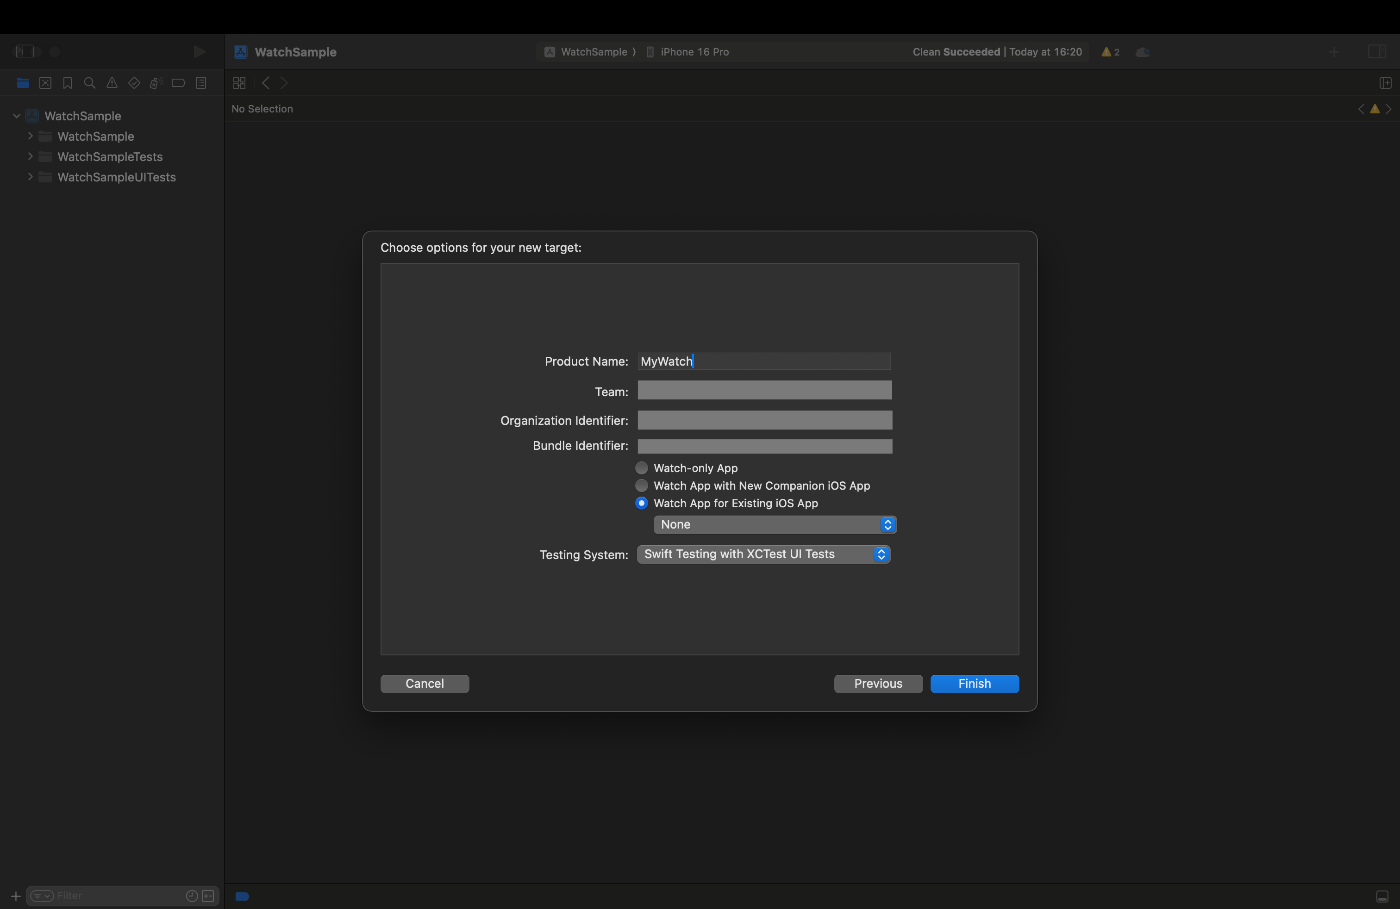
Product Name で watchOS の名前を指定します。
今回は「MyWatch」としておきます。
iOS アプリに付随する watchOS のアプリを作成するので、「Watch App for Existing iOS App」にチェックを入れておきます。
これで以下の画像のように MyWatch の Folder が追加されているかと思います。
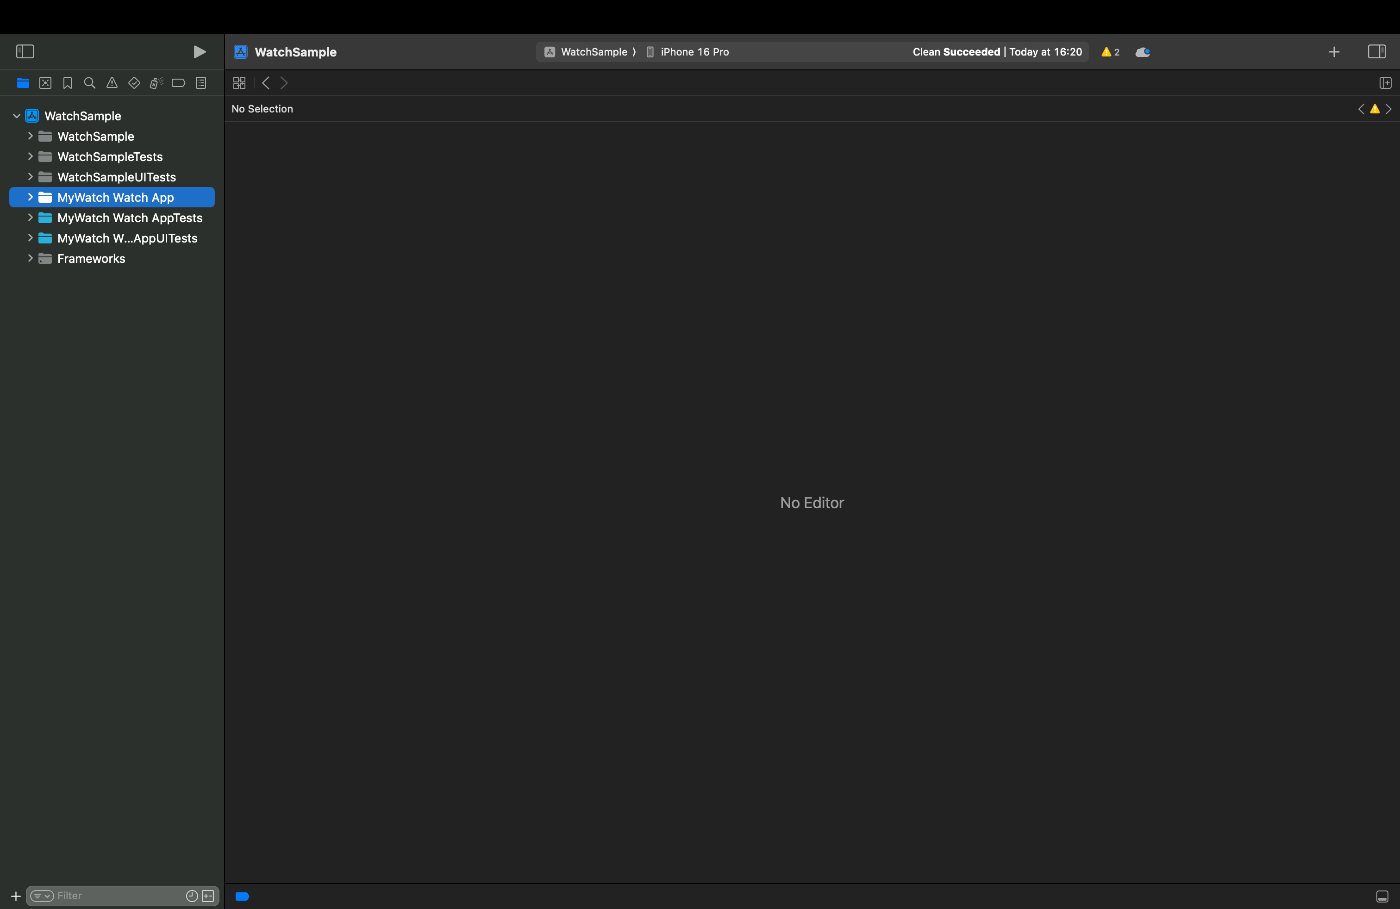
次に追加された MyWatch の Folder を右クリックして「Convert to Group」を選択します。
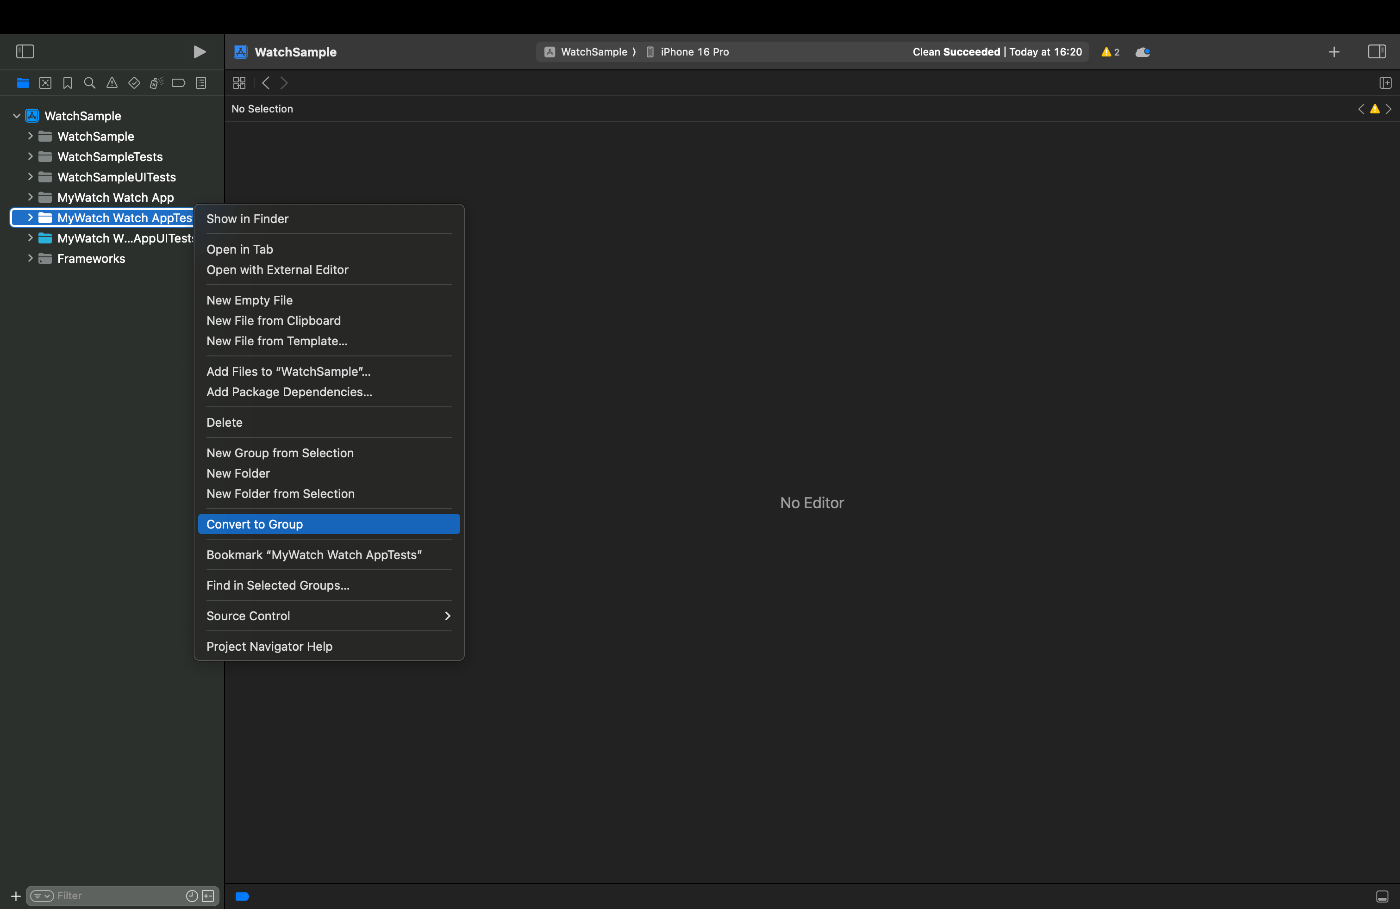
「Convert to Group」を選択しない場合は、以下の記事で共有したエラーが起こる可能性があります。
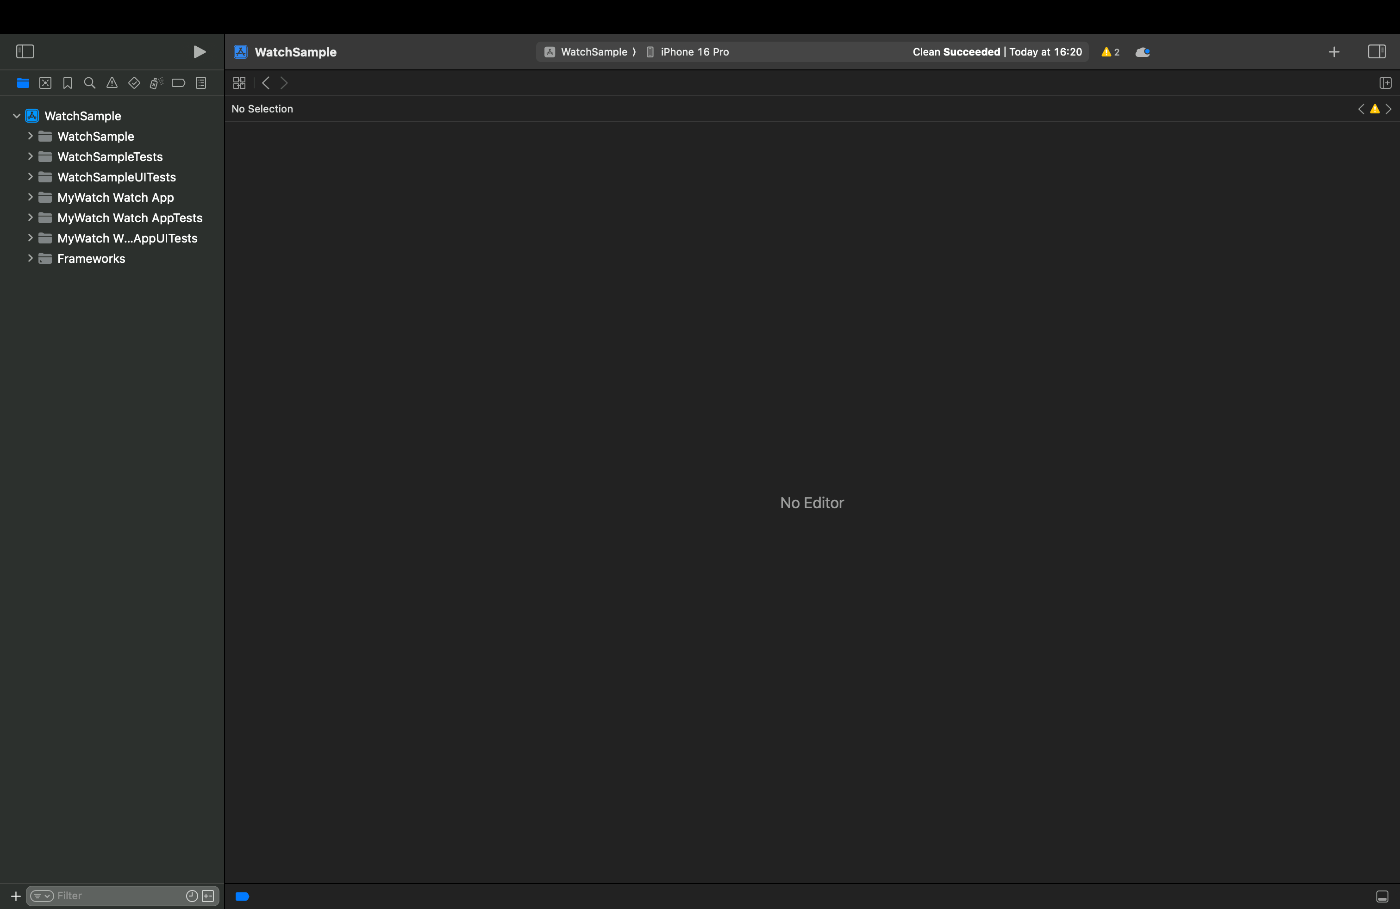
MyWatch の Folder を Group に変更して、以下のような表示になれば watchOS のプロジェクト作成は完了です。
3. iOS アプリのプロジェクト設定
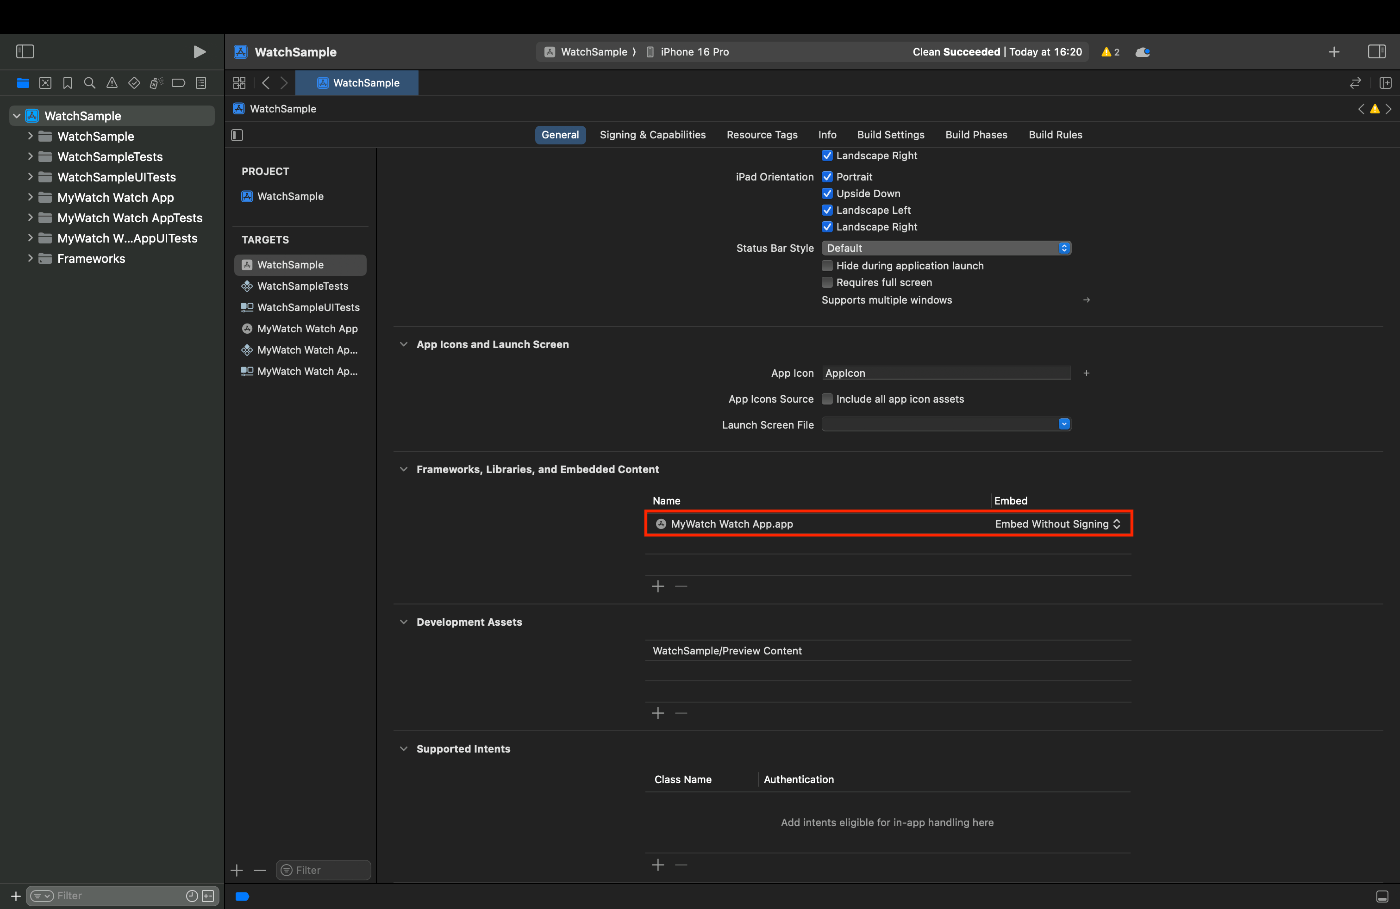
iOS アプリ側(Watch Sample)の General の「Frameworks, Libraries, and Embedded Content」の項目に MyWatch を追加しておきます。
また、Build Phase のエラーが出る可能性があるため、以下の画像のような順番にしておきます。
- Target Dependencies
- Rub Build Tool Plug-ins
- Compile Sources
- Link Binary With Libraries
- Copy Bundle Resources
- Embed Watch Content
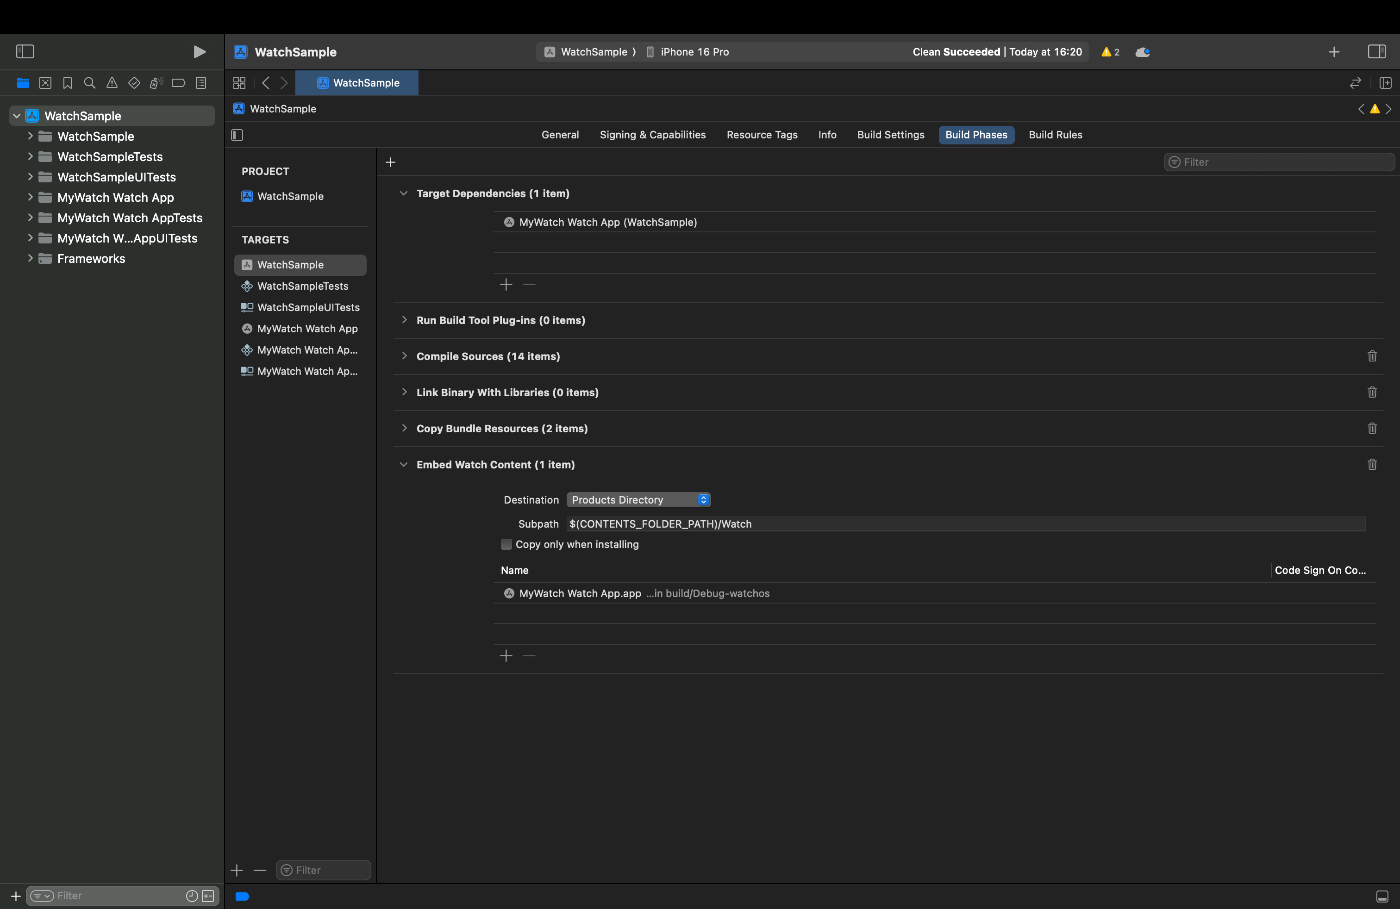
「Target Dependencies」と「Embed Watch Content」の項目に MyWatch が含まれていることを確認します。
これで iOS アプリのプロジェクト設定は完了です。
4. watchOS アプリのプロジェクト設定
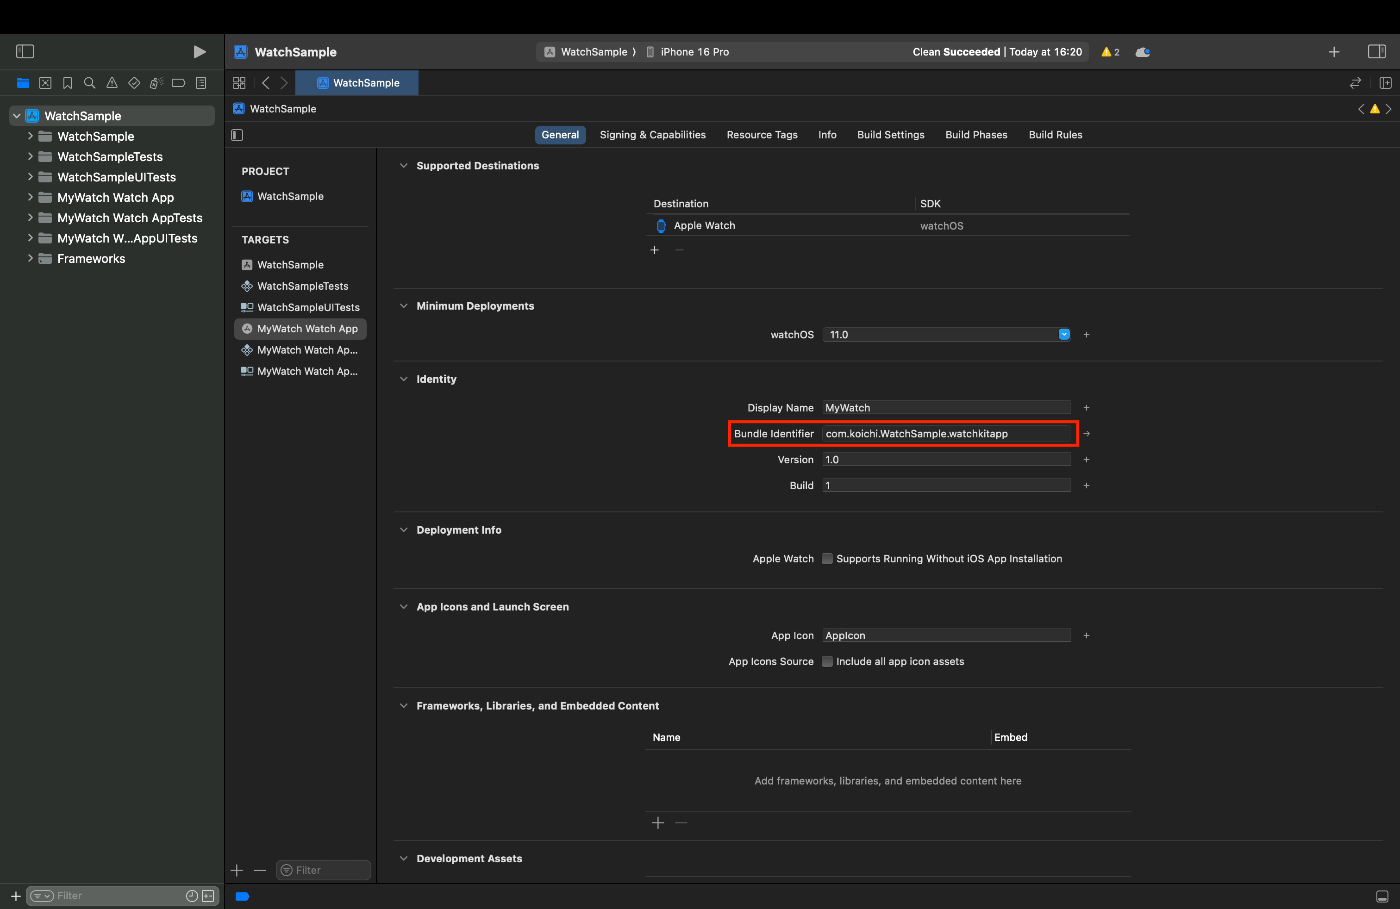
watchOS 側の Bundle Identifier の項目を {iOS側のBundle Identifier}.watchkitapp となるように変更します。
今回のプロジェクトでは iOS 側の Bundle Identifier が com.koichi.WatchSample であるため、以下の画像の赤枠部分のように watchOS 側の Bundle Identifier を com.koichi.WatchSample.watchkitapp としておきます。
次に watchOS 側の Info.plist の WKCompanionAppBundleIdentifier の項目を iOS アプリの Bundle Identifier に変更します。
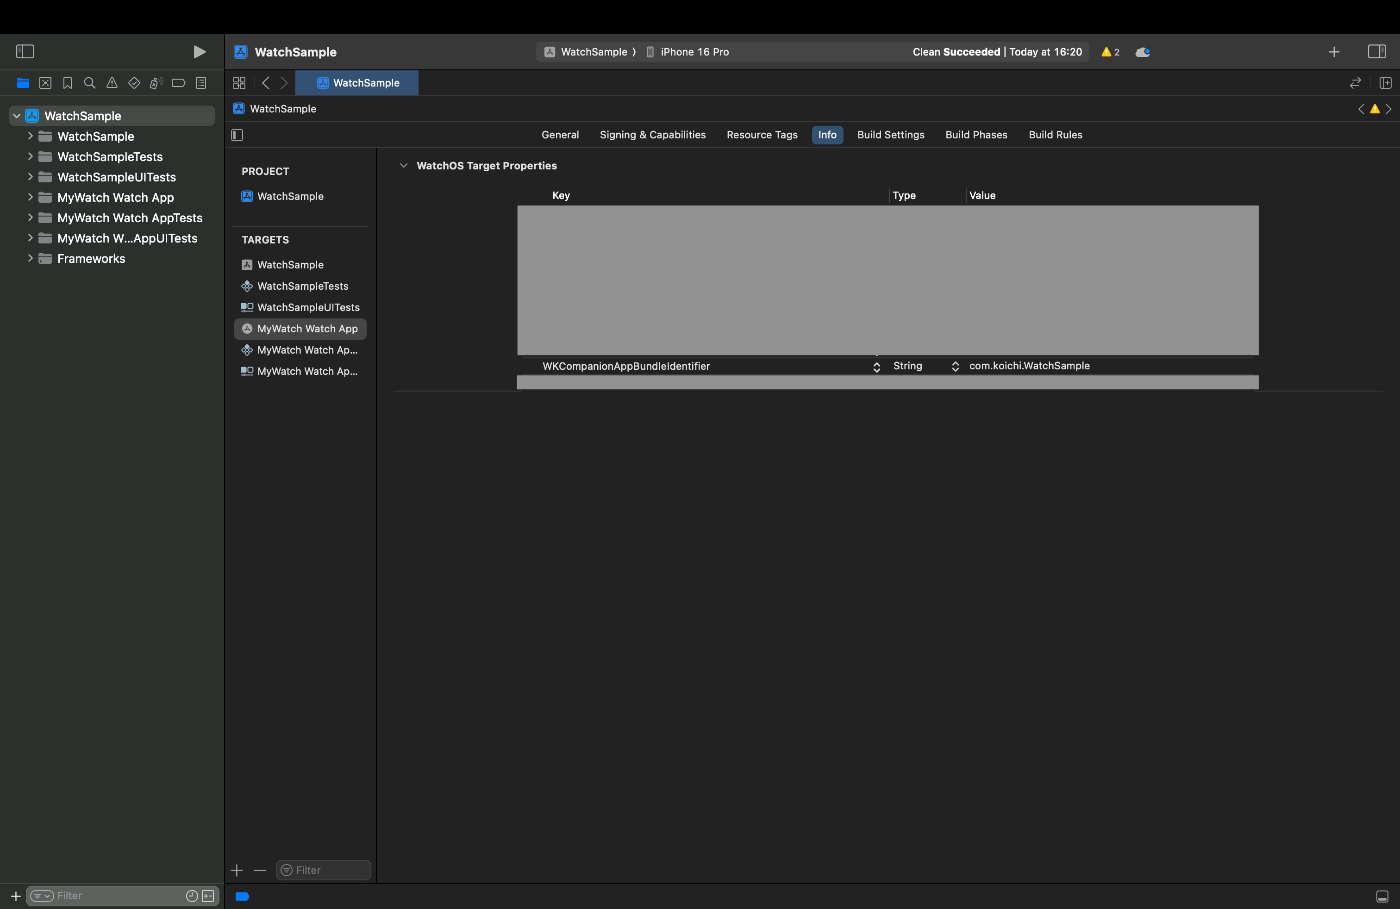
これで watchOS アプリのプロジェクト設定は完了です。
5. Simulator の設定
最後に iOS, watchOS Simulator の設定をしていきます。
まずは Window > Devices and Simulators を選択します。
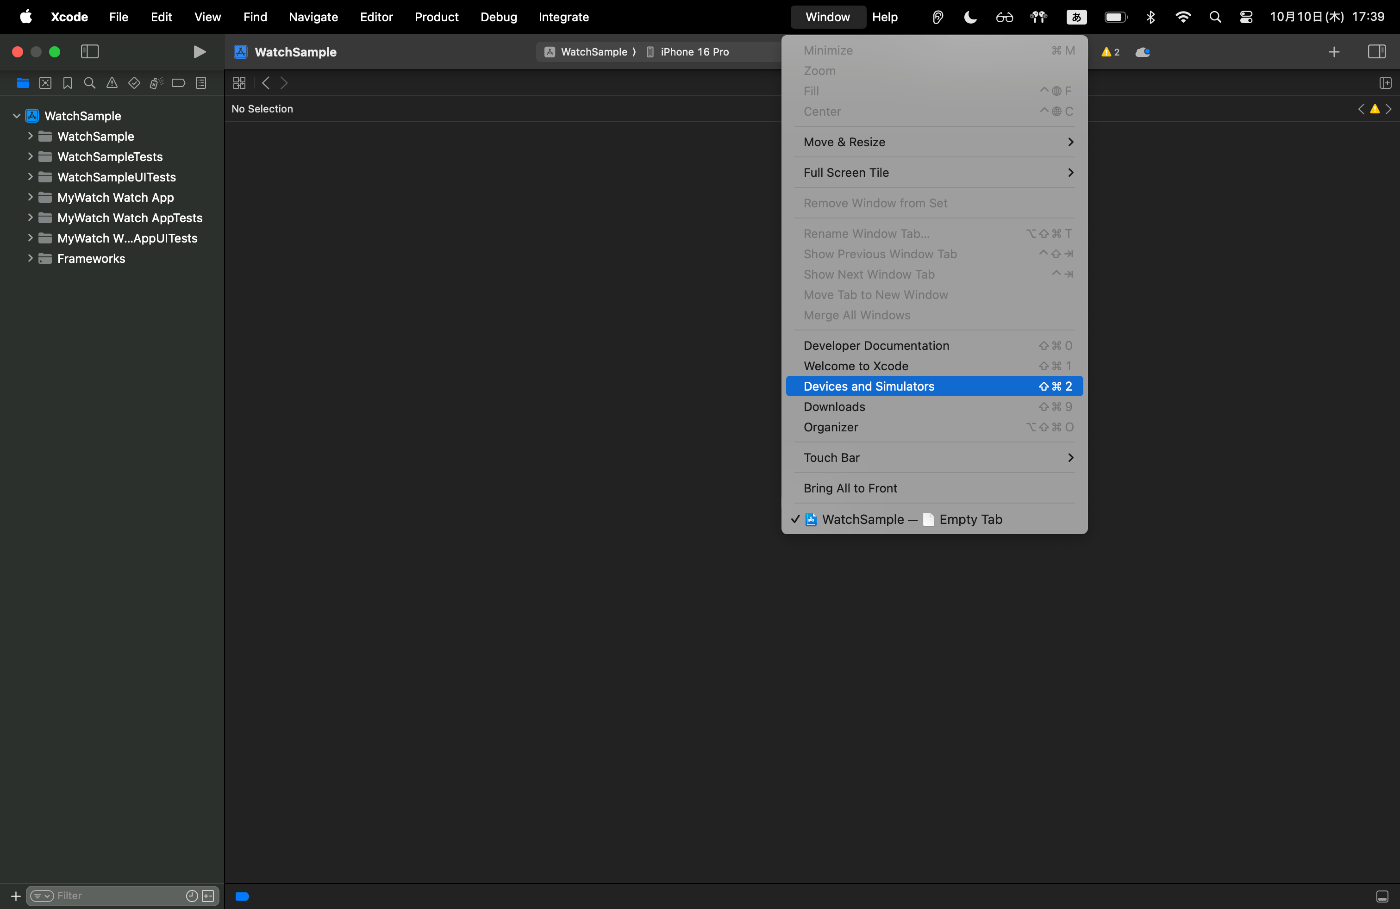
次に Simulators の項目で画面下の + ボタンを押します。
「Paired Apple Watch」の項目にチェックを入れて、好みのデバイスを選択して「Next」を押します。
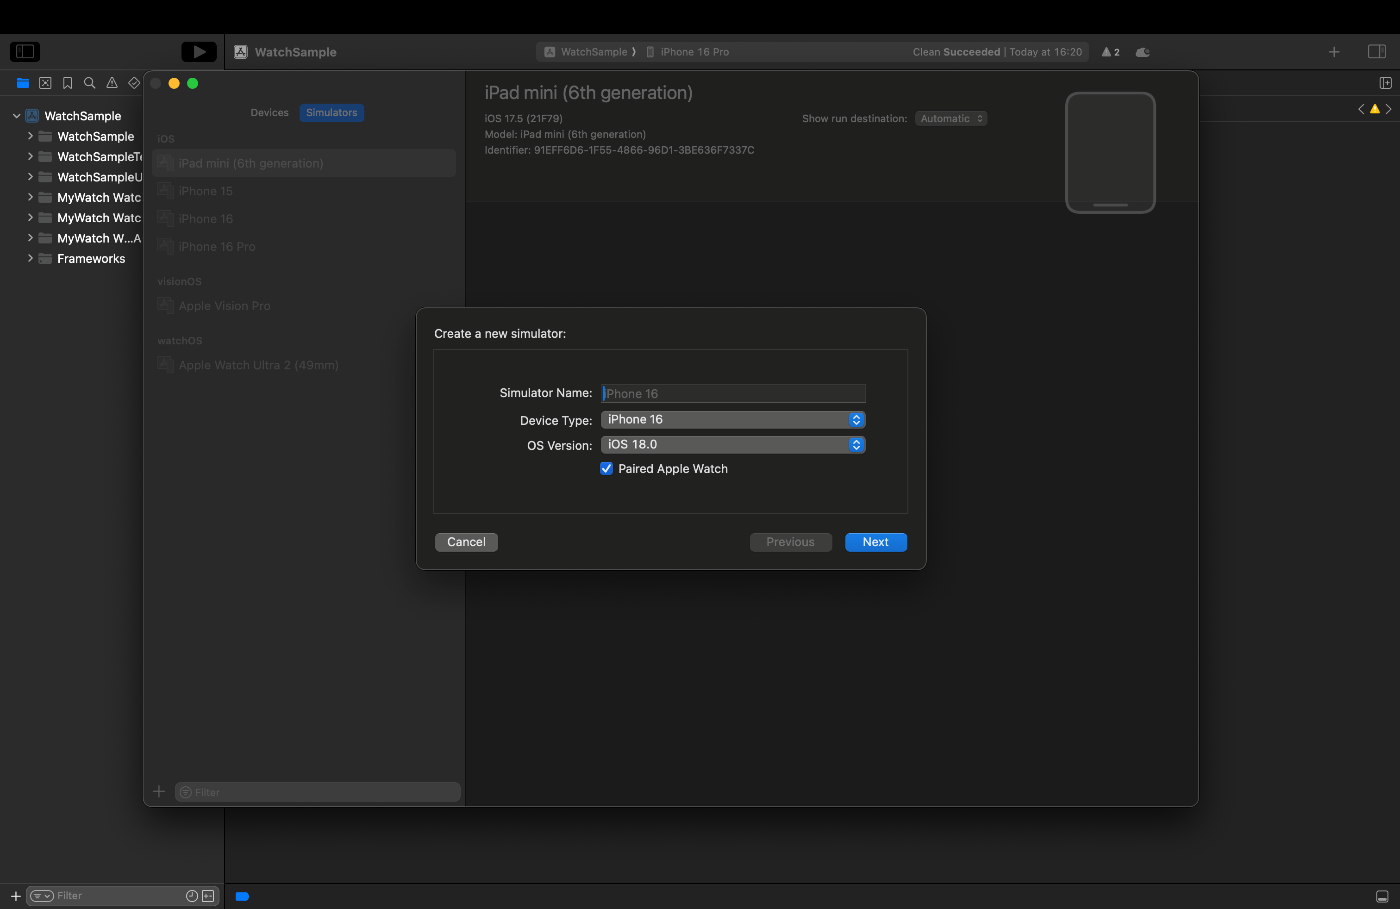
最後に好みの watchOS のデバイスを選択して「Create」を押します。
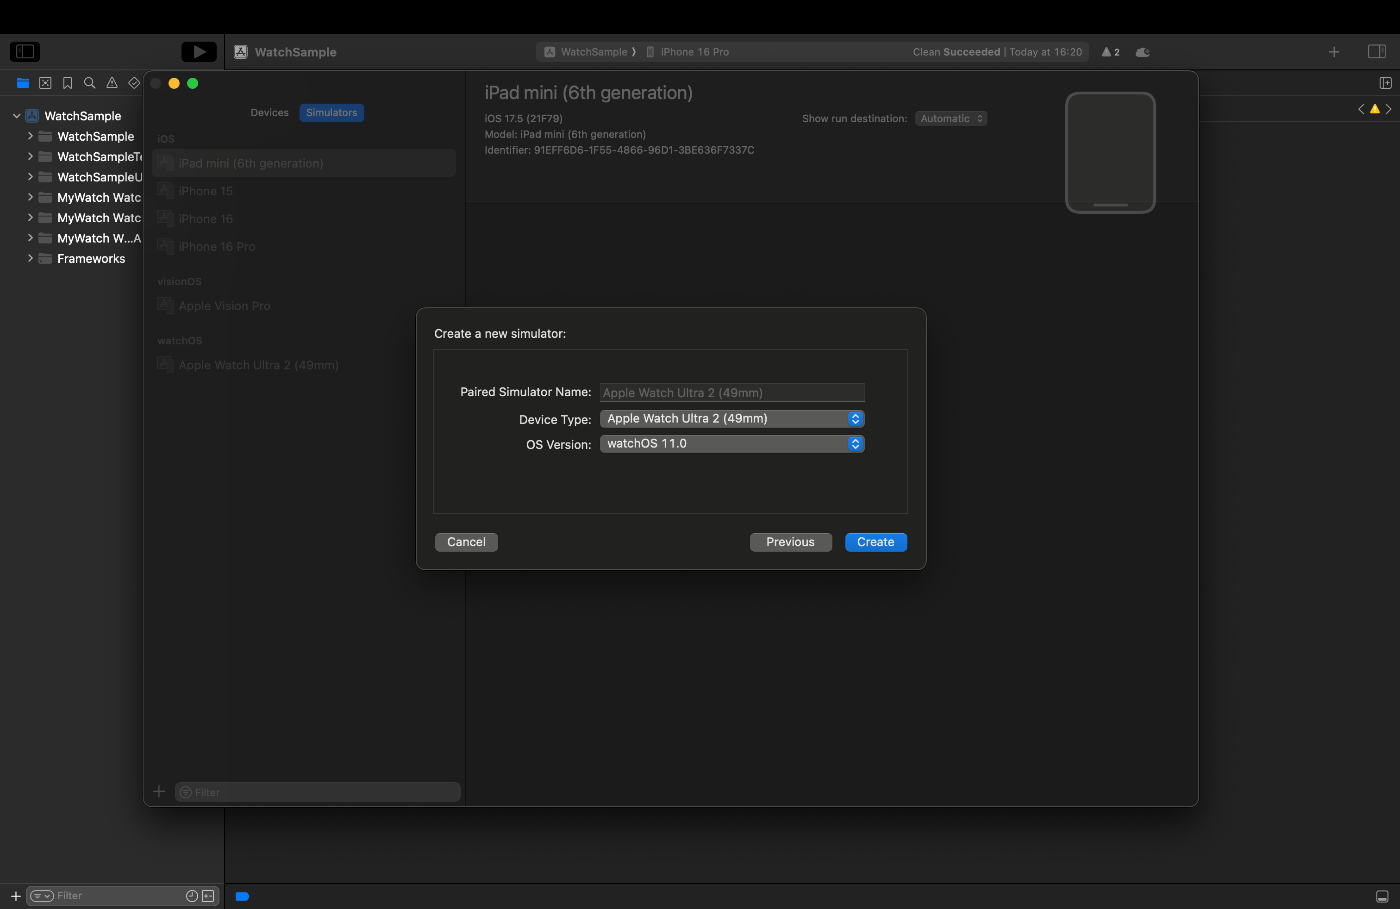
これで Simulator の設定は完了です。
アプリ実装
準備が完了したため、次はアプリの実装を進めていきます。
最終的には以下の動画のように、iPhone と Apple Watch のどちらでも操作できる Todo アプリができるようになります。
アプリの実装は以下の手順で進めます。
- iOS 側の実装
- watchOS 側の実装
1. iOS 側の実装
今回実装するのは Todo アプリです。
iOS 側の実装は以下の手順で進めていきます。
- Model の作成
- Manager の作成
- View の作成
- App の変更
まずは Todo モデルの実装から行います。
コードは以下の通りです。
Todo 自体は四つのパラメータを持つシンプルな作りにしています。
また、 SwiftData を使用するため、 @Model アノテーションを付与しています。
import Foundation
import SwiftData

@Model
final class Todo {
    var id: UUID
    var title: String
    var isCompleted: Bool
    var lastModified: Date

    init(id: UUID = UUID(), title: String, isCompleted: Bool = false, lastModified: Date = Date()) {
        self.id = id
        self.title = title
        self.isCompleted = isCompleted
        self.lastModified = lastModified
    }
}

extension Todo: Codable {
    enum CodingKeys: String, CodingKey {
        case id, title, isCompleted, lastModified
    }

    func encode(to encoder: Encoder) throws {
        var container = encoder.container(keyedBy: CodingKeys.self)
        try container.encode(id, forKey: .id)
        try container.encode(title, forKey: .title)
        try container.encode(isCompleted, forKey: .isCompleted)
        try container.encode(lastModified, forKey: .lastModified)
    }

    convenience init(from decoder: Decoder) throws {
        let container = try decoder.container(keyedBy: CodingKeys.self)
        let id = try container.decode(UUID.self, forKey: .id)
        let title = try container.decode(String.self, forKey: .title)
        let isCompleted = try container.decode(Bool.self, forKey: .isCompleted)
        let lastModified = try container.decode(Date.self, forKey: .lastModified)
        self.init(id: id, title: title, isCompleted: isCompleted, lastModified: lastModified)
    }
}
次に Todo を管理する TodoManager を実装していきます。
コードは以下の通りです。以下で詳しくみていきます。
import SwiftData
import WatchConnectivity

@MainActor
class TodoManager: NSObject, ObservableObject {
    let modelContainer: ModelContainer
    let modelContext: ModelContext

    @Published var todos: [Todo] = []

    override init() {
        do {
            modelContainer = try ModelContainer(for: Todo.self)
            modelContext = modelContainer.mainContext
        } catch {
            fatalError("Failed to create ModelContainer for Todo: \(error.localizedDescription)")
        }

        super.init()

        fetchTodos()
        setupWatchConnectivity()
    }

    func fetchTodos() {
        let descriptor = FetchDescriptor<Todo>(sortBy: [SortDescriptor(\.lastModified)])
        do {
            todos = try modelContext.fetch(descriptor)
        } catch {
            print("Error fetching todos: \(error.localizedDescription)")
        }
    }

    func addTodo(_ todo: Todo) {
        modelContext.insert(todo)
        saveTodos()
        sendTodosToWatch()
    }

    func updateTodo(_ todo: Todo) {
        todo.lastModified = Date()
        saveTodos()
        sendTodosToWatch()
    }

    func deleteTodo(_ todo: Todo) {
        modelContext.delete(todo)
        saveTodos()
        sendTodosToWatch()
    }

    private func saveTodos() {
        do {
            try modelContext.save()
            fetchTodos()
        } catch {
            print("Error saving todos: \(error.localizedDescription)")
        }
    }

    // WatchConnectivity
    private func setupWatchConnectivity() {
        if WCSession.isSupported() {
            WCSession.default.delegate = self
            WCSession.default.activate()
        }
    }

    private func sendTodosToWatch() {
        guard WCSession.default.isReachable else {
            print("Watch is not reachable")
            return
        }

        do {
            let encodedTodos = try JSONEncoder().encode(todos)
            WCSession.default.sendMessage(["todos": encodedTodos], replyHandler: { reply in
                print("Message sent successfully to watch. Reply: \(reply)")
            }) { error in
                print("Error sending todos to watch: \(error.localizedDescription)")
            }
        } catch {
            print("Error encoding todos: \(error.localizedDescription)")
        }
    }
}

extension TodoManager: WCSessionDelegate {
    nonisolated func session(_ session: WCSession, activationDidCompleteWith activationState: WCSessionActivationState, error: Error?) {
        if let error = error {
            print("WCSession activation failed with error: \(error.localizedDescription)")
        } else {
            print("WCSession activated with state: \(activationState.rawValue)")
        }
    }

    nonisolated func sessionDidBecomeInactive(_ session: WCSession) {
        print("WCSession became inactive")
    }

    nonisolated func sessionDidDeactivate(_ session: WCSession) {
        print("WCSession deactivated")
        // Reactivate the session
        WCSession.default.activate()
    }

    nonisolated func session(_ session: WCSession, didReceiveMessage message: [String : Any], replyHandler: @escaping ([String : Any]) -> Void) {
        guard let encodedTodos = message["todos"] as? Data else {
            print("Received message does not contain todos data")
            replyHandler(["status": "error", "message": "Invalid data received"])
            return
        }

        do {
            let decodedTodos = try JSONDecoder().decode([Todo].self, from: encodedTodos)
            DispatchQueue.main.async {
                self.updateLocalTodos(with: decodedTodos)
                replyHandler(["status": "success"])
            }
        } catch {
            print("Error decoding todos: \(error.localizedDescription)")
            replyHandler(["status": "error", "message": "Failed to decode todos"])
        }
    }

    private func updateLocalTodos(with receivedTodos: [Todo]) {
        for todo in todos {
            modelContext.delete(todo)
        }
        todos = receivedTodos

        for todo in todos {
            modelContext.insert(todo)
        }

        saveTodos()
    }
}
以下では SwiftData で使用する modelContainer, modelContext の定義を行なっています。
また、 Todo のリストを定義し、外部からも参照できるように @Published アノテーションを付与しています。
let modelContainer: ModelContainer
let modelContext: ModelContext

@Published var todos: [Todo] = []
以下では初期化メソッドを定義しています。
Todo の ModelContainer を作成し、 modelContext には作成した ModelContainer の mainContext を割り当てています。
その他にも後述の fetchTodos メソッドで Todo の一覧を取得したり、 setupWatchConnectivity メソッドで watchOS 側のアプリの設定をしたりしています。
override init() {
    do {
        modelContainer = try ModelContainer(for: Todo.self)
        modelContext = modelContainer.mainContext
    } catch {
        fatalError("Failed to create ModelContainer for Todo: \(error.localizedDescription)")
    }

    super.init()

    fetchTodos()
    setupWatchConnectivity()
}
以下では、 Todo の一覧を取得する fetchTodos メソッドを定義しています。
Todo の一覧は Todo の FetchDescriptor を modelContext.fetch メソッドの引数に入れることで取得することができます。
取得した Todo の一覧は todos に代入しています。
func fetchTodos() {
    let descriptor = FetchDescriptor<Todo>(sortBy: [SortDescriptor(\.lastModified)])
    do {
        todos = try modelContext.fetch(descriptor)
    } catch {
        print("Error fetching todos: \(error.localizedDescription)")
    }
}
以下ではそれぞれ Todo の追加、更新、削除、保存処理を実装しています。
addTodo では insert メソッドを実行することで SwiftData に Todo を追加しています。
updateTodo では受けとった Todo の lastModified のみを更新して保存しています。
deleteTodo では delete メソッドを実行することで受け取った Todo を削除しています。
saveTodos では modelContext.save を実行することで現在のデータを保存しています。また、保存した後に fetchTodos を実行することで Todo のリストを更新しています。
func addTodo(_ todo: Todo) {
    modelContext.insert(todo)
    saveTodos()
    sendTodosToWatch()
}

func updateTodo(_ todo: Todo) {
    todo.lastModified = Date()
    saveTodos()
    sendTodosToWatch()
}

func deleteTodo(_ todo: Todo) {
    modelContext.delete(todo)
    saveTodos()
    sendTodosToWatch()
}

private func saveTodos() {
    do {
        try modelContext.save()
        fetchTodos()
    } catch {
        print("Error saving todos: \(error.localizedDescription)")
    }
}
以下では watchOS との連携に必要な関数の実装を行なっています。
setupWatchConnectivity では、 WCSession がサポートされている場合に、self を delegate に指定し、 activate を実行することで watchOS からの入力を受け付けています。
また、 sendTodosToWatch では JSON 形式に直した Todo のリストを sendMessage メソッドで watch 側に送信しています。 watchOS にデータを送信するメソッドは他にもありますが、今回は sendMessage を使用しています。
private func setupWatchConnectivity() {
    if WCSession.isSupported() {
        WCSession.default.delegate = self
        WCSession.default.activate()
    }
}

private func sendTodosToWatch() {
    guard WCSession.default.isReachable else {
        print("Watch is not reachable")
        return
    }

    do {
        let encodedTodos = try JSONEncoder().encode(todos)
        WCSession.default.sendMessage(["todos": encodedTodos], replyHandler: { reply in
            print("Message sent successfully to watch. Reply: \(reply)")
        }) { error in
            print("Error sending todos to watch: \(error.localizedDescription)")
        }
    } catch {
        print("Error encoding todos: \(error.localizedDescription)")
    }
}
次に TodoManager の extension として定義した WCSessionDelegate についてみていきます。
session では watchOS の状態に応じた出力を定義しています。 watch と正常に通信できなかった場合はエラーが表示されるように指定しています。
sessionDidBecomeInactive では session が watch 側との通信を停止する際に実行される関数を定義します。今回は特に処理は必要ないため、 print 文を実行しています。
sessionDidDeactivate では session からすべてのデータを送信し、通信が終了した際に実行される関数を定義します。今回は、watch 側との通信を再度行うように activate メソッドを実行しています。
nonisolated func session(_ session: WCSession, activationDidCompleteWith activationState: WCSessionActivationState, error: Error?) {
    if let error = error {
        print("WCSession activation failed with error: \(error.localizedDescription)")
    } else {
        print("WCSession activated with state: \(activationState.rawValue)")
    }
}

nonisolated func sessionDidBecomeInactive(_ session: WCSession) {
    print("WCSession became inactive")
}

nonisolated func sessionDidDeactivate(_ session: WCSession) {
    print("WCSession deactivated")
    WCSession.default.activate()
}
以下の session ではメッセージを受け取った際に実行する関数を定義しています。
ここでは、 sendMessage で送られてきた message の todos に格納された JSON形式の Todo のリストをでコードして、updateLocalTodos に渡しています。
また、データの受け取りの成功・失敗に応じて、 replyHandler でデータを返すようにしています。
このようにすることで、送られてきた Todo のリストを扱うことができるようになります。
nonisolated func session(_ session: WCSession, didReceiveMessage message: [String : Any], replyHandler: @escaping ([String : Any]) -> Void) {
    guard let encodedTodos = message["todos"] as? Data else {
        print("Received message does not contain todos data")
        replyHandler(["status": "error", "message": "Invalid data received"])
        return
    }

    do {
        let decodedTodos = try JSONDecoder().decode([Todo].self, from: encodedTodos)
        DispatchQueue.main.async {
            self.updateLocalTodos(with: decodedTodos)
            replyHandler(["status": "success"])
        }
    } catch {
        print("Error decoding todos: \(error.localizedDescription)")
        replyHandler(["status": "error", "message": "Failed to decode todos"])
    }
}
最後に以下の部分で端末の SwiftData に保存されている Todo のリストを更新する処理を記述しています。現状保存されている Todo のリストを全て delete して、引数として受け取った receivedTodos を insert することでデータを入れ替えています。
private func updateLocalTodos(with receivedTodos: [Todo]) {
    for todo in todos {
        modelContext.delete(todo)
    }
    todos = receivedTodos

    for todo in todos {
        modelContext.insert(todo)
    }

    saveTodos()
}
これで Todo を管理する TodoManager の実装は完了です。
次に Todo の表示や編集を行う TodoView を作成していきます。
TextField にタイトルを入力して改行を押すと Todo がリストに追加されるようになっています。
また、リストの要素をスワイプすることで削除できるようにしています。
コードは以下の通りです。
import SwiftUI
import SwiftData

struct TodoView: View {
    @StateObject private var todoManager = TodoManager()
    @State private var newTodoTitle = ""

    var body: some View {
        NavigationView {
            List {
                TextField("New Todo", text: $newTodoTitle, onCommit: addTodo)

                ForEach(todoManager.todos) { todo in
                    TodoRow(todo: todo, updateTodo: todoManager.updateTodo)
                }
                .onDelete(perform: deleteTodos)
            }
            .navigationTitle("Todos")
            .toolbar {
                EditButton()
            }
        }
    }

    private func addTodo() {
        let newTodo = Todo(title: newTodoTitle)
        todoManager.addTodo(newTodo)
        newTodoTitle = ""
    }

    private func deleteTodos(at offsets: IndexSet) {
        offsets.forEach { index in
            todoManager.deleteTodo(todoManager.todos[index])
        }
    }
}

struct TodoRow: View {
    let todo: Todo
    let updateTodo: (Todo) -> Void

    var body: some View {
        Toggle(isOn: Binding(
            get: { todo.isCompleted },
            set: { newValue in
                todo.isCompleted = newValue
                updateTodo(todo)
            }
        )) {
            Text(todo.title)
        }
    }
}
最後に App の変更を行います。
SwiftData を使用するために modelContainer に Todo を渡して、 Todo のモデルを認識できるようにしています。
コードは以下の通りです。
import SwiftUI
import SwiftData

@main
struct WatchSampleApp: App {
    var body: some Scene {
        WindowGroup {
            TodoView()
        }
        .modelContainer(for: Todo.self)
    }
}
これで iOS 側の実装は完了です。
2. watchOS 側の実装
次に watchOS 側の実装に移ります。
watchOS の実装は先程の iOS 側の実装を少し編集するだけで動作します。
まずは Todo のモデルです。
コードは以下で、iOS 側で実装したモデルと全く同じ内容にしています。
import Foundation
import SwiftData

@Model
final class Todo {
    var id: UUID
    var title: String
    var isCompleted: Bool
    var lastModified: Date

    init(id: UUID = UUID(), title: String, isCompleted: Bool = false, lastModified: Date = Date()) {
        self.id = id
        self.title = title
        self.isCompleted = isCompleted
        self.lastModified = lastModified
    }
}

extension Todo: Codable {
    enum CodingKeys: String, CodingKey {
        case id, title, isCompleted, lastModified
    }

    func encode(to encoder: Encoder) throws {
        var container = encoder.container(keyedBy: CodingKeys.self)
        try container.encode(id, forKey: .id)
        try container.encode(title, forKey: .title)
        try container.encode(isCompleted, forKey: .isCompleted)
        try container.encode(lastModified, forKey: .lastModified)
    }

    convenience init(from decoder: Decoder) throws {
        let container = try decoder.container(keyedBy: CodingKeys.self)
        let id = try container.decode(UUID.self, forKey: .id)
        let title = try container.decode(String.self, forKey: .title)
        let isCompleted = try container.decode(Bool.self, forKey: .isCompleted)
        let lastModified = try container.decode(Date.self, forKey: .lastModified)
        self.init(id: id, title: title, isCompleted: isCompleted, lastModified: lastModified)
    }
}
次に TodoManager の実装に移ります。
iOS 側で実装したものをそのままコピーしてくると以下の2行のエラーが表示されます。
iOS 側の sessionDidBecomeInactive, sessionDidDeactivate メソッドは iOS 側のみで使用できる関数であるため、エラーが表示されている二つの関数の実装を削除しておきます。
Cannot override 'sessionDidBecomeInactive' which has been marked unavailable
Cannot override 'sessionDidDeactivate' which has been marked unavailable
また、iOS 側で実装した sendTodosToWatch メソッドに関して、今回は sendTodosToPhone
という名前にして、以下のような実装にしておきます。
private func sendTodosToPhone() {
    guard WCSession.default.isReachable else {
        print("Phone is not reachable")
        return
    }

    do {
        let encodedTodos = try JSONEncoder().encode(todos)
        WCSession.default.sendMessage(["todos": encodedTodos], replyHandler: { reply in
            print("Message sent successfully to phone. Reply: \(reply)")
        }) { error in
            print("Error sending todos to phone: \(error.localizedDescription)")
        }
    } catch {
        print("Error encoding todos: \(error.localizedDescription)")
    }
}
watchOS 側の TodoManager の変更は以上で、コードは以下のようになります。
import SwiftData
import WatchConnectivity

@MainActor
class TodoManager: NSObject, ObservableObject {
    let modelContainer: ModelContainer
    let modelContext: ModelContext

    @Published var todos: [Todo] = []

    override init() {
        do {
            modelContainer = try ModelContainer(for: Todo.self)
            modelContext = modelContainer.mainContext
        } catch {
            fatalError("Failed to create ModelContainer for Todo: \(error.localizedDescription)")
        }

        super.init()

        fetchTodos()
        setupWatchConnectivity()
    }

    func fetchTodos() {
        let descriptor = FetchDescriptor<Todo>(sortBy: [SortDescriptor(\.lastModified)])
        do {
            todos = try modelContext.fetch(descriptor)
        } catch {
            print("Error fetching todos: \(error.localizedDescription)")
        }
    }

    func addTodo(_ todo: Todo) {
        modelContext.insert(todo)
        saveTodos()
        sendTodosToPhone()
    }

    func updateTodo(_ todo: Todo) {
        todo.lastModified = Date()
        saveTodos()
        sendTodosToPhone()
    }

    func deleteTodo(_ todo: Todo) {
        modelContext.delete(todo)
        saveTodos()
        sendTodosToPhone()
    }

    private func saveTodos() {
        do {
            try modelContext.save()
            fetchTodos()
        } catch {
            print("Error saving todos: \(error.localizedDescription)")
        }
    }

    // WatchConnectivity
    private func setupWatchConnectivity() {
        if WCSession.isSupported() {
            WCSession.default.delegate = self
            WCSession.default.activate()
        }
    }

    private func sendTodosToPhone() {
        guard WCSession.default.isReachable else {
            print("Phone is not reachable")
            return
        }

        do {
            let encodedTodos = try JSONEncoder().encode(todos)
            WCSession.default.sendMessage(["todos": encodedTodos], replyHandler: { reply in
                print("Message sent successfully to phone. Reply: \(reply)")
            }) { error in
                print("Error sending todos to phone: \(error.localizedDescription)")
            }
        } catch {
            print("Error encoding todos: \(error.localizedDescription)")
        }
    }
}

extension TodoManager: WCSessionDelegate {
    nonisolated func session(
        _ session: WCSession,
        activationDidCompleteWith activationState: WCSessionActivationState,
        error: Error?
    ) {
        if let error = error {
            print("WCSession activation failed with error: \(error.localizedDescription)")
        } else {
            print("WCSession activated with state: \(activationState.rawValue)")
        }
    }

    nonisolated func session(
        _ session: WCSession,
        didReceiveMessage message: [String : Any],
        replyHandler: @escaping ([String : Any]) -> Void
    ) {
        guard let encodedTodos = message["todos"] as? Data else {
            print("Received message does not contain todos data")
            replyHandler(["status": "error", "message": "Invalid data received"])
            return
        }

        do {
            let decodedTodos = try JSONDecoder().decode([Todo].self, from: encodedTodos)
            DispatchQueue.main.async {
                self.updateLocalTodos(with: decodedTodos)
                replyHandler(["status": "success"])
            }
        } catch {
            print("Error decoding todos: \(error.localizedDescription)")
            replyHandler(["status": "error", "message": "Failed to decode todos"])
        }
    }

    private func updateLocalTodos(with receivedTodos: [Todo]) {
        for todo in todos {
            modelContext.delete(todo)
        }
        todos = receivedTodos

        for todo in todos {
            modelContext.insert(todo)
        }

        saveTodos()
    }
}
次に watchOS 側の TodoView の実装に移ります。
TodoView のコードも iOS で実装した TodoView のものと同様で問題ないかと思います。
コードは以下の通りです。
import SwiftUI
import SwiftData

struct TodoView: View {
    @StateObject private var todoManager = TodoManager()
    @State private var newTodoTitle = ""

    var body: some View {
        List {
            TextField("New Todo", text: $newTodoTitle, onCommit: addTodo)

            ForEach(todoManager.todos) { todo in
                TodoRow(todo: todo, updateTodo: todoManager.updateTodo)
            }
            .onDelete(perform: deleteTodos)
        }
        .navigationTitle("Todos")
    }

    private func addTodo() {
        let newTodo = Todo(title: newTodoTitle)
        todoManager.addTodo(newTodo)
        newTodoTitle = ""
    }

    private func deleteTodos(at offsets: IndexSet) {
        offsets.forEach { index in
            todoManager.deleteTodo(todoManager.todos[index])
        }
    }
}

struct TodoRow: View {
    let todo: Todo
    let updateTodo: (Todo) -> Void

    var body: some View {
        Toggle(isOn: Binding(
            get: { todo.isCompleted },
            set: { newValue in
                todo.isCompleted = newValue
                updateTodo(todo)
            }
        )) {
            Text(todo.title)
        }
    }
}
最後に watchOS 側の App の編集を行います。
コードは以下の通りです。
iOS と同様に SwiftData を使用するために modelContext に Todo のモデルを渡しています。
import SwiftUI
import SwiftData

@main
struct MyWatch_Watch_AppApp: App {
    var body: some Scene {
        WindowGroup {
            TodoView()
        }
        .modelContainer(for: Todo.self)
    }
}
これで watchOS 側の実装も完了です。
iOS と watchOS の両方でアプリを実行すると以下の動画のようにアプリが連携して動くことが確認できます。
なお、アプリを実行する際には以下の2点に気をつけてみてください。
-
iPhone と Apple Watch が連携されていることを確認する
アプリを実行するときはそれぞれペアリングされた Simulator を使用するよう注意しましょう。
watchOS で実行する際には「Apple Watch Ultra 2 (49mm) via iPhone 16 Pro」のように接続されている iPhone が表示されるかと思うので、そこを参考にしていただければと思います。 -
データが保存されない場合は再起動する
データが保存されない場合は Xcode や iOS Simulator を再起動したり、登録してる Simulator を一度削除してから実行し直すと治る場合があります。
まとめ
最後まで読んでいただいてありがとうございました。
今回は iOS と watchOS の連携を行う方法をまとめました。
連携を行うための設定は多少手間がかかりますが、設定が完了すれば Model や Manager などを使い回すことができるため、あまり負荷をかけずにアプリを watchOS に対応させることができます。
既存のアプリの一部の機能を切り出して実装するといった方法も実現できるので、ユーザーの要望に応じて実装してみても良いなと感じました。
誤っている点やもっと良い書き方があればご指摘いただければ幸いです。
参考
Discussion