作って学ぶ Cloud Load Balancing 入門
概要
Cloud Load Balancing を構成する要素は複数あり、初見でそれらを全て把握して設定するのは困難です。
本稿では初めて Cloud Load Balancing を触る人に向けて、terraform でグローバル外部アプリケーションロードバランサを設定する方法について、ドキュメントをベースにまとめました。
手を動かしながら Cloud Load Balancing の概要を把握するのに役立てば幸いです。
全体構成
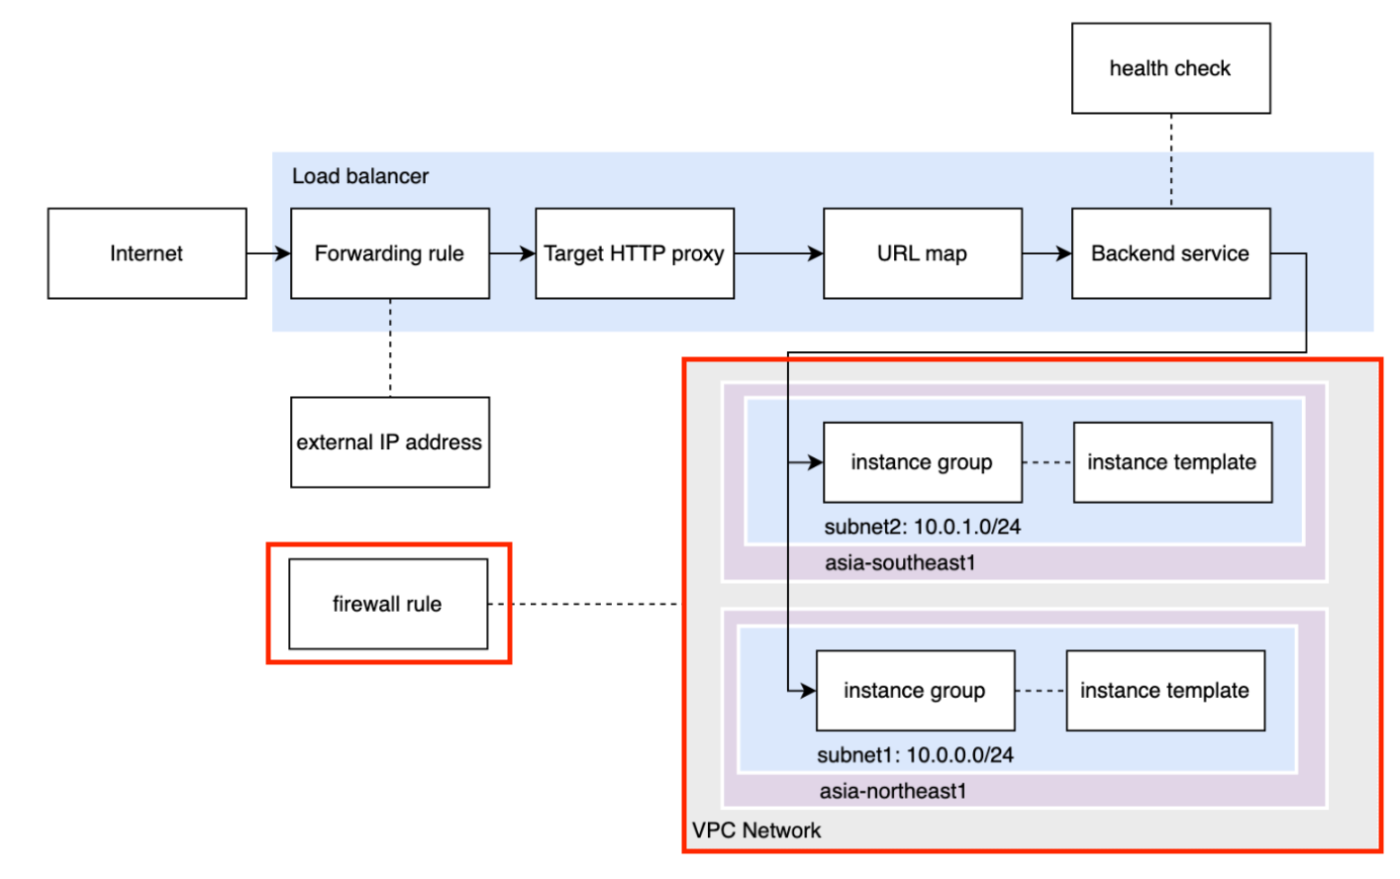
今回作成する構成は下図の通りです。

-
VPC Network/subnet:instance group を配置するためのネットワーク、サブネットを作成します。
-
instance template:instance group を作るのにインスタンステンプレートを作成します。
-
instance group:マネージドインスタンスグループ(MIG)のこと。instance template を元にリージョン MIG を2つ作成して、それぞれを異なるリージョンに配置します。
-
firewall rule:内向きアクセスを許可するファイアウォールルールを作成して、instance group にアクセスできるようにします。
-
Backend service:Cloud Load Balancing によるトラフィックの分散方法(1秒あたりの最大リクエスト数や、VM インスタンスの使用率など)を定義します。トラフィックを流す宛先(=バックエンド)に指定できるアプリケーションタイプは限られており、ここでは2つの instance group にトラフィックを分散します。
-
health check:Backend service では、ロードバランサからの接続を受信するバックエンドの稼働状況を定期的に監視するヘルスチェックを指定します。これにより、処理不能なバックエンドにリクエストが送信されるリスクを軽減できます。
-
URL map:ホストルールやパスマッチャーを構成してリクエストを異なる宛先に転送できます。ここではシンプルにするためホストルールやパスマッチャーを設定せず、Backend service の構成に従ってリクエストを instance group に送ります。
-
external IP address:インターネットの向こう側にいるクライアントが Load Balancer にアクセスする際に指定する IP アドレス。forwarding rule に紐づけます。
-
forwarding rule:外部アプリケーションロードバランサでは、forwarding rule は Target HTTP(S) proxy を参照します。ここでは、トラフィックを Target HTTP proxy に転送します。
-
Target HTTP proxy:forwarding rule で指定された IP アドレスとポートをリッスンし、リクエストを受信すると HTTP 接続を終端します。URL map と Backend service の構成に従って、適切なバックエンドと新しい接続を確立します。
VPC Network
VPC Network を作成するには google_compute_network を使用します。
resource "google_compute_network" "lb_sample" {
  name                    = "lb-sample-network"
  auto_create_subnetworks = false
}
VPCネットワークが作成されたことを次のコマンドで確認します。
$ gcloud compute networks list --filter="name:lb-sample-network"
NAME               SUBNET_MODE  BGP_ROUTING_MODE  IPV4_RANGE  GATEWAY_IPV4
lb-sample-network  CUSTOM       REGIONAL
subnet
subnet を作成するには google_compute_subnetwork を使用します。
network には作成した VPC Network を指定します。
resource "google_compute_subnetwork" "lb_sample_subnet" {
  name                             = "lb-sample-subnet"
  ip_cidr_range                    = "10.0.0.0/24"
  network                          = google_compute_network.lb_sample.self_link
  region                           = "asia-northeast1"
  stack_type                       = "IPV4_ONLY"
}

resource "google_compute_subnetwork" "lb_sample_subnet_2" {
  name                             = "lb-sample-subnet-2"
  ip_cidr_range                    = "10.0.1.0/24"
  network                          = google_compute_network.lb_sample.self_link
  region                           = "asia-southeast1"
  stack_type                       = "IPV4_ONLY"
}
サブネットが作成されたことを次のコマンドで確認します。
$ gcloud compute networks subnets list --filter="network:lb-sample-network"
NAME                REGION           NETWORK            RANGE        STACK_TYPE
lb-sample-subnet    asia-northeast1  lb-sample-network  10.0.0.0/24  IPV4_ONLY
lb-sample-subnet-2  asia-southeast1  lb-sample-network  10.0.1.0/24  IPV4_ONLY
instance template
instance template を作成するには google_compute_instance_template を使用します。
network には作成した VPC Network、subnetwork には instance group を配置する subnet を設定します。
また、http-server というネットワークタグを設定して後述する firewall rule が適用されるようにします。
<project-id> は自身の Google Cloud Project のプロジェクト番号に置き換えてください。
resource "google_compute_instance_template" "lb_sample_template_asia_north" {
  name = "lb-sample-template-asia-northeast1"
  disk {
    auto_delete  = true
    boot         = true
    device_name  = "lb-sample-template-asia-northeast1"
    mode         = "READ_WRITE"
    source_image = "projects/debian-cloud/global/images/debian-12-bookworm-v20250212"
    type         = "PERSISTENT"
  }
  labels       = null
  machine_type = "e2-micro"
  metadata = {
    # The startup-script-url specifies a script that executes when instances are started. This script installs Apache and changes the welcome page to include the client IP and the name, region, and zone of the VM instance. Feel free to explore this script.
    # https://storage.googleapis.com/cloud-training/gcpnet/httplb/startup.sh
    startup-script-url = "gs://cloud-training/gcpnet/httplb/startup.sh"
  }
  network_interface {
    access_config {
      network_tier = "PREMIUM"
    }
    network                     = google_compute_network.lb_sample.self_link
    subnetwork                  = google_compute_subnetwork.lb_sample_subnet.self_link
  }
  region = "asia-northeast1"
  scheduling {
    automatic_restart           = true
    on_host_maintenance         = "MIGRATE"
    provisioning_model          = "STANDARD"
  }
  service_account {
    email = "<project-id>-compute@developer.gserviceaccount.com"
    scopes = [
      "https://www.googleapis.com/auth/devstorage.read_only", "https://www.googleapis.com/auth/logging.write",
      "https://www.googleapis.com/auth/monitoring.write", "https://www.googleapis.com/auth/service.management.readonly",
      "https://www.googleapis.com/auth/servicecontrol", "https://www.googleapis.com/auth/trace.append"
    ]
  }
  tags = ["http-server"]  # Network tags
}

resource "google_compute_instance_template" "lb_sample_template_asia_south" {
  name = "lb-sample-template-asia-southeast1"
  disk {
    auto_delete  = true
    boot         = true
    device_name  = "lb-sample-template-asia-southeast1"
    mode         = "READ_WRITE"
    source_image = "projects/debian-cloud/global/images/debian-12-bookworm-v20250212"
    type         = "PERSISTENT"
  }
  labels       = null
  machine_type = "e2-micro"
  metadata = {
    startup-script-url = "gs://cloud-training/gcpnet/httplb/startup.sh"
  }
  network_interface {
    access_config {
      network_tier = "PREMIUM"
    }
    network                     = google_compute_network.lb_sample.self_link
    subnetwork                  = google_compute_subnetwork.lb_sample_subnet_2.self_link
  }
  region = "asia-southeast1"
  scheduling {
    automatic_restart           = true
    on_host_maintenance         = "MIGRATE"
    provisioning_model          = "STANDARD"
  }
  service_account {
    email = "<project-id>-compute@developer.gserviceaccount.com"
    scopes = [
      "https://www.googleapis.com/auth/devstorage.read_only", "https://www.googleapis.com/auth/logging.write",
      "https://www.googleapis.com/auth/monitoring.write", "https://www.googleapis.com/auth/service.management.readonly",
      "https://www.googleapis.com/auth/servicecontrol", "https://www.googleapis.com/auth/trace.append"
    ]
  }
  tags = ["http-server"]  # Network tags
}
instance template が作成されたことを次のコマンドで確認します。
$ gcloud compute instance-templates list
NAME                                MACHINE_TYPE  PREEMPTIBLE  CREATION_TIMESTAMP
lb-sample-template-asia-northeast1  e2-micro                   2025-03-22T04:41:59.741-07:00
lb-sample-template-asia-southeast1  e2-micro                   2025-03-22T04:58:30.082-07:00
instance group
instance group を作成するには google_compute_region_instance_group_manager を使用します。
instance_template には作成した instance template を指定します。
resource "google_compute_region_instance_group_manager" "lb_mig_group_asia_north" {
  name                             = "lb-sample-asia-northeast1-mig"
  base_instance_name               = "lb-sample-asia-northeast1-mig"
  region                           = "asia-northeast1"
  distribution_policy_zones        = ["asia-northeast1-a", "asia-northeast1-b", "asia-northeast1-c"]
  wait_for_instances               = false
  wait_for_instances_status        = "STABLE"
  target_size                      = 1
  named_port {
    name = "http"
    port = 80
  }
  version {
    instance_template = google_compute_instance_template.lb_sample_template_asia_north.self_link
  }
}

resource "google_compute_region_instance_group_manager" "lb_mig_group_asia_south" {
  name                             = "lb-sample-asia-southeast1-mig"
  base_instance_name               = "lb-sample-asia-southeast1-mig"
  region                           = "asia-southeast1"
  distribution_policy_zones        = ["asia-southeast1-a", "asia-southeast1-b", "asia-southeast1-c"]
  wait_for_instances               = false
  wait_for_instances_status        = "STABLE"
  target_size                      = 1
  named_port {
    name = "http"
    port = 80
  }
  version {
    instance_template = google_compute_instance_template.lb_sample_template_asia_south.self_link
  }
}
instance group が作成されたことを次のコマンドで確認します。
$ gcloud compute instance-groups managed list
NAME                           LOCATION         SCOPE   BASE_INSTANCE_NAME             SIZE  TARGET_SIZE  INSTANCE_TEMPLATE                   AUTOSCALED
lb-sample-asia-northeast1-mig  asia-northeast1  region  lb-sample-asia-northeast1-mig  1     1            lb-sample-template-asia-northeast1  no
lb-sample-asia-southeast1-mig  asia-southeast1  region  lb-sample-asia-southeast1-mig  1     1            lb-sample-template-asia-southeast1  no
firewall rule
作成した instance group にアクセスするには、firewall rule が必要です。
ここでは全てのIPからのアクセスを許可する firewall rule を作成して、VPC ネットワーク内の http-server というネットワークタグを持つリソースに適用します。
firewall rule を作成するには google_compute_firewall を使用します。
resource "google_compute_firewall" "lb_allow_http" {
  name                    = "lb-sample-allow-http"
  direction               = "INGRESS"
  network                 = google_compute_network.lb_sample.self_link
  priority                = 1000
  source_ranges           = ["0.0.0.0/0"]
  target_tags             = ["http-server"]
  allow {
    ports    = ["80"]
    protocol = "tcp"
  }
  disabled                = false
}
firewall rule が作成されたことを次のコマンドで確認します。
$ gcloud compute firewall-rules list --filter network=lb-sample-network
NAME                  NETWORK            DIRECTION  PRIORITY  ALLOW   DENY  DISABLED
lb-sample-allow-http  lb-sample-network  INGRESS    1000      tcp:80        False
ここまでで全体像の赤枠部分が出来上がりました。

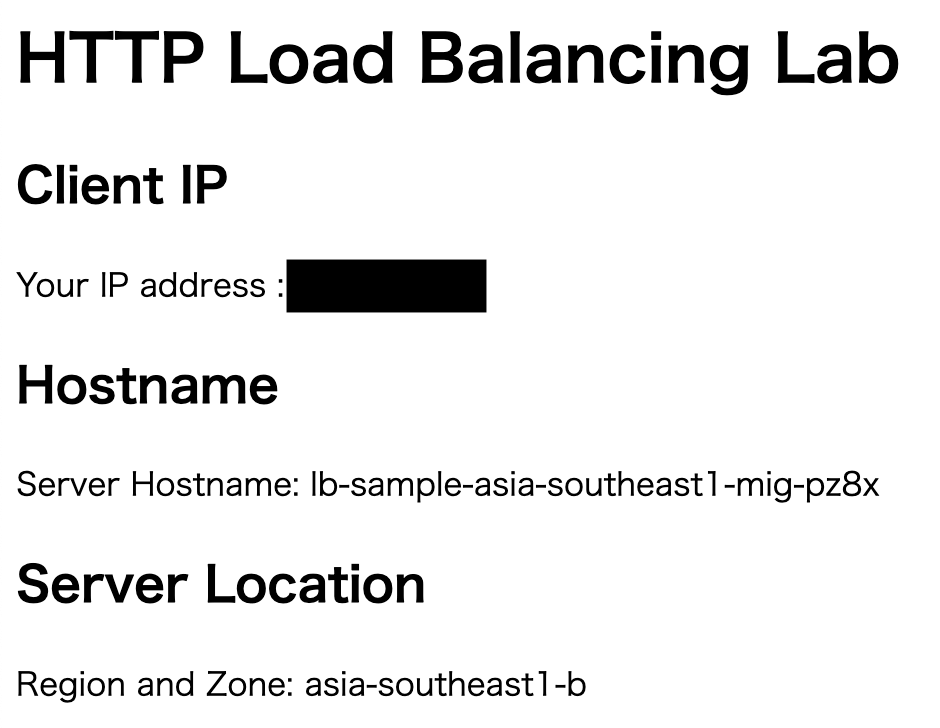
これまで作成したリソースが正しく設定されているか確認するため、instance group の VM インスタンスに設定された外部IPをブラウザから叩いてみます。
次のように Hostname や Server Location が画面に表示されれば問題なく VM インスタンスにアクセスできています。
 |
|---|
 |
|---|
health check
health check を作成するには google_compute_health_check を使用します。
resource "google_compute_health_check" "lb_sample_health_check" {
  name                = "lb-sample-health-check"
  check_interval_sec  = 5
  healthy_threshold   = 2
  timeout_sec         = 5
  unhealthy_threshold = 2
  http_health_check {
    port               = 80
    port_specification = "USE_FIXED_PORT"
    proxy_header       = "NONE"
    request_path       = "/"
  }
}
health check が作成されたことを次のコマンドで確認します。
$ gcloud compute health-checks list
NAME                     REGION  PROTOCOL
lb-sample-health-check           HTTP
Backend service
Backend service を作成するには google_compute_backend_service を使用します。
health_checks に作成した health check を設定し、backend.group に作成した instance group を設定します。
resource "google_compute_backend_service" "lb_sample_backend" {
  name                            = "lb-sample-backend"
  connection_draining_timeout_sec = 300
  health_checks = [
    google_compute_health_check.lb_sample_health_check.id
  ]
  load_balancing_scheme           = "EXTERNAL_MANAGED"
  port_name                       = "http"
  protocol                        = "HTTP"
  session_affinity                = "NONE"
  timeout_sec                     = 30
  backend {
    group                        = google_compute_region_instance_group_manager.lb_mig_group_asia_north.instance_group
    balancing_mode               = "RATE"
    capacity_scaler              = 1
    max_rate_per_instance        = 1
  }
  backend {
    group                        = google_compute_region_instance_group_manager.lb_mig_group_asia_south.instance_group
    balancing_mode               = "UTILIZATION"
    capacity_scaler              = 1
    max_utilization              = 0.8
  }
}
asia-northeast1 の instance group には最大 1 rps(request per second)、asia-southeast1 の instance group には最大使用率80%までとして、トラフィックを流すように設定しました。
Backend service が作成されたことを次のコマンドで確認します。
$ gcloud beta compute backend-services list
NAME               BACKENDS                                                                                                                   PROTOCOL  LOAD_BALANCING_SCHEME  HEALTH_CHECKS
lb-sample-backend  asia-northeast1/instanceGroups/lb-sample-asia-northeast1-mig,asia-southeast1/instanceGroups/lb-sample-asia-southeast1-mig  HTTP      EXTERNAL_MANAGED       lb-sample-health-check
URL map
URL map を作成するには、google_compute_url_map を使用します。
default_service に作成した backend service を設定します。
resource "google_compute_url_map" "lb_sample_url_map" {
  name            = "lb-sample-url-map"
  default_service = google_compute_backend_service.lb_sample_backend.self_link
}
URL map が作成されたことを次のコマンドで確認します。
$ gcloud beta compute url-maps list
NAME                   DEFAULT_SERVICE
lb-sample-url-map      backendServices/lb-sample-backend
Target HTTP proxy
Target HTTP proxy を作成するには google_compute_target_http_proxy を使用します。
url_map に作成した url map を設定します。
resource "google_compute_target_http_proxy" "lb_sample_target_http_proxy" {
  name                        = "lb-sample-http-target-proxy"
  url_map                     = google_compute_url_map.lb_sample_url_map.self_link
}
Target HTTP proxy が作成されたことを次のコマンドで確認します。
$ gcloud beta compute target-http-proxies list
NAME                         URL_MAP
lb-sample-http-target-proxy  lb-sample-url-map
external IP address
外部 IP アドレスを予約するには google_compute_global_address を使用します。
resource "google_compute_global_address" "lb_sample_ip" {
  name       = "lb-sample-ipv4"
  ip_version = "IPV4"
}
予約された IPv4 アドレスを次のコマンドで確認します。
$ gcloud compute addresses describe lb-sample-ipv4 \
    --format="get(address)" \
    --global
<予約された IPv4 アドレス>
Forwarding rule
Forwarding rule を作成するには google_compute_global_forwarding_rule を使用します。
target に作成した Target HTTP proxy を指定し、ip_address に予約した IP アドレスを指定します。
resource "google_compute_global_forwarding_rule" "lb_sample_forwarding_rule" {
  name                  = "lb-sample-forwarding-rule"
  ip_protocol           = "TCP"
  load_balancing_scheme = "EXTERNAL_MANAGED"
  port_range            = "80-80"
  target                = google_compute_target_http_proxy.lb_sample_target_http_proxy.self_link
  ip_address            = google_compute_global_address.lb_sample_ip.address
}
Forwarding rule が作成されたことを次のコマンドで確認します。
$ gcloud beta compute forwarding-rules list
NAME                           REGION  IP_ADDRESS          IP_PROTOCOL  TARGET
lb-sample-forwarding-rule              <予約された IPv4 アドレス>        TCP          lb-sample-http-target-proxy
ロードバランサの動作確認
Forwarding rule を作成してから反映されるまでに少し時間がかかるため数分程度待機します。
その後、ブラウザで http://<予約された IPv4 アドレス> にアクセスして、次のような画面が表示されればロードバランサが正常に動作しています。
 |
|---|
次に、2つの instance group で負荷分散されているかを確認するため、以下のシェルスクリプトを実行します。
end=$((SECONDS+300)); while [ $SECONDS -lt $end ]; do seq 10 | xargs -n1 -P10 -I{} sh -c 'curl -s http://<予約された IPv4 アドレス> | sed -n "s/.*Server Hostname: \([^<]*\).*/\1/p"; echo'; done
これは <予約された IPv4 アドレス> にリクエストを送信しアクセス先の Hostname を出力する処理を10並列で5分間実行し続けるコマンドです。
これを実行すると最初は asia-northeast1 にある Hostname だけが出力され続け、時間が経つと asia-southeast1 の Hostname が多く出力されるようになります。
lb-sample-asia-northeast1-mig-4x3t
lb-sample-asia-northeast1-mig-4x3t
lb-sample-asia-northeast1-mig-4x3t
lb-sample-asia-northeast1-mig-4x3t
lb-sample-asia-northeast1-mig-4x3t
lb-sample-asia-northeast1-mig-4x3t
...
...
...
lb-sample-asia-southeast1-mig-pz8x
lb-sample-asia-southeast1-mig-pz8x
lb-sample-asia-southeast1-mig-pz8x
lb-sample-asia-northeast1-mig-4x3t
lb-sample-asia-southeast1-mig-pz8x
lb-sample-asia-southeast1-mig-pz8x
...
最初はクライアントに近い場所にある asia-northeast1 の instance group にリクエストが流されるものの、Backend service で最大 1 rps という制限を設定したため、それを超える頻度でリクエストが送られてきたことを検知すると asia-southeast1 の instance group に流されるようになったという動きになります。
Discussion