Raspberry Pi 4でYoctoを動かしてみる
Raspberry Pi 4でYoctoを試すためのメモです。
Yoctoの基礎知識
Yoctoとは?
Yoctoとは、組み込み向けのLinux Distributionを作成するためのパッケージ、ライセンス管理、ビルドシステムなどを統合したツールです。Yocto Project(https://www.yoctoproject.org/)で開発が進められています。
基本的に半年に1度、バージョンアップがなされていきます。基本的に次のバージョンがリリースされたら、前のバージョンはメンテナンスに移行しますが、LTSと呼ばれるリリースはその後もアップデートが提供されるそうです。
YoctoはOpenEmbeddedプロジェクトから派生・発展したものであり、現在もYoctoだけではなくOpenEmbeddedのシステムと連携しています。
使用できるデバイスは?
Linuxが動くものであれば、たいていメーカーからBSPとして設定が用意されています。基本的にはそれを用いて作成しますが、メーカーによっては早期にKernelの追従などをやめてしまう場合があります。その場合は自分で
今の最新バージョンは?
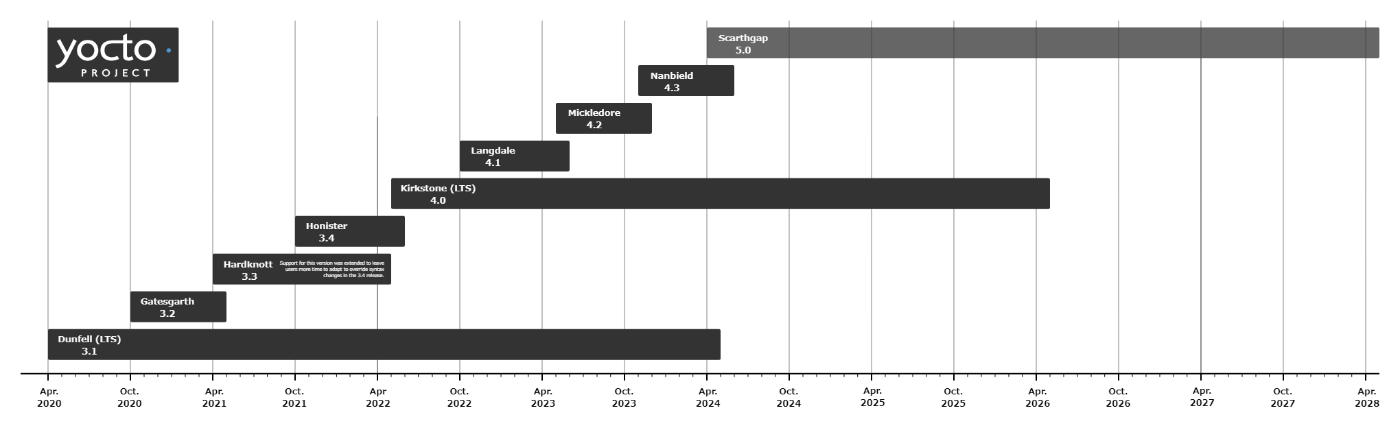
Yocto projectのページによると2023年11月に最新の4.3.1(Nanbield)がリリースされています。毎年4月と10月にメジャーバージョンアップがあります。ただ、最新のものを使用するとBSPが対応していない場合があるので注意が必要です。
また、それとは別にLTS(Long Term Support)と定義されたバージョンがあります。今リリースされている最新のLTSは4.0(KirkStone)で、これは2026年4月までサポートが続けられます。今使うのであれば4.0ベースで進めるのが良いでしょう。(本書でも4.0をベースに解説します)
2024年1月時点でのリリーススケジュールは以下のようになっています。(https://docs.yoctoproject.org/ref-manual/release-process.html)
Pokyってなに?
Yoctoのビルドシステムで生成されるリファレンスの君込Linuxディストリビューションをさして使われます。
開発に必要な環境は?
基本的にLinux環境が必要です。(mac OSでも可)
WindowsではWSL2を使うことで対応できますが、ディスクサイズやメディア・デバイスへの書き込みで制限が出る場合があります。
今回はUbuntu 22.04をインストールしたPCで開発環境の確認を行っています。
開発環境を整える
必要な開発マシンのスペックは?
Yocto Projectで記載されている最低スペックは以下のとおりです。
- ディスク容量 90GByte以上
- RAM 8GByte以上
- CPU 最低4コア以上
CPUは早ければ早く、メモリも多ければ多いほど良いです。ストレージはHDDだと遅いので、SSDを準備したほうが良いです。また、ビルド時に必要なソースコードやリソースをネットワーク経由で取得するので、高速なインターネット回線も必須です。
OSは何を使うのが良い?
YOcto Projectで推奨されているOSは以下のとおりです。
- Ubuntu 18.04 (LTS)
- Ubuntu 20.04 (LTS)
- Fedora 36
- Fedora 37
- AlmaLinux 8.7
- AlmaLinux 9.1
- Debian GNU/Linux 11.x (Bullseye)
- OpenSUSE Leap 15.3
- OpenSUSE Leap 15.4
本書ではUbuntu 20.04を用いて確認を行います。
※Ubuntu 22.04では正常にビルドできませんでした。こちら( https://zenn.dev/kobayutapon/articles/a586249c89d42b )を参考にDocker環境でビルドすることでイメージが作れるようになります。
必要なパッケージを追加する
今回使用するUbuntu 20.04の環境では以下のパッケージを追加する必要があります。
sudo apt install gawk wget git diffstat unzip texinfo gcc build-essential chrpath socat cpio python3 python3-pip python3-pexpect xz-utils debianutils iputils-ping python3-git python3-jinja2 libegl1-mesa libsdl1.2-dev python3-subunit mesa-common-dev zstd liblz4-tool file locales
sudo locale-gen en_US.UTF-8
Raspberry Pi 4のイメージを作成する
それでは、実際にRaspberry Pi 4Bのイメージを作成してみます。
Yoctoソースコードの取得
Yoctoシステムのソースコードを取得します。以下では~/work2以下に取得することとします。
指定するタグの一覧はこちら(https://git.yoctoproject.org/poky)で確認できます。
cd ~/work2
git clone git://git.yoctoproject.org/poky
cd poky
git checkout -b kirkstone refs/tags/kirkstone-4.0.15
Raspberry Pi用BSPの取得
Raspberry Pi用のBSPパッケージを取得し、追加します。ブランチはkirkstoneを指定します。
cd ~/work2/poky
git clone git://git.yoctoproject.org/meta-raspberrypi
cd meta-raspberrypi
git checkout -b kirkstone origin/kirkstone
openembedded環境の取得
OpenEmbeddedパッケージを取得し、追加します。ブランチはkirkstoneを指定します。
cd ~/work2/poky
git clone git://git.openembedded.org/meta-openembedded
cd meta-openembedded/
git checkout -b kirkstone origin/kirkstone
ビルド環境の設定
ビルド環境を構築します。以下のコマンドを実行するとビルド用のディレクトリが作成され、そのディレクトリにビルドに使う設定ファイルが生成されます。ここではビルドディレクトリをpi-buildとしています。
cd ~/work2/poky
source oe-init-build-env pi-build
この作業を行うと poky/pi-build/conf以下に以下のファイルが作成されます。
- bblayers.conf
- local.conf
- templateconf.cfg
それぞれのファイルの中身は以下のようになります。
# POKY_BBLAYERS_CONF_VERSION is increased each time build/conf/bblayers.conf
# changes incompatibly
POKY_BBLAYERS_CONF_VERSION = "2"

BBPATH = "${TOPDIR}"
BBFILES ?= ""

BBLAYERS ?= " \
  /home/kobayashi/work2/poky/meta \
  /home/kobayashi/work2/poky/meta-poky \
  /home/kobayashi/work2/poky/meta-yocto-bsp \
  "
#
# This file is your local configuration file and is where all local user settings
# are placed. The comments in this file give some guide to the options a new user
# to the system might want to change but pretty much any configuration option can
# be set in this file. More adventurous users can look at
# local.conf.sample.extended which contains other examples of configuration which
# can be placed in this file but new users likely won't need any of them
# initially.
#
# Lines starting with the '#' character are commented out and in some cases the
# default values are provided as comments to show people example syntax. Enabling
# the option is a question of removing the # character and making any change to the
# variable as required.

#
# Machine Selection
#
# You need to select a specific machine to target the build with. There are a selection
# of emulated machines available which can boot and run in the QEMU emulator:
#
#MACHINE ?= "qemuarm"
#MACHINE ?= "qemuarm64"
#MACHINE ?= "qemumips"
#MACHINE ?= "qemumips64"
#MACHINE ?= "qemuppc"
#MACHINE ?= "qemux86"
#MACHINE ?= "qemux86-64"
#
# There are also the following hardware board target machines included for
# demonstration purposes:
#
#MACHINE ?= "beaglebone-yocto"
#MACHINE ?= "genericx86"
#MACHINE ?= "genericx86-64"
#MACHINE ?= "edgerouter"
#
# This sets the default machine to be qemux86-64 if no other machine is selected:
MACHINE ??= "qemux86-64"

#
# Where to place downloads
#
# During a first build the system will download many different source code tarballs
# from various upstream projects. This can take a while, particularly if your network
# connection is slow. These are all stored in DL_DIR. When wiping and rebuilding you
# can preserve this directory to speed up this part of subsequent builds. This directory
# is safe to share between multiple builds on the same machine too.
#
# The default is a downloads directory under TOPDIR which is the build directory.
#
#DL_DIR ?= "${TOPDIR}/downloads"

#
# Where to place shared-state files
#
# BitBake has the capability to accelerate builds based on previously built output.
# This is done using "shared state" files which can be thought of as cache objects
# and this option determines where those files are placed.
#
# You can wipe out TMPDIR leaving this directory intact and the build would regenerate
# from these files if no changes were made to the configuration. If changes were made
# to the configuration, only shared state files where the state was still valid would
# be used (done using checksums).
#
# The default is a sstate-cache directory under TOPDIR.
#
#SSTATE_DIR ?= "${TOPDIR}/sstate-cache"

#
# Where to place the build output
#
# This option specifies where the bulk of the building work should be done and
# where BitBake should place its temporary files and output. Keep in mind that
# this includes the extraction and compilation of many applications and the toolchain
# which can use Gigabytes of hard disk space.
#
# The default is a tmp directory under TOPDIR.
#
#TMPDIR = "${TOPDIR}/tmp"

#
# Default policy config
#
# The distribution setting controls which policy settings are used as defaults.
# The default value is fine for general Yocto project use, at least initially.
# Ultimately when creating custom policy, people will likely end up subclassing
# these defaults.
#
DISTRO ?= "poky"
# As an example of a subclass there is a "bleeding" edge policy configuration
# where many versions are set to the absolute latest code from the upstream
# source control systems. This is just mentioned here as an example, its not
# useful to most new users.
# DISTRO ?= "poky-bleeding"

#
# Package Management configuration
#
# This variable lists which packaging formats to enable. Multiple package backends
# can be enabled at once and the first item listed in the variable will be used
# to generate the root filesystems.
# Options are:
#  - 'package_deb' for debian style deb files
#  - 'package_ipk' for ipk files are used by opkg (a debian style embedded package manager)
#  - 'package_rpm' for rpm style packages
# E.g.: PACKAGE_CLASSES ?= "package_rpm package_deb package_ipk"
# We default to rpm:
PACKAGE_CLASSES ?= "package_rpm"

#
# SDK target architecture
#
# This variable specifies the architecture to build SDK items for and means
# you can build the SDK packages for architectures other than the machine you are
# running the build on (i.e. building i686 packages on an x86_64 host).
# Supported values are i686, x86_64, aarch64
#SDKMACHINE ?= "i686"

#
# Extra image configuration defaults
#
# The EXTRA_IMAGE_FEATURES variable allows extra packages to be added to the generated
# images. Some of these options are added to certain image types automatically. The
# variable can contain the following options:
#  "dbg-pkgs"       - add -dbg packages for all installed packages
#                     (adds symbol information for debugging/profiling)
#  "src-pkgs"       - add -src packages for all installed packages
#                     (adds source code for debugging)
#  "dev-pkgs"       - add -dev packages for all installed packages
#                     (useful if you want to develop against libs in the image)
#  "ptest-pkgs"     - add -ptest packages for all ptest-enabled packages
#                     (useful if you want to run the package test suites)
#  "tools-sdk"      - add development tools (gcc, make, pkgconfig etc.)
#  "tools-debug"    - add debugging tools (gdb, strace)
#  "eclipse-debug"  - add Eclipse remote debugging support
#  "tools-profile"  - add profiling tools (oprofile, lttng, valgrind)
#  "tools-testapps" - add useful testing tools (ts_print, aplay, arecord etc.)
#  "debug-tweaks"   - make an image suitable for development
#                     e.g. ssh root access has a blank password
# There are other application targets that can be used here too, see
# meta/classes/image.bbclass and meta/classes/core-image.bbclass for more details.
# We default to enabling the debugging tweaks.
EXTRA_IMAGE_FEATURES ?= "debug-tweaks"

#
# Additional image features
#
# The following is a list of additional classes to use when building images which
# enable extra features. Some available options which can be included in this variable
# are:
#   - 'buildstats' collect build statistics
USER_CLASSES ?= "buildstats"

#
# Runtime testing of images
#
# The build system can test booting virtual machine images under qemu (an emulator)
# after any root filesystems are created and run tests against those images. It can also
# run tests against any SDK that are built. To enable this uncomment these lines.
# See classes/test{image,sdk}.bbclass for further details.
#IMAGE_CLASSES += "testimage testsdk"
#TESTIMAGE_AUTO:qemuall = "1"

#
# Interactive shell configuration
#
# Under certain circumstances the system may need input from you and to do this it
# can launch an interactive shell. It needs to do this since the build is
# multithreaded and needs to be able to handle the case where more than one parallel
# process may require the user's attention. The default is iterate over the available
# terminal types to find one that works.
#
# Examples of the occasions this may happen are when resolving patches which cannot
# be applied, to use the devshell or the kernel menuconfig
#
# Supported values are auto, gnome, xfce, rxvt, screen, konsole (KDE 3.x only), none
# Note: currently, Konsole support only works for KDE 3.x due to the way
# newer Konsole versions behave
#OE_TERMINAL = "auto"
# By default disable interactive patch resolution (tasks will just fail instead):
PATCHRESOLVE = "noop"

#
# Disk Space Monitoring during the build
#
# Monitor the disk space during the build. If there is less that 1GB of space or less
# than 100K inodes in any key build location (TMPDIR, DL_DIR, SSTATE_DIR), gracefully
# shutdown the build. If there is less than 100MB or 1K inodes, perform a hard halt
# of the build. The reason for this is that running completely out of space can corrupt
# files and damages the build in ways which may not be easily recoverable.
# It's necessary to monitor /tmp, if there is no space left the build will fail
# with very exotic errors.
BB_DISKMON_DIRS ??= "\
    STOPTASKS,${TMPDIR},1G,100K \
    STOPTASKS,${DL_DIR},1G,100K \
    STOPTASKS,${SSTATE_DIR},1G,100K \
    STOPTASKS,/tmp,100M,100K \
    HALT,${TMPDIR},100M,1K \
    HALT,${DL_DIR},100M,1K \
    HALT,${SSTATE_DIR},100M,1K \
    HALT,/tmp,10M,1K"

#
# Shared-state files from other locations
#
# As mentioned above, shared state files are prebuilt cache data objects which can be
# used to accelerate build time. This variable can be used to configure the system
# to search other mirror locations for these objects before it builds the data itself.
#
# This can be a filesystem directory, or a remote url such as https or ftp. These
# would contain the sstate-cache results from previous builds (possibly from other
# machines). This variable works like fetcher MIRRORS/PREMIRRORS and points to the
# cache locations to check for the shared objects.
# NOTE: if the mirror uses the same structure as SSTATE_DIR, you need to add PATH
# at the end as shown in the examples below. This will be substituted with the
# correct path within the directory structure.
#SSTATE_MIRRORS ?= "\
#file://.* https://someserver.tld/share/sstate/PATH;downloadfilename=PATH \
#file://.* file:///some/local/dir/sstate/PATH"

#
# Yocto Project SState Mirror
#
# The Yocto Project has prebuilt artefacts available for its releases, you can enable
# use of these by uncommenting the following lines. This will mean the build uses
# the network to check for artefacts at the start of builds, which does slow it down
# equally, it will also speed up the builds by not having to build things if they are
# present in the cache. It assumes you can download something faster than you can build it
# which will depend on your network.
# Note: For this to work you also need hash-equivalence passthrough to the matching server
#
#BB_HASHSERVE_UPSTREAM = "hashserv.yocto.io:8687"
#SSTATE_MIRRORS ?= "file://.* http://sstate.yoctoproject.org/all/PATH;downloadfilename=PATH"

#
# Qemu configuration
#
# By default native qemu will build with a builtin VNC server where graphical output can be
# seen. The line below enables the SDL UI frontend too.
PACKAGECONFIG:append:pn-qemu-system-native = " sdl"
# By default libsdl2-native will be built, if you want to use your host's libSDL instead of
# the minimal libsdl built by libsdl2-native then uncomment the ASSUME_PROVIDED line below.
#ASSUME_PROVIDED += "libsdl2-native"

# You can also enable the Gtk UI frontend, which takes somewhat longer to build, but adds
# a handy set of menus for controlling the emulator.
#PACKAGECONFIG:append:pn-qemu-system-native = " gtk+"

#
# Hash Equivalence
#
# Enable support for automatically running a local hash equivalence server and
# instruct bitbake to use a hash equivalence aware signature generator. Hash
# equivalence improves reuse of sstate by detecting when a given sstate
# artifact can be reused as equivalent, even if the current task hash doesn't
# match the one that generated the artifact.
#
# A shared hash equivalent server can be set with "<HOSTNAME>:<PORT>" format
#
#BB_HASHSERVE = "auto"
#BB_SIGNATURE_HANDLER = "OEEquivHash"

#
# Memory Resident Bitbake
#
# Bitbake's server component can stay in memory after the UI for the current command
# has completed. This means subsequent commands can run faster since there is no need
# for bitbake to reload cache files and so on. Number is in seconds, after which the
# server will shut down.
#
#BB_SERVER_TIMEOUT = "60"

# CONF_VERSION is increased each time build/conf/ changes incompatibly and is used to
# track the version of this file when it was generated. This can safely be ignored if
# this doesn't mean anything to you.
CONF_VERSION = "2"
meta-poky/conf
これらの設定ファイルを修正して作りたいイメージを生成します。
BSPやOpenEmbedded環境を追加する
以下のコマンドを実行し、bblayers.confにBSP Layer(今回はmeta-raspberrypi)とOpenEmbeddedで必要なLayerを追加します。
bitbake-layers add-layer ../meta-raspberrypi/
bitbake-layers add-layer ../meta-openembedded/meta-oe/
bitbake-layers add-layer ../meta-openembedded/meta-python/
bitbake-layers add-layer ../meta-openembedded/meta-multimedia/
bitbake-layers add-layer ../meta-openembedded/meta-networking/
コマンドの実行が正常に行われると、conf/bblayers.confの中に指定したレイヤーが追加されています。
# POKY_BBLAYERS_CONF_VERSION is increased each time build/conf/bblayers.conf
# changes incompatibly
POKY_BBLAYERS_CONF_VERSION = "2"

BBPATH = "${TOPDIR}"
BBFILES ?= ""

BBLAYERS ?= " \
  /home/kobayashi/work2/poky/meta \
  /home/kobayashi/work2/poky/meta-poky \
  /home/kobayashi/work2/poky/meta-yocto-bsp \
  /home/kobayashi/work2/poky/meta-raspberrypi \
  /home/kobayashi/work2/poky/meta-openembedded/meta-oe \
  /home/kobayashi/work2/poky/meta-openembedded/meta-python \
  /home/kobayashi/work2/poky/meta-openembedded/meta-multimedia \
  /home/kobayashi/work2/poky/meta-openembedded/meta-networking \
  "
local.confの設定を行う
local.confを編集し、ビルドするイメージの設定を行います。ここでターゲットデバイスや追加するパッケージ等を設定します。ビルド環境を作成した際にテンプレートが作成され散るので、これを修正して使用します。
ターゲットの設定
local.confのMACHINEにターゲットのマシン名を設定します。今回はRaspberry Pi 4B用の64bitイメージを作成したいのでraspberrypi4-64を指定します。
MACHINE ?= "raspberrypi4-64"
Raspberry Pi用のマシン名は以下の表のようになります。最新はこちら(https://layers.openembedded.org/layerindex/branch/master/layer/meta-raspberrypi/)を確認してください。
| MACHINE | 対応するボード |
|---|---|
| raspberrypi-armv7 | RaspberryPi boards in 32 bit mode |
| raspberrypi-armv8 | RaspberryPi boards in 64 bit mode |
| raspberrypi-cm | RaspberryPi Compute Module (CM1) |
| raspberrypi-cm3 | RaspberryPi Compute Module 3 (CM3) |
| raspberrypi0 | RaspberryPi Zero board |
| raspberrypi0-2w | RaspberryPi0 2 Wifi in 32 bits mode |
| raspberrypi0-2w-64 | RaspberryPi0 2 Wifi in 64 bits mode |
| raspberrypi0-wifi | RaspberryPi Zero WiFi board |
| raspberrypi2 | RaspberryPi 2 |
| raspberrypi3 | RaspberryPi 3 in 32 bits mode |
| raspberrypi3-64 | RaspberryPi 3 in 64 bits mode |
| raspberrypi4 | RaspberryPi 4 in 32 bit mode |
| raspberrypi4-64 | RaspberryPi 4 in 64 bits mode |
| 注:Raspberry Pi CM4はraspberrypi4もしくはraspberrypi4-64を指定することで使用可能です。ただし、config.txtで設定するデバイス情報が異なるので、必要に応じて対応が必要です。 | |
| 以下に最小限の設定を行ったlocal.confを記載します。 |
#
# local.conf sample for Raspberry Pi 4B
#
# Machine Selection
# Set Raspberry Pi 4B/CM4
MACHINE ?= "raspberrypi4-64"
MACHINE ??= "qemux86-64"

#
# Where to place downloads
#
DL_DIR ?= "${TOPDIR}/downloads"

#
# Where to place shared-state files
#
SSTATE_DIR ?= "${TOPDIR}/sstate-cache"

#
# Where to place the build output
#
TMPDIR = "${TOPDIR}/tmp"

#
# Default policy config
#
DISTRO ?= "poky"

#
# Package Management configuration
#
PACKAGE_CLASSES ?= "package_rpm"

#
# SDK target architecture
#
# Supported values are i686, x86_64, aarch64
SDKMACHINE ?= "x86_64"

#
# Extra image configuration defaults
#
# The EXTRA_IMAGE_FEATURES variable allows extra packages to be added to the generated
# images. Some of these options are added to certain image types automatically. The
# variable can contain the following options:
#  "dbg-pkgs"       - add -dbg packages for all installed packages
#                     (adds symbol information for debugging/profiling)
#  "src-pkgs"       - add -src packages for all installed packages
#                     (adds source code for debugging)
#  "dev-pkgs"       - add -dev packages for all installed packages
#                     (useful if you want to develop against libs in the image)
#  "ptest-pkgs"     - add -ptest packages for all ptest-enabled packages
#                     (useful if you want to run the package test suites)
#  "tools-sdk"      - add development tools (gcc, make, pkgconfig etc.)
#  "tools-debug"    - add debugging tools (gdb, strace)
#  "eclipse-debug"  - add Eclipse remote debugging support
#  "tools-profile"  - add profiling tools (oprofile, lttng, valgrind)
#  "tools-testapps" - add useful testing tools (ts_print, aplay, arecord etc.)
#  "debug-tweaks"   - make an image suitable for development
#                     e.g. ssh root access has a blank password
# There are other application targets that can be used here too, see
# meta/classes/image.bbclass and meta/classes/core-image.bbclass for more details.
# We default to enabling the debugging tweaks.
EXTRA_IMAGE_FEATURES ?= "debug-tweaks"

#
# Additional image features
#
USER_CLASSES ?= "buildstats"

#

#
# Interactive shell configuration
#
#OE_TERMINAL = "auto"
# By default disable interactive patch resolution (tasks will just fail instead):
PATCHRESOLVE = "noop"

#
# Disk Space Monitoring during the build
#
BB_DISKMON_DIRS ??= "\
    STOPTASKS,${TMPDIR},1G,100K \
    STOPTASKS,${DL_DIR},1G,100K \
    STOPTASKS,${SSTATE_DIR},1G,100K \
    STOPTASKS,/tmp,100M,100K \
    HALT,${TMPDIR},100M,1K \
    HALT,${DL_DIR},100M,1K \
    HALT,${SSTATE_DIR},100M,1K \
    HALT,/tmp,10M,1K"

#
# Shared-state files from other locations
#
#SSTATE_MIRRORS ?= "\
#file://.* https://someserver.tld/share/sstate/PATH;downloadfilename=PATH \
#file://.* file:///some/local/dir/sstate/PATH"

#
# Yocto Project SState Mirror
#
#BB_HASHSERVE_UPSTREAM = "hashserv.yocto.io:8687"
#SSTATE_MIRRORS ?= "file://.* http://sstate.yoctoproject.org/all/PATH;downloadfilename=PATH"

#
# Qemu configuration
#
PACKAGECONFIG:append:pn-qemu-system-native = " sdl"
# By default libsdl2-native will be built, if you want to use your host's libSDL instead of
# the minimal libsdl built by libsdl2-native then uncomment the ASSUME_PROVIDED line below.
#ASSUME_PROVIDED += "libsdl2-native"

#
# Hash Equivalence
#
#BB_HASHSERVE = "auto"
#BB_SIGNATURE_HANDLER = "OEEquivHash"

#
# Memory Resident Bitbake
#
#BB_SERVER_TIMEOUT = "60"

# CONF_VERSION is increased each time build/conf/ changes incompatibly and is used to
# track the version of this file when it was generated. This can safely be ignored if
# this doesn't mean anything to you.
CONF_VERSION = "2"
ビルドの実行
以下のコマンドを実行し、ビルドを開始します。
bitbake core-image-minimal
初回は必要なソースコードのダウンロードを行うため、非常に時間がかかります。検証機の環境(Ryzen5 5600/RAM 64GB/SSD NvME 2TB)ではダウンロード含めて3時間ほどかかりました。
ビルドしたイメージはrpi-build/tmp/deploy/images/raspberrypi4-64以下に生成されます。
イメージの書き込み
生成したイメージを書き込みます。Yoctoの最新のリリースではbmap-toolsを用いて書き込みを行います。先にbmap-toolsをインストールしておきます。
sudo apt install -y bmap-tools
bmap-toolsのインストールが完了していたら、以下のコマンドでイメージを書き込みます。ここでは/dev/sdgに書き込みます。
sudo bmaptool copy tmp/deploy/images/raspberrypi4-64/core-image-minimal-raspberrypi4-64.wic.bz2 /dev/sdg
wicの形式はパーティション情報を含んだイメージです。bzip2で解凍したものをddで書き込んでも同様のことが行えます。
※Linux Desktopで作業をしている場合、SDカードなどが自動でマウントされます。マウントされているとbmaptoolの実行が失敗するので、実行前にumountコマンドでアンマウントする必要があります。
起動確認
書き込んだSDカードをRaspberry Pi 4Bに挿し、電源を投入して起動できることを確認します。正常に起動できればイメージのビルドが正しく行われています。
以上が基本的な使い方になります。
各パッケージのソースコードを取得するのが一番時間がかかります。高速化する方法ないものでしょうか??(2024/1現在、4.0.15のソース取得が自分の環境では48時間以上かかっています。。。)
Discussion