【前編】Next.jsでログインフォームを実装する 〜chakra-ui×react-hook-form編〜
概要
Next.jsの開発でよく使用するログインフォームについて記事にまとめておきます。
少し長くなりそうなので、全3編に分けて、紹介していきます。
前編 chakra-ui×react-hook-form編 ←今回の記事です
中編 firebase authentication編
後編 バリデーションとトリガー編
大きく分けて、画面の実装とバックの処理、最後は処理フローの自動化やフォームの利便性を上げる3段階で記事を投稿しようと思います!
使用する技術は以下になります。
- Next.js
- chakra-ui
- react-hook-form
- firebase
- authentication
- cloud firestore
- cloud functions
プロジェクトのセットアップ
まずは、Next.jsのプロジェクトを作成しましょう!下記のコマンドをターミナルで実行します
npx create-next-app@latest
実行すると、下記のように質問が表示されるので、それぞれ解答していきます。
What is your project named? … auth-form-app
Would you like to use TypeScript? … Yes
Would you like to use ESLint? … Yes
Would you like to use Tailwind CSS? … No
Would you like to use `src/` directory? … Yes
Would you like to use App Router? (recommended) … Yes
Would you like to customize the default import alias? › No
作成されたプロジェクトvscodeで表示します。
今回は、cssを使用する予定はないので、css等と初期状態で実装されているnext.jsの画面のコードは削除しておき、layout.tsxも触る予定はないので、最低限、エラーが表示されない状態、もしくは各環境、仕様に合わせて実装していただければと思います。
appフォルダ直下のpage.tsxは下記の状態になっています
export default function HomeScreen() {
  return (
    <div>
      <p>ホーム画面</p>
    </div>
  )
}
これで、プロジェクトの初期設定は完了です。npm run devで実行してみると、ホーム画面と表示されると思います。
chakra-uiの初期設定
続いて、プロジェクトでchakra-uiが使用できるようにセットアップをしていきます。
下記のchakra-uiの公式ドキュメントからnpm installするコマンドをコピーしてvscodeのターミナルから実行します。
npm i @chakra-ui/react @emotion/react @emotion/styled framer-motion
インストールができたら、下記のようなフォルダ構成で、それぞれファイルを作成していきます。
src
 ├ app
 │   ├ layout.tsx
 │   └ page.tsx // ホーム画面
 └ common
     ├ design
     │   └ index.tsx
     └ providers
         └ design_provider.tsx
それでは、chakra-uiの設定をしていきます。
'use client'
export * from '@chakra-ui/react'
'use client'

import { ChakraProvider } from '@chakra-ui/react'

export default function DesignProvider({
  children,
}: {
  children: React.ReactNode
}) {
  return <ChakraProvider>{children}</ChakraProvider>
}
design_provider.tsxを使って、プロジェクト全体をラッピングしてあげます。
app/layout.tsxで設定してあげましょう。
import DesignProvider from '@/common/provider/design_provider'

import type { Metadata } from 'next'

export const metadata: Metadata = {
  title: 'Create Next App',
  description: 'Generated by create next app',
}

export default function RootLayout({
  children,
}: {
  children: React.ReactNode
}) {
  return (
    <html lang='ja'>
      <body>
        <DesignProvider>{children}</DesignProvider>
      </body>
    </html>
  )
}
これで、chakra-uiが使用することができます!app/page.tsxで少し確かめてみましょう。
import { Box } from '@/common/design'

export default function HomeScreen() {
  return (
    <div>
      <p>ホーム画面</p>
      <Box width='200px' height='300px' bg='red'></Box>
    </div>
  )
}
実行すると、赤い四角が追加されていることがわかると思います。これは、chakra-uiの`<Box>を利用して表示させています。

これでchakra-uiが使用できることが確認できました。次は、react-hook-formをプロジェクトに追加して、実際にログインフォームを実装してみましょう。
フォームの作成
まずは、react-hook-formをインストールしていきます。下記のコマンドをvscodeのターミナルで実行します。
npm install react-hook-form
インストールができたら、ログインフォームを実装していきます。まずは、フォルダ構成を下記で作成しておきます。
app
 ├ signin
 │   └ page.tsx // サインイン画面
 ├ signup
 │   └ page.tsx // サインアップ画面
 └ page.tsx // ホーム画面
それでは、サインイン画面とサインアップ画面それぞれを実装してきます。
'use client'
import NextLink from 'next/link'
import { useState } from 'react'
import { useForm } from 'react-hook-form'

import {
  Button,
  Flex,
  FormControl,
  FormLabel,
  Heading,
  Input,
  InputGroup,
  InputRightElement,
  VStack,
} from '@/common/design'

// フォームで使用する変数の型を定義
type formInputs = {
  email: string
  password: string
}

/** サインイン画面
 * @screenname SignInScreen
 * @description ユーザのサインインを行う画面
 */
export default function SignInScreen() {
  const { handleSubmit, register } = useForm<formInputs>()

  const [show, setShow] = useState<boolean>(false)

  const onSubmit = handleSubmit(async (data) => {})
  return (
    <Flex
      flexDirection='column'
      width='100%'
      height='100vh'
      justifyContent='center'
      alignItems='center'
    >
      <VStack spacing='5'>
        <Heading>ログイン</Heading>
        <form onSubmit={onSubmit}>
          <VStack spacing='4' alignItems='left'>
            <FormControl>
              <FormLabel htmlFor='email' textAlign='start'>
                メールアドレス
              </FormLabel>
              <Input id='email' {...register('email')} />
            </FormControl>

            <FormControl>
              <FormLabel htmlFor='password'>パスワード</FormLabel>
              <InputGroup size='md'>
                <Input
                  pr='4.5rem'
                  type={show ? 'text' : 'password'}
                  {...register('password')}
                />
                <InputRightElement width='4.5rem'>
                  <Button h='1.75rem' size='sm' onClick={() => setShow(!show)}>
                    {show ? 'Hide' : 'Show'}
                  </Button>
                </InputRightElement>
              </InputGroup>
            </FormControl>
            <Button
              marginTop='4'
              color='white'
              bg='teal.400'
              type='submit'
              paddingX='auto'
            >
              ログイン
            </Button>
            <Button
              as={NextLink}
              bg='white'
              color='black'
              href='/signup'
              width='100%'
            >
              新規登録はこちらから
            </Button>
          </VStack>
        </form>
      </VStack>
    </Flex>
  )
}
実行して、レイアウトを確認してみましょう!下記のように表示されたらOKです!

下記のような構造で、フォームに入力して、ボタンを押下すると、サブミットされ、処理が実行されます。
中編でfirebaseと繋げて、実際にログイン処理を実装するのは、onSubmit内に記載する形になります!
const onSubmit = handleSubmit(async (data) => {
  // ログインボタンを押したときの処理
})

<form onSubmit={onSubmit}>
  ...
  <Button type='submit'>ログイン</Button>
</form>
これで、サインイン画面のフォームの実装は完了です!続いて、サインアップ画面の実装です。
'use client'
import NextLink from 'next/link'
import { useState } from 'react'
import { useForm } from 'react-hook-form'

import {
  Button,
  Flex,
  FormControl,
  FormLabel,
  Heading,
  Input,
  InputGroup,
  InputRightElement,
  VStack,
} from '@/common/design'

// フォームで使用する変数の型を定義
type formInputs = {
  email: string
  password: string
  confirm: string
}

/** サインアップ画面
 * @screenname SignUpScreen
 * @description ユーザの新規登録を行う画面
 */
export default function SignUpScreen() {
  const { handleSubmit, register } = useForm<formInputs>()

  const [password, setPassword] = useState(false)
  const [confirm, setConfirm] = useState(false)

  const onSubmit = handleSubmit(async (data) => {})

  const passwordClick = () => setPassword(!password)
  const confirmClick = () => setConfirm(!confirm)

  return (
    <Flex height='100vh' justifyContent='center' alignItems='center'>
      <VStack spacing='5'>
        <Heading>新規登録</Heading>
        <form onSubmit={onSubmit}>
          <VStack alignItems='left'>
            <FormControl>
              <FormLabel htmlFor='email' textAlign='start'>
                メールアドレス
              </FormLabel>
              <Input id='email' {...register('email')} />
            </FormControl>

            <FormControl>
              <FormLabel htmlFor='password'>パスワード</FormLabel>
              <InputGroup size='md'>
                <Input
                  pr='4.5rem'
                  type={password ? 'text' : 'password'}
                  {...register('password')}
                />
                <InputRightElement width='4.5rem'>
                  <Button h='1.75rem' size='sm' onClick={passwordClick}>
                    {password ? 'Hide' : 'Show'}
                  </Button>
                </InputRightElement>
              </InputGroup>
            </FormControl>

            <FormControl>
              <FormLabel htmlFor='confirm'>パスワード確認</FormLabel>
              <InputGroup size='md'>
                <Input
                  pr='4.5rem'
                  type={confirm ? 'text' : 'password'}
                  {...register('confirm')}
                />
                <InputRightElement width='4.5rem'>
                  <Button h='1.75rem' size='sm' onClick={confirmClick}>
                    {confirm ? 'Hide' : 'Show'}
                  </Button>
                </InputRightElement>
              </InputGroup>
            </FormControl>

            <Button
              marginTop='4'
              color='white'
              bg='teal.400'
              type='submit'
              paddingX='auto'
            >
              新規登録
            </Button>
          </VStack>
        </form>
        <Button as={NextLink} href='/signin' bg='white' width='100%'>
          ログインはこちらから
        </Button>
      </VStack>
    </Flex>
  )
}
これも、サインイン画面と同様に、formタグを使用して、ボタンを押下したら、サブミットされて、処理が実行されるような流れで新規登録が行われます!
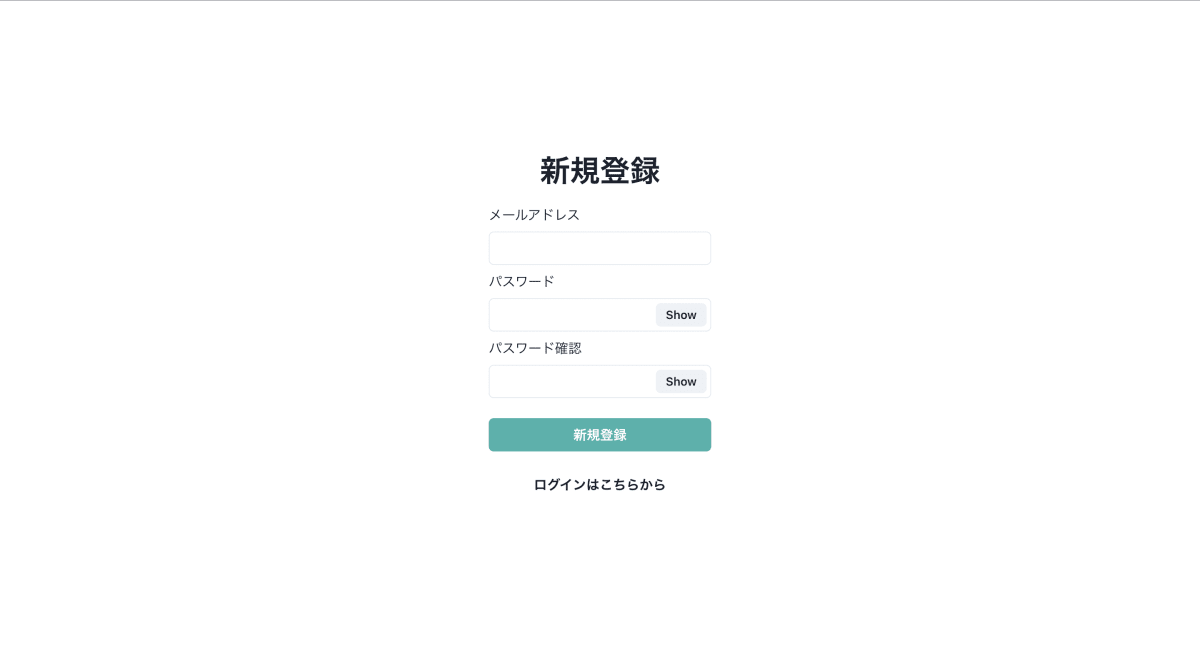
最後に画面を確認してみましょう!下記のような画面が表示されたらOKです!
終わりに
今回は、Next.jsのログインフォームと新規登録フォームの画面の実装についてまとめました!
この認証画面は追加の仕様がない限り、いつも使いまわしちゃってます(笑)
結構シンプルなデザインで自分的には最低限のデザインのこの画面が気にいっちゃってます・・w
次回は、firebaseの初期設定をして、実際にauthenticationにユーザを登録して、ログインができるまでを実装してみようと思います!
最後まで読んでいただきありがとうございました!
Discussion