FedCM が Chrome 108 から 使えるようになった
この記事は Digital Identity技術勉強会 #iddance Advent Calendar 2022 の20日目の記事です。
Chrome 108 から FedCM API が使えるようになったので、早速試してみました。
FedCM とはなにか
FedCM は、Federated Credential Management API の略で、3rd Party Cookie を廃止しても ID連携の仕組みが動くようにする仕組みです。
以下の挙動はよく目にするかと思います。これは 3rd Party Cookie によって IdP 側のログイン状態を確認できることによって実現されています。FedCM を使えば、3rd Party Cookie が廃止されても画像のようなシームレスなログイン体験を提供することができます。

登場人物紹介
- Relying Party (RP): IDP を利用してログインするサービスのこと
- Identity Provider (IDP): ユーザーの情報や、RP に対して権限移譲のを管理します。FedCM を利用した場合、IDP は、PR に対して Token を発行します
- User Agent: ここでは、ブラウザ
RP が ブラウザに実装されている FedCM API を利用して、IDP が発行する Token を取得してユーザー認証を行うといった流れになります。
久しぶりに仕様を確認してみると、id token から token という名前に変わっていました。
以降は、仕様に合わせて token と呼びます.
-> https://github.com/fedidcg/FedCM/pull/257
id token という縛りが無くなった分、 フロントチャネルに渡るのが許容できなければ、 token を暗号化したりも選択肢とししてでてくるので、良かったのかなと感じます。
流れ
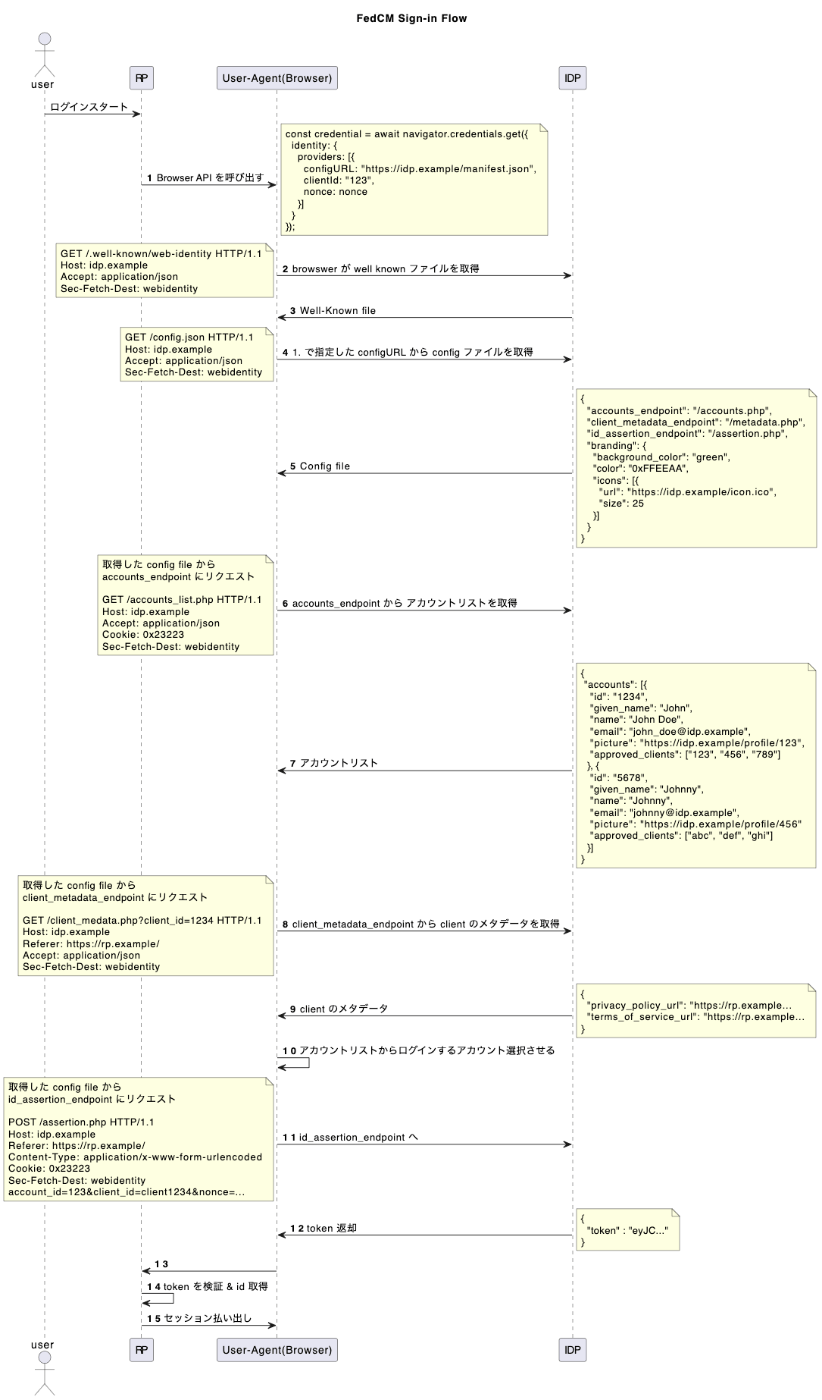
RP が、navigator.credentials.get() を呼び出すと ブラウザが IDP に設定ファイルなり、エンドポイントなりにリクエストを投げて最終的に、ブラウザにトークンを返します。RP はそれを受け取って、自身のバックエンドにトークンを使ってログインをするという流れになります。
それでは実際に実装してみます。サンプルコードでは以下のように動作します。

実装
サンプルコード
動作環境
- Chome 108
- Node.js: 16.14.0
- Next.js: 13.0.7
- React: 18.2.0
- Go 1.19
IDP の実装
まず IDP の実装をまとめてみます。
- well-knwon ファイルを作成する
- IDP 設定ファイルエンドポイントの実装
- 各エンドポイントの実装
- Account List エンドポイント: IDP にログイン済みアカウント一覧を取得するエンドポイント。ブラウザが Cookie を送信することで IDP 側は、ユーザーを特定することが可能です
- Client Metadata エンドポイント: RP のメタデータ情報を取得するエンドポイント
- Identity Assertions: RP がログインするために必要なトークンを取得するためのエンドポイント
Step 1. well-knwon ファイルを作成する
まず、IDP の設定ファイルの URL を配列で持つ well-known ファイルを作成します。そしてそのファイル を IdP の eTLD+1 の /.well-known/web-identity から well-known ファイルを提供する必要があります。
たとえば、IDP が https://accounts.idp.example/ で 配信されている場合は、https://idp.example/.well-known/web-identity にwell-known ファイルを設定する必要があります。
後述する RP 側が navigator.credentials.get() を呼び出す箇所がありがますが、そこで IDP の設定ファイルを指定して一致している必要があります。
ファイルの形式
| parameter | required | note |
|---|---|---|
| ProviderURLs | ○ | IDP の設定ファイルの URLs |
ここが複数してできることで、一つの domain でホストされている IDPがテナント構成になっているなどで Discovery エンドポイントが path ごとに複数管理されている場合でも対応できそうです。ちょっと管理が大変ですが。。。
サンプルコードでは struct から json を返していますが、実際には静的ファイルでいいと思います。(json 書くのがめんどく...)
type WebIdentity struct {
	ProviderURLs []string `json:"provider_urls"`
}

func (s *Server) func GetWellKnownFileHandler(w http.ResponseWriter, r *http.Request) {

	// FedCM API からなのかチェック
	if !fedcm.AllowedHeader(r) {
		w.WriteHeader(http.StatusUnauthorized)
		return
	}

	wi := &fedcm.WebIdentity{
		ProviderURLs: []string{
			"http://localhost:8080/config.json",
		},
	}

	w.Header().Set("content-type", "application/json")

	if err := json.NewEncoder(w).Encode(&wi); err != nil {
		w.WriteHeader(http.StatusInternalServerError)
		return
	}
}
上記のコードに fedcm.AllowedHeader() 関数があるかとおもいます。これは、Sec-Fetch-Dest header に webidentity があるのかをチェックしています。これをすることで、FedCM ブラウザが送信したものであると確信することができます。XSS 攻撃から保護することができます。
しかし、これは今後、ブラウザによったら、対応しない可能性もあるので注意が必要です。
The FedCM API introduces several non-static endpoints on the IDP, so these need to be protected from XSS attacks. In order to do so, the FedCM API introduces a new value for the Sec-Fetch-Dest header, a forbidden header name. The requests initiated by the FedCM API have a webidentity value for this header. The value cannot be set by random websites, so the IDP can be confident that the request was originated by the FedCM browser rather than sent by a websites trying to run an XSS attack. An IDP must to check for this header’s value in the credentialed requests it receives, which ensures that the request was initiated by the user agent, based on the FedCM API. A malicious actor cannot spam FedCM API calls, so this is sufficient protection for the new IDP endpoints.
https://fedidcg.github.io/FedCM/#sec-fetch-dest-header
Step 2. IDP 設定ファイルの実装
IDP のこちらのエンドポイントは well-known エンドポイントにリストアップされるエンドポイントになります。このエンドポイントは、ブラウザが必要な IDP のエンドポイントのリストがあります。
それと、ボタンの色や icon なども設定することができます。
ブラウザリクエスト
GET /config.json HTTP/1.1
Host: idp.example
Accept: application/json
Sec-Fetch-Dest: webidentity
IDP は、以下の形式でレスポンスを返します。
レスポンスパラメーター
| parameter | required | note |
|---|---|---|
| accounts_endpoint | ○ | アカウントリスト URL |
| client_metadata_endpoint | - | クライアントメタデータ URL |
| id_assertion_endpoint | ○ | IDP の設定ファイルの URL |
| branding | - | ui などのカスタマイズ設定 |
| branding.background_color | - | ボタンの色を設定する |
| branding.color | - | ボタンテキストの色を設定する |
| icons | - | Icon の設定情報を配列 |
Icon
| parameter | required | note |
|---|---|---|
| url | ○ | icon の url, svg画像はサポートしていない |
| size | - | アイコンの大きさ. 25 以上必要 |
サンプル
{
  "accounts_endpoint": "/fedcm/fedcm/accounts_endpoint",
  "client_metadata_endpoint": "/fedcm/client_metadata_endpoint",
  "id_assertion_endpoint": "/fedcm/id_assertion_endpoint",
  "branding": {
    "background_color": "green",
    "color": "0xFFEEAA",
    "icons": [{
      "url": "https://idp.example/icon.ico",
      "size": 25
    }]
  }
}
Step 3. Account List エンドポイント
IDP にログインしているユーザーのリストを取得します。こちらなぜリストなのかというと google アカウントのような 1人が複数のアカウントを保持することがあるのでリストになっています。

ブラウザは、cookie を使ってリクエストを送信するので、IDP は cookie からセッションに紐づく user を取得します。
サンプルコードは登録しているユーザーを全て表示していますので悪しからず、、、
GET /accounts_endpoint HTTP/1.1
Host: accounts.idp.example
Accept: application/json
Cookie: 0x23223
Sec-Fetch-Dest: webidentity
IDP は、以下の形式でレスポンスを返します。
レスポンスパラメーター
| parameter | required | note |
|---|---|---|
| id | ○ | ユーザー識別子 |
| name | ○ | 名前 |
| ○ | メールアドレス | |
| given_name | - | ユーザー名 |
| picture | - | ボタンの色を設定する |
| branding.color | - | ボタンテキストの色を設定する |
| approved_clients | - | Icon の設定情報を配列 |
Step 4. Client Metadata エンドポイント
RP のプライバシーポリシーや利用規約のリンク先を返します。

ブラウザは Cookie を送信せず、client_id をクエリパラメータに入れて送信します。
GET /client_metadata_endpoint?client_id=1234 HTTP/1.1
Host: accounts.idp.example
Referer: https://rp.example/
Accept: application/json
Sec-Fetch-Dest: webidentity
IDP は、以下の形式でレスポンスを返します。
レスポンスパラメーター
| parameter | required | note |
|---|---|---|
| privacy_policy_url | ○ | RP のプライバシーポリシーのリンク |
| terms_of_service_url | ○ | RP の利用規約のリンク |
{
  "privacy_policy_url": "https://rp.example/clientmetadata/privacy_policy.html",
  "terms_of_service_url": "https://rp.example/clientmetadata/terms_of_service.html"
}
Step 5. Identiy Assertions エンドポイント
ここのエンドポイントは、サインインしているユーザーのアサーションを返します。
ブラウザは Content-Type: application/x-www-form-urlencoded として、cookie と パラメータを POST で送信します。
POST /id_assertion_endpoint HTTP/1.1
Host: accounts.idp.example
Referer: https://rp.example/
Content-Type: application/x-www-form-urlencoded
Cookie: 0x23223
Sec-Fetch-Dest: webidentity
account_id=123&client_id=client1234&nonce=Ct60bD&disclosure_text_shown=true
ここは、Context-Type: application/json ではないので注意!
IDP は以下のことを確認する必要があります
- ユーザーによって選択されたアカウントID がすでにサインインしているID と一致しているか
- Referer ヘッダーが 渡された ClientID に対して事前に登録されたオリジンと一致すること
An IDP MUST check the referrer to ensure that a malicious RP does not receive an ID token corresponding to another RP. In other words, the IDP MUST check that the referrer is represented by the client id. As the client ids are IDP-specific, the user agent cannot perform this check.
Reference: https://fedidcg.github.io/FedCM/#idp-api-id-assertion-endpoint
レスポンスパラメーター
| parameter | required | note |
|---|---|---|
| token | ○ | IDP が RP のログインするために必要なトークン |
以上で IDP 側の実装は以上です。
RP の実装
RP の実装はとてもシンプルです。公式のドキュメントにもありますが、 navigator.credentials.get を呼ぶだけです。
const signinWithFedCM = async (
  context: ApiContext,
  params: SigninWithFedCMParams,
): Promise<Credential | null> => {
  if (typeof window === 'undefined') {
    // can't use on server side
    return null
  }
  if (!isFedCMEnabled()) {
    return null
  }

  return navigator.credentials.get({
    identity: {
      providers: [
        {
          configURL: params.configURL,
          clientId: params.clientId,
          nonce: params.nonce,
        },
      ],
    },
  })
}
sever side では呼べないようにチェックもいれています。
リクエストパラメータ
| parameter | required | note |
|---|---|---|
| configURL | ○ | IDP 設定ファイルのパス |
| clientId | ○ | IDP が発行した RP のクライアント識別子 |
| nonce | - | リプレイス攻撃を防ぐための |
あとちょっとしたポイントですが、 react で window オブジェクトの状態で component の出しわけする場合、SSR においてサーバサイドで React が生成した DOM と クライアント側でレンダリングおこなった DOM の結果がことなることで React Hydration Error が起こります。
Reference: https://nextjs.org/docs/messages/react-hydration-error
特に難しいことではないですが、以下のように seEffect と useState を用いて DOM の結果を同じにさせつつも、mount 後に コンポーネントの出し分けをするようにしれば解決します。
const SigninWithFedCMContainer = ({
  onSignin,
}: SigninWithFedCMContainerProps) => {
  const { signinWithFedCM, isFedCMEnabled } = useAuthContext()

  const [mounted, setMounted] = useState(false)

  const setGlobalSpinner = useGlobalSpinnerActionsContext()
  const handleSignin = async () => {
    const N = 16
    const nonce = randomBytes(N).toString('base64').substring(0, N)
    try {
      setGlobalSpinner(true)
      await signinWithFedCM(nonce)
      onSignin && onSignin()
    } catch (err: unknown) {
      if (err instanceof Error) {
        window.alert(err.message)
        onSignin && onSignin(err)
      }
    } finally {
      setGlobalSpinner(false)
    }
  }

  useEffect(() => {
    if (isFedCMEnabled()) {
      setMounted(true)
    }
  }, [isFedCMEnabled])

  if (!mounted) {
    return null
  }

  return (
    <Button variant={'secondary'} width="100%" onClick={() => handleSignin()}>
      FedCM demo
    </Button>
  )
}
サンプルコードでは RP 側で nonce のチェックをいれてないので、実際のコードではチェックをいれてください
最後に
実際に、API を利用して実装してみて RP 側の実装はそんなに難しくないといった印象でした。まだまだ主要なブラウザの実装が完了していないのをみると、まだまだ普及に時間がかかりそうですが、RP 側の実装が、こんなに簡単に実装できるなら取り入れる価値は十分にありそうです。FedCM の仕様が各ブラウザに実装されて、普及し始めれば、ソーシャルログインがかなり簡単にシンプルになるなと感じました。IDP の実装も一見多そうですがそこまで複雑ではないので、そこまでコストかけずに実装できるのかなと思いました。
やっぱり、トークンがフロントチャネルに行くのは気持ち悪さを感じるので今後どうなるのか楽しみです。このようなユーザー体験がよくなる仕様は積極的に取り入れていきたいとおもった次第でした。
Discussion