いろんな言語で実装されたアプリケーションに計装を行う - Node.js編
はじめに
こんにちは、Splunk Observability の導入支援を行っている、kntr_nkgm です。
今回は Node.js で実装されているアプリケーションに対して、OpenTelemetry による計装を行っていきます。
シリーズ的に書いていく予定ですので、この一連の記事の位置づけについては、以下を参照してください。技術的な内容のみ参照したい場合は、読み飛ばしてもらって構いません。
この記事の位置づけ
これは何?
共通の仕様に基づいて、異なる言語・フレームワークを用いて実装されているアプリケーションに対して、OpenTelemetry によって計装を行っていきます。
「これぐらいのことをやれば、APMを活用できるんだね」という理解を深めていくことを目的としています
どうやるの?
アプリケーション
RealWorld (Github) からサンプルアプリケーションを拝借します。
これは、
- マイクロブログサービスのサンプルコード集
- 共通仕様に基づいて、異なる言語・ライブラリ・フレームワークを用いて実装されている
- フロントエンドのみ、バックエンドのみのコードもあり、組み合わせ可能
というものなので、学習用途にはちょうど良さそうです
APM/オブザーバビリティツール
Opentelemetry ベースで実装
- オープンスタンダードなオブザーバビリティフレームワーク
言語・フレームワークによっては、Auto Instrumentation によりコードに手を加えることなく一定のデータ取得が可能になるので、基本的にはまずはそこから始めます。
加えて、いくつかのシナリオを想定して、Manual Instrumentation を行っていきます。
トラブル時の調査で「以下のような情報が確認できたらなー」というようなデータを想像しながら、より活用しやすくなるように、という観点で、トレースに含める情報を増やしたり変更したりする予定です。
バックエンドとしては、Splunk Observability Cloud を利用します。
が、OpenTelemetryに準拠していれば、どのバックエンドでも基本的に利用可能です。
環境準備
EC2 の環境で作業を実施していきます。
環境としては以下のようなものを用意しています。
- Ubuntu 22.04 LTS, t2.large
事前に OS のアップデートまでは完了させておきます。
$ sudo apt update && sudo apt upgrade -y
Node.js のセットアップ
今回のサンプルアプリケーションは、以下のレポジトリから拝借してきます。
Node.js + Express.js + Sequelize + SQLite/PostgreSQL + Next.js fullstack static/SSR/SSG/ISG Example Realworld App
このアプリケーションは、Node.js 14.17.0 (npm 6.14.13) のバージョンが指定されているため、当該バージョンの環境をセットアップします
$ curl https://raw.githubusercontent.com/creationix/nvm/master/install.sh | bash
$ source ~/.nvm/nvm.sh
$ nvm install 14.17.0
完了したら、以下のコマンドでバージョン確認を実施
$ node -v
v14.17.0
$ npm version
6.14.13
アプリケーションのダウンロードと起動
README を参考しながら、とりあえず起動できることを確認します。
$ git clone https://github.com/cirosantilli/node-express-sequelize-nextjs-realworld-example-app.git
$ cd node-express-sequelize-nextjs-realworld-example-app
$ npm install
$ npm run dev
以下のように出力されたらアプリケーションとしては起動できていそうです。
> conduit-node@1.0.0 dev /home/ubuntu/node-express-sequelize-nextjs-realworld-example-app
> NODE_OPTIONS='--unhandled-rejections=strict' nodemon ./app.js

[nodemon] 1.11.0
[nodemon] to restart at any time, enter `rs`
[nodemon] watching: *.*
[nodemon] starting `node ./app.js`
event - compiled client and server successfully in 5.1s (390 modules)
Attention: Next.js now collects completely anonymous telemetry regarding usage.
This information is used to shape Next.js' roadmap and prioritize features.
You can learn more, including how to opt-out if you'd not like to participate in this anonymous program, by visiting the following URL:
https://nextjs.org/telemetry

Listening on: http://localhost:3000
一旦 Ctrl+C で停止します。
また、デモデータを使うために、PostgreSQL を導入・セットアップしていきます。こちらも、GitHub の README に従って実施していきます
# インストールとセットアップ
$ sudo apt install postgresql
$ sudo -u postgres createuser -s "$(whoami)"
$ createdb "$(whoami)"
$ createdb realworld_next
$ psql -c "CREATE ROLE realworld_next_user with login password 'a'"
$ psql -c 'GRANT ALL PRIVILEGES ON DATABASE realworld_next TO realworld_next_user'
$ echo "SECRET=$(tr -dc A-Za-z0-9 </dev/urandom | head -c 256)" >> .env

# アプリケーション起動とデモデータの作成
$ npm run build-prod
# デモデータ作成
$ npm run seed-prod
# アプリケーションを起動、コマンド実行後にブラウザでアクセス確認可能
$ npm run start-prod
http://[EC2のIPアドレス]:3000 にブラウザでアクセスすると、以下のようなサイトが表示されるはずです。これでサンプルアプリケーションは問題なく起動できたことが確認できました。
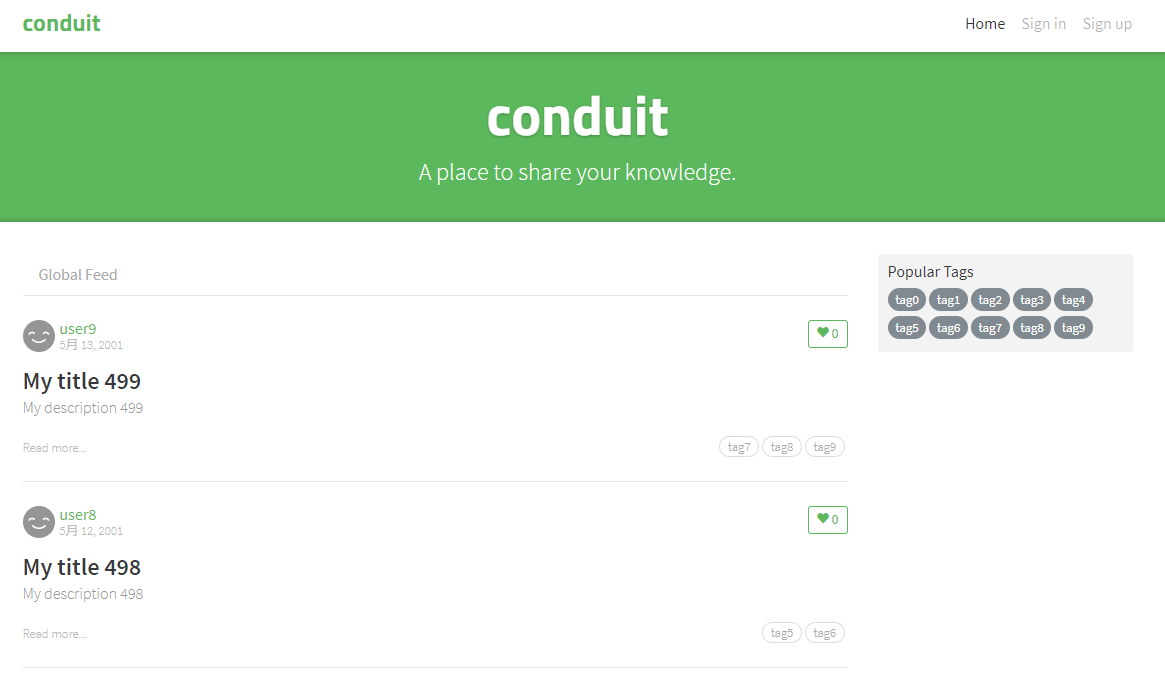
準備が整ったので、ここから計装を行っていきます。
OpenTelemetry による計装
OpenTelemetry Collector の導入
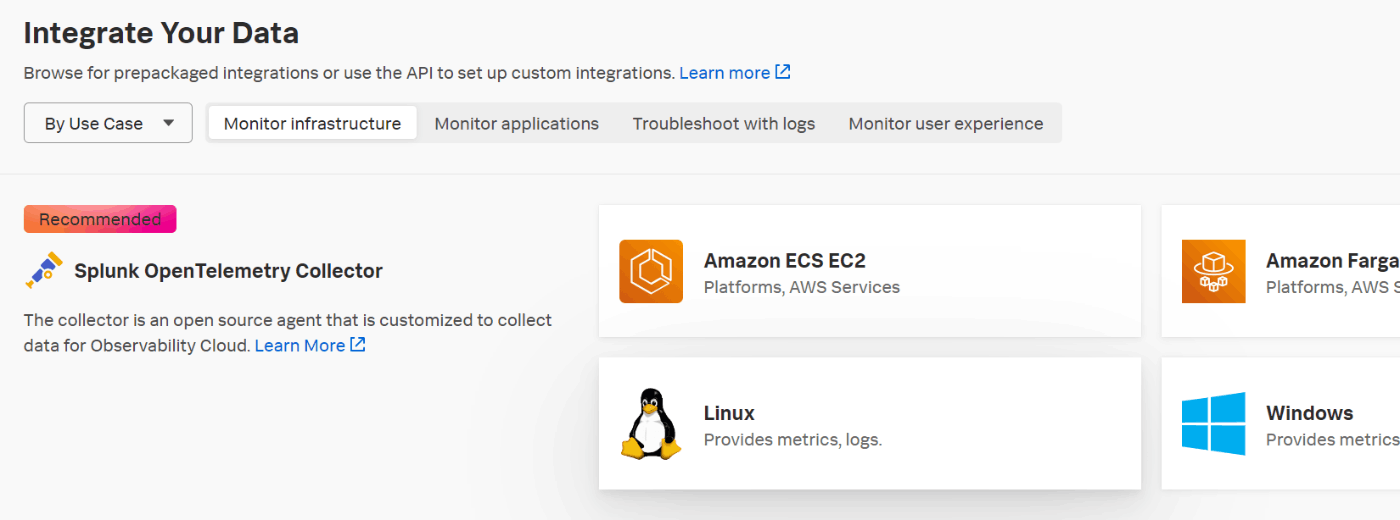
では、ここから、OpenTelemetry を用いた計装に入っていきます。
今回の Splunk distro の Collector を使います。
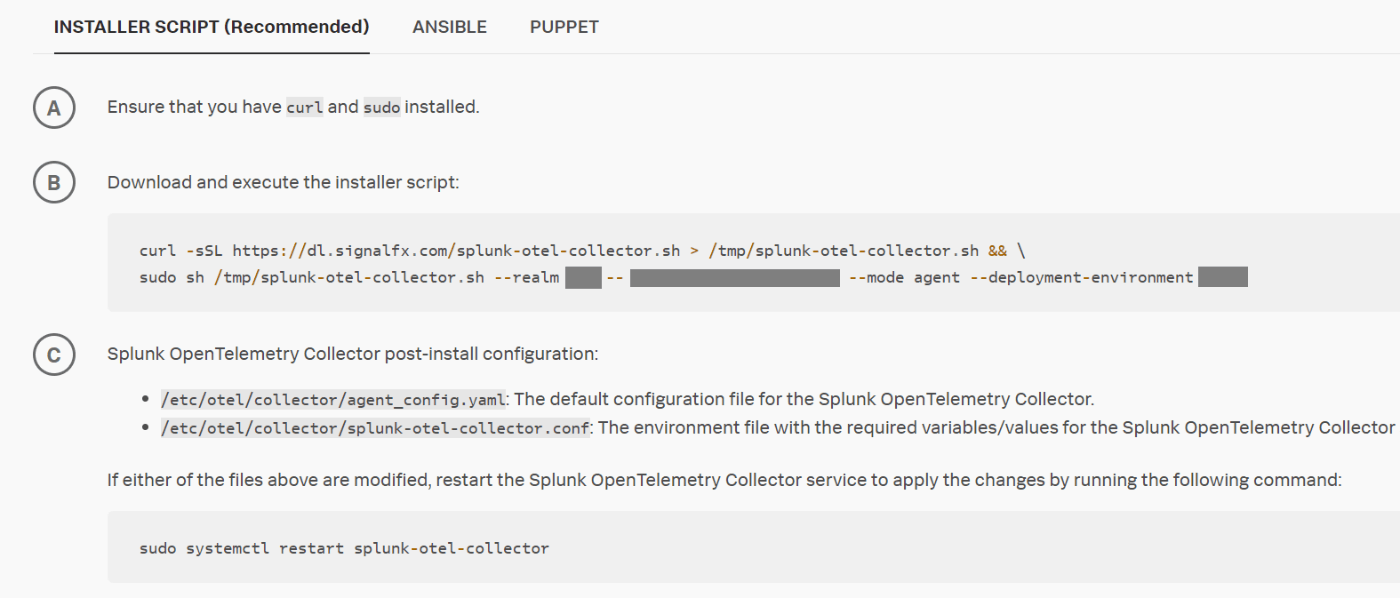
Splunk Observability Cloud 上で、以下のようなメニューを選んでいくと、導入時に実行するコマンドなどが表示されますので、これに従って実施します。
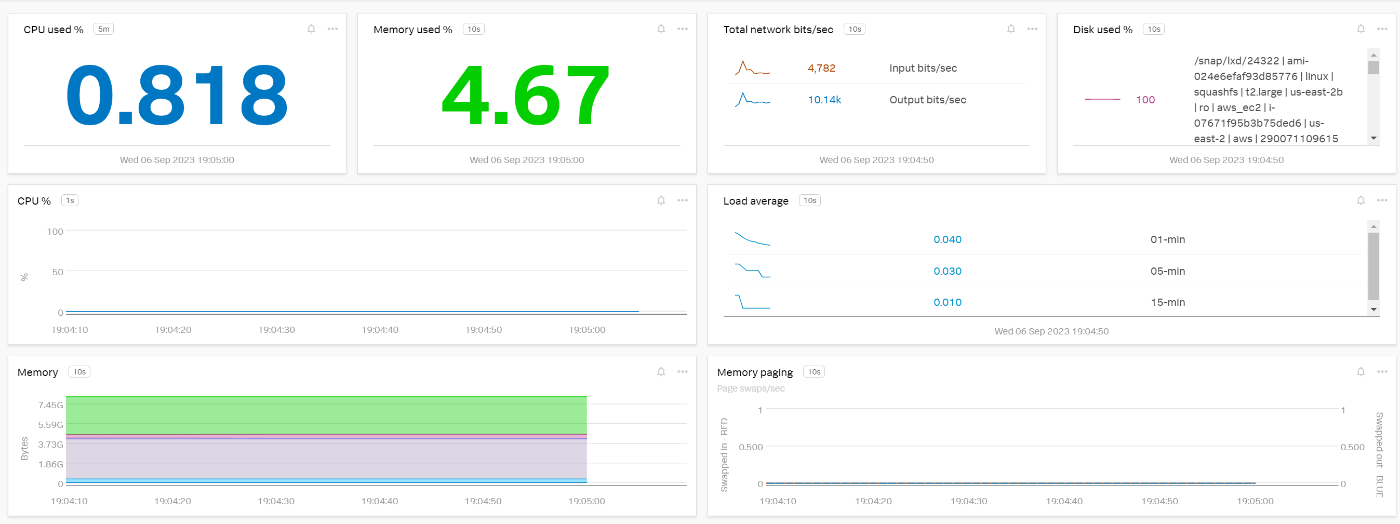
OpenTelemetry Collector の導入が完了すると、ダッシュボード上でもデータが取れていることが確認できます
Auto Instrumentation
次に、APM のセットアップです。
こちらも同様にメニュー画面から実施していきます。
実行するコマンドとしては、以下のようなものになります。
# Nodejs用のパッケージを取得
$ npm install @splunk/otel
# 環境変数を設定
## アプリケーションの名前
$ export OTEL_SERVICE_NAME='knrw-nodejs'
## 取得するデータに対して付与するAttribute情報
$ export OTEL_RESOURCE_ATTRIBUTES='deployment.environment=knrw,service.version=0.1.0'
## OpenTelemetry Collector のポート
$ export OTEL_EXPORTER_OTLP_ENDPOINT='http://localhost:4317'
取得したパッケージを node -r @splunk/otel/instrument <app>.js として実行すれば、APMでのデータ取得が開始されます。
READMEから、アプリケーションの起動コマンドは、npm run start-prod ですが、package.json では、以下のように設定されています。
{
  "name": "conduit-node",
  "version": "1.0.0",
  "description": "conduit on node",
  "main": "app.js",
  "scripts": {
    "back-test": "NODE_ENV=test npm run dev",
    "build": "./bin/sync-db.js && next build",
    "build-dev": "./bin/sync-db.js && NEXT_PUBLIC_NODE_ENV=development npm run build",
    "build-prod": "./prod.sh ./bin/sync-db.js && ./prod.sh npm run build",
    "deploy": "npm run test-next && npm run test-pg-next && git push -f heroku-next next:master && git push && git push origin next:deploy",
    "dev": "NODE_OPTIONS='--unhandled-rejections=strict' nodemon ./app.js",
    "dev-demo": "NEXT_PUBLIC_DEMO=true npm run dev",
    "dev-pg": "REALWORLD_PG=true npm run dev",
    "format": "prettier --ignore-path .prettierignore --write .",
    "lint": "next lint",
    "seed-prod": "./prod.sh ./bin/generate-demo-data.js --force-production",
    "start": "node --unhandled-rejections=strict ./app.js",
    "start-dev": "NEXT_PUBLIC_NODE_ENV=development NODE_ENV_NEXT_SERVER_ONLY=production node --unhandled-rejections=strict ./app.js",
    "start-prod": "./prod.sh npm start",
    "test": "NODE_ENV=test mocha test --ignore-leaks test.js",
    "test-api": "./realworld/api/run-api-tests.sh",
    "test-next": "npm run build-dev && npm run test-next-nobuild",
    "test-next-nobuild": "NODE_ENV_NEXT_SERVER_ONLY=production REALWORLD_TEST_NEXT=true npm test -- --timeout 100000",
    "test-pg": "REALWORLD_PG=true npm test --",
    "test-pg-next": "npm run build-dev && REALWORLD_PG=true NODE_ENV_NEXT_SERVER_ONLY=production REALWORLD_TEST_NEXT=true npm test -- --timeout 100000",
    "tsc": "tsc"
  },
npm run start-prod コマンドは ./prod.sh npm start を実行するようで、npm start は node --unhandled-rejections=strict ./app.js を実行しているようですね。
その他にも、node と nodemon コマンドでアプリケーションを起動させているようなので、nodeとnodemonのコマンド実行箇所の後ろに -r @splunk/otel/instrument を追加します。
+    "dev": "NODE_OPTIONS='--unhandled-rejections=strict' nodemon -r @splunk/otel/instrument ./app.js",
-    "dev": "NODE_OPTIONS='--unhandled-rejections=strict' nodemon ./app.js",
+    "start": "node -r @splunk/otel/instrument --unhandled-rejections=strict ./app.js",
-    "start": "node --unhandled-rejections=strict ./app.js",
+    "start-dev": "NEXT_PUBLIC_NODE_ENV=development NODE_ENV_NEXT_SERVER_ONLY=production node -r @splunk/otel/instrument --unhandled-rejections=strict ./app.js",
-    "start-dev": "NEXT_PUBLIC_NODE_ENV=development NODE_ENV_NEXT_SERVER_ONLY=production node --unhandled-rejections=strict ./app.js",
修正が完了したら、アプリケーションを起動してみましょう。
$ npm run start-prod
起動時の引数の変更が反映されているようですね。問題なさそうです。
> conduit-node@1.0.0 start-prod /home/ubuntu/node-express-sequelize-nextjs-realworld-example-app
> ./prod.sh npm start

++ cat .env
++ xargs
+ env SECRET=vCQUwUMR5YSLYzdjkFdmdTjUTRb6e6BW8FI6z22P4V2I6Mn0XobOhvlPcJ9FwOQbfYRJ50VAEPN4VlHAmzZ7UCCjWqUkHjLk0x72sb8rL8MtRSwGne6NDc9dFKes1ebEatvENql47ZFwKbYOdeiRq68NbfGivKRR2sLAaiJdwppZgKYeiXO0G4cl8RwP5K4ezNtkHXgZ72RmdEPAYqsB8xNkQQyMUGtBlsDHRSTtRLUr56lxOkcaQweYlfLRR7nQ NODE_ENV=production npm start

> conduit-node@1.0.0 start /home/ubuntu/node-express-sequelize-nextjs-realworld-example-app
> node -r @splunk/otel/instrument --unhandled-rejections=strict ./app.js

Warning: connect.session() MemoryStore is not
designed for a production environment, as it will leak
memory, and will not scale past a single process.
info  - Loaded env from /home/ubuntu/node-express-sequelize-nextjs-realworld-example-app/.env
Listening on: http://localhost:3000
では、ブラウザでアクセスを行って、いくつか操作をしてみましょう。Sign Up したり、Sign In したり、記事を作ってみたり。
さて、APM の画面に戻ってみると、早速サービスマップが生成されましたね。
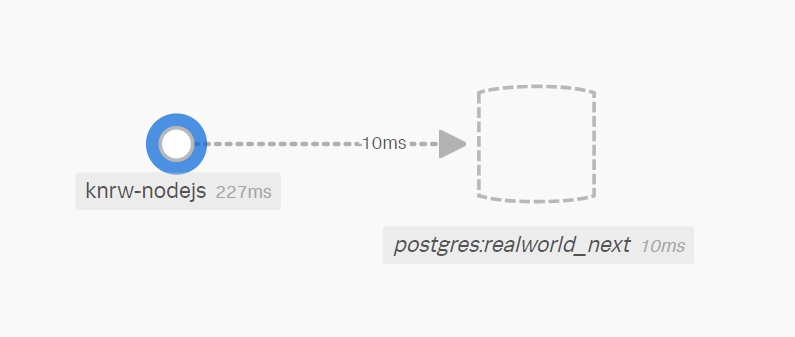
では、更にトレースの情報なども見ていきましょう。
Sign Up や Sign In 処理の際には、POST 処理が行われていますので、Trace 一覧の画面から探してみると、以下のような感じで見えていますね。

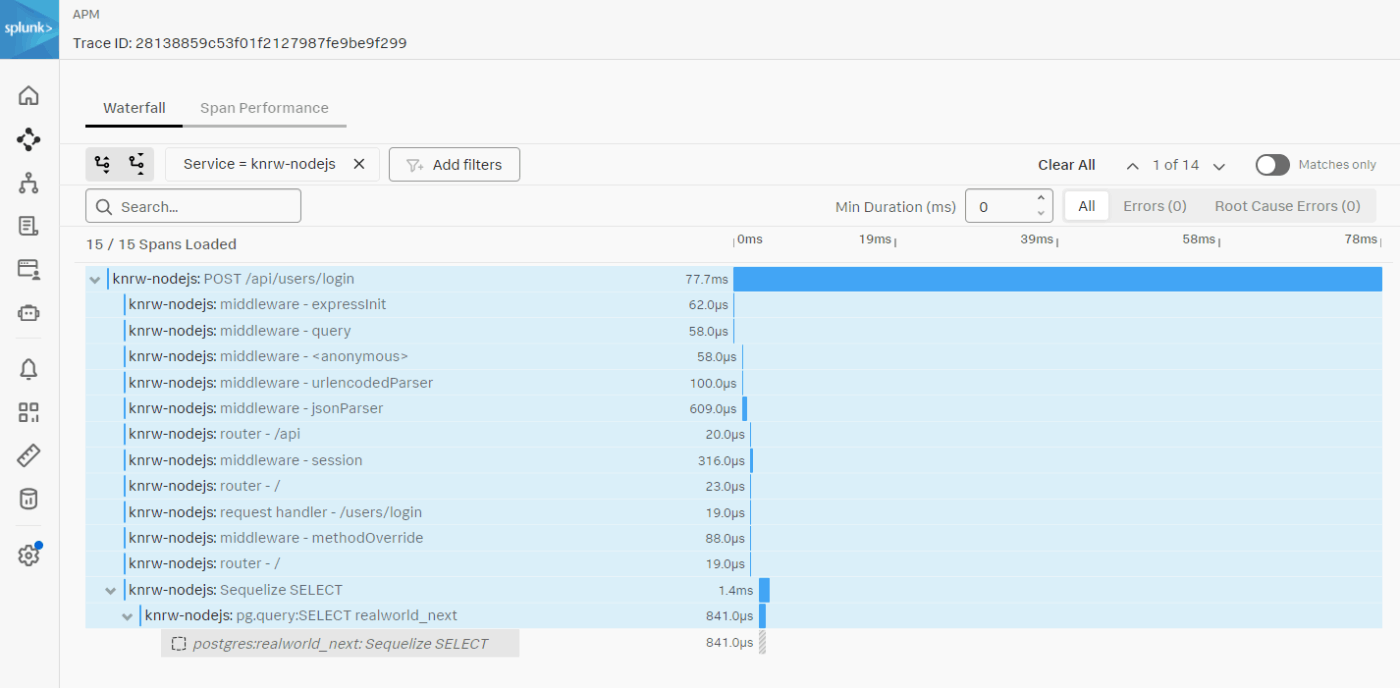
いい感じです。
Manual Instrumentation
Sign Up 時に指定されたパラメータを取得する
では、もうすこし頑張ってみましょう。
今回は、Sign Up の際に指定したパスワードを取得してみようと思います。
Sign Up の処理では、/api/users に対してPOSTの処理を実施しているようなので、 api/users.js ファイルを開いてみましょう。

以下の function が実行されていそうですね。
router.post('/users', async function (req, res, next)
Manual Instrumentation を実施する上で必要なパッケージをインストールします。
$ npm install @opentelemetry/api @opentelemetry/resources @opentelemetry/semantic-conventions
では、api/users.js ファイルを更新していきます。
まず、以下を const passport の下に追加。
const opentelemetry = require('@opentelemetry/api')
const { trace } = require('@opentelemetry/api')
const tracer = trace.getTracer('api_user', '0.1.0')
router.post('/users', async function (req, res, next) を確認していくと、以下で変数を設定しているようなので
    user.username = req.body.user.username
    user.email = req.body.user.email
    user.ip = lib.getClientIp(req)
    req.app
      .get('sequelize')
      .models.User.setPassword(user, req.body.user.password)
この下に以下のコードを足してみましょう
    const span = opentelemetry.trace.getActiveSpan()
    span.setAttribute('username', user.username.toString())
    span.setAttribute('email', user.email.toString())
    span.setAttribute('client_ip', user.ip.toString())
    span.setAttribute('password', req.body.user.password.toString())
コード改修を行ったので、再度ビルドしてから起動、ブラウザ上で Sign Up などを試してみましょう。
$ npm run build-prod
$ npm run start-prod
attribute として先ほど指定した email や client_ip が取得できるようになったようですね。

おわりに
(結構ボリュームのある記事になってしまいましたが)実際にやっている内容自体はそれほど難しくなかったのではないでしょうか?
私自身 Node.js をがっつりと触ってきたわけではないので多少試行錯誤した部分はありましたが、OpenTelemetry の公式ガイドなども分かりやすかったため、計装自体はスムーズにできたように思います。
スパン開発・運用対象のアプリケーションの特性や開発・運用フェーズのニーズに応じて様々に活用していくとよさそうです。
こんな感じで、他の言語で書かれている同一のアプリケーションについても計装を施してみて、また記事として公開していこうと思います。
Discussion