AWS AppSync EventsをAmplifyを使って触ってみた
先日、Lambdaの10周年記念生誕祭に参加し、そこでAWS Lambdaとの関わりについてを語ってきました。
で、この懇親会のときにAWS AppSyncの新機能としてAppSync Eventsがリリースされたという話を聞きました。
それまではGraphQLを使って毎回スキーマを書いたり、リゾルバを設定するなど、使うための煩わしさがありました(昔プロジェクトでAppSyncを使われてたときはなんで使っているのか訳が分からなかったことがあります)。AppSync EventsではWebsocketを使ったシンプルなPubSubが使えるようなって、手軽にフロントエンドでリアルタイム通信ができるようになったと聞いて、とても興味深かったです。
というわけで、今回はAppSync EventsをAmplifyで触ってみたいと思います。
今回作成するもの
今回はAWS SamplesにあるNext.jsのAmplifyのテンプレートのソースコードをアレンジしてAppSync Eventsを使ったTodoアプリを作成してみます。
事前準備
- AWS CLIのインストール
- Node.js(v20以上)
構築手順
まずは以下のコマンドでソースコードを取得します。
git clone https://github.com/aws-samples/amplify-next-pages-template
続いて、ソースコードのディレクトリに移動し、必要なパッケージをインストールします。
cd amplify-next-pages-template
npm install
追加でCDKのパッケージとAmplifyのReact用のUIコンポーネントをインストールします。
npm install aws-cdk-lib amplify-ui-react
以上で準備が整いました。
実装
バックエンドの実装
環境構築ができたところでバックエンドの実装を行います。
AppSync Eventsは、GraphQLの時と同様にいくつかAPIの認証方法がありますが、今回はCognito User Poolを使って認証を行います。
そのため、 backend.ts を以下のコードに書き換えます。
import { defineBackend } from '@aws-amplify/backend';
import { auth } from './auth/resource';

// import CDK resources:
import {
  CfnApi,
  CfnChannelNamespace,
  AuthorizationType,
} from 'aws-cdk-lib/aws-appsync';
import { Policy, PolicyStatement } from 'aws-cdk-lib/aws-iam';

const backend = defineBackend({
  auth,
});

// create a new stack for our Event API resources:
const customResources = backend.createStack('custom-resources');

// add a new Event API to the stack:
const cfnEventAPI = new CfnApi(customResources, 'CfnEventAPI', {
  name: 'todo-event-api',
  eventConfig: {
    authProviders: [
      {
        authType: AuthorizationType.USER_POOL,
        cognitoConfig: {
          awsRegion: customResources.region,
          // configure Event API to use the Cognito User Pool provisioned by Amplify:
          userPoolId: backend.auth.resources.userPool.userPoolId,
        },
      },
    ],
    // configure the User Pool as the auth provider for Connect, Publish, and Subscribe operations:
    connectionAuthModes: [{ authType: AuthorizationType.USER_POOL }],
    defaultPublishAuthModes: [{ authType: AuthorizationType.USER_POOL }],
    defaultSubscribeAuthModes: [{ authType: AuthorizationType.USER_POOL }],
  },
});

// create a default namespace for our Event API:
new CfnChannelNamespace(
  customResources,
  'CfnEventAPINamespace',
  {
    apiId: cfnEventAPI.attrApiId,
    name: 'default',
  }
);

// attach a policy to the authenticated user role in our User Pool to grant access to the Event API:
backend.auth.resources.authenticatedUserIamRole.attachInlinePolicy(
  new Policy(customResources, 'AppSyncEventPolicy', {
    statements: [
      new PolicyStatement({
        actions: [
          'appsync:EventConnect',
          'appsync:EventSubscribe',
          'appsync:EventPublish',
        ],
        resources: [`${cfnEventAPI.attrApiArn}/*`, `${cfnEventAPI.attrApiArn}`],
      }),
    ],
  })
);

// finally, add the Event API configuration to amplify_outputs:
backend.addOutput({
  custom: {
    events: {
      url: `https://${cfnEventAPI.getAtt('Dns.Http').toString()}/event`,
      aws_region: customResources.region,
      default_authorization_type: AuthorizationType.USER_POOL,
    },
  },
});
ここでは、サンプルにもともとあった認証機能を使ってAppSync Events APIの認証を行うため、Authのリソースのインポートはそのまま残します。
そして、AppSync EventsのリソースはCDKの記述を使って定義をおり、UIでAppSync Eventsが呼び出せる用に amplify_outputs.json の出力として、定義したリソース情報を追加しています。
元あった amplify/data ディレクトリはこれで不要になるので削除します。
rm -rf amplify/data
フロントエンドの実装
次にフロントエンドの実装を行います。
今回はAmplify Eventsを使うためにCognitoの認証を使います。そのため、 pages/_app.tsx を以下のように書き換えます。
import "@/styles/app.css";
import type { AppProps } from "next/app";
import { Amplify } from "aws-amplify";
import { Authenticator } from '@aws-amplify/ui-react';
import outputs from "@/amplify_outputs.json";
import "@aws-amplify/ui-react/styles.css";

Amplify.configure(outputs);

export default function App({ Component, pageProps }: AppProps) {
  return (
    <Authenticator>
      <Component {...pageProps} />
    </Authenticator>
  );
}
Amplify.configure(outputs) でバックエンドで定義したCognitoの設定やAppSync Eventsの設定を読み込んでいます。
また、認証についてはAmplify UIの Authenticator を使っており、これにより認証が通ってなければログイン画面にリダイレクトされるようになります。
今度は、アプリケーション本体のコードを書き換えます。
pages/index.tsx を以下のように書き換えます。
import { useState, useEffect } from "react";
import { Todo } from "@/types";
import type { EventsChannel } from 'aws-amplify/data';
import { events } from 'aws-amplify/data';

export default function App() {
  const [todos, setTodos] = useState<Todo[]>([]);
  const [inputText, setInputText] = useState<string>('');

  useEffect(() => {
    let channel: EventsChannel;

    const connectAndSubscribe = async () => {
      channel = await events.connect('default/todo');

      channel.subscribe({
        next: (data) => {
          console.log('received', data);
          const todo = {
            id: data.id,
            content: data.event.content
          }
          setTodos((prev) => [...prev, todo]);
        },
        error: (err) => console.error('error', err)
      });
    };
    connectAndSubscribe();

    return () => channel && channel.close();
  }, []);

  async function createTodo() {
    if (!inputText) return;
    await events.post('default/todo', {
      content: inputText,
    });
    setInputText('');
  }

  function handleInput(e: React.ChangeEvent<HTMLInputElement>) {
    setInputText(e.target.value);
  }

  return (
    <main>
      <h1>My todos</h1>
      <input type="text" placeholder="New todo" value={inputText} onInput={handleInput} />
      <button onClick={createTodo}>+ new</button>
      <ul>
        {todos.map((todo) => (
          <li key={todo.id}>{todo.content}</li>
        ))}
      </ul>
      <div>
        🥳 App successfully hosted. Try creating a new todo.
        <br />
        <a href="https://docs.amplify.aws/gen2/start/quickstart/nextjs-pages-router/">
          Review next steps of this tutorial.
        </a>
      </div>
    </main>
  );
}
オリジナルのサンプルでは window.prompt を使って入力を受け付けていましたが、今回は入力フォームを使って入力を受け付けるように変更しています(ここは単純に自分のこだわり)。
AppSync Eventsから飛んでくるイベントのSubscribeは以下の関数で行っています。
Websocketを使うため、 useEffect の中で events.connect で接続を行い、 channel.subscribe でイベントを受け取るようにしています。
また、クリーンアップのために return で channel.close() を呼び出しています。
  useEffect(() => {
    let channel: EventsChannel;

    const connectAndSubscribe = async () => {
      channel = await events.connect('default/todo');

      channel.subscribe({
        next: (data) => {
          console.log('received', data);
          const todo = {
            id: data.id,
            content: data.event.content
          }
          setTodos((prev) => [...prev, todo]);
        },
        error: (err) => console.error('error', err)
      });
    };
    connectAndSubscribe();

    return () => channel && channel.close();
  }, []);
一方、新しいTodoを作成する関数は以下のようになっています。
こちらもAppSync Eventsを使っていますが、PublishはシンプルなRESTを使っており、 events.post でイベントを送信しています。
  async function createTodo() {
    if (!inputText) return;
    await events.post('default/todo', {
      content: inputText,
    });
    setInputText('');
  }
動作確認
実装が終わったら実際に動作確認してみます。
まずは動作確認用のサンドボックス環境を立ち上げます。
npx ampx sandbox
コマンドを実行するとバックエンドのデプロイが始まります。
最終的に全てのリソースがデプロイされて、 amplify_outputs.json が生成されたら、デプロイは正常に完了しています。
次に、フロントエンドのアプリケーションをビルドします。
ビルドする理由は、開発サーバーで動かすとサブスクライブでイベントを2重に受け取ってしまうためです。
npm run build
ビルドが完了したら、以下のコマンドでアプリケーションを起動します。
npm run start
起動したら、ブラウザで http://localhost:3000 にアクセスすると、以下の認証画面が表示されます。
ここで任意のユーザー名とパスワードを入力してログインします。

ログインが完了すると、TODOアプリが表示されます。
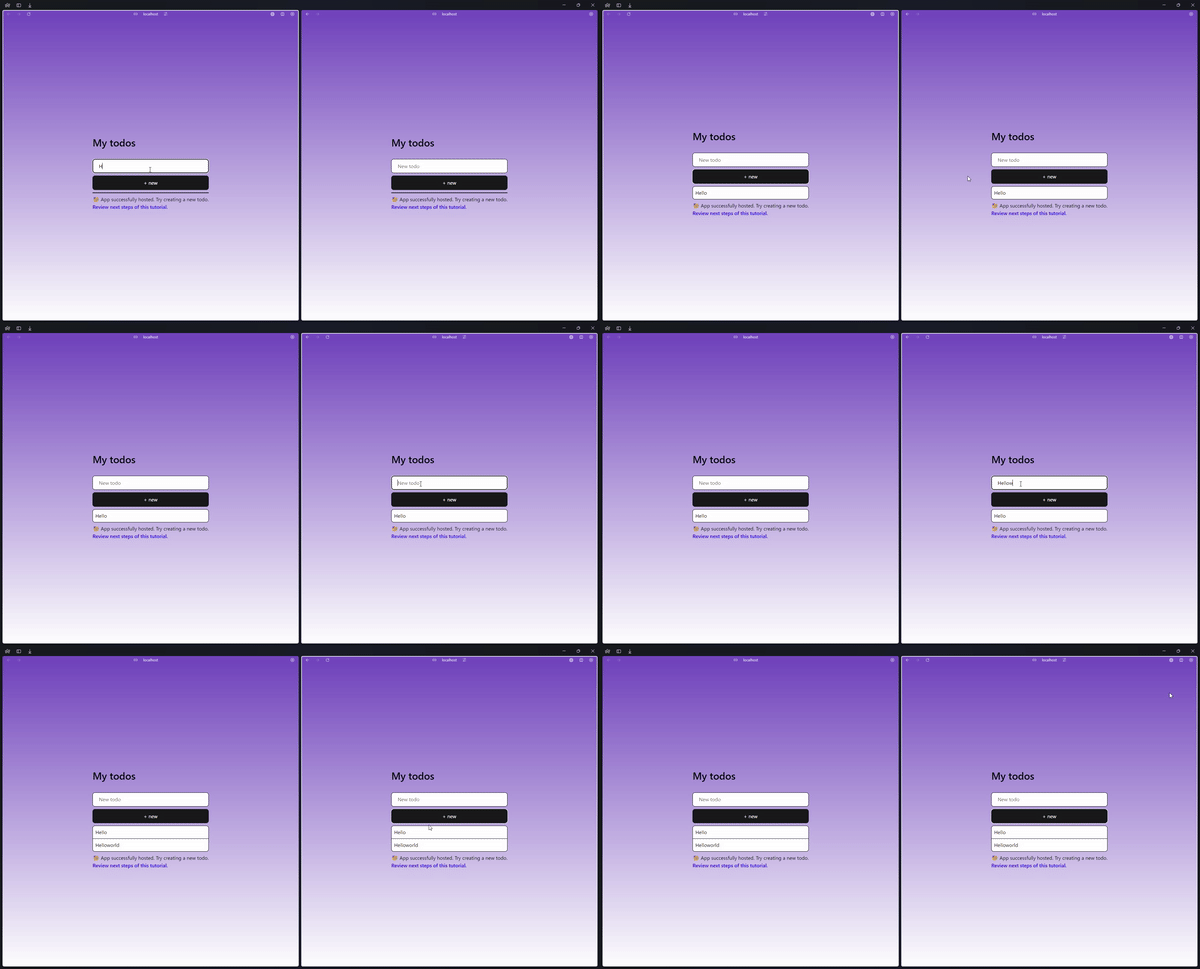
フォームに何かしらテキストを入力して、 + new ボタンを押すと、フォームの下に新しいTODOが追加されるのが確認できます。
以下のように画面を並べると、リアルタイムでイベントを受け取って片方の画面にも同じTODOが表示されることが確認できます。

後はレポジトリにPushして、Amplify Consoleでレポジトリを連携すればCI/CDが実行されてAWS上にデプロイされるはずです。(その辺りは割愛します)
今回のソースコード
今回のソースコードは以下のリポジトリにあります。
本題から逸れるので省略しましたが、オリジナルのレポジトリからCSSも少し変更しています。
まとめ
今回はAppSync EventsをAmplify上で動かしてみました。
AppSync Eventsは、GraphQLと比べて手軽にPubSubを実現できのが魅力的ですが、現状ではPublishしたイベントは同じチャネル名前空間のSubscribeにしか対応しておらず、GraphQLのようにデータの永続化やLambdaを使ったハンドラはまだ対応していません。
ただ、公式ブログでは今後DynamoDBやAuroraなどのデータソースやLambdaのサポートも予定しているようなので、今後のアップデートに期待したいところです!
参考
Discussion