🎨
クリエイティブコーディングで個人的に使えそうなテクニックを集めてみた
こんにちは.趣味で p5.js を使いながらジェネラティブアートに勤しんでいる Keeth(和仁🐊) こと桑原です.
本記事では,p5.js で遊ぶ際によく書くコードや表現方法など,備忘録的に tips を集めた記事となります.このページに訪れられた方も何か持って帰ってもらえるものがあれば嬉しいなと思って書いてみました.中身は随時更新していきたいと思います(たぶん).
setup
Square canvas to match the size of the view
正方形の canvas を指定する際,画面横幅 or 縦幅の min の方を基準にcanvas のサイズを決定する.
function setup() {
  createCanvas(W = min(windowWidth, windowHeight), W);
  background(255);
}
grid layout
物体を 格子状 に配置するときのやり方.いろんな書き方があるうちの1つ.
const CELL_COUNT = 8;

function setup() {
  createCanvas(400, 400);
  background(200);
  noLoop();
  noStroke();

  drawGrid();
}

function drawGrid() {
  let gridSize = width * 0.9;
  let cellSize = gridSize / CELL_COUNT;

  for (let i = 0; i < CELL_COUNT; i++) {
    for (let j = 0; j < CELL_COUNT; j++) {
      const x = cellSize * i + cellSize / 2 + (width - gridSize) / 2;
      const y = cellSize * j + cellSize / 2 + (height - gridSize) / 2;
      ellipse(x, y, 20);
    }
  }
}
randomly sized grid layout
単なる格子状の配置ではなく,ランダムにサイズが違う配置も見ていて面白い.再帰関数を使うことで表現できる.
const DEPTH = 8;

function setup() {
  createCanvas(400, 400);
  background(255);
  angleMode(DEGREES);
  rectMode(CENTER);
  noLoop();
  noStroke();
  dividedRect(20, 20, width - 40, height - 40, DEPTH);
}

function dividedRect(x, y, w, h, n) {
  if (n > 0) {
    n--;
    if (w >= h) {
      let rndw = random(0.4, 0.9) * w;
      dividedRect(x, y, rndw, h, n);
      dividedRect(x + rndw, y, w - rndw, h, n);
    }
    if (w < h) {
      let rndh = random(0.4, 0.9) * h;
      dividedRect(x, y, w, rndh, n);
      dividedRect(x, y + rndh, w, h - rndh, n);
    }
  } else {
    fill(random(255));
    rect(x + w / 2, y + h / 2, w - 5, h - 5);
  }
}
実行結果

ideas
Draw a striped circle
単なる円を描くのではなく,円を線で描くやり方.
const diameter = 100;

function setup() {
  createCanvas(400, 400);
  background(255);
  noLoop();
  noStroke();

  translate(width / 2, height / 2);

  fill(0);
  ellipse(0, 0, diameter);

  fill(255);
  for (let i = -diameter / 2; i < diameter / 2; i += 10) {
    i % 20 === 0 && rect(i, -diameter / 2, 10, diameter);
  }
}
with WEBGL
function setup() {
  createCanvas(400, 400, WEBGL);
  background(255);
  noLoop();
  noStroke();

  let pg = createGraphics(100, 100);
  pg.background(255);
  pg.fill(0);
  pg.rectMode(CENTER);
  for (let i = 0; i < 100; i += 10) {
    i % 20 === 0 && pg.rect(i, 0, 10, height);
  }

  texture(pg);
  ellipse(0, 0, 100);
}
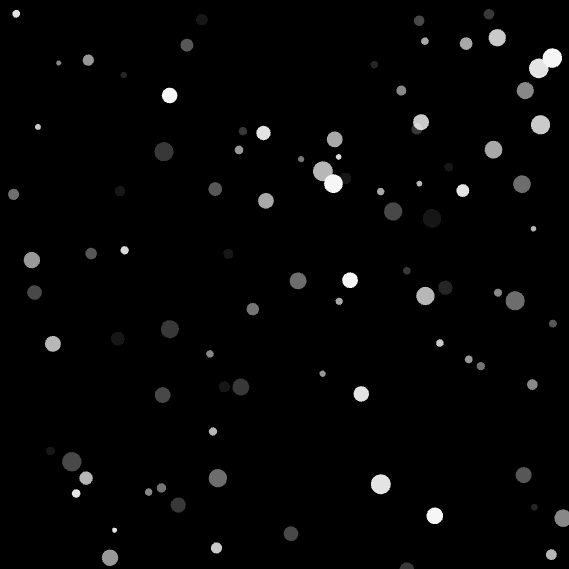
Like Parallax Effect
上から何かを降らすようなアニメーションを描く場合,明るいものから暗いものになるにつれて落下速度を遅くするとパララックス効果のような見た目が作れる.
let snowflakes = [];
const NUM = 100;
let xoff = 0.0;

function setup() {
  createCanvas(W = min(windowWidth, windowHeight), W);
  noStroke();

  for (let i = 0; i < NUM; i++) {
    const op = random(255) // ← ここと
    const v = map(op, 0, 255, 1, 5) // ← ここ
    snowflakes.push({
      x: random(width),
      y: random(height),
      size: random(5, 20),
      op: op,
      r: random(20, 50),
      velocity: v,
    });
  }
}

// draw() は割愛
実行結果
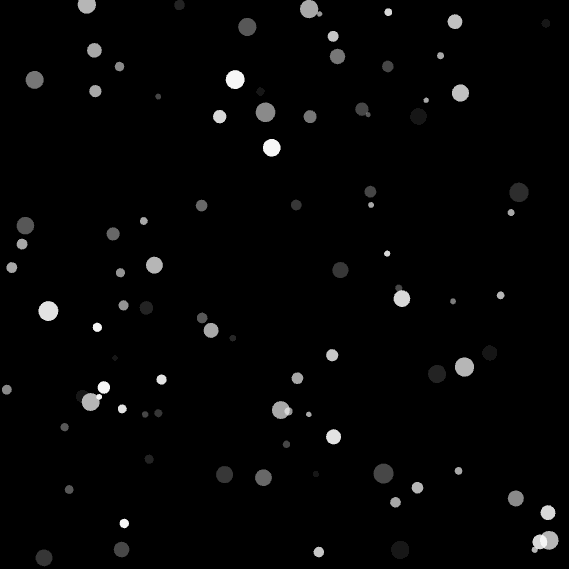
@youtoy さんに明るさではなく,大きさで表現するアイディアもいただいたので追記.
    const size = random(5, 20)  // ← ここと
    const v = map(size, 5, 20, 1, 5) // ← ここ
    snowflakes.push({
      x: random(width),
      y: random(height),
      size: size,
      op: random(255),
      r: random(20, 50),
      velocity: v,
    });
実行結果(先ほどとほぼ一緒)
Add Shadow
物体に影をつける簡単なやり方.
function setup() {
  createCanvas(400, 400);
  background(255);
  noStroke();

  drawingContext.shadowColor = color(100);
  drawingContext.shadowBlur = 16;

  ellipse(width / 2, height / 2, 150)
}
実行結果

How to draw hexagons
vertex を使わない六角形の描き方.
function drawHexagonWithTriangles(cx, cy) {
  let angleOffset = PI / 3;
  const cl = random(255)
  fill(cl);
  stroke(cl);

  for (let i = 0; i < 6; i++) {
    let angle1 = angleOffset * i - PI / 6;
    let angle2 = angleOffset * (i + 1) - PI / 6;

    let x1 = cx + hexRadius * cos(angle1);
    let y1 = cy + hexRadius * sin(angle1);

    let x2 = cx + hexRadius * cos(angle2);
    let y2 = cy + hexRadius * sin(angle2);

    triangle(cx, cy, x1, y1, x2, y2);
  }
}
実行結果

Discussion