PlotlyでIFCの3Dモデルを表示したい
IFCファイルの3DモデルをPythonで手軽に表示させたいなと思ったので。
表示させるならIFC.jsがあるけど、PlotlyならHTMLファイルにもできるし、なんか活用方法あるんじゃないかと思うのでやります。
使うモデルはIfcOpenShellのドキュメントに置いてあるサンプルファイル
ifcopenshellでIFCのジオメトリ取得
公式ドキュメント見ると、位置情報(変換行列)と形状情報をそれぞれ取得しているけれども、設定で世界座標系で取得するようにすれば、自動で変換行列を適応してくれるらしい。
つまりこう設定する
import ifcopenshell
import ifcopenshell.geom

settings = ifcopenshell.geom.settings()
settings.set(settings.USE_WORLD_COORDS, True)
設定のあとに以下で世界座標系のジオメトリを取得できる。
model = ifcopenshell.open(path)
element = model.by_type('IfcWall')[0]

shape = ifcopenshell.geom.create_shape(settings, element)
faces = shape.geometry.faces
edges = shape.geometry.edges
verts = shape.geometry.verts
materials = shape.geometry.materials
material_ids = shape.geometry.material_ids
Plotlyで表示させる。
ChatGPTに頂点と面の情報から表示する方法を聞いたら出てきたコード。
頂点と面と面の色の3つのデータがあればできそう。
import plotly.graph_objects as go

# 頂点の座標
vertices = [
    [0, 0, 0],  # 頂点1
    [1, 0, 0],  # 頂点2
    [0, 1, 0],  # 頂点3
]

# 頂点をつなぐ面のリスト
faces = [
    [1, 2, 3],  # 面1 (頂点のインデックスで定義)
]

# 面の作成
mesh = go.Mesh3d(
    # X, Y, Z座標を展開して設定
    x=[vertex[0] for vertex in vertices],
    y=[vertex[1] for vertex in vertices],
    z=[vertex[2] for vertex in vertices],
    # 面の定義
    i=[face[0]-1 for face in faces],  # plotlyは0ベースのインデックスなので、1を引く
    j=[face[1]-1 for face in faces],
    k=[face[2]-1 for face in faces],
    # 色の設定
    facecolor=['rgba(255,0,0,0.5)'],  # 赤色で半透明
)

# プロットの設定と表示
fig = go.Figure(data=[mesh])
fig.update_layout(scene=dict(
    xaxis_title='X軸',
    yaxis_title='Y軸',
    zaxis_title='Z軸'
))
fig.show()
ifcopenshellで取得したデータをPlotlyで表示させるように変換する。
material.transparencyは透明度なんだけど、1が完全に透明で0が不透明になっているため逆にする必要がある。(あと0-255に正規化してるけど、0-1のままでよかったっぽい。)
material.diffuseのないデータもあるみたいだけどひとまず。
verts = np.array(verts).reshape(-1, 3)
faces = np.array(faces).reshape(-1, 3)

colors = [np.array(material.diffuse) * 255 for material in materials]
transparencies = [1 - material.transparency for material in materials]
colors = np.hstack([np.array(colors), np.array(transparencies).reshape(-1, 1) * 255])
facecolors = [colors[material_id] for material_id in material_ids]
これで表示できる。
このときレイアウト設定で scene_aspectmode='data' を設定しないとアスペクト比がおかしくなる。
import plotly.graph_objects as go
import numpy as np

mesh = go.Mesh3d(
    x=verts[:, 0],
    y=verts[:, 1],
    z=verts[:, 2],
    i=faces[:, 0],
    j=faces[:, 1],
    k=faces[:, 2],
    facecolor=facecolors
)

fig = go.Figure(data=[mesh])
fig.update_layout(
    scene_aspectmode='data',
)
fig.show()
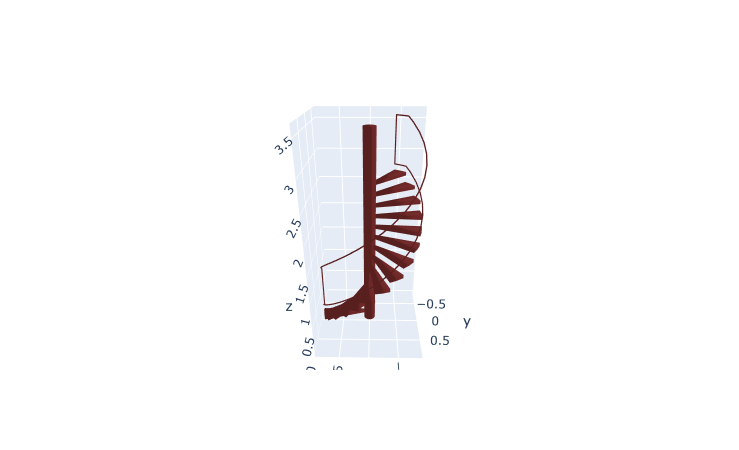
こんな感じ。表示してわかりやすい階段で。
全メッシュを取得してPlotlyのメッシュを作成。
IfcProductで取得すると形状を持ったエンティティ全てが取得できる。ただそうするとIfcSpace(部屋の情報など)や IfcOpeningElement(壁の開口部など)といったものも取得してしまうので、それは除くようにする。
また、アノテーションや形状情報を持っていないエンティティはcreate_shapeでエラーになるので例外処理しておく。
meshes = []
for element in model.by_type("IfcProduct"):
    entity_name = element.is_a()
    if  entity_name in ('IfcOpeningElement', 'IfcSpace', 'IfcOpeningStandardCase'):
        continue

    try:
        shape = ifcopenshell.geom.create_shape(settings, element)
    except:
        print(element)
        continue

    faces = shape.geometry.faces
    verts = shape.geometry.verts
    materials = shape.geometry.materials
    material_ids = shape.geometry.material_ids

    verts = np.array(verts).reshape(-1, 3)
    faces = np.array(faces).reshape(-1, 3)

    colors = [np.array(material.diffuse) * 255 for material in materials]
    transparencies = [1 - material.transparency for material in materials]
    colors = np.hstack([np.array(colors), np.array(transparencies).reshape(-1, 1) * 255])
    facecolors = [colors[material_id] for material_id in material_ids]

    mesh = go.Mesh3d(
        x=verts[:, 0],
        y=verts[:, 1],
        z=verts[:, 2],
        i=faces[:, 0],
        j=faces[:, 1],
        k=faces[:, 2],
        facecolor=facecolors,
    )
    meshes.append(mesh)
ちなみにIfcSpaceや IfcOpeningElement を除く処理は web-ifc だと以下のコード。
作成したメッシュをPlotlyで表示。noaxisを設定の設定で軸を表示しないようにできる。
fig = go.Figure(data=meshes)

noaxis = dict(
    showbackground=False,
    showgrid=False,
    showline=False,
    showticklabels=False,
    ticks="",
    title="",
    zeroline=False,
)

fig.update_layout(
    scene=dict(
        xaxis = noaxis,
        yaxis = noaxis,
        zaxis = noaxis,
    ),
    scene_aspectmode='data',
)
fig.show()
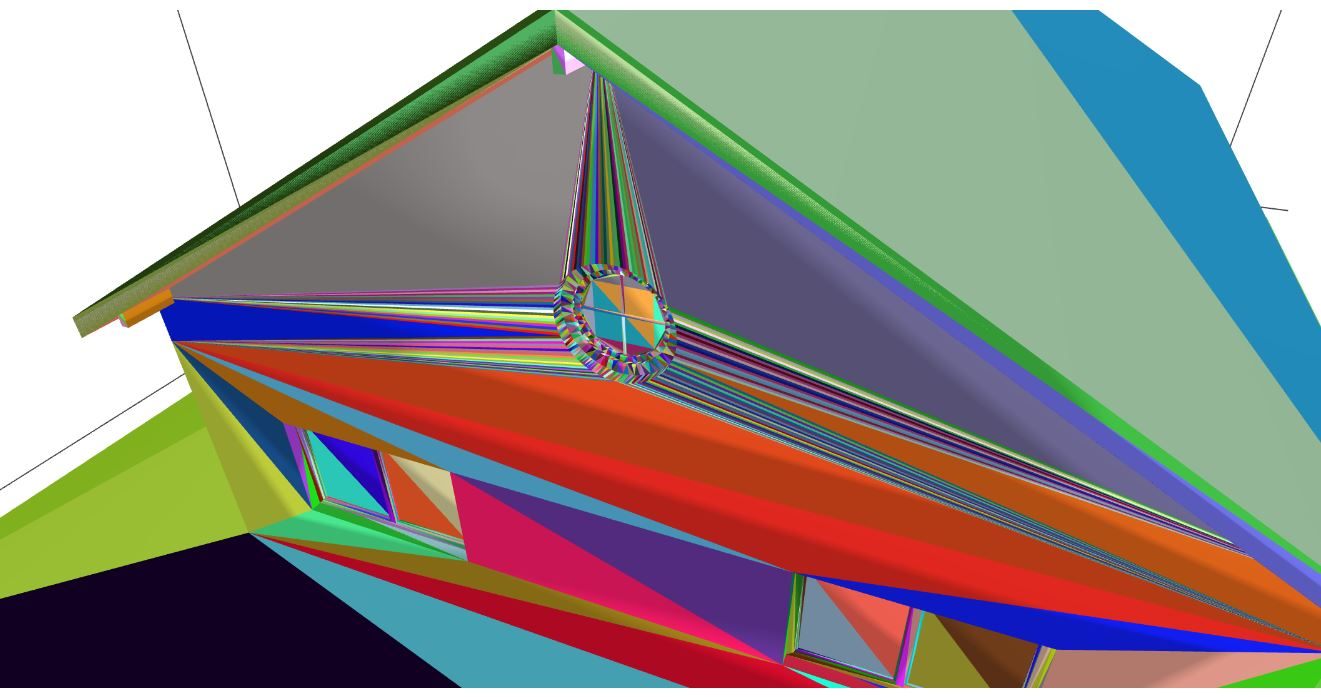
でもなんか壁が変になってる。なんでだろ?

ChatGPTに聞いたらライティングのせいだろうということで、flatshading=Trueを設定した。
    mesh = go.Mesh3d(
        x=verts[:, 0],
        y=verts[:, 1],
        z=verts[:, 2],
        i=faces[:, 0],
        j=faces[:, 1],
        k=faces[:, 2],
        facecolor=facecolors,
        flatshading=True,
    )
よさそう

でも角度変えると変だよ?

ライティングの設定とかもあるから調べてたけど、なんか法線方向が間違っている気がする。
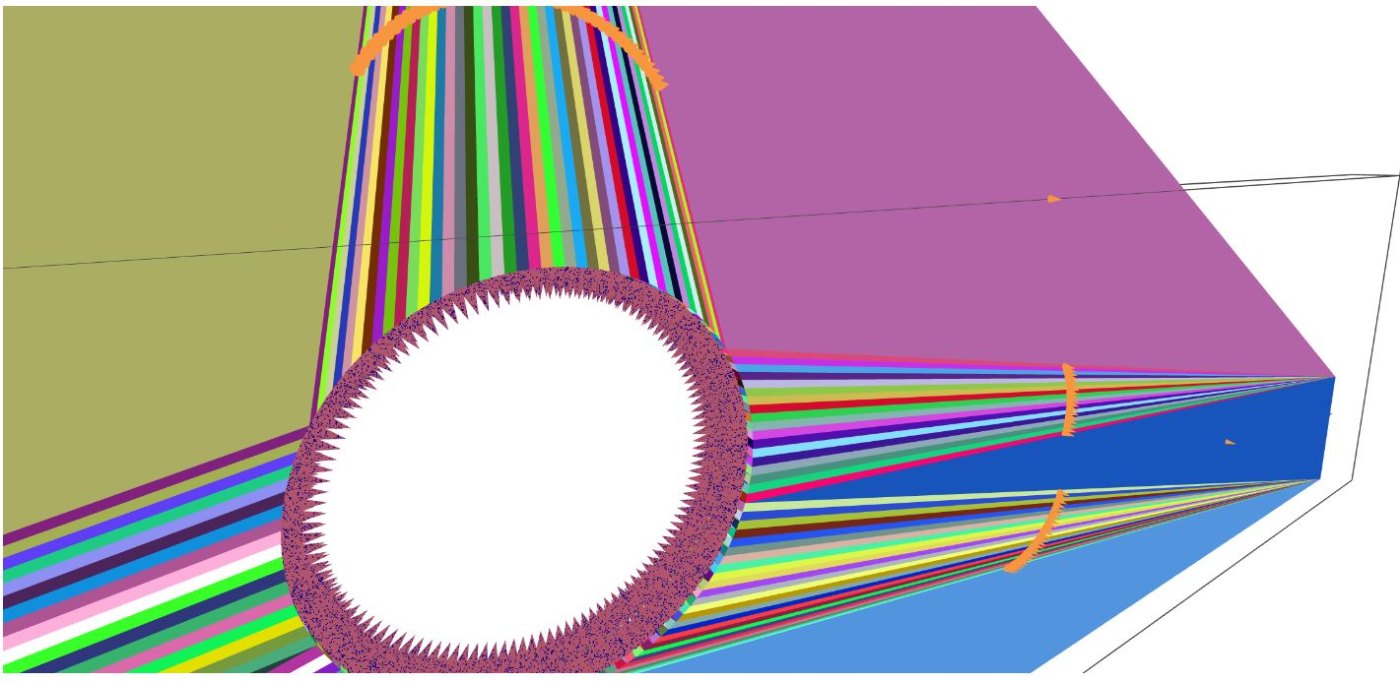
メッシュがどうなっているのか確認するために、色をランダムに。円の部分が細かいですね。
法線方向を確認するために円錐を描画する。
# 面の中心と法線ベクトルを計算
face_centers = np.mean(verts[faces], axis=1)
face_normals = np.cross(verts[faces[:, 1]] - verts[faces[:, 0]],
                        verts[faces[:, 2]] - verts[faces[:, 0]])
face_normals = face_normals / np.linalg.norm(face_normals, axis=1)[:, np.newaxis]  # 正規化

# 矢印(法線ベクトル)の描画
cone = go.Cone(
    x=face_centers[:, 0],
    y=face_centers[:, 1],
    z=face_centers[:, 2],
    u=face_normals[:, 0],
    v=face_normals[:, 1],
    w=face_normals[:, 2],
    sizemode='absolute',
    sizeref=1,
    showscale=False,
)
ちょっとわかりにくいけど全部外側向いているから、法線方向はあってそう。
ちょっと原因分からないので、ひとまずこれで妥協します。
(というかPlotlyだとこれが限界?)
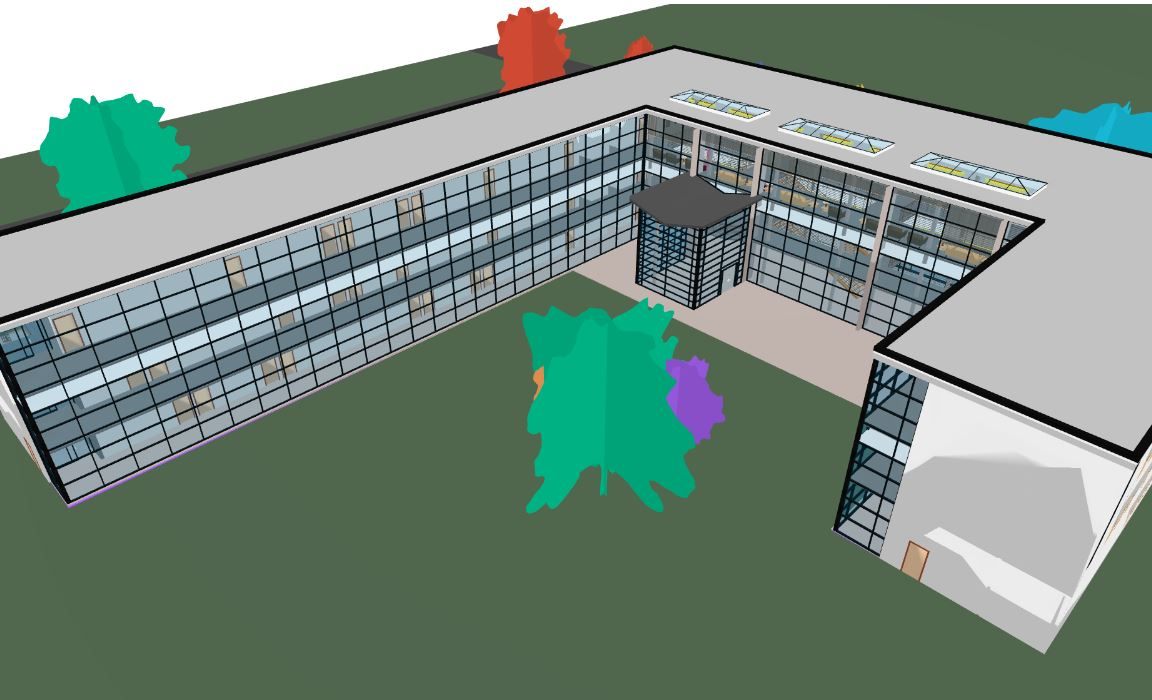
少し大きめのモデル。たしかRevitのサンプルモデルか何か。
一応読めはするけどとても重い。小さめのデータを確認するくらいが限度かな、という感じ。
木は色の指定がないのでランダム?な色になっている。灰色とか無難な色を指定したほうがいいかも。
if len(materials) == 0:
    facecolors = None
    # この方が良さそう
    # facecolors = ['lightgray'] * len(faces)
else:
    colors = [np.array(material.diffuse) for material in materials]
    transparencies = [1 - material.transparency for material in materials]
    colors = np.hstack([np.array(colors), np.array(transparencies).reshape(-1, 1)])
    facecolors = [colors[material_id] for material_id in material_ids]
ちなみに表示じゃなくてHTMLファイル出力はこれで。
fig.write_html(
    "file.html",
    include_plotlyjs='cdn', # 'cdn', 'directory', True, False
    full_html=True,
)
表示が変なの lightingの設定を色々いじってたらできた。
mesh = go.Mesh3d(
    x=verts[:, 0],
    y=verts[:, 1],
    z=verts[:, 2],
    i=faces[:, 0],
    j=faces[:, 1],
    k=faces[:, 2],
    facecolor=facecolors,
    flatshading=True,
    # 追加
    lighting=dict(
        ambient=1,  # 環境光を最大にする
        diffuse=0,  # 拡散光を無効にする
    ),
)
どの角度から見ても問題なく表示されてる。

まとめて記事にしたのでCloseする。
(なんでZennでメモしてQiitaで記事書いてるんだろうか...?)
あと、hover表示で属性の表示でもしようかもしようかとも思ったけど、気が向いたらやります。