Spring Security で RDB にユーザを永続化した際の挙動をソースコードとともに確認する
はじめに
これまで、 Spring Security の挙動をソースコードを追いながら見ていきました。
今回の記事では、サンプルコード をもとに Spring Security の認証時に使用するユーザを RDB に永続化する方法を確認していきます。
今回の作業ブランチは persist-to-DB です。
Spring Security が設定してくれている内容と、フレームワーク内部の実装を掘り下げることで、
セキュリティを意識する上で必要な実装についての理解を深められればと思います。
| ライブラリ | バージョン | Maven central URL |
|---|---|---|
spring-boot-starter-web |
3.0.1 |
https://mvnrepository.com/artifact/org.springframework.boot/spring-boot-starter-web/3.0.1 |
spring-boot-starter-security |
3.0.1 |
https://mvnrepository.com/artifact/org.springframework.boot/spring-boot-starter-security/3.0.1 |
spring-core |
6.0.3 |
https://mvnrepository.com/artifact/org.springframework/spring-core/6.0.3 |
spring-security-web |
6.0.1 |
https://mvnrepository.com/artifact/org.springframework.security/spring-security-web/6.0.1 |
JdbcUserDetailsManager を使用したユーザの管理
前回の記事で、「Spring Security が認証を行う流れ」を確認しました。
ログインのリクエストからユーザを取得し、パスワードの有効性を確認しているのは、
DaoAuthenticationProvider であり、ドキュメント に前後の処理が図示されておりわかりやすいです。
(実際のソースコードリーディングは前回の記事で実施)

ポイントとしては、③の UserDetailsService の実装を差し替えることで、ユーザの取得先(取得方法)を変更できるということです。
UserDetailsService のドキュメントに記載のように、Spring Security が提供する実装として、
インメモリと JDBC のサポートがあります。
Spring Security provides in-memory and JDBC implementations of UserDetailsService.
もしくは、 UserDetailsService interface を自身で実装し、それをDIコンテナに登録することでユーザの取得の処理をカスタマイズできます。
インメモリの実装は、 InMemoryUserDetailsManager であり、前回の記事のこちらで挙動を確認済みです。
まずは JDBC の実装である JdbcUserDetailsManager を使用してみます。
こちらの commit 時点に移動すると実際に動かして試せます。
docker-compose.yaml を使用し、 Postgres をコンテナ起動します。
services:
  postgres:
    image: postgres:13.9
    container_name: spring-security-demo-postgres
    ports:
      - 15432:5432
    volumes:
      - ./.docker/postgres:/var/lib/postgresql/data
    environment:
      POSTGRES_USER: postgres
      POSTGRES_PASSWORD: password
      POSTGRES_DB: testdb
      POSTGRES_INITDB_ARGS: "--encoding=UTF-8"
    restart: always
$ docker compose up -d
application.yaml にも接続先の情報を記載します。
spring:
  datasource:
    url: jdbc:postgresql://localhost:15432/testdb
    driverClassName: org.postgresql.Driver
    username: postgres
    password: password
Spring Security が指定する schema がドキュメントに記載されています。
Postgres 用に書き換えた以下の DDL を流します。
(自分は IntelliJ のデータベースクライアントで流しました)
drop table if exists authorities;
drop table if exists users;

drop sequence if exists user_id_seq;
drop sequence if exists authority_id_seq;

create sequence user_id_seq;
create sequence authority_id_seq;

create table users
(
    id int not null default nextval('user_id_seq') primary key,
    username varchar(50)  not null unique,
    password varchar(500) not null,
    enabled  boolean                 not null
);

create table authorities
(
    id int not null default nextval('authority_id_seq') primary key,
    username  varchar(50) not null,
    authority varchar(50) not null,
    constraint fk_authorities_users foreign key (username) references users (username)
);

create unique index ix_auth_username on authorities (username, authority);
あとは、UserDetailsService の実装として、JdbcUserDetailsManager を使用するためにDIコンテナに登録します。
ドキュメントを参考にサンプルのユーザを作成済みの状態にします。
この先、ユーザの登録時に BCryptPasswordEncoder を DI コンテナから引っ張っていきたいため、Bean定義します。
@Configuration
class SecurityConfig {
    @Bean
    fun users(dataSource: DataSource): UserDetailsManager {
        val user: UserDetails = User.builder()
            .username("admin")
            // encode with Spring Boot CLI
            // https://docs.spring.io/spring-security/reference/features/authentication/password-storage.html#authentication-password-storage-boot-cli
            // $ spring encodepassword 1qazxsw2
	    // delete "{bcrypt}\"
            .password("$2a\$10\$1gHHMqYmv7spE.896lYtKuenhXSRGyZ0FK.JTzAOSD6qgRKtPl5wy")
            .authorities("USER", "ADMIN")
            .build()
        val admin: UserDetails = User.builder()
            .username("user")
            // $ spring encodepassword 2wsxzaq1
            .password("$2a\$10\$saAFPwyIghNePc0C4sKuUOBUIQBs6xnC8sUh2OvLW6fuU57oJ1tp6")
            .authorities("USER")
            .build()

        val users = JdbcUserDetailsManager(dataSource)
        users.createUser(user)
        users.createUser(admin)
        return users
    }

    @Bean
    fun passwordEncoder() : PasswordEncoder = BCryptPasswordEncoder()
}
この状態で、アプリケーションをデバック実行してみると、
JdbcUserDetailsManager の createUser メソッドが呼ばれ
	@Override
	public void createUser(final UserDetails user) {
		validateUserDetails(user);
		getJdbcTemplate().update(this.createUserSql, (ps) -> {
			ps.setString(1, user.getUsername());
			ps.setString(2, user.getPassword());
			ps.setBoolean(3, user.isEnabled());

// (略)
以下の DML が発行されることで、
private String createUserSql = DEF_CREATE_USER_SQL;
public static final String DEF_CREATE_USER_SQL = "insert into users (username, password, enabled) values (?,?,?)";
DB にユーザが作成されます。
作成されたことを確認します。
### どっちでも
### $ docker compose exec postgres bash -c 'psql -Upostgres -d testdb -c "select * from users"'
$ docker compose exec -T postgres /bin/bash <<EOF
psql -Upostgres -d testdb -c "select * from users"
EOF

 id | username |                           password                           | enabled
----+----------+--------------------------------------------------------------+---------
  1 | admin    | $2a$10$1gHHMqYmv7spE.896lYtKuenhXSRGyZ0FK.JTzAOSD6qgRKtPl5wy | t
  2 | user     | $2a$10$saAFPwyIghNePc0C4sKuUOBUIQBs6xnC8sUh2OvLW6fuU57oJ1tp6 | t
(2 rows)
では、Basic認証が通ることを確認します。
$ admin_encoded_credential=$(echo -n "admin:1qazxsw2" | base64)
$ curl --location --request GET 'localhost:9080/public' --header "Authorization: Basic $admin_encoded_credential"

hello public world

$ user_encoded_credential=$(echo -n "user:2wsxzaq1" | base64)
$ curl --location --request GET 'localhost:9080/public' --header "Authorization: Basic $user_encoded_credential"

hello public world
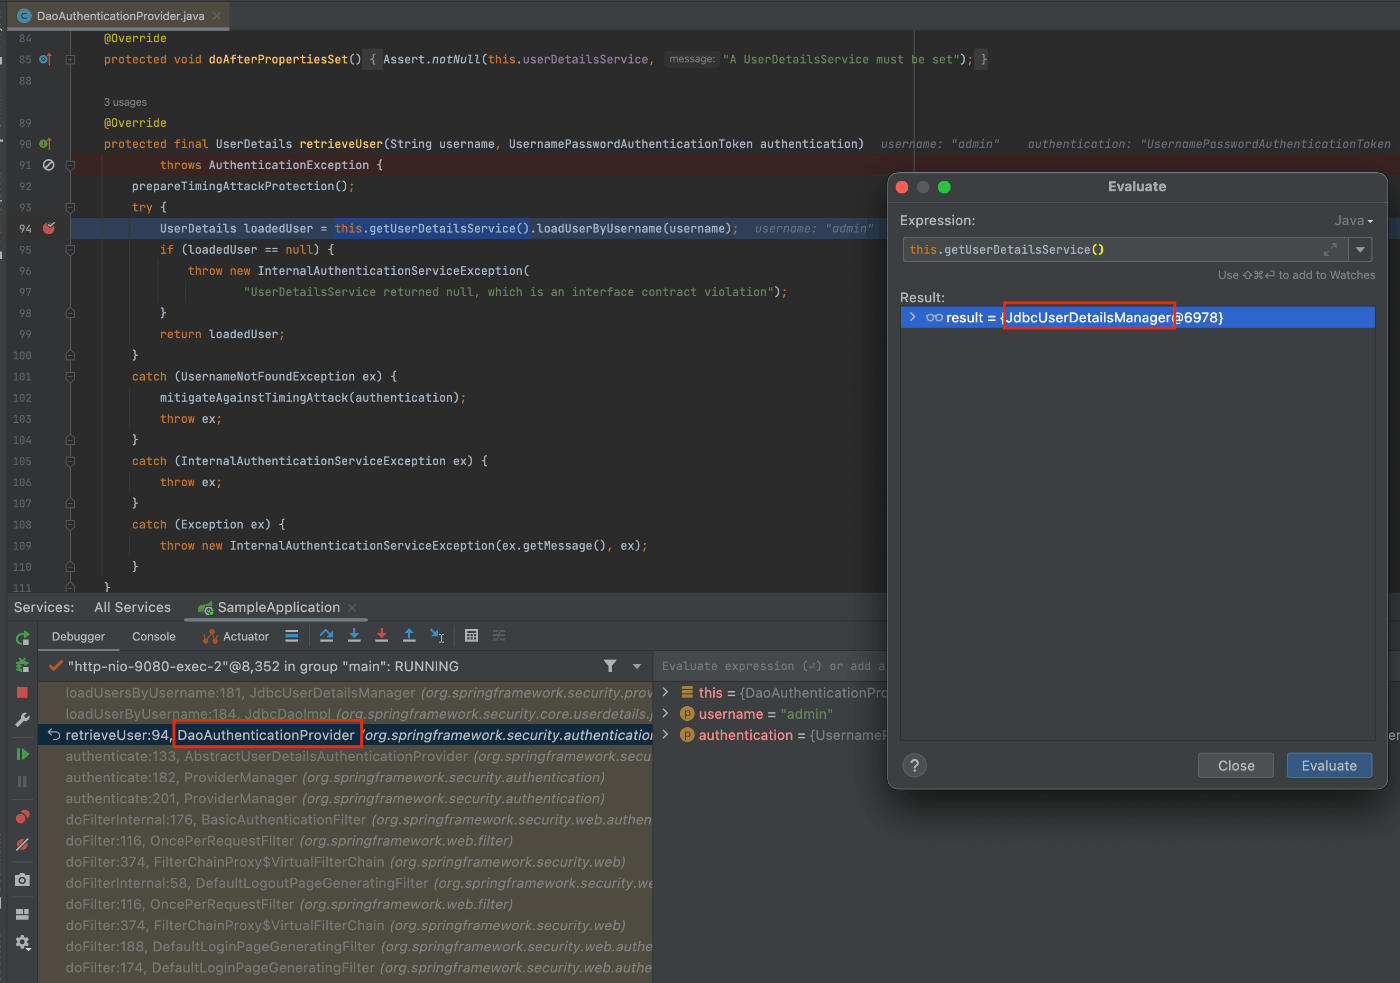
この際、デバック実行し stacktrace を確認すると、
org/springframework/security/authentication/dao/DaoAuthenticationProvider.java で UserDetailsService を呼び出す際に、
実装として org/springframework/security/provisioning/JdbcUserDetailsManager.java の loadUsersByUsername が呼ばれている事がわかります。
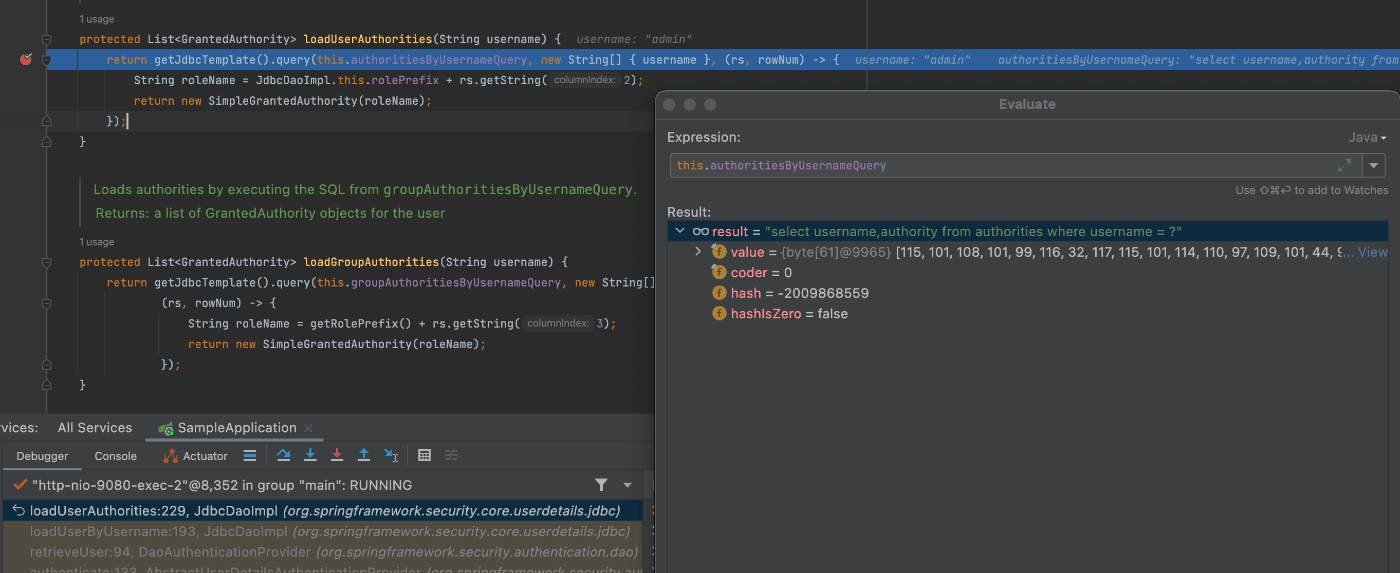
発行されている SQL を確認すると、
先程作成したテーブルからリクエストの username で検索をかけていることが分かります。
	@Override
	protected List<UserDetails> loadUsersByUsername(String username) {
		return getJdbcTemplate().query(getUsersByUsernameQuery(), this::mapToUser, username);
	}
private String usersByUsernameQuery;
this.usersByUsernameQuery = DEF_USERS_BY_USERNAME_QUERY;
	public static final String DEF_USERS_BY_USERNAME_QUERY = "select username,password,enabled "
			+ "from users "
			+ "where username = ?";
その後、 loadUserAuthorities メソッドで authorities テーブルにも検索をかけています。
その後の流れは、前回の記事で確認したものと同じで、
DB から取得したユーザの encode 済みのパスワードと、リクエストのパスワードを encoding したものを比較し、パスワードが有効であるかを確認しログインの認証の判定をしています。
ユーザの取得方法の挙動だけが変わった ことが確認できました。以下が確認できたわけです。
UserDetailsServiceの実装を差し替えることで、ユーザの取得先(取得方法)を変更できるということです。
UserDetailsService を独自に実装する
JdbcUserDetailsManager を使用することで、
手軽に Spring Security が提供する実装を活用して DB にユーザを永続化できることが分かりました。
一方で、テーブルの構造が Spring Security が指定するものに縛られてしまうというデメリットがあります。
別の属性を持った Entity を認証する対象として DB にて管理したい場合や、
権限自体を単独でデータベースで管理したい場合(後述のように、ユーザと権限と多対多関係にする)など、
認証情報を要件に合わせたテーブル構成にしてそこからデータを取得してきたい場合は、
UserDetailsService interface を自身で実装し、それをDIコンテナに登録すればよいです。
では、カスタマイズしていきます。
最終的なコードは branch persist-to-DB に checkout することで実際に動かして確認できます。
(差分は こちらの merge commit より確認できます)
まず、 build.gradle.kts の定義を変更し、
jOOQ を使用して別のテーブルの情報でログインの判定を行うようにしてみます。
	// implementation("org.springframework.boot:spring-boot-starter-data-jdbc")
	implementation("org.springframework.boot:spring-boot-starter-jooq")
認証情報を保持する Entity は Customer というクラス、および DB のテーブルとします。
class Customer private constructor(
    id: Int?, email: String, password: String, roles: Set<Role>?
) {
    var id: Int? = id
    val email = email
    val password = password
    val roles: Set<Role>? = roles

// 略
また、権限情報を表す Entity および DB のテーブルは Role とします。
上記の Customer の属性にあるように、 Customer は Role を重複なく複数持てるようにします。
class Role private constructor(
    id: Int?, name: String
){
    var id: Int? = id
    val name = name
DDL としては以下のものを使用します。
customer は複数の role を持てて、role は複数の customer に紐づくため、
多対多(N:N)のリレーションとし中間テーブルで customer_role を作成しています。
create sequence customer_id_seq;
create table customers
(
    id       int          not null default nextval('customer_id_seq') primary key,
    email    varchar(50)  not null unique,
    password varchar(500) not null
);

drop table if exists roles;
drop sequence if exists role_id_seq;

create sequence role_id_seq;
create table roles
(
    id   int         not null default nextval('role_id_seq') primary key,
    name varchar(50) not null unique
);

create sequence customer_role_id_seq;
create table customer_role
(
    id          int not null default nextval('customer_role_id_seq') primary key,
    customer_id int not null,
    role_id     int not null,
    constraint fk_customer_role_customer_id foreign key (customer_id) references customers (id),
    constraint fk_customer_role_role_id foreign key (role_id) references roles (id)
);
DB からデータを所得する箇所のコードは、
domain layer に repository の interface を定義し、
interface CustomerRepository {
    fun findByEmail(email: String): Customer?
    fun save(customer: Customer): Customer
    fun findAll(): List<Customer>
    fun attachRoles(customerId: Int, roles: List<String>): Customer
}

interface RoleRepository {
    fun findByName(name: String): Role?
    fun save(role: Role): Role
    fun findAll(): List<Role>
}
infrastructure layer に実装(今回だと jOOQ を使用したデータベースへのアクセス)を記載します。
(onion archtecture で記載していますが、 Spring Security の話とは関係がないので今回は割愛)
customers, customer_role(中間テーブル), roles を結合して取得し、
customer に role を持たせてインスタンス化したものを返しています。
@Repository
class CustomerJooqRepository(private val create: DSLContext) : CustomerRepository {

    val c: Customers = CUSTOMERS.`as`("c")
    val cr: CustomerRole = CUSTOMER_ROLE.`as`("cr")
    val r: Roles = ROLES.`as`("r")

    override fun findByEmail(email: String): Customer? {

        val records = create.select()
            .from(c.leftOuterJoin(cr).on(cr.CUSTOMER_ID.eq(c.ID)))
            .leftOuterJoin(r).on(r.ID.eq(cr.ROLE_ID))
            .where(c.EMAIL.eq(email))
            .fetch()

        if (records.isEmpty()) {
            return null
        }

        val roles = records.map {
            Role.reconstruct(
                id = it.getValue(r.ID)!!,
                name = it.getValue(r.NAME)!!
            )
        }.toSet()

        val first: Record = records.first()

        return Customer.reconstruct(
            id = first.getValue(c.ID)!!,
            email = first.getValue(c.EMAIL)!!,
            password = first.getValue(c.PASSWORD)!!,
            roles = roles
        );
    }
そして、 UserDetailsService interface を自身で実装した CustomerDetails を追加します。
こちらは上記の CustomerRepository の findByEmail メソッドで認証情報を保持する customer を取得し Spring Security がユーザを扱う形式である UserDetails をインスタンス化して返すものです。
stereotype annotation である @Service を使用してDIコンテナへの登録をしています。
@Service
class CustomerDetails(
    private val customerRepository: CustomerRepository,
    private val roleRepository: RoleRepository,
    private val passwordEncoder: PasswordEncoder,
) : UserDetailsService {

    override fun loadUserByUsername(email: String): UserDetails {
        val customer = customerRepository.findByEmail(email)
            ?: throw UsernameNotFoundException("User details not found for the user : $email")

        val authorities: MutableList<GrantedAuthority> = ArrayList()
        customer.roles?.map {
            authorities.add(SimpleGrantedAuthority("ROLE_${it.name}"))
        }
        return User(customer.email, customer.password, authorities)
    }
}
DB に初期データを流しておきます。
-- initial data for admin user
insert into roles (id, name)
values (default, 'ADMIN'),
       (default, 'USER');

insert into customers (id, email, password)
values (default, 'admin@example.com', '$2a$10$ancDG4fEZY31a9OtuqSbs./SPUu7s00qam5sXinI5NrTLSGlCy/BK');

insert into customer_role (customer_id, role_id)
values ((select c.id from customers c where c.email = 'admin@example.com'),
        (select r.id from roles r where r.name = 'ADMIN')),
       ((select c.id from customers c where c.email = 'admin@example.com'),
        (select r.id from roles r where r.name = 'USER'));

select c.*, r.name
from customers c
       left join customer_role cr on c.id = cr.customer_id
       left join roles r on cr.role_id = r.id;

/*
+--+-----------------+------------------------------------------------------------+-----+
|id|email            |password                                                    |name |
+--+-----------------+------------------------------------------------------------+-----+
|1 |admin@example.com|$2a$10$ancDG4fEZY31a9OtuqSbs./SPUu7s00qam5sXinI5NrTLSGlCy/BK|ADMIN|
|1 |admin@example.com|$2a$10$ancDG4fEZY31a9OtuqSbs./SPUu7s00qam5sXinI5NrTLSGlCy/BK|USER |
+--+-----------------+------------------------------------------------------------+-----+
*/
この状態でアプリケーションをデバック実行してリクエストすると、
$ admin_encoded_credential=$(echo -n "admin:1qazxsw2" | base64)
$ curl --location --request GET 'localhost:9080/public' --header "Authorization: Basic $admin_encoded_credential"

hello public world

$ user_encoded_credential=$(echo -n "user:2wsxzaq1" | base64)
$ curl --location --request GET 'localhost:9080/public' --header "Authorization: Basic $user_encoded_credential"

hello public world
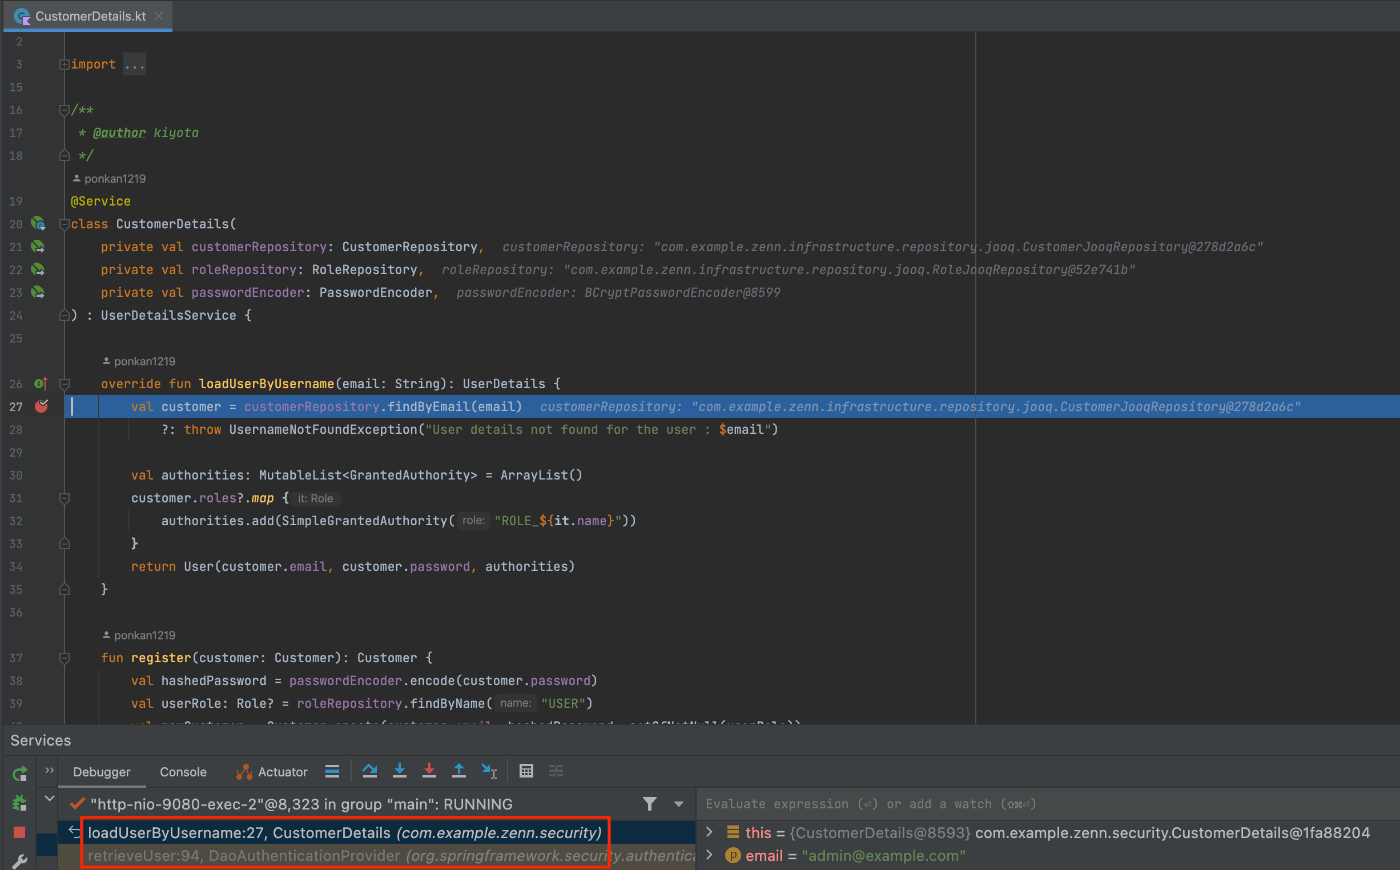
org/springframework/security/authentication/dao/DaoAuthenticationProvider.java で UserDetailsService を呼び出す際に、
実装として com/example/zenn/security/CustomerDetails.kt の loadUsersByUsername が呼ばれている事がわかります。
つまりは以下の点が検証できたわけです。
ポイントとしては、③の
UserDetailsServiceの実装を差し替えることで、ユーザの取得先(取得方法)を変更できるということです。
もしくは、
UserDetailsServiceinterface を自身で実装し、それをDIコンテナに登録することでユーザの取得の処理をカスタマイズできます。
ユーザの新規作成
ユーザーの新規追加、 role の付与も branch persist-to-DB にて追加しています。
新規追加時には、 DIコンテナから BCryptPasswordEncoder を引っ張ってきて、
リクエストのあったパスワードを hash 化し、
USER をいう初期設定用の role を付与してユーザをインスタンス化して DB に保存しています。
    fun register(customer: Customer): Customer {
        val hashedPassword = passwordEncoder.encode(customer.password)
        val userRole: Role? = roleRepository.findByName("USER")
        val newCustomer = Customer.create(customer.email, hashedPassword, setOfNotNull(userRole))
        return customerRepository.save(newCustomer)
    }
おわりに
Spring Security の認証時に使用するユーザを RDB に永続化する方法を確認しました。
UserDetailsService の実装を差し替えることで、
ユーザの取得先(取得方法)を変更できる柔軟性の高さにより、要件に合わせたカスタマイズができますね。
次回は、独自の処理を差し込む Filter を追加する方法と、
認可についても言及できればと思います。
また、認証後は JWT(Json Web Token) を使用して認可の判定ができるようにシステムを作る方法も見ていきます。
つづき
Discussion