CI/CD入門(Next.js, GitHub Actions)
はじめに
CI/CDとGitHub Actionsについては、触ったことはあるが理解はしていないという状態でした。
昨今は業務上でフロントエンドエンジニアが記述することも多いという記事を見ましたので1から勉強するために本記事の作成に至りました。
CI/CDとは
CIとは
CIはContinuous Integrationの略で、継続的インテグレーションと呼ばれています。
コミットやマージに対して、自動的にテストやビルドを実行するソフトウェア開発の手法です。
CDとは
CDはContinuous Delivery/Continuous Deploymentの略で、継続的デリバリー/継続的デプロイメントと呼ばれています。
継続的デリバリーとはリリースの準備までを自動で行い、デプロイは手動で行う手法です。
継続的デプロイメントは本番環境へのデプロイまでを自動で行う手法です。
継続的デリバリーと継続的デプロイメントのいずれを選択するかは、そのアプリケーションの性質や開発チームの方針によって異なります。
CI/CDのメリット
- 小さいサイクルでCI/CDを回すことでバグを早期発見することができます。
- テストとデプロイを自動で行うことで人為的なミスが減少し、コア業務に集中できます。
GitHub Actionsとは
GitHubのリポジトリにCI/CDの機能を作成することが可能な、GitHubの一環として提供されるサービスです。
プロジェクトのセットアップ
プロジェクトを作成します。
npx create-next-app@latest

簡易的なCIの作成
CIの実装と実行
GitHubにmainリポジトリを作成し、Actionsのset up a workflow yourselfを選択します。

GitHubよりrepository/.github/workflows/hello.ymlを作成します。
CIはworkflows直下に作成する必要があります。
name: hello

on:
  push:
    branches: [main]

jobs:
  ci:
    runs-on: ubuntu-latest
    steps:
      - run: echo 'Hello'
commit changesを選択します。

Actionsを見てみます。

Create hello.ymlを選択します。

ciを選択するとhello.ymlが正常に実行されていることがわかります。

テストとしてtest ci hello.ymlという名前で空コミットを作成し、プッシュしてみます。
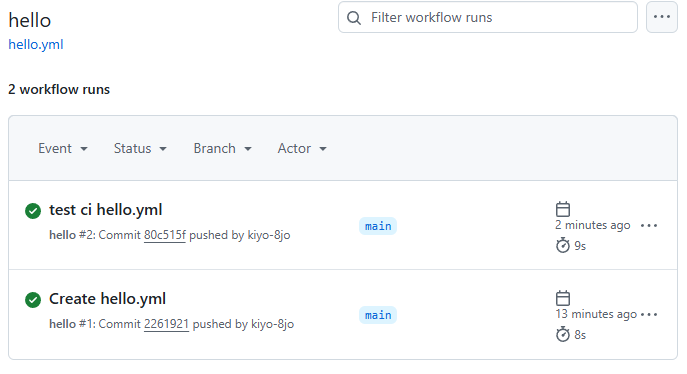
test ci hello.ymlを選択すると、正常に実行されていることがわかります。

CIのコードを見てみる
先ほど作成したhello.ymlを見てみます。
name: hello

on:
  push:
    branches: [main]

jobs:
  ci:
    runs-on: ubuntu-latest
    steps:
      - run: echo 'Hello'
-
name:はワークフローの名前を定義しています。
GitHubのActionsタブにも表示されます。 -
on:はワークフローが実行されるためのトリガーを定義しています。
今回は、mainブランチへのコードのプッシュです。
先ほど空コミットのプッシュに実行されたのはこの設定が理由です。 -
jobs:は実行時の処理を定義しています。
今回はciという名前の処理を定義しています。
runs-on:はどのような仮想環境で処理するかを定義しています。
今回はubuntuの最新版を使用しています。
steps:は具体的な処理を定義しています。
今回はHelloと表示する処理です。
実践的なCI/CD構築
今回はmainブランチに更新があった場合に自動的にPrettierでコード成形、ESLintでコード修正を行い、自動的にVercelにデプロイするような構築を目指します。
ESLintのセットアップ
ESLintの設定を行います。
設定ファイルにて除外の対象ファイルを指定し、自動修正のために@typescript-eslint/consistent-type-imports、warningが機能しているか確認のためにno-consoleを設定します。
import { dirname } from "path";
import { fileURLToPath } from "url";
import { FlatCompat } from "@eslint/eslintrc";

const __filename = fileURLToPath(import.meta.url);
const __dirname = dirname(__filename);

const compat = new FlatCompat({
  baseDirectory: __dirname,
});

const eslintConfig = [
  ...compat.extends("next/core-web-vitals", "next/typescript"),
  {
    ignores: ["**/.next/**", "**/node_modules/**"],
  },
  {
    files: ["**/*.{js,mjs,cjs,ts,tsx}"],
    rules: {
      "@typescript-eslint/consistent-type-imports": [
        "error",
        { prefer: "type-imports" },
      ],
      "no-console": "warn",
    },
  },
];

export default eslintConfig;
package.jsonのスクリプトを変更します。
  "scripts": {
   ...
    "lint": "next lint && npx eslint . --ext .js,.jsx,.ts,.tsx,.mjs",
    "lint:fix": "next lint --fix && npx eslint . --ext .js,.jsx,.ts,.tsx,.mjs --fix"
  },
page.tsxを変更します。
import { FC } from "react";

const page: FC = () => {
  console.log('test')
  return (
    <div className="h-screen flex items-center justify-center">
      CI/CDを学んでいます
    </div>
  );
};

export default page;
consoleにwarningが、importにエラーが出ているのでESLintが正常に働いていることがわかります。

console文を消去し、自動修正を行います。
npm run lint:fix
自動修正が正常に働いていることがわかります。

Prettierのセットアップ
Prettierの設定を行います。
Prettier本体と自動修正確認用にTailwindCSSフォーマッターのパッケージをインストールします。
npm i -D prettier prettier-plugin-tailwindcss
Prettier設定ファイルを作成します。
/** @type {import('prettier').Config & import('prettier-plugin-tailwindcss').PluginOptions} */
const config = {
  plugins: ["prettier-plugin-tailwindcss"],
};

export default config;
package.jsonのスクリプトを変更します。
  "scripts": {
   ...
    "format": "prettier --check \"**/*.{ts,tsx,js,jsx,cjs,mjs,md,json,yml,yaml}\" --cache",
    "format:fix": "prettier --write \"**/*.{ts,tsx,js,jsx,cjs,mjs,md,json,yml,yaml}\" --cache"
  },
自動修正を行います。
npm run format:fix
自動修正が正常に働いていることがわかります。


CIの作成
先ほどはGitHub上でCIを作成しましたが、今回はコードエディター上で行います。
エディター上の.github/workflowsディレクトリに先ほど作成したhello.ymlがあるので削除し、ci.ymlを作成します。GitHub上にあるhello.ymlは削除しておきます。
自動formatの実行コード
name: ci

on:
  push:
    branches: [main]

jobs:
  format:
    runs-on: ubuntu-latest
    strategy:
      matrix:
        node-version: ["20.x"]
    permissions:
      contents: write

    steps:
      #リポジトリのソースを持ってくる
      - uses: actions/checkout@v4
        with:
          ref: ${{ github.head_ref}}
          token: ${{secrets.WORKFLOW_TOKEN}}
        #node.jsを使えるようにする
      - name: Use Node.js ${{ matrix.node-version}}
        uses: actions/setup-node@v4
        with:
          node-version: ${{ matrix.node-version}}
        #依存関係のインストール
      - name: Install dependencies
        run: npm ci
        #フォーマット修正
      - run: npm run format:fix
        #修正したコードを再コミット
      - uses: stefanzweifel/git-auto-commit-action@v5
各コードが何を行っているかはコメントアウトを参照してください。
GitHubActionsの設定を行います。
Developer Setting > Personal Access Tokens > Fine-grained tokens > Generate new token よりトークンを取得します。
リポジトリに戻り Setting > Security > Secrets and variables > Actions > New repository secret にWORKFLOW_TOKENという名前で先ほど取得したトークンを設定します。
参考にさせていただきました
プッシュしてci.ymlが正常に動作していることを確認します。

自動コミットを見ると自動フォーマットが行われていることがわかります。

コードエディタでpullしてフォーマットされた状態にしておきます。
ESLint自動修正の実行コード
ci.ymlに追記します。
name: ci

on:
  push:
    branches: [main]

jobs:
-  format:
+  auto-fix:
    runs-on: ubuntu-latest
    strategy:
      matrix:
        node-version: ["20.x"]
    permissions:
      contents: write

    steps:
      #リポジトリのソースを持ってくる
      - uses: actions/checkout@v4
        with:
          ref: ${{ github.head_ref}}
          token: ${{secrets.WORKFLOW_TOKEN}}
        #node.jsを使えるようにする
      - name: Use Node.js ${{ matrix.node-version}}
        uses: actions/setup-node@v4
        with:
          node-version: ${{ matrix.node-version}}
        #依存関係のインストール
      - name: Install dependencies
        run: npm ci
        #フォーマット修正
      - run: npm run format:fix
+       #lint修正
+     - run: npm run lint:fix
        #修正したコードを再コミット
      - uses: stefanzweifel/git-auto-commit-action@v5
ESLintで構文エラーを起こしたいのでpage.tsxを編集します。
import { FC } from "react";

const page: FC = () => {
  return (
    <div className="flex h-screen items-center justify-center">
      CI/CDを学んでいます
    </div>
  );
};

export default page;

プッシュしてci.ymlが正常に動作していることを確認します。

自動コミットを見ると自動修正が行われていることがわかります。
コードエディタでpullして自動修正された状態にしておきます。
CDの実装
GitHub Actionsを使用してVercelへの自動デプロイを実装します。
Vercelとは
Nest.jsを開発しているVercel社が運営しているサービスです。
VercelはGitHubとリポジトリを連携することでプッシュすることで自動的にデプロイすることができます。より細かくデプロイのタイミングを操作したい場合は GitHub Actions のワークフロー上で Vercel CLI を利用できます。
Vercelのセットアップ
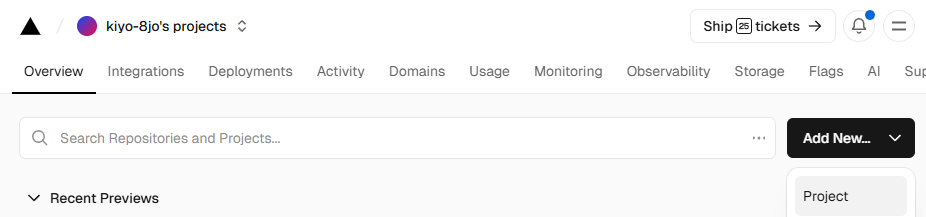
Vercelにログインしてadd New > Projectよりプロジェクトを作成します。
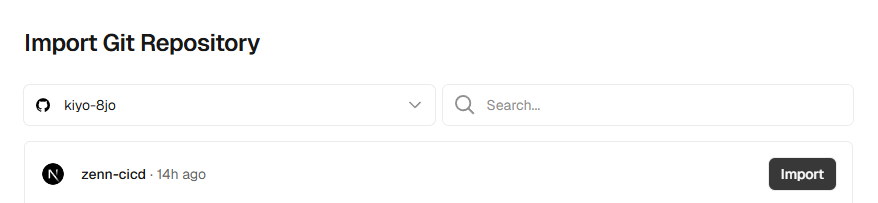
インポートするGitHubリポジトリのImportを選択します。
デプロイします。

デプロイされたことが確認できます。

GitHub Actionsの作成
.github/workflows/vercel-deploy.ymlを作成します。
name: Vercel Production Deployment
env:
  VERCEL_ORG_ID: ${{ secrets.VERCEL_ORG_ID }}
  VERCEL_PROJECT_ID: ${{ secrets.VERCEL_PROJECT_ID }}
on:
  push:
    branches:
      - main
jobs:
  Deploy-Production:
    runs-on: ubuntu-latest
    steps:
      - uses: actions/checkout@v2
      - name: Install Vercel CLI
        run: npm install --global vercel@latest
      - name: Pull Vercel Environment Information
        run: vercel pull --yes --environment=production --token=${{ secrets.VERCEL_TOKEN }}
      - name: Build Project Artifacts
        run: vercel build --prod --token=${{ secrets.VERCEL_TOKEN }}
      - name: Deploy Project Artifacts to Vercel
        run: vercel deploy --prebuilt --prod --token=${{ secrets.VERCEL_TOKEN }}
コードについては公式の記事を参照してください。
GitHub Actionsの環境変数を設定
GitHub Actionsで使用する環境変数を設定します。
VERCEL_ORG_ID
vercel > Settings > Team IDを控えておきます。
VERCEL_ORG_ID
vercel > project > Settings > Project IDを控えておきます。
VERCEL_TOKEN
vercel > アイコンを選択 > Account Settings > Tokes > Create
GitHub Actionsの設定
GitHub Actions で利用する Secrets を設定します。
GitHub Actions > Setting > Security > Secrets and variables > Actions
にVERCEL_ORG_ID、VERCEL_ORG_ID、VERCEL_TOKENを登録します。
Vercel と GitHub の連携を解除
現在Vercelにリポジトリが連携されているので、プッシュするとGitHub Actionsに関係なくVercelに自動デプロイされます。
連携を解除します。
vercel > project > Settings > Git > Disconnect > Continue
動作確認
自動デプロイが正常に動作するかテストします。
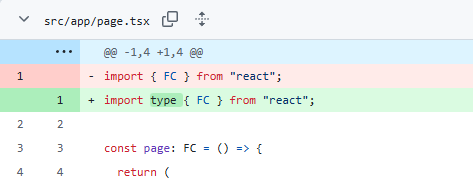
TailwindCSSの自動フォーマットが働くようにpage.tsxを編集します。
import type { FC } from "react";

const page: FC = () => {
  return (
    <div className="h-screen flex  items-center justify-center">
      CI/CDを学んでいます
    </div>
  );
};

export default page;
プッシュしてGitHubを確認すると自動フォーマットが働いていることがわかります。

Vercelを確認すると自動デプロイが働いていることがわかります。

まとめ
今回はCI/CDについて勉強し、プッシュ時に自動的にフォーマッタとLintの修正が働き、Vercelに自動デプロイすることができるような構築を行いました。
Next.jsのコードを書くことだけでなく、プロジェクトの環境を構築できるエンジニアになるためのステップを踏むことができたと思います。
参考文献
Discussion