PowerShellでOPC UAクライアントを作る
はじめに
本記事は、主にPLC(Programmable Logic Controller)向けのソフトウェア開発に従事、または関心のある方で、Structured Text(ST)による開発に興味がある方向けです。OMRON社のSysmac Studioとコントローラ(NX1またはNX5)を使用します。また、PowerShellを使用します。
今回は、UA-.NETStandardを使用してPowerShellでOPC UAクライアント(以下、PwshOpcUaClient)を作成します。ConsoleReferenceClient(以下、リファレンス)の劣化版ですが、スクリプトを配置したディレクトリで完結、かつ、インスタントに使えるようにします。明確な要件と目的のあるOPC UAクライアントが必要な場合、UA-.NETStandardを使用するのであれば、ライセンスに注意して迷わずC#で実装しましょう。PowerShellを使用するのは軽量で改変が容易なツールを作成するためです。
UA-.NETStandardは、OPC Foundationが公式に提供する.NET Standard向けのOPC UAスタックとパッケージ化したライブラリを含む一連のプロジェクト群です。今回はパッケージを使用します。パッケージは、nugetで公開されており、サンプルコードもパッケージを使用して構築されているので、ユーザーによって使用されることが意図されています。PwshOpcUaClientは、nugetで取得したアセンブリを直接使用します。これにより、ライブラリのクライアントを構築するだけで、PowerShellで使用可能なOPC UAクライアントが手に入ります。
OPC UAクライアントの構築手順は、リファレンスと大差ありませんが、構築手順を確認するために構成ファイルだけではなく手続き的にOPC UAクライアントを構築する関数も用意します。これにより、UA-.NETStandardでOPC UAクライアントを構築する流れの概要を確認することができ、使えそうなクラスや関数を探す起点とすることができます。
OPC UAクライアント処理の要点は、OPC UAサーバとセッションを確立することです。セッションを確立してしまえば、メッセージ交換に集中できます。最も出くわす問題である、つながらないという現象の原因は、セッション確立の段階で生じます。OPC UAが特徴の一つとしているセキュリティ機能に関連したものとしてです。そのような時に軽量で柔軟なツールは活きる可能性があります。豊富な診断機能を持つツールもあるとは思いますが、UA-.NETStandardのコードベースには別の利点があるように思われます。UA-.NETStandardが、広くOPC UAスタック開発で検証に使用されているのではないかということです。
PwshOpcUaClientの入手
PwshOpcUaClientの使用に必要なものは、以下にあります。
PowerShellは、あらかじめ使える状態にしてください。nugetは、不要です。アセンブリは、セットアップスクリプトがnuget含めダウンロードします。
構築環境
PwshOpcUaClientは、以下の環境で構築しています。UA-.NETStandardのバージョンは適時更新するので、現在のバージョンはsetup.ps1を確認します。
| 対象 | バージョン |
|---|---|
| PowerShell | 7 |
| OPCFoundation.NetStandard.Opc.Ua.Client | 1.5.376.244 |
| OPCFoundation.NetStandard.Opc.Ua.Client.ComplexTypes | 1.5.376.244 |
PwshOpcUaClientの構成
PwshOpcUaClientは、以下で構成します。
-
PwshOpcUaClient.ps1
PwshOpcUaClient本体です。
PowerShellセッションにロードして使用します。 -
LoadAssembly.ps1
アセンブリを現在のPowerShellセッションにロードします。
Add-Typeを実行します。.NETのバージョンに問題がある場合、スクリプトを修正して読み込むアセンブリを変更します。 -
setup.ps1
アセンブリの取得と配置をします。
Nuget.exeをダウンロードし、必要なアセンブリの取得と配置をします。簡素なスクリプトなので必要に応じて修正します。
PwshOpcUaClientは、これらが同一ディレクトリにあるとき正常に動作します。デフォルトクライアントが使用するパスもPwshOpcUAのディレクトリ下に配置します。また、UA-.NETStandardのアセンブリもPwshOpcUaClientのディレクトリ下に配置します。
PwshOpcUaClientのデフォルトクライアントのディレクトリ構造は以下です。
root
├── PwshOpcUaClient.ps1
├── LoadAssembly.ps1
├── setup.ps1
├── libs
├── logs
└── pki
    ├── issuer
    |   └── certs
    ├── userIssuer
    |   └── certs
    ├── trustedUser
    |   └── certs
    ├── httpsIssuer
    |   └── certs
    ├── trustedHttps
    |   └── certs
    ├── own
    |   ├── certs
    |   └── privates
    ├── rejected
    |   └── certs
    └── trusted
        └── certs
-
libs
UA-.NETStandardのアセンブリを配置します。
LoadAssembly.ps1は、Nugetで取得したディレクトリ構造に対して読み込み処理を実行します。 -
logs
ログを格納します。 -
pki/issuer/certs
発行者証明書を配置します。 -
pki/userIssuer/certs
追加のユーザー発行者証明書を配置します。 -
pki/trustedUser/certs
信頼するユーザーの証明書を配置します。 -
pki/httpsIssuer/certs
HTTPS接続時の追加の発行者証明書を配置します。 -
pki/trustedHttps/certs
HTTPS接続時に信頼する証明書を配置します。 -
pki/own/certs
クライアント証明書(.der)を配置します。
PwshOpcUaClientが生成した証明書もここに配置します。 -
pki/own/privates
クライアントが使用するPFXファイルを配置します。
PwshOpcUaClientが生成したPFXファイルもここに配置します。 -
pki/rejected/certs
拒否したサーバ証明書を格納します。 -
pki/trusted/certs
信頼する証明書を配置します。
これらの構造の詳細は、UA-.NETStandardに依存します。CRLは、各ストアのcrlという名称のサブディレクトリに配置するようです。WindowsではX509Storeをサポートしているので、必要であれば使用できます。詳細はドキュメントを確認してください。
PwshOpcUaClientの使用手順
PwshOpcUaClientは、以下の手順で使用します。
- 適当なフォルダにPwshOpcUaClientの構成物を配置
setup.ps1を実行- PwshOpcUaClientを使用するスクリプトで
PwshOpcUaClient.ps1をドットソースで読み込む
PwshOpcUaClientが必要とする証明書とディレクトリは、UA-.NETStandardによって適時作成されます。使用する証明書を指定する場合、PwshOpcUaClient.ps1を証明書の内容に合わせて修正するか、構成ファイル(*.Config.xml)を配置し、PwshOpcUaClientを構成ファイルで構築します。構成ファイルについてのドキュメントは見当たらないのでサンプルコードやライブラリのコードを確認してください。
UA-.NETStandardのアセンブリには有効な署名がされていますが、実行できない場合、PowerShellの実行ポリシーを確認します。
サーバとのセッション確立時や、メッセージ交換に署名または、署名と暗号化を使用するとサーバ、クライアントそれぞれが証明書を拒否する可能性があります。いずれも拒否した証明書を信頼することで、次の接続から拒否しなくなります。証明書に問題が無ければ、以下の操作を行います。
-
PwshOpcUaClientがサーバ証明書を拒否したとき
サーバ証明書が意図したものであれば、pki/rejected/certsに格納されたサーバ証明書をpki/trusted/certsに移動します。 -
サーバがクライアント証明書を拒否したとき
サーバで拒否した証明書を信頼する手順があれば、それに従います。
クライアント証明書が必要であれば、pki/own/certs内の証明書を使用します。
PwshOpcUaClientの実装
PwshOpcUaClientは、UA-.NETStandardライブラリのクライアント機能を使用するだけなので、コンパクトです。インスタントな使用が前提のため、エラー復帰や再接続といった処理は行いません。必要なことがあれば、PowerShellのコンテクストであることを活用します。また、UA-.NETStandardに対してツールとして機能的にラップすることもありません。UA-.NETStandardが考えるOPC UAのコンテクストで直に操作します。
using namespace Opc.Ua
using namespace Opc.Ua.Client
using namespace Opc.Ua.Client.ComplexTypes
using namespace Opc.Ua.Configuration
. "$PSScriptRoot\LoadAssembly.ps1"

function New-DefaultPwshOpcUaClientApplication {
    # Create application certificates.
    $applicationCertificates = New-Object CertificateIdentifierCollection
    foreach($alg in @('RsaSha256', 'NistP256', 'NistP384', 'BrainpoolP256r1')) {
        $applicationCertificates.Add((New-Object CertificateIdentifier -Property @{
            StoreType = 'Directory'
            StorePath = "$PSScriptRoot/pki/own"
            SubjectName = 'CN=Pwsh Opc Ua Client, C=JP, S=Tokyo, O=ST freak, DC=localhost'
            CertificateTypeString = $alg
        }))
    }

    $certificatePasswordProvider = New-Object CertificatePasswordProvider -ArgumentList ''
    $securityConfiguration = New-Object SecurityConfiguration -Property @{
        ApplicationCertificates = $applicationCertificates
        CertificatePasswordProvider = $certificatePasswordProvider
        AutoAcceptUntrustedCertificates = $true
        TrustedPeerCertificates = New-Object CertificateTrustList -Property @{
            StoreType = 'Directory'
            StorePath = "$PSScriptRoot/pki/trusted"
        }
        TrustedIssuerCertificates = New-Object CertificateTrustList -Property @{
            StoreType = 'Directory'
            StorePath = "$PSScriptRoot/pki/issuer"
        }
        RejectedCertificateStore = New-Object CertificateStoreIdentifier -Property @{
            StoreType = 'Directory'
            StorePath = "$PSScriptRoot/pki/rejected"
        }
        UserIssuerCertificates = New-Object CertificateTrustList -Property @{
            StoreType = 'Directory'
            StorePath = "$PSScriptRoot/pki/userIssuer"
        }
        TrustedUserCertificates = New-Object CertificateTrustList -Property @{
            StoreType = 'Directory'
            StorePath = "$PSScriptRoot/pki/trustedUser"
        }
        HttpsIssuerCertificates = New-Object CertificateTrustList -Property @{
            StoreType = 'Directory'
            StorePath = "$PSScriptRoot/pki/httpsIssuer"
        }
        TrustedHttpsCertificates = New-Object CertificateTrustList -Property @{
            StoreType = 'Directory'
            StorePath = "$PSScriptRoot/pki/trustedHttps"
        }
    }

    $wellKnownDiscoveryUrls = New-Object StringCollection -ArgumentList 1
    $wellknownDiscoveryUrls.Add('opc.tcp://localhost:4840')
    $clientConfiguration = New-Object ClientConfiguration -Property @{
        # DefaultSessionTimeout = 60000
        # MinSubscriptionLifeTime = 10000
        OperationLimits = New-Object OperationLimits -Property @{
            MaxNodesPerRead = 2500;
            MaxNodesPerHistoryReadData = 1000;
            MaxNodesPerHistoryReadEvents = 1000;
            MaxNodesPerWrite = 2500;
            MaxNodesPerHistoryUpdateData = 1000;
            MaxNodesPerHistoryUpdateEvents = 1000;
            MaxNodesPerMethodCall = 2500;
            MaxNodesPerBrowse = 2500;
            MaxNodesPerRegisterNodes = 2500;
            MaxNodesPerTranslateBrowsePathsToNodeIds = 2500;
            MaxNodesPerNodeManagement = 2500;
            MaxMonitoredItemsPerCall = 2500;
        }
        WellKnownDiscoveryUrls = $wellKnownDiscoveryUrls
    }

    $applicationName = 'Pwsh Opc Ua Client'
    $appConfiguration = New-Object ApplicationConfiguration -Property @{
        ApplicationName = $applicationName
        ApplicationUri = 'urn:localhost:OpcUaClientTools:PwshOpcUaClient'
        ApplicationType = [ApplicationType]::Client
        ProductUri = 'uri:stfreak.jp:OpcUaClientTools:PwshOpcUaClient'
        SecurityConfiguration = $securityConfiguration
        ClientConfiguration = $clientConfiguration
        TransportQuotas = New-Object TransportQuotas -Property @{
            # encoding limits
            MaxMessageSize = 4194304 #NX1:61440 (60KB) (SBCD-374, 1-6)
            MaxStringLength = 4194304 #NX1:1986
            MaxByteStringLength = 4194304
            MaxArrayLength = 65535 #NX1:~10000? 65535 is not allowed.
            # MaxEncodingNestingLevels
            # MaxDecoderRecoveries

            # message limits
            MaxBufferSize = 65535
            OperationTimeout = 120000
            ChannelLifetime = 300000
            SecurityTokenLifetime = 3600000
        }

        TraceConfiguration = New-Object TraceConfiguration -Property @{
            OutputFilePath = "$PSScriptRoot\logs\OpcUaClientTools.PwshOpcUaClient.log.txt"
            DeleteOnLoad = $false
            TraceMasks = 519
        }
    }
    $appConfiguration.validate([ApplicationType]::Client).ConfigureAwait($false).GetAwaiter().GetResult()
        | Out-Null
    $appConfiguration.TraceConfiguration.ApplySettings()
        | Out-Null

    New-Object ApplicationInstance -Property @{
        ApplicationName = $applicationName
        ApplicationType = [ApplicationType]::Client
        ApplicationConfiguration = $appConfiguration
        ConfigSectionName = 'PwshOpcUaClient'
        CertificatePasswordProvider = $certificatePasswordProvider
    }
}

function New-PwshOpcUaClientApplication {
    param(
        [string]$ConfigFilePath = $null
    )

    if ([String]::IsNullOrEmpty($ConfigFilePath)) {
        return (New-DefaultPwshOpcUaClientApplication)
    }
    $passwordProvider = New-Object CertificatePasswordProvider -ArgumentList ''
    $application = New-Object ApplicationInstance -Property @{
        ApplicationName = 'Pwsh Opc Ua Client'
        ApplicationType = [ApplicationType]::Client
        ConfigSectionName = 'PwshOpcUaClient'
        CertificatePasswordProvider = $passwordProvider
    }

    $application.LoadApplicationConfiguration($ConfigFilePath, $true).ConfigureAwait($false).GetAwaiter().GetResult()
        | Out-Null
    $application
}

function New-PwshOpcUaClientCert {
    param(
        [ApplicationInstance]$Application
    )

    $ok = $Application.DeleteApplicationInstanceCertificate().GetAwaiter().GetResult()
    $ok -and $Application.CheckApplicationInstanceCertificates($true).GetAwaiter().GetResult()
}

function New-PwshOpcUaClient {
    param(
        [string]$ServerUrl = 'opc.tcp://localhost:4840',
        [UserIdentity]$AccessUserIdentity = $null,
        [bool]$UseSecurity = $true,
        [int]$SessionLifeTime = 60000,
        [string]$ConfigFilePath = $null
    )

    $application = New-PwshOpcUaClientApplication -ConfigFilePath $ConfigFilePath
    $application.CheckApplicationInstanceCertificates($true).ConfigureAwait($false).GetAwaiter().GetResult()
        | Out-Null
    $endpointDescription = [CoreClientUtils]::SelectEndpoint($application.ApplicationConfiguration, $ServerUrl, $UseSecurity)
    $endpointConfiguration = [EndpointConfiguration]::Create($application.ApplicationConfiguration)
    $endpoint = New-Object ConfiguredEndpoint -ArgumentList $null, $endpointDescription, $endpointConfiguration

    # if null then Anonymous
    $AccessUserIdentity ??= New-Object UserIdentity

    $session = [TraceableSessionFactory]::Instance.CreateAsync(
        $application.ApplicationConfiguration,
        $endpoint,
        $false,
        $application.ApplicationConfiguration.ApplicationName,
        $SessionLifeTime,
        $AccessUserIdentity,
        $null
    ).ConfigureAwait($false).GetAwaiter().GetResult()

    $complexTypeSystem = New-Object ComplexTypeSystem -ArgumentList $session
    $complexTypeSystem.Load().ConfigureAwait($false).GetAwaiter().GetResult()
        | Out-Null

    @{
        Application = $application
        Endpoint = $endpoint
        Session = $session
        ComplexTypeSystem = $complexTypeSystem
    }
}

function Dispose-PwsOpcUaClient {
    param(
        [hashtable]$Client
    )

    if ($null -eq $Client -or $null -eq $Client.Session) {
        return
    }

    [void]$Client.Session.Close()
    [void]$Client.Session.Dispose()
    $Client.Session = $null
    $Client.Application = $null
    $Client.Endpoint = $null
    $Client.ComplexTypeSystem = $null
}
OPC UAクライアント構築の流れ
PwshOpcUaClient.ps1を元にUA-.NETStandardのクライアント構築の流れを確認します。確認する関数は、New-DefaultPwshOpcUaClientApplicationとNew-PwshOpcUaClientです。以下に手続きと構成ファイルによるOPC UAクライアント構築の流れを示します。確認するのは手続きによるOPC UAクライアント構築の流れです。
手続きによるOPC UAクライアント構築の流れ
- ApplicationConfigurationの作成
- ApplicationInstanceの作成
- サーバからエンドポイントを取得
- Sessionの作成
- ComplexTypeSystemの作成
構成ファイルによるクライアント構築の流れ
- ApplicationInstanceの作成
- ApplicationConfigurationの取得
- サーバからエンドポイントを取得
- Sessionの作成
- ComplexTypeSystemの作成
構成ファイルからクライアントを構築する場合、構成ファイルのロード処理内で合わせてApplicationConfigurationの構成が行われます。
1. ApplicationConfigurationの作成
ApplicationConfigurationは、クライアントの構成と設定を取りまとめる重要なクラスです。このオブジェクトを適切に構成することでライブラリが仕事をできるようになります。ApplicationConfigurationの作成は、クライアント構築で最も重要な手順です。
ApplicationConfigurationの作成手順は、以下です。
- CertificateIdentifier (アプリケーションの証明書)の作成
- SecurityConfigurationの作成
- ClientConfigurationの作成
- ApplicationConfigurationの生成
- ApplicationConfigurationの検証
- トレースの有効化
内容はライブラリが必要とする情報を組み立てるだけですが、OPC UAクライアントを使用する場合にユーザーが気にかける必要があることを一通り確認することになります。
1.1 CertificateIdentifier (アプリケーションの証明書)の作成
まず、クライアントを使用するアプリケーションの証明書を定義します。証明書の内容は、メッセージ交換を署名または、署名と暗号化も使用して行うのであれば、正確に指定します。証明書が無い場合、デフォルトではOPC UAクライアント構築過程で自己署名証明書をStorePathで指定したパスに作成します。デフォルトの証明書の期限は1年です。
    # Create application certificates.
    $applicationCertificates = New-Object CertificateIdentifierCollection
    foreach($alg in @('RsaSha256', 'NistP256', 'NistP384', 'BrainpoolP256r1')) {
        $applicationCertificates.Add((New-Object CertificateIdentifier -Property @{
            StoreType = 'Directory'
            StorePath = "$PSScriptRoot/pki/own"
            SubjectName = 'CN=Pwsh Opc Ua Client, C=JP, S=Tokyo, O=ST freak, DC=localhost'
            CertificateTypeString = $alg
        }))
    }
1.2 SecurityConfigurationの作成
SecurityConfigurationは、セキュリティ関連の構成を取りまとめまとめるクラスです。セッション確立時に拒否した証明書は、ここで指定したパスに保存されるため有効あるいは、ライブラリが有効にすることが可能なパスを指定します。また、OPC UAクライアントはデフォルトで信頼していない証明書を拒否しますが、AutoAcceptUntrustedCertificatesをtrueにすることで自動で信頼リストに追加するようになります。
    $certificatePasswordProvider = New-Object CertificatePasswordProvider -ArgumentList ''
    $securityConfiguration = New-Object SecurityConfiguration -Property @{
        ApplicationCertificates = $applicationCertificates
        CertificatePasswordProvider = $certificatePasswordProvider
        AutoAcceptUntrustedCertificates = $true
        TrustedPeerCertificates = New-Object CertificateTrustList -Property @{
            StoreType = 'Directory'
            StorePath = "$PSScriptRoot/pki/trusted"
        }
        TrustedIssuerCertificates = New-Object CertificateTrustList -Property @{
            StoreType = 'Directory'
            StorePath = "$PSScriptRoot/pki/issuer"
        }
        RejectedCertificateStore = New-Object CertificateStoreIdentifier -Property @{
            StoreType = 'Directory'
            StorePath = "$PSScriptRoot/pki/rejected"
        }
        UserIssuerCertificates = New-Object CertificateTrustList -Property @{
            StoreType = 'Directory'
            StorePath = "$PSScriptRoot/pki/userIssuer"
        }
        TrustedUserCertificates = New-Object CertificateTrustList -Property @{
            StoreType = 'Directory'
            StorePath = "$PSScriptRoot/pki/trustedUser"
        }
        HttpsIssuerCertificates = New-Object CertificateTrustList -Property @{
            StoreType = 'Directory'
            StorePath = "$PSScriptRoot/pki/httpsIssuer"
        }
        TrustedHttpsCertificates = New-Object CertificateTrustList -Property @{
            StoreType = 'Directory'
            StorePath = "$PSScriptRoot/pki/trustedHttps"
        }
    }
1.3 ClientConfigurationの作成
ClientConfigurationは、OPC UAクライアントの振る舞いを定義します。サーバの制約が明らかである場合、設定を合わせると意図しない例外を避けることができます。
    $wellKnownDiscoveryUrls = New-Object StringCollection -ArgumentList 1
    $wellknownDiscoveryUrls.Add('opc.tcp://localhost:4840')
    $clientConfiguration = New-Object ClientConfiguration -Property @{
        # DefaultSessionTimeout = 60000
        # MinSubscriptionLifeTime = 10000
        OperationLimits = New-Object OperationLimits -Property @{
            MaxNodesPerRead = 2500;
            MaxNodesPerHistoryReadData = 1000;
            MaxNodesPerHistoryReadEvents = 1000;
            MaxNodesPerWrite = 2500;
            MaxNodesPerHistoryUpdateData = 1000;
            MaxNodesPerHistoryUpdateEvents = 1000;
            MaxNodesPerMethodCall = 2500;
            MaxNodesPerBrowse = 2500;
            MaxNodesPerRegisterNodes = 2500;
            MaxNodesPerTranslateBrowsePathsToNodeIds = 2500;
            MaxNodesPerNodeManagement = 2500;
            MaxMonitoredItemsPerCall = 2500;
        }
        WellKnownDiscoveryUrls = $wellKnownDiscoveryUrls
    }
1.4 ApplicationConfigurationの生成
ApplicationConfigurationの生成に必要なオブジェクトが揃ったら、ApplicationConfigurationを生成します。TransportQuotasは、サーバの制約に合わせることで意図しない例外を避けることができます。TraceConfigurationはロギングの構成です。
    $applicationName = 'Pwsh Opc Ua Client'
    $appConfiguration = New-Object ApplicationConfiguration -Property @{
        ApplicationName = $applicationName
        ApplicationUri = 'urn:localhost:OpcUaClientTools:PwshOpcUaClient'
        ApplicationType = [ApplicationType]::Client
        ProductUri = 'uri:stfreak.jp:OpcUaClientTools:PwshOpcUaClient'
        SecurityConfiguration = $securityConfiguration
        ClientConfiguration = $clientConfiguration
        TransportQuotas = New-Object TransportQuotas -Property @{
            # encoding limits
            MaxMessageSize = 4194304 #NX1:61440 (60KB) (SBCD-374, 1-6)
            MaxStringLength = 4194304 #NX1:1986
            MaxByteStringLength = 4194304
            MaxArrayLength = 65535 #NX1:~10000? 65535 is not allowed.
            # MaxEncodingNestingLevels
            # MaxDecoderRecoveries

            # message limits
            MaxBufferSize = 65535
            OperationTimeout = 120000
            ChannelLifetime = 300000
            SecurityTokenLifetime = 3600000
        }
        TraceConfiguration = New-Object TraceConfiguration -Property @{
            OutputFilePath = "$PSScriptRoot\logs\OpcUaClientTools.PwshOpcUaClient.log.txt"
            DeleteOnLoad = $false
            TraceMasks = 519
        }
    }
1.5 ApplicationConfigurationの検証
ApplicationConfigurationを生成したら、検証を行います。検証メソッド(validate)は、OPC UAクライアント構築に必要なApplicationConfigurationの構成処理を含んでいるので必ず実行します。
$appConfiguration.validate([ApplicationType]::Client).ConfigureAwait($false).GetAwaiter().GetResult()
        | Out-Null
1.6 トレースの有効化
トレースを有効化してログを生成するようにします。トレーサーは独自に定義することもできるようですが、リファレンスにあるようにSerilogのようなロギングライブラリを使用することを意図しているようです。
    $appConfiguration.TraceConfiguration.ApplySettings()
        | Out-Null
2. ApplicationInstanceの作成
ApplicationConfigurationを作成したら、ApplicationInstanceを生成します。
    New-Object ApplicationInstance -Property @{
        ApplicationName = $applicationName
        ApplicationType = [ApplicationType]::Client
        ApplicationConfiguration = $appConfiguration
        ConfigSectionName = 'PwshOpcUaClient'
        CertificatePasswordProvider = $certificatePasswordProvider
    }
ApplicationInstanceを生成したら、CheckApplicationInstanceCertificatesメソッドを呼び出します。アプリケーションの証明書が無い場合、このメソッド内で作成されます。
$application.CheckApplicationInstanceCertificates($true).ConfigureAwait($false).GetAwaiter().GetResult()
    | Out-Null
3. サーバからエンドポイントを取得
ApplicationInstanceの作成に成功すれば、サーバとセッションを確立する準備は出来ています。次は、サーバとどのようなセッションを確立するか決定していきます。セッションは、サーバが公開するエンドポイントとそのエンドポイントに対するクライアントの構成から作成します。サーバが公開するエンドポイントを手続き的に作成することも不可能ではないのですが、サーバが設定する値を含むため結局は、サーバから情報を取得することになります。
CoreClientUtilsクラスにはApplicationConfigurationに従ってサーバから情報を取得して適当なエンドポイントを決定する静的メソッドがあるので、これを使用します。適当なとはセキュリティ強度のことを指します。ApplicationConfigurationの構成で使用可能な署名方式とサーバが使用可能としている方式のうち最もセキュリティ強度が高いと評価する署名方式を選択するようです。この選択は、署名方式だけではなく、メッセージ交換が署名のみか署名と暗号化を行うかを含め評価しているようです。
[CoreClientUtils]::SelectEndpointメソッドを呼び出してエンドポイントを取得します。同メソッドは、UA-.NETStandardのエンドポイント表現であるEndpointDescriptionを返します。$UseSecurityに$falseを指定すると署名も暗号化も使用しないエンドポイントを選択します。
$endpointDescription = [CoreClientUtils]::SelectEndpoint($application.ApplicationConfiguration, $ServerUrl, $UseSecurity)
EndpointDescriptionを取得したら、EndpointConfigurationと組み合わせてConfiguredEndpointを生成します。
    $endpointConfiguration = [EndpointConfiguration]::Create($application.ApplicationConfiguration)
    $endpoint = New-Object ConfiguredEndpoint -ArgumentList $null, $endpointDescription, $endpointConfiguration
4. Sessionの作成
ConfiguredEndpointを生成したら、いよいよSessionの作成です。接続に使用するUserIdentityを生成し、ファクトリ(TraceableSessionFactory)でSessionを作成します。ユーザー名とパスワードを使用する場合、それらを指定してUserIdentityを生成します。
    # if null then Anonymous
    $AccessUserIdentity ??= New-Object UserIdentity

    $session = [TraceableSessionFactory]::Instance.CreateAsync(
        $application.ApplicationConfiguration,
        $endpoint,
        $false,
        $application.ApplicationConfiguration.ApplicationName,
        $SessionLifeTime,
        $AccessUserIdentity,
        $null
    ).ConfigureAwait($false).GetAwaiter().GetResult()
5. ComplexTypeSystemの作成
Sessionを作成したら、ComplexTypeSystemを作成します。ComplexTypeSystemは"Complex Data Type"(いわゆる複合型)を扱うための機能です。ComplexTypeSystemを作成することで複合型を扱いやすくなります。例えば、複合型ノードの読み書きを複合型と同じプロパティを持つオブジェクトの読み書きとして操作できるようになります。
Sessionを引数にComplexTypeSystemを生成し、Loadメソッドを呼び出します。コンストラクタの引数として渡したSessionを使用し、サーバからデータ型情報を取得して内部構成を行います。これ以降、Sessionを介したノードの読み書きで複合型はオブジェクトとして扱えるようになります。どのような型として扱えるかは、取得したノード値のGetTypeメソッドやGet-Memberコマンドレットに渡すことで確認できます。
    $complexTypeSystem = New-Object ComplexTypeSystem -ArgumentList $session
    $complexTypeSystem.Load().ConfigureAwait($false).GetAwaiter().GetResult()
        | Out-Null
ここまでで、一般的なOPC UAサーバの使用に必要なセッションが確立したことになります。後は、必要なだけメッセージ交換を行います。
PwshOpcUaClientでOPC UAサーバに接続
PwshOpcUaClientを使用してOPC UAサーバに接続します。OPC UAサーバは、Sysmac Sutidoのシミュレータに付属のOPC UAサーバとコントローラ(NX102-9000, Ver.1.64)のOPC UAサーバを使用します。素朴な変数の読み書きなので、その他のOPC UAサーバでもセッションの確立に問題が無ければNodeIdを修正することで使用できます。
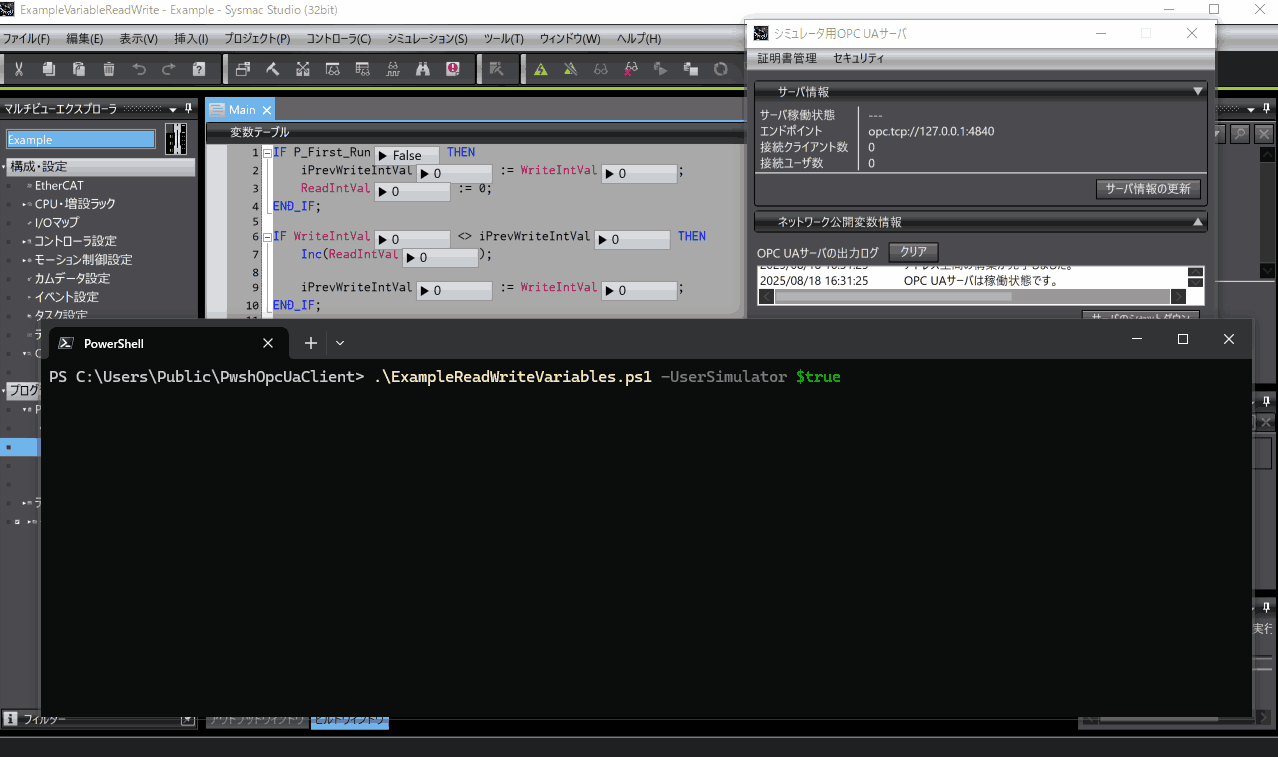
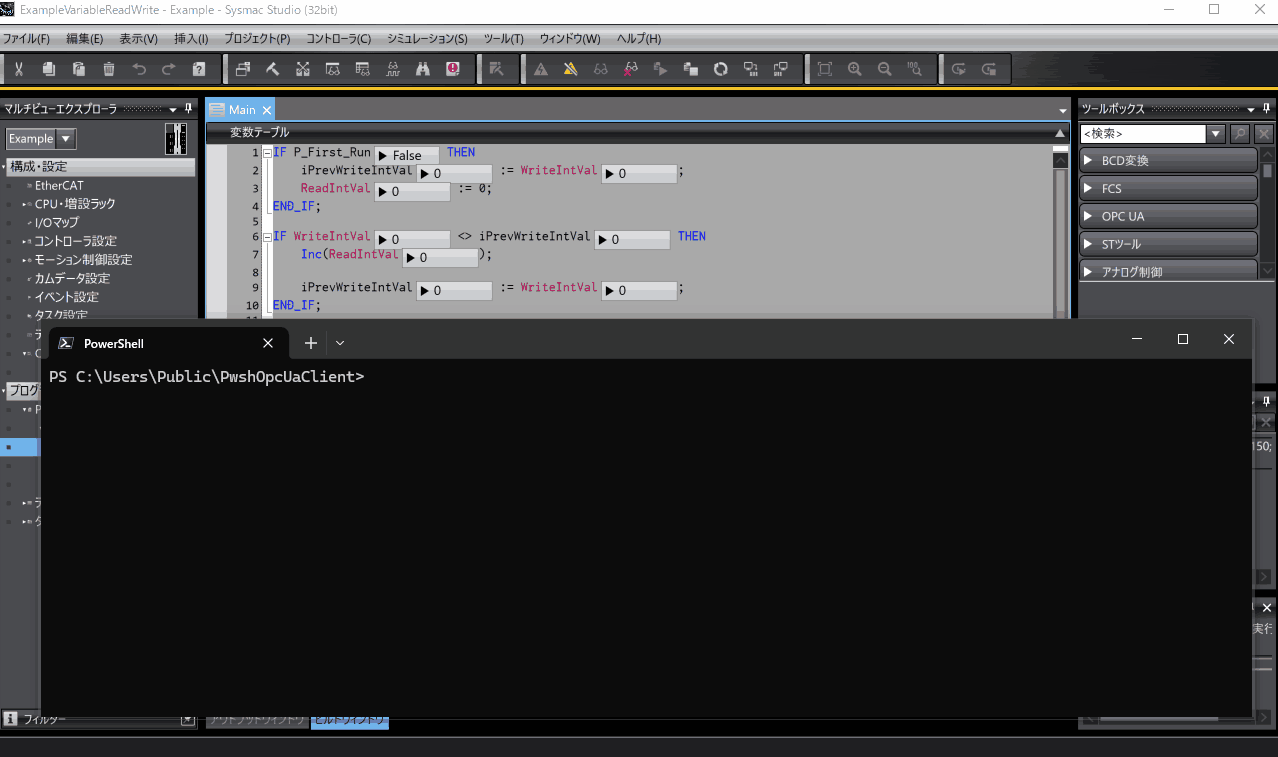
サーバは、OPC UAによる変数公開に加え以下のプログラムを動作させて値を変化させます。サーバとクライアント双方で素朴な変数読み書きを行うことを意図しています。
IF P_First_Run THEN
    iPrevWriteIntVal := WriteIntVal;
    ReadIntVal := 0;
END_IF;

IF WriteIntVal <> iPrevWriteIntVal THEN
    Inc(ReadIntVal);

    iPrevWriteIntVal := WriteIntVal;
END_IF;
PwshOpcUaClientを使用するPowerShellスクリプトは以下です。変数の読み書き処理と検証を繰り返します。
using namespace Opc.Ua
param(
    [bool]$UseSimulator = $true,
    [string]$ServerUrl = 'opc.tcp://localhost:4840',
    [bool]$UseSecurity = $true,
    [string]$UserName = 'taker',
    [string]$UserPassword = 'chocolatepancakes',
    [double]$Interval = 0.05
)
. "$PSScriptRoot/../PwshOpcUaClient.ps1"

function Main () {
    try {
        $AccessUserIdentity = [string]::IsNullOrEmpty($UserName) `
                                ? (New-Object UserIdentity) `
                                : (New-Object UserIdentity -ArgumentList $UserName, $UserPassword)
        $clientParam = @{
            ServerUrl = $ServerUrl
            UseSecurity = $UseSecurity
            SessionLifeTime = 60000
            AccessUserIdentity = $AccessUserIdentity
        }
        $client = New-PwshOpcUaClient @clientParam

        # The namespace is different between the simulator and the controller.
        $ns = $UseSimulator ? '2' : '4';

        # Define write values.
        $writeValues = New-Object WriteValueCollection
        $writeValue = New-Object WriteValue
        $writeValue.NodeId = New-Object NodeId -ArgumentList "ns=$ns;s=WriteIntVal"
        $writeValue.AttributeId = [Attributes]::Value
        $writeValue.Value = New-Object DataValue
        $writeValues.Add($writeValue)

        # Define read values.
        $readValues = New-Object ReadValueIdCollection
        $readValue = New-Object ReadValueId -Property @{
            AttributeId = [Attributes]::Value
        }
        $readValue.NodeId = New-Object NodeId -ArgumentList "ns=$ns;s=ReadIntVal"
        $readValues.Add($readValue)

        $results = $null
        $diagnosticInfos = $Null
        $exception = $null
        [Int32]$counter = 0
        While ($true) {
            # Write $counter to `WriteIntVal` in the server.
            $_writeValues = $writeValues.Clone()
            $_writeValues[0].Value.Value = $counter

            $results = $null
            $diagnosticInfos = $null
            $response = $client.Session.Write(
                $null,
                $_writeValues,
                [ref]$results,
                [ref]$diagnosticInfos
            )
            if ($null -ne ($exception = ValidateResponse `
                                            $response `
                                            $results `
                                            $diagnosticInfos `
                                            $_writeValues `
                                            'Failed to write.')
            ) {
                throw $exception
            }

            # Read 'ReadIntVal' from the server.
            $results= New-Object DataValueCollection
            $diagnosticInfos = New-Object DiagnosticInfoCollection
            $response = $client.Session.Read(
                $null,
                [double]0,
                [TimestampsToReturn]::Both,
                $readValues,
                [ref]$results,
                [ref]$diagnosticInfos
            )
            if ($null -ne ($exception = ValidateResponse `
                                            $response `
                                            $results `
                                            $diagnosticInfos `
                                            $readValues `
                                            'Failed to read.')
            ) {
                throw $exception
            }

            "counter=$counter, ReadIntVal=$($results[0].Value)"
                | Write-Host

            ++$counter
            if ($counter -gt 1000) { break }
            Start-Sleep -Seconds $Interval
        }
    }
    catch {
        $_.Exception
    }
    finally {
        Dispose-PwsOpcUaClient -Client $client
    }
}

class OpcUaFetchException : System.Exception {
    [hashtable]$CallInfo
    OpcUaFetchException([string]$Message,
                        [hashtable]$CallInfo) : base($Message)
    {
        $this.CallInfo = $CallInfo
    }
}

function ValidateResponse {
    param(
        $Response,
        $Results,
        $DiagnosticInfos,
        $Requests,
        $ExceptionMessage
    )

    if (($Results
            | Where-Object { $_ -is [StatusCode]}
            | ForEach-Object { [ServiceResult]::IsNotGood($_) }
        ) -contains $true `
        -or ($Results.Count -ne $Requests.Count)
    ) {
        return [OpcUaFetchException]::new($ExceptionMessage, @{
            Response = $Response
            Results = $Results
            DiagnosticInfos = $DiagnosticInfos
        })
    } else {
        return $null
    }
}

Main
シミュレータ用OPC UAサーバに接続
Sysmac SutdioにはVer.1.62よりシミュレータ用OPC UAサーバが付属しています。PwshOpcUaClientのターゲットの1つなので、問題無く接続できます。
シミュレータ用OPC UAサーバはシミュレータと連動することで、OPC UAによる外部連携を含むプログラムの机上テストを行いやすくします。PwshOpcUaClientで連携先のモックを作成することも簡単にできます。
シミュレータ用OPC UAサーバは、セキュリティに関連した機能が削られています。具体的には、以下のようになります。
- ユーザーのパスワードを無視する
- クライアント証明書を無条件に信頼する
ユーザーの指定は、公開FBインスタンス参照のロール設定確認に必要なので残っているのだと思いますが、その他はザルです。しかし、それらは実機立ち上げの初期に露呈する問題ばかりなので、後になって問題が生じる可能性は小さいように思われます。また、設定の問題なのでコードの変更が必要になることも無さそうです。
今回は、以下のように操作してOPC UAサーバを立ち上げます。シミュレータ用OPC UAサーバの詳細はマニュアルを参照してください。
シミュレータ用OPC UAサーバの設定
OPC UAサーバを立ち上げたら、スクリプトを含むフォルダで以下を実行します。PwshOpcUaClientのデフォルトクライアントは、構成ファイル間の相対位置が正しければ実行時のロケーションは任意です。
./ExampleReadWriteVariables.ps1 -Interval 0.01
OPC UAサーバに接続すると以下のように延々と値の読み書きを繰り返します。シミュレータのプログラム実行サイクルは実時間に対してのんびりです。そのため、OPC UAで高頻度に読み書きをすると1サイクル中に複数回の読み書きを行うことになります。その結果として値にズレが生じます。
シミュレータ用OPC UAサーバと値の読み書き
コントローラのOPC UAサーバに接続
コントローラのOPC UAサーバもPwshOpcUaClientのターゲットの1つなので問題無く接続できます。本運用を模したテスト用コントローラを想定しています。
テスト用コントローラのOPC UAサーバは、理由が無ければ普段から運用環境と同じセキュリティポリシーで使用します。クライアント証明書の扱いなどが少し手間かもしれませんが、立ち上げ時に慌てることや戸惑うことも少なくなると思います。また、これまでセキュリティポリシーによらず応答が一定であるかを確認したことが無いためです。
PwshOpcUaClientでコントローラのOPC UAサーバに接続する場合、一度コントローラに対してセッション確立を試みて証明書を拒否させた後、コントローラで拒否した証明書を信頼させると間違いがありません。証明書の期限が有効である限り、セキュリティポリシーの変更やクライアント証明書の再作成をしなければ再度の操作は不要です。
本運用ではこのような操作を盲目的に行わないようにします。これは、自動で信頼されていない証明書を信頼することを手動で行っているに過ぎないからです。あらかじめ証明書をインストールするか、信頼した証明書が意図したものであるかを確認します。拇印の確認ぐらいはしましょう。
今回は、以下のように操作してOPC UAサーバを立ち上げます。セキュリティ設定を行ったら、PwshOpcUaClientのクライアント証明書を信頼するために一度アクセスして拒否させた後、信頼リストに移動しています。OPC UAサーバの詳細はマニュアルを参照してください。
コントローラのOPC UAサーバの設定
OPC UAサーバを立ち上げたら、スクリプトを含むフォルダで以下を実行します。YOUR_DEVICE_ADDRはコントローラのアドレスで置き換えます。
./ExampleReadWriteVariables.ps1 -UseSimulator $false -ServerUrl YOUR_DEVICE_ADDR -Interval 0.01
サーバに接続するとシミュレータ用OPC UAサーバ同様に延々と読み書きを繰り返します。コントローラはプログラムが指定したサイクルで動作するので、よほどのことをしない限り値にズレは生じません。
コントローラのOPC UAサーバと値の読み書き
まとめ
Sysmac StudioのシミュレータでOPC UAサーバが使えるようになり、適当なクライアントを探していたのですが、OPC Foundationがリファレンスとして.NET向けのスタックを公開しており、ライブラリとして使いやすそうだったので使ってみることにしました。軽量で柔軟なツールにする目的があったので見送りましたが、open62541も良さそうです。
UA-.NETStandardをPowerShellから直接使用するという事例が見当たらず、サンプルコードとアセンブリを一通り確認していけそうだなという勢いでやってみると思った以上であることが確認できました。Sysmac StudioのFBインスタンス公開機能を使用したMethod風のFB呼び出しや、それを応用してRingBufferをRPCのように使用して結構な負荷でメッセージ交換をするということも支障が無かったからです。これは、コントローラのOPC UAサーバ機能を含め思いがけない収穫でした。
意図はしていませんでしたが、PwshOpcUaClientはコンパクトかつ、UA-.NETStandardのコードをそのまま使用するのでクライアントモックの作成に適当です。シミュレータでOPC UA機能を含むシミュレーションを行うということは、OPC UAを介して外部とやり取りするプログラムを開発することになるので、手軽なモックがあると便利です。ハッピーパスより、アンハッピーパスの確認に使うのが良さそうです。
適当なOPC UAクライアントを手に入れたので、次はSysmac StudioのFBインスタンス公開機能を扱うことにします。OPC UA Methodとしての公開ではなかったので戸惑ったのですが、Method風に呼び出すことはできます。また、OPC UAサーバ機能はタフなので、ハードに使うこともできます。
Discussion